DIY Outdoor Projector Screen – Made of Flex Seal
August 11, 2021Today on the hookup I’m going to show you how I made this 165” projector screen using about 3 gallons of flex seal, and why you probably shouldn’t do it, at least not the way I did.
A little backstory here: Last year I remodeled my patio, and one of the things that I seriously considered was turning this section of my screened enclosure into a projector screen. In the end I scrapped the idea because the screen wasn’t going to be big enough, and other than the pool there wouldn’t have been a good place to watch it, but having a projector screen on the patio has been in the back of my mind ever since.

Fast forward a year, and our patio remodel has been awesome, and there’s not a single thing I would change, but because we shifted our seating area from under the lanai to under the pergola the shades that I built 4 years ago to protect us from the afternoon sun are in the wrong place.
And after living with that issue for a year and procrastinating a new shade project, I was visiting my brother-in-law who works as a project manager for a construction company that builds multimillion dollar homes. He showed me a roller screen that he had salvaged from a demolition job they had just completed. Originally these giant screens were designed to be able to enclose a patio space at the touch of a button, but this one had seen better days. The mounting hardware was all rusted and the screens had multiple rips and tears that would prevent them from keeping out bugs, but the motors were working and the screens were actually bigger than my pergola, so I could trim it down and make one giant screen for the whole pergola instead of multiple small screens.
Related to that, there’s a reason that I didn’t title this video “I built a 165 inch projector screen for $350”, because I started with a salvaged motor, screen and roller that probably cost around $4000 new, but if you want to learn a little bit about projectors, projector screens and flex seal, and see how this projector screen performs, stick around for the rest of the video.
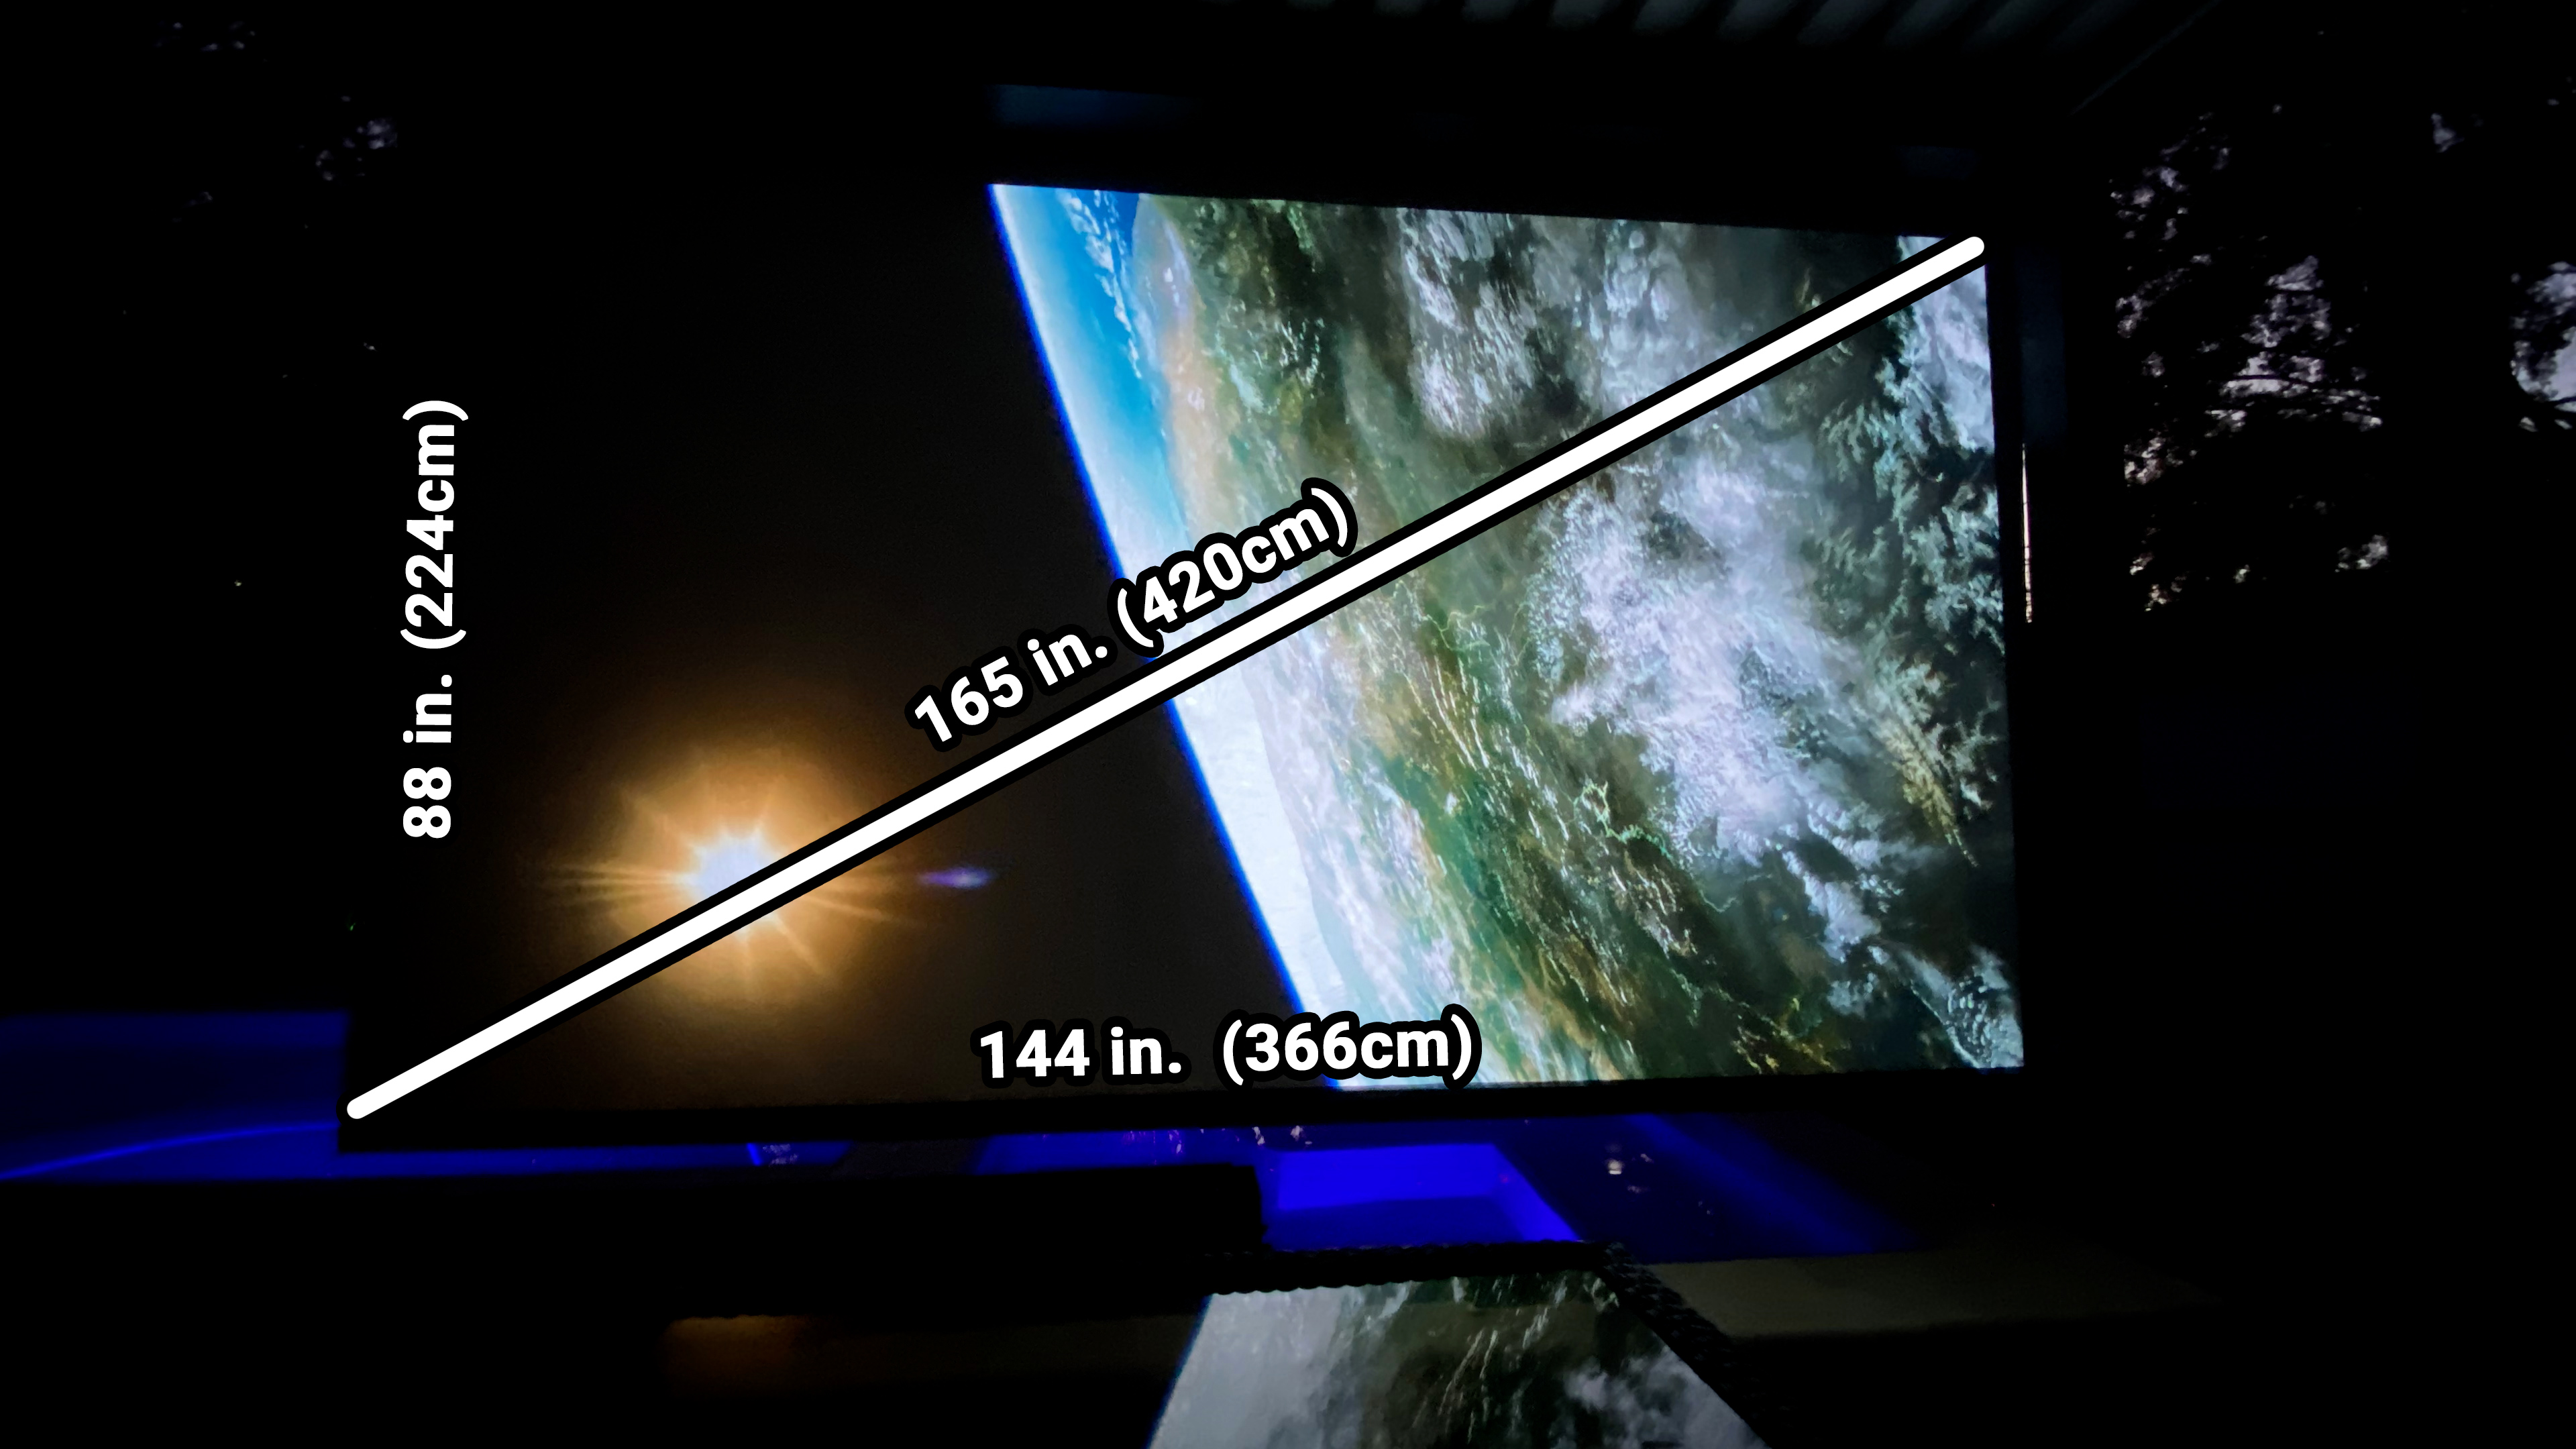
The original screen was made up of 3 parts. A giant weatherproof tubular motor made by simu drives a thick aluminum roller. On one side there’s a ball joint with a pin that springs in and out, and on the other side there’s a rigid mount with two pins to hold it in place. When I first got the screen it was 162 inches long, but I trimmed it down to the size of my pergola which is 144 inches wide, and a little over 88” tall, which gives me a massive 165” diagonal viewing area for 16:9 widescreen content.
One of the key aspects of the screen is the bottom spreader bar which not only prevents wrinkles in the screen, but is also weighted with around 40 pounds of tungsten to prevent the screen from blowing around in the wind. The weighted bar is the main reason why the motors have to be so huge. To put it in perspective the shade screens that I built 4 years ago are 72 inches square and use geared stepper motors that provide around 2 newton meters of torque, compared to the simu motors that push out a massive 25 newton meters. Thankfully the motors were also operating well under spec since I ended up adding around 30 additional pounds of flex seal onto the screen.
So why flex seal? Commercials and memes of course. I had a screen that I wanted to seal up, and if you can make a boat with flex seal, you can probably make a projector screen. And, as I mentioned, the screen had a lot of damage, and you know what can fix a lot of damage? Flex seal.
I really had no idea how to go about applying the flex seal so I started with a roller and some thin coats. However, after 2 coats and about a half gallon of flex seal later, the screen was barely opaque and none of the holes were filling in.
I decided that coat #3 was going to go on thick to seal up the holes, and as expected, it used WAY more flex seal. I painted it on half the screen at a time and this coat took about ¾ of a gallon for half the screen. There are two major problems with painting flex seal on a surface like this: First since the screen was hanging vertically if you apply the flex seal thick enough to cover the holes it starts to drip before it can harden enough to stay in place, but you can’t lay the screen down flat because of the second problem. Every time you run your brush over the screen all the flex seal goes through the holes and starts dripping down the back, and when you try to spread it out on the back it pushes back through to the front.
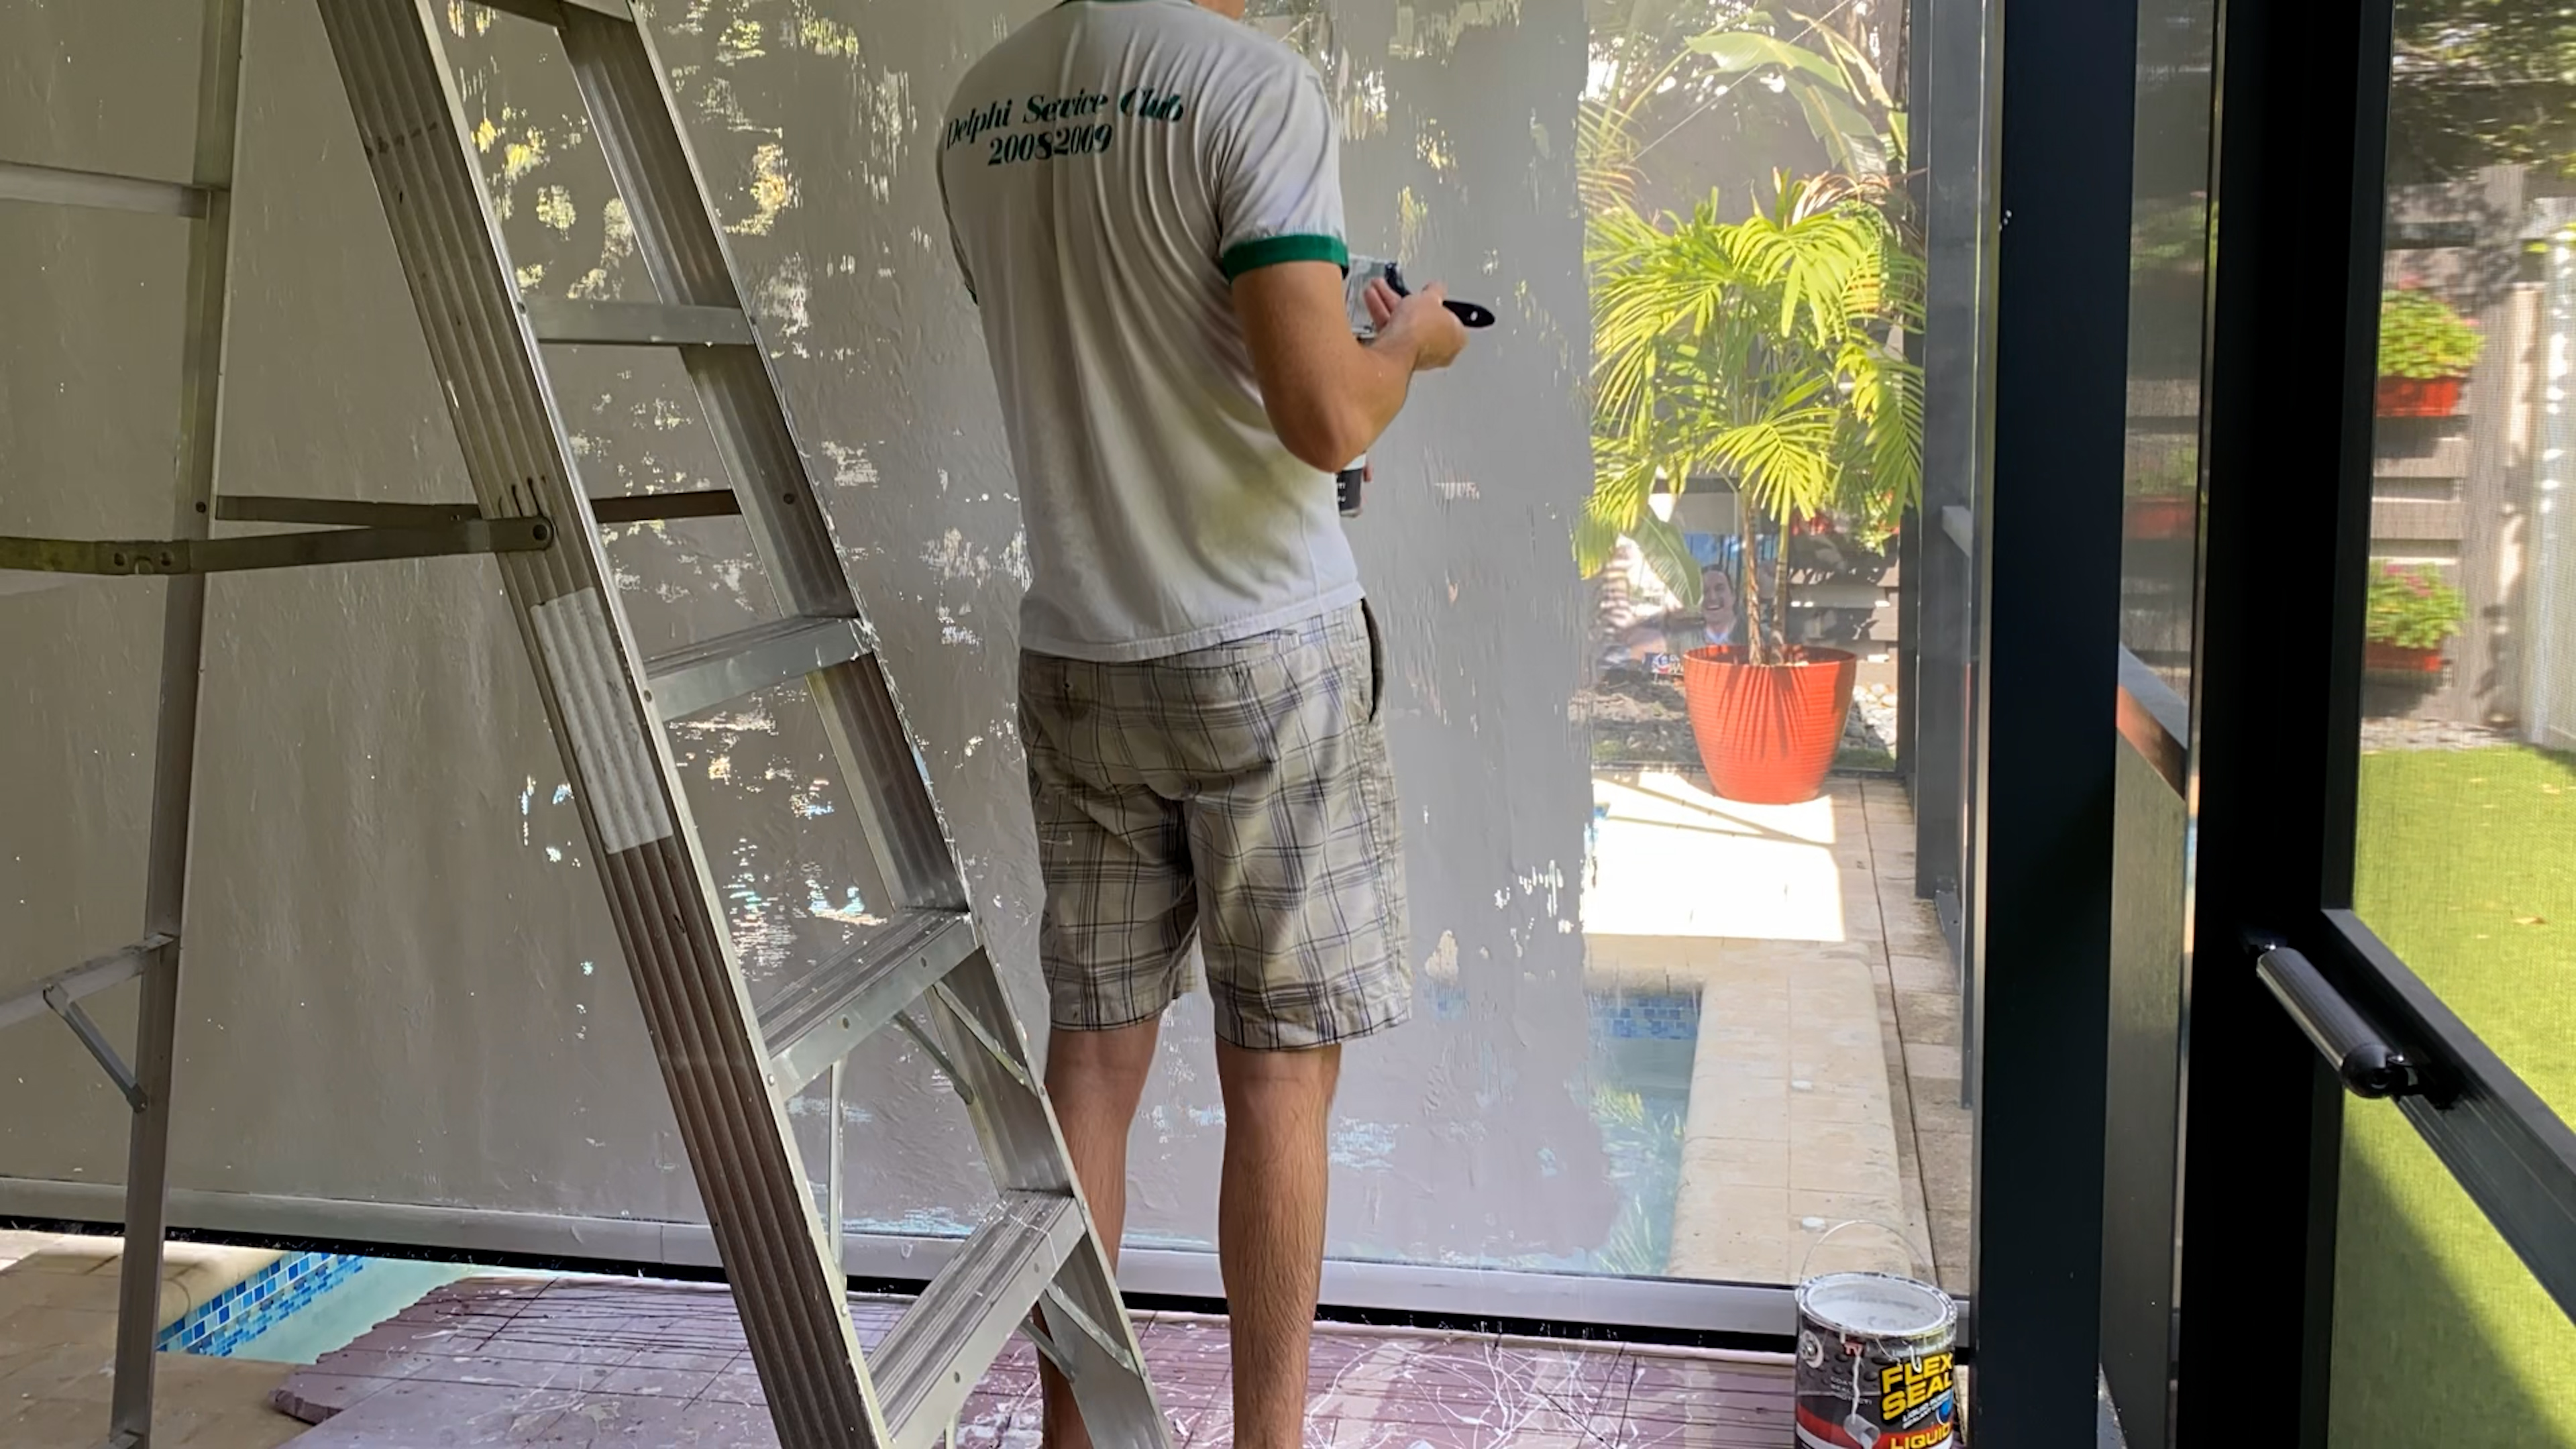
About halfway through the first thick coat I was pretty confident that this project wasn’t going to work out the way I planned, but I was really too deep to stop so I kept going. If I had to do it over again, I think I would try to paint from the back first, pushing the flex seal through the holes and then smoothing it out on the front, since that seemed to give a better, finish with less drips.
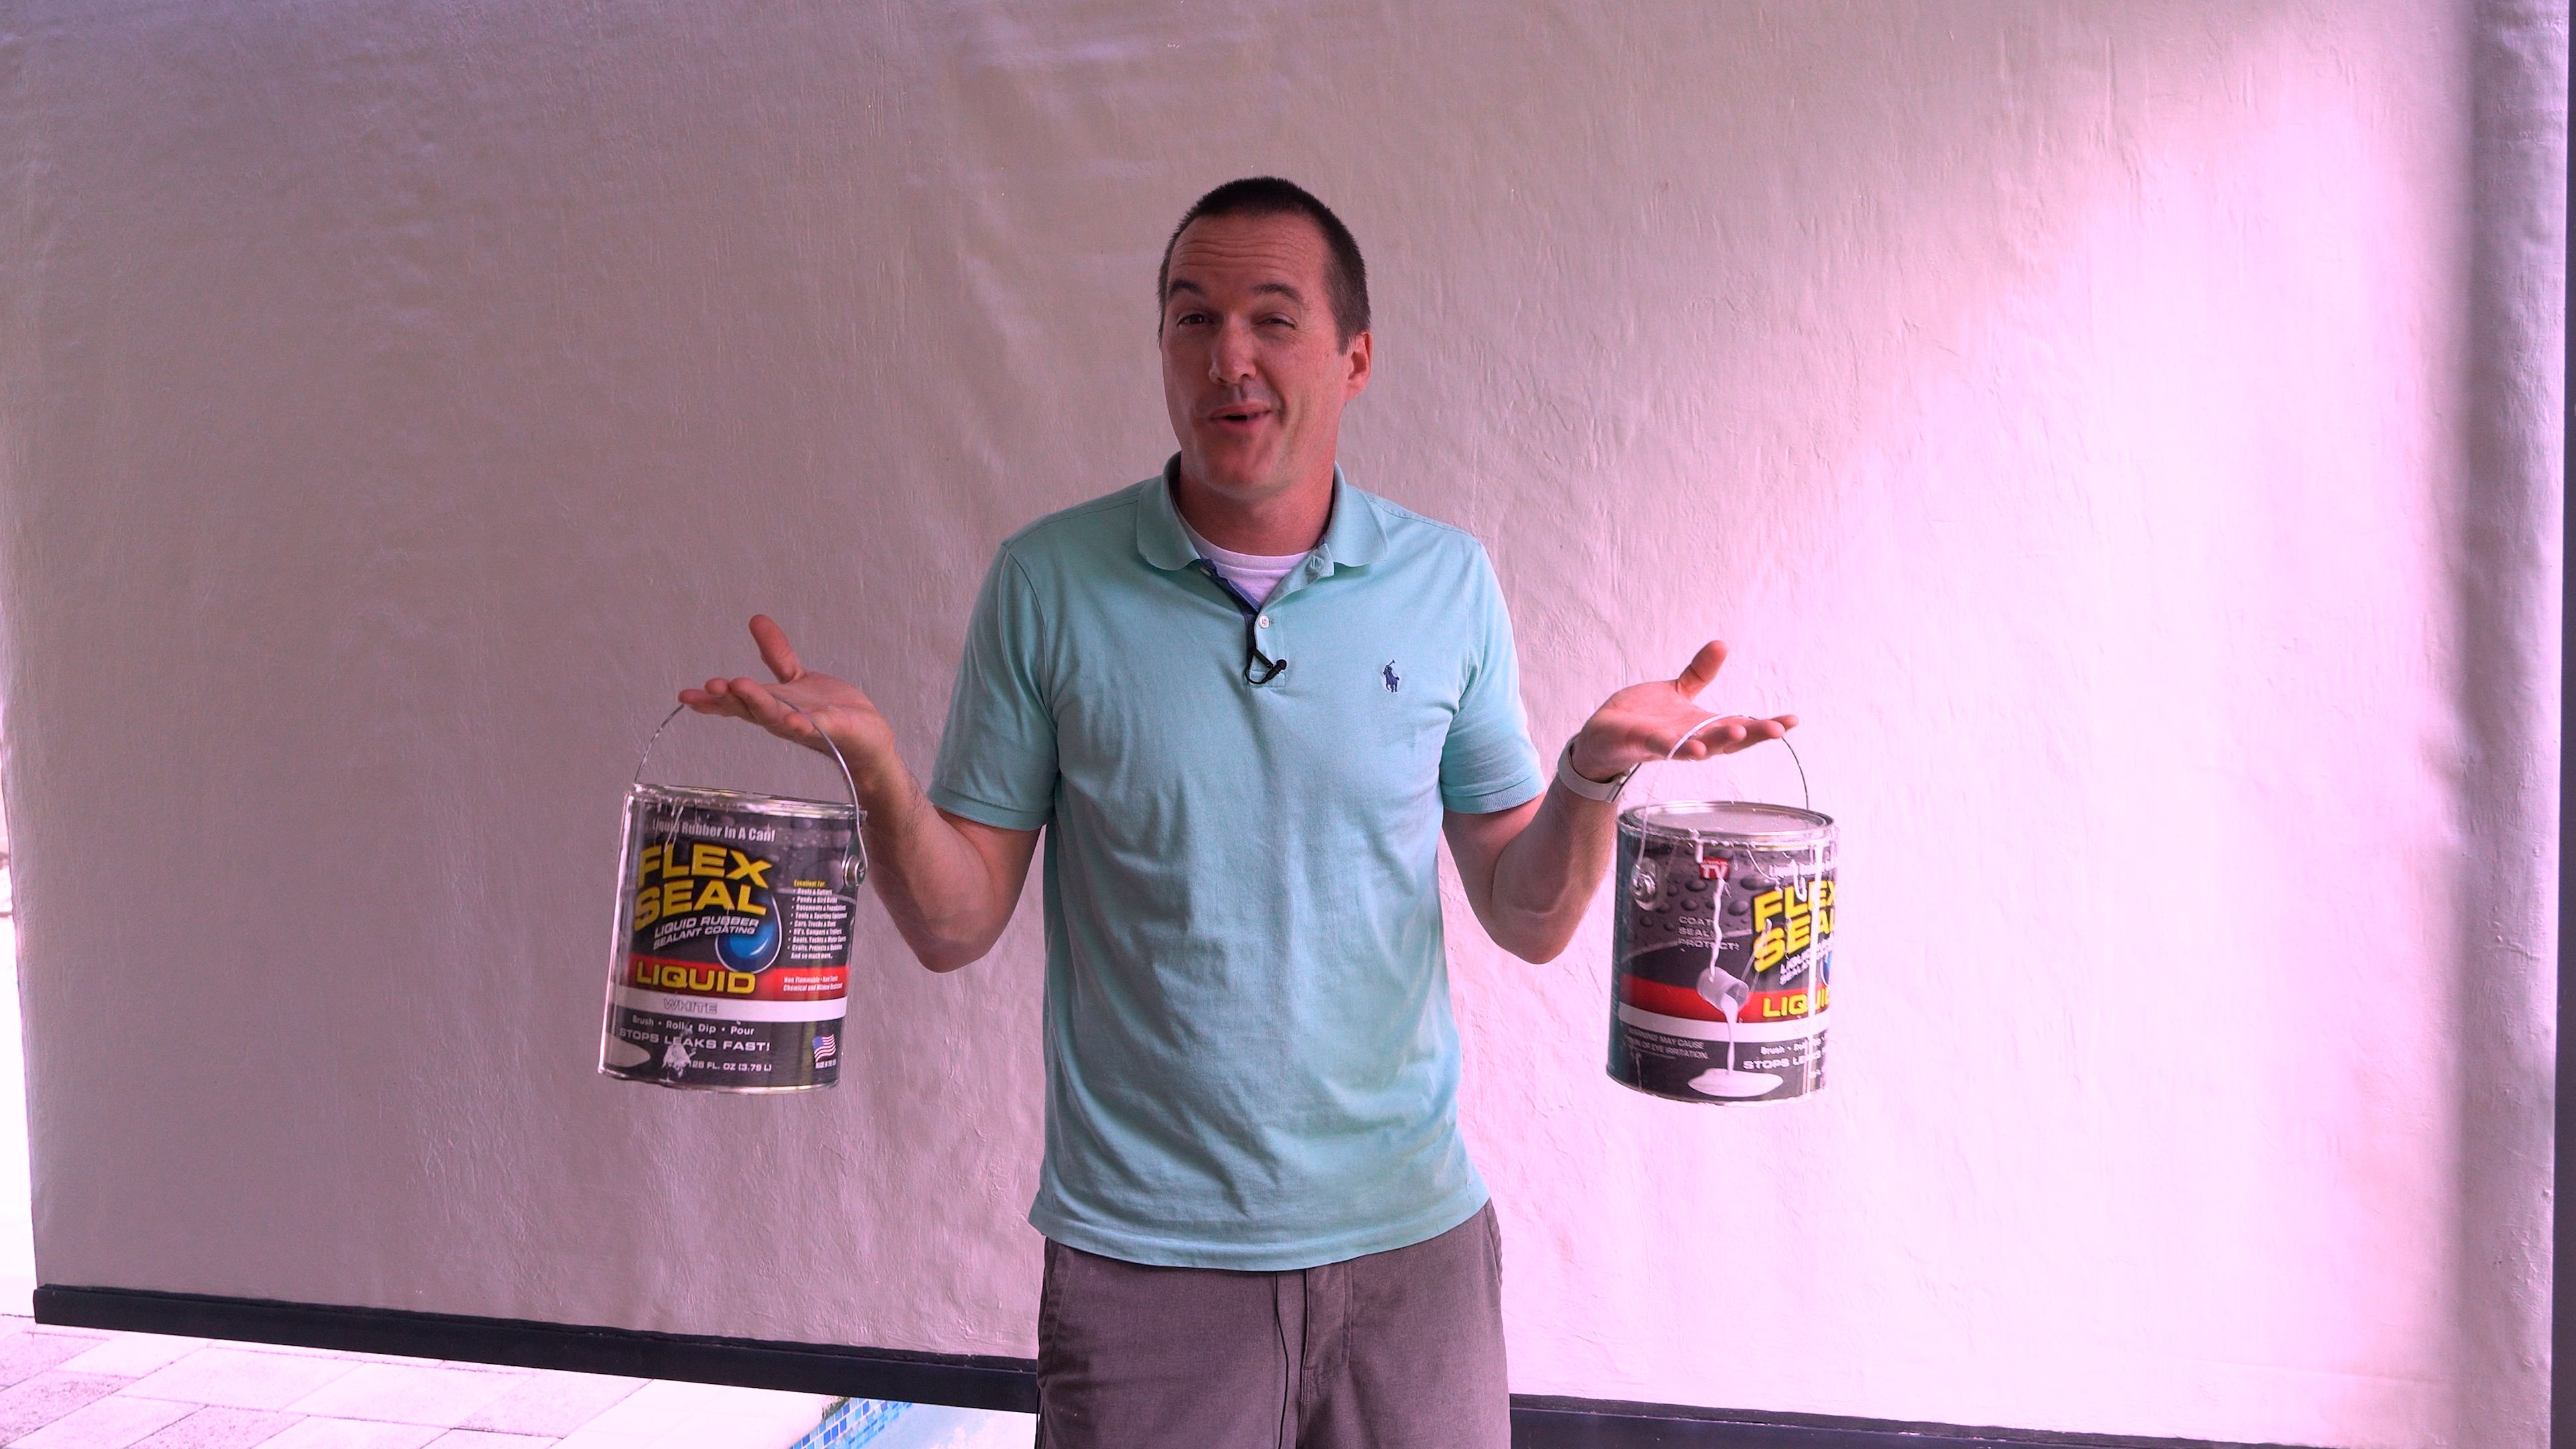
The second thick coat, which was actually the 4th coat, was more of the same, lots of flex seal and lots of dripping. After I finished I had spent a little over 8 hours apply just under 3 gallons of flex seal, which at $95 a gallon meant I was over $300 into this project when you count all the paint brushes that have to be thrown away between coats because you can’t clean flex seal out of a paint brush.
Anxious to see the fruits of my labor, that night I set up an ultra short throw projector and turned on a movie. Honestly? It was terrible, barely watchable. The texture of drips in the flex seal was super visible and distracting, and my friends and I only made it through about 15 minutes of the movie before calling it quits.
Discouraged but not beaten I convinced myself that the projector that I had intended to use, which was a short throw ceiling mounted model from BenQ, would be better since the light would be projected at less severe of an angle making the texture of the screen less of an issue. I was limited to short throw and ultra short throw projectors since I wanted a huge screen from a relatively short distance and had decided on this benq projector because it had a lower latency for when my daughter and I want to play video games on a huge screen… and it was on sale.
Fast forward a week and my new projector was mounted to the wall under my pergola about 9 feet away from the screen resulting in a massive 165” projection. Once again I turned it on, put on a movie, and was immediately disappointed by the results. This time, the texture wasn’t an issue, but the glossy finish of the flex seal meant that a large section of the screen had a bright glare that moved around based on your seating position and if you sat in the middle of the couch the glare was in the exact center of the screen. Again, the movie was basically unwatchable, this time because of the glare and we gave up again.
I was definitely committed to making this thing work no matter what, but at this point I basically made a screen that was missing the two most important qualities of a projector screen which are uniformity and anti-reflectivity.
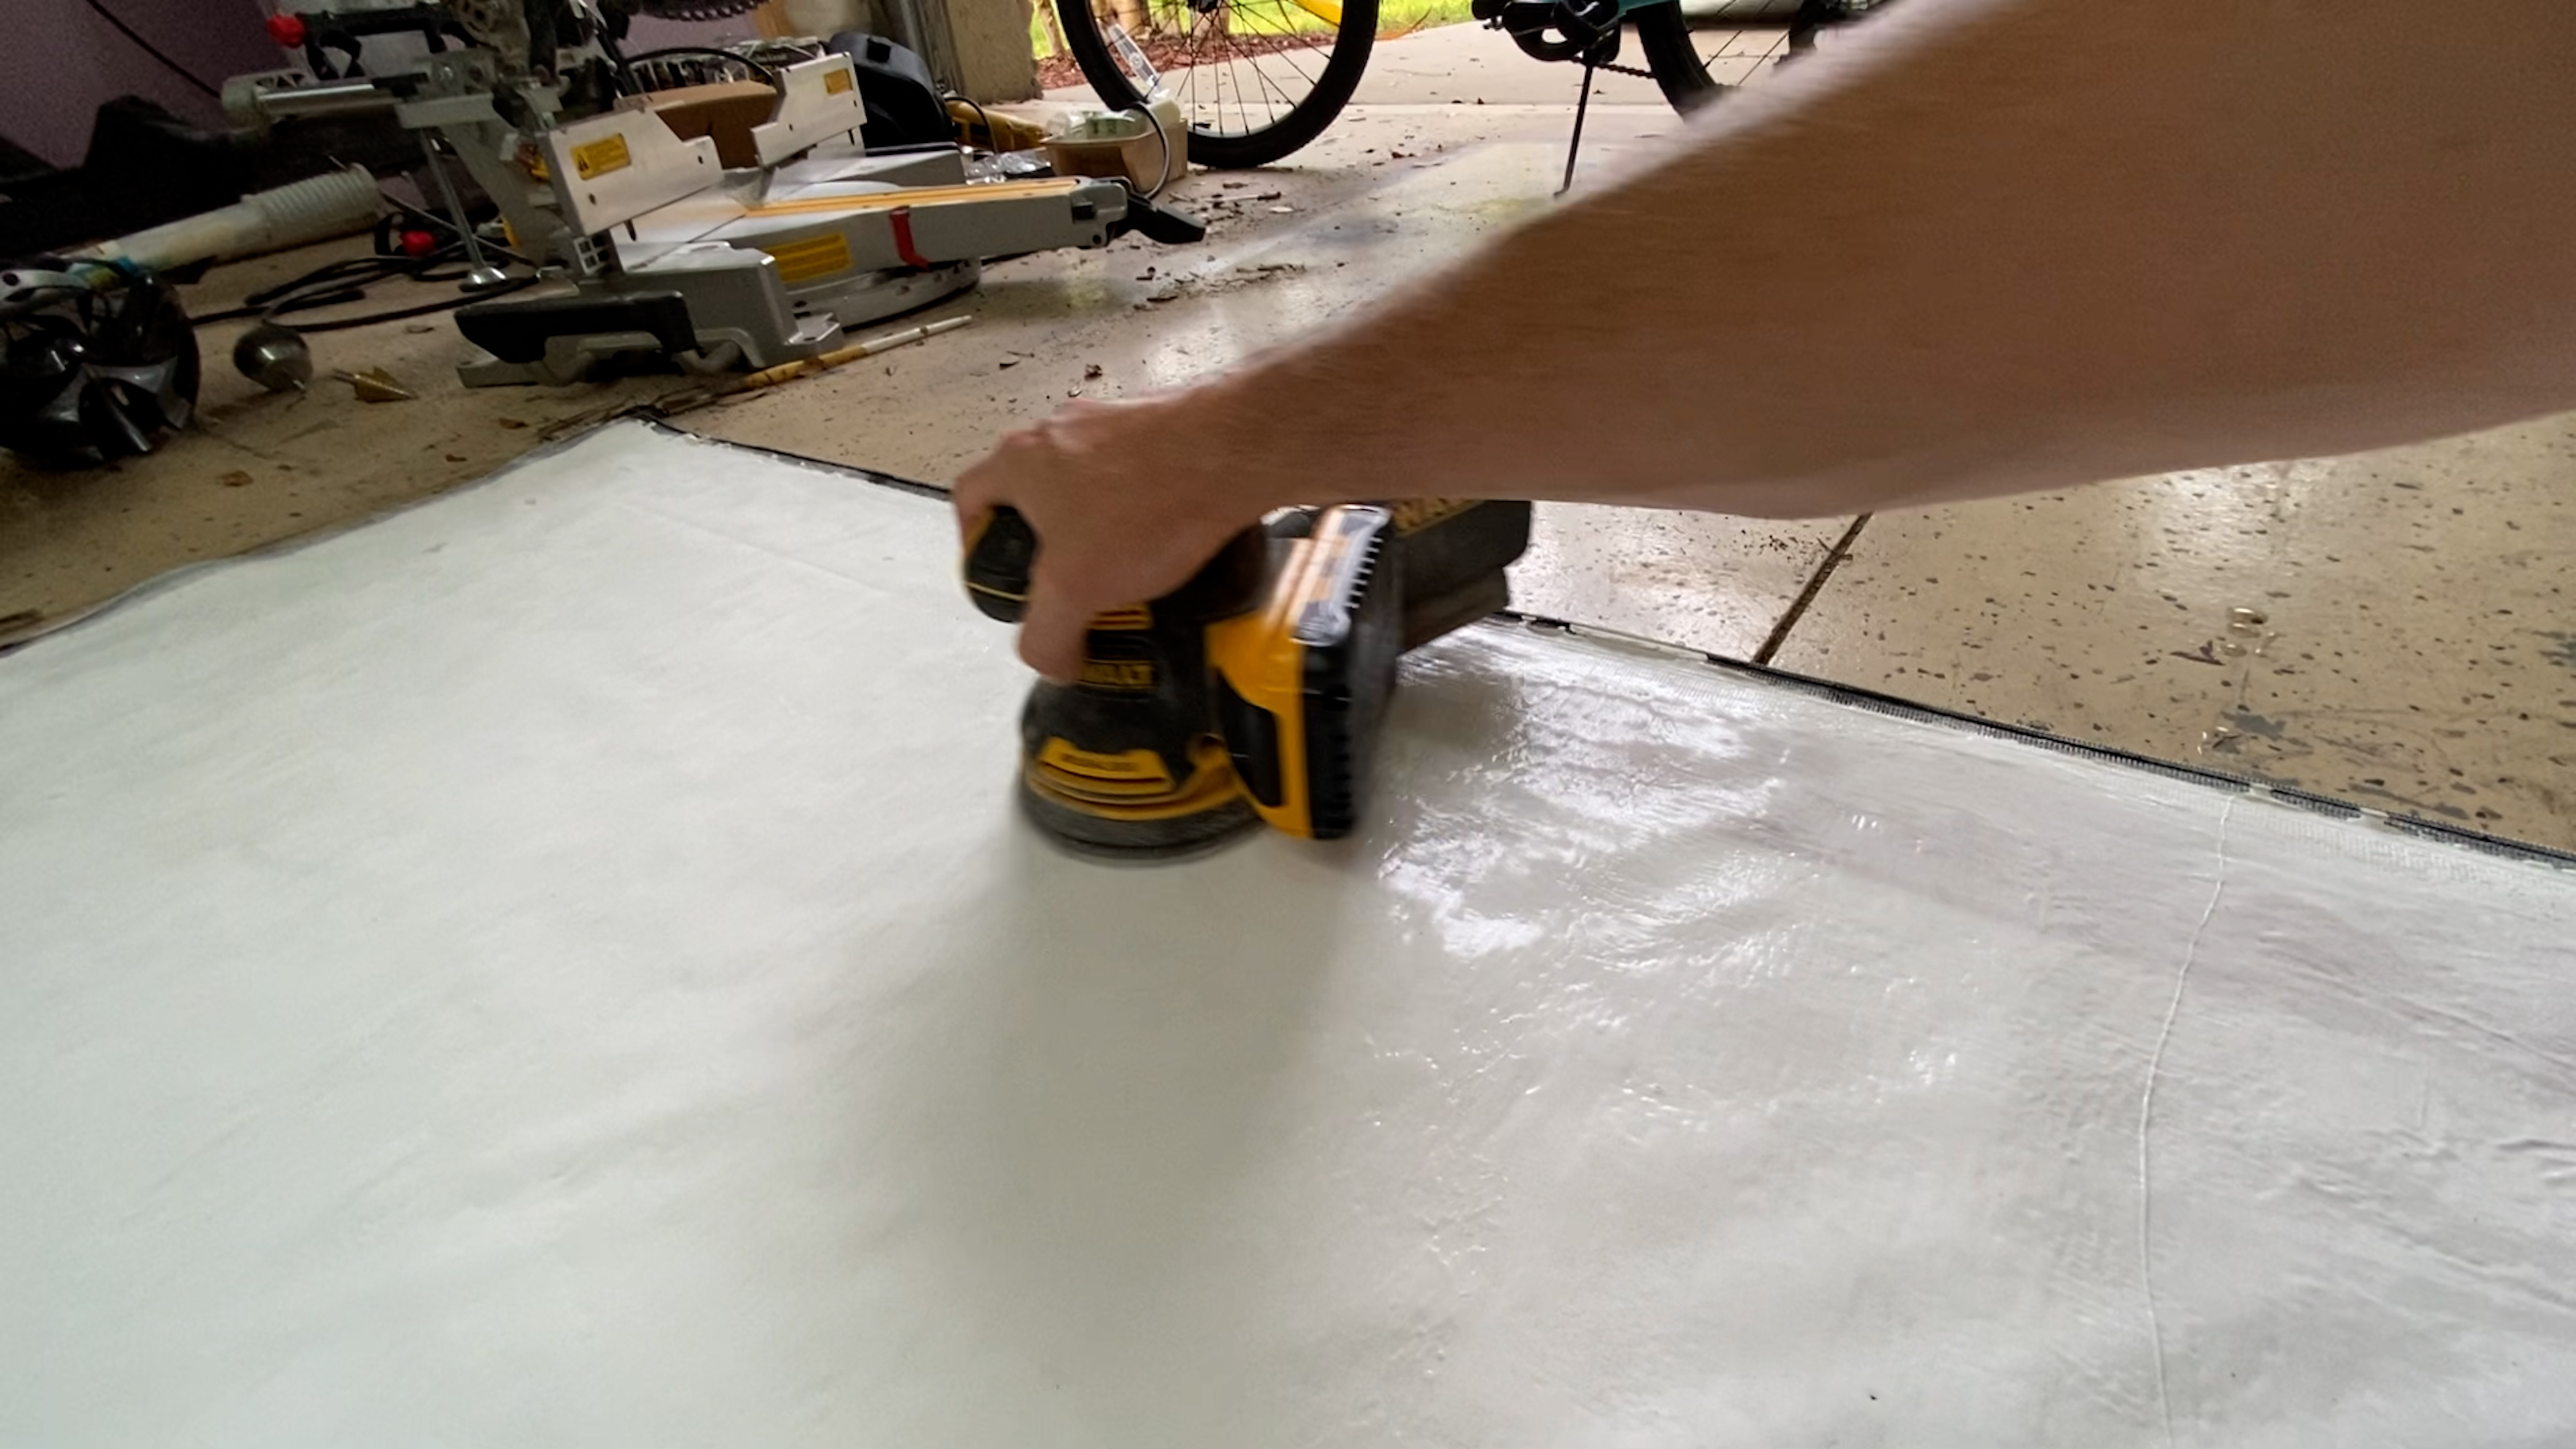
What do you do when something is too glossy or too uneven? You sand it of course. But can you even sand flex seal? There was only one way to find out so I took the entire screen down, brought it into my garage and busted out my orbital sander with some pretty aggressive 80 grit sandpaper. There was a pretty good chance that using 80 grit and a power sander was going to immediately destroy the whole project, but in its current state it was already a total failure, so I figured I’d give it a shot. Interestingly enough, flex seal CAN be sanded, and not only did it help to decrease the texture of the screen, but also got rid of a lot of the glossy finish, so maybe things were starting to turn around.
While I had the screen down I wanted to put a dark boarder on the top and bottom, so I got out my measuring tape and used some dark oil based paint. Not only was it impossible to get a clean edge since because painters tape doesn’t stick to flex seal, but it turns out it didn’t matter, because paint doesn’t stick to flex seal either, and even after a full 24 hours of dry time I could just peel the paint away with my finger.
Thankfully after some trial and error with different products I figured out that plastidip spray sticks pretty well to a sanded flex seal surface and because it was a spray can I was able to get the clean boarders I was hoping for just using a straight edge. I painted the spreader bar with the same dark tint of plastidip and put the screen back up. For a third time now I fired up a movie, and this time I was pretty sure it was going to look great, but once again my soul was completely crushed when the glare was almost as bad as before. It was completely distracting and still unwatchable.
So at this point I was about 16 hours and about $450 into this total failure of a project. Out of ideas, I watched every youtube video about deglossing paint and decided I was going to try a chemical deglosser. Based on the youtube videos and just the chemistry behind it I was pretty sure the deglosser wasn’t going to work, and it was probably also going to significantly discolor the flex seal, but I was all out of ideas.
![]()
Then, when looking for the deglosser at home depot something else caught my eye: matte finish clear spray paint. Long story short: 2 cans of this stuff for under $10 saved the entire project. Check out this footage after a single coat on half the screen. Notice the glare on the right side, and how it just disappears on the left side… it’s basically a miracle. 2 cans was enough for two light coats over the entire screen and even though you can scrape away the matte finish with your finger, it isn’t going to flake away on its own doesn’t discolor the screen, so it will be cheap and easy to reapply if needed.
The night after I finished with the matte spray paint my daughter had some friends over and we hooked up the Nintendo switch to the projector. Four-player mario cart out by the pool was everything I wanted it to be. In split screen mode each player has the equivalent of their own 80 inch TV, and the smile on my face was even bigger than the one on my daughters face. Sometimes when the cost of a project starts creeping up I say some like “I’ve spent more on dumber things before”, but I’m not sure I have in this case. Still after also watching a movie on it that night on the new screen I couldn’t have been happier, and if this screen was all I’d ever experienced I’d be out here on YouTube telling everyone to go make their own flex seal screen, but that’s not really how I roll. We all know that comparison is the thief of joy, and I was way too happy at this point so I needed something to compare to.
I picked up a 120” motorized projector screen, like a real one for a home theater, with ambient light rejecting technology, tension bars, and a proper enclosure, and this one actually comes up from the ground instead of dropping down… which was way cooler than I thought it would be. This one is made by VividStorm and is 120”, so not as big as my screen, but plenty big to do a comparison. As I mentioned my weighted spreader bar does an okay job of keeping wrinkles out of the screen, but not a perfect job, and the flex seal complicates things even more by making the screen thick and non-stretchy.
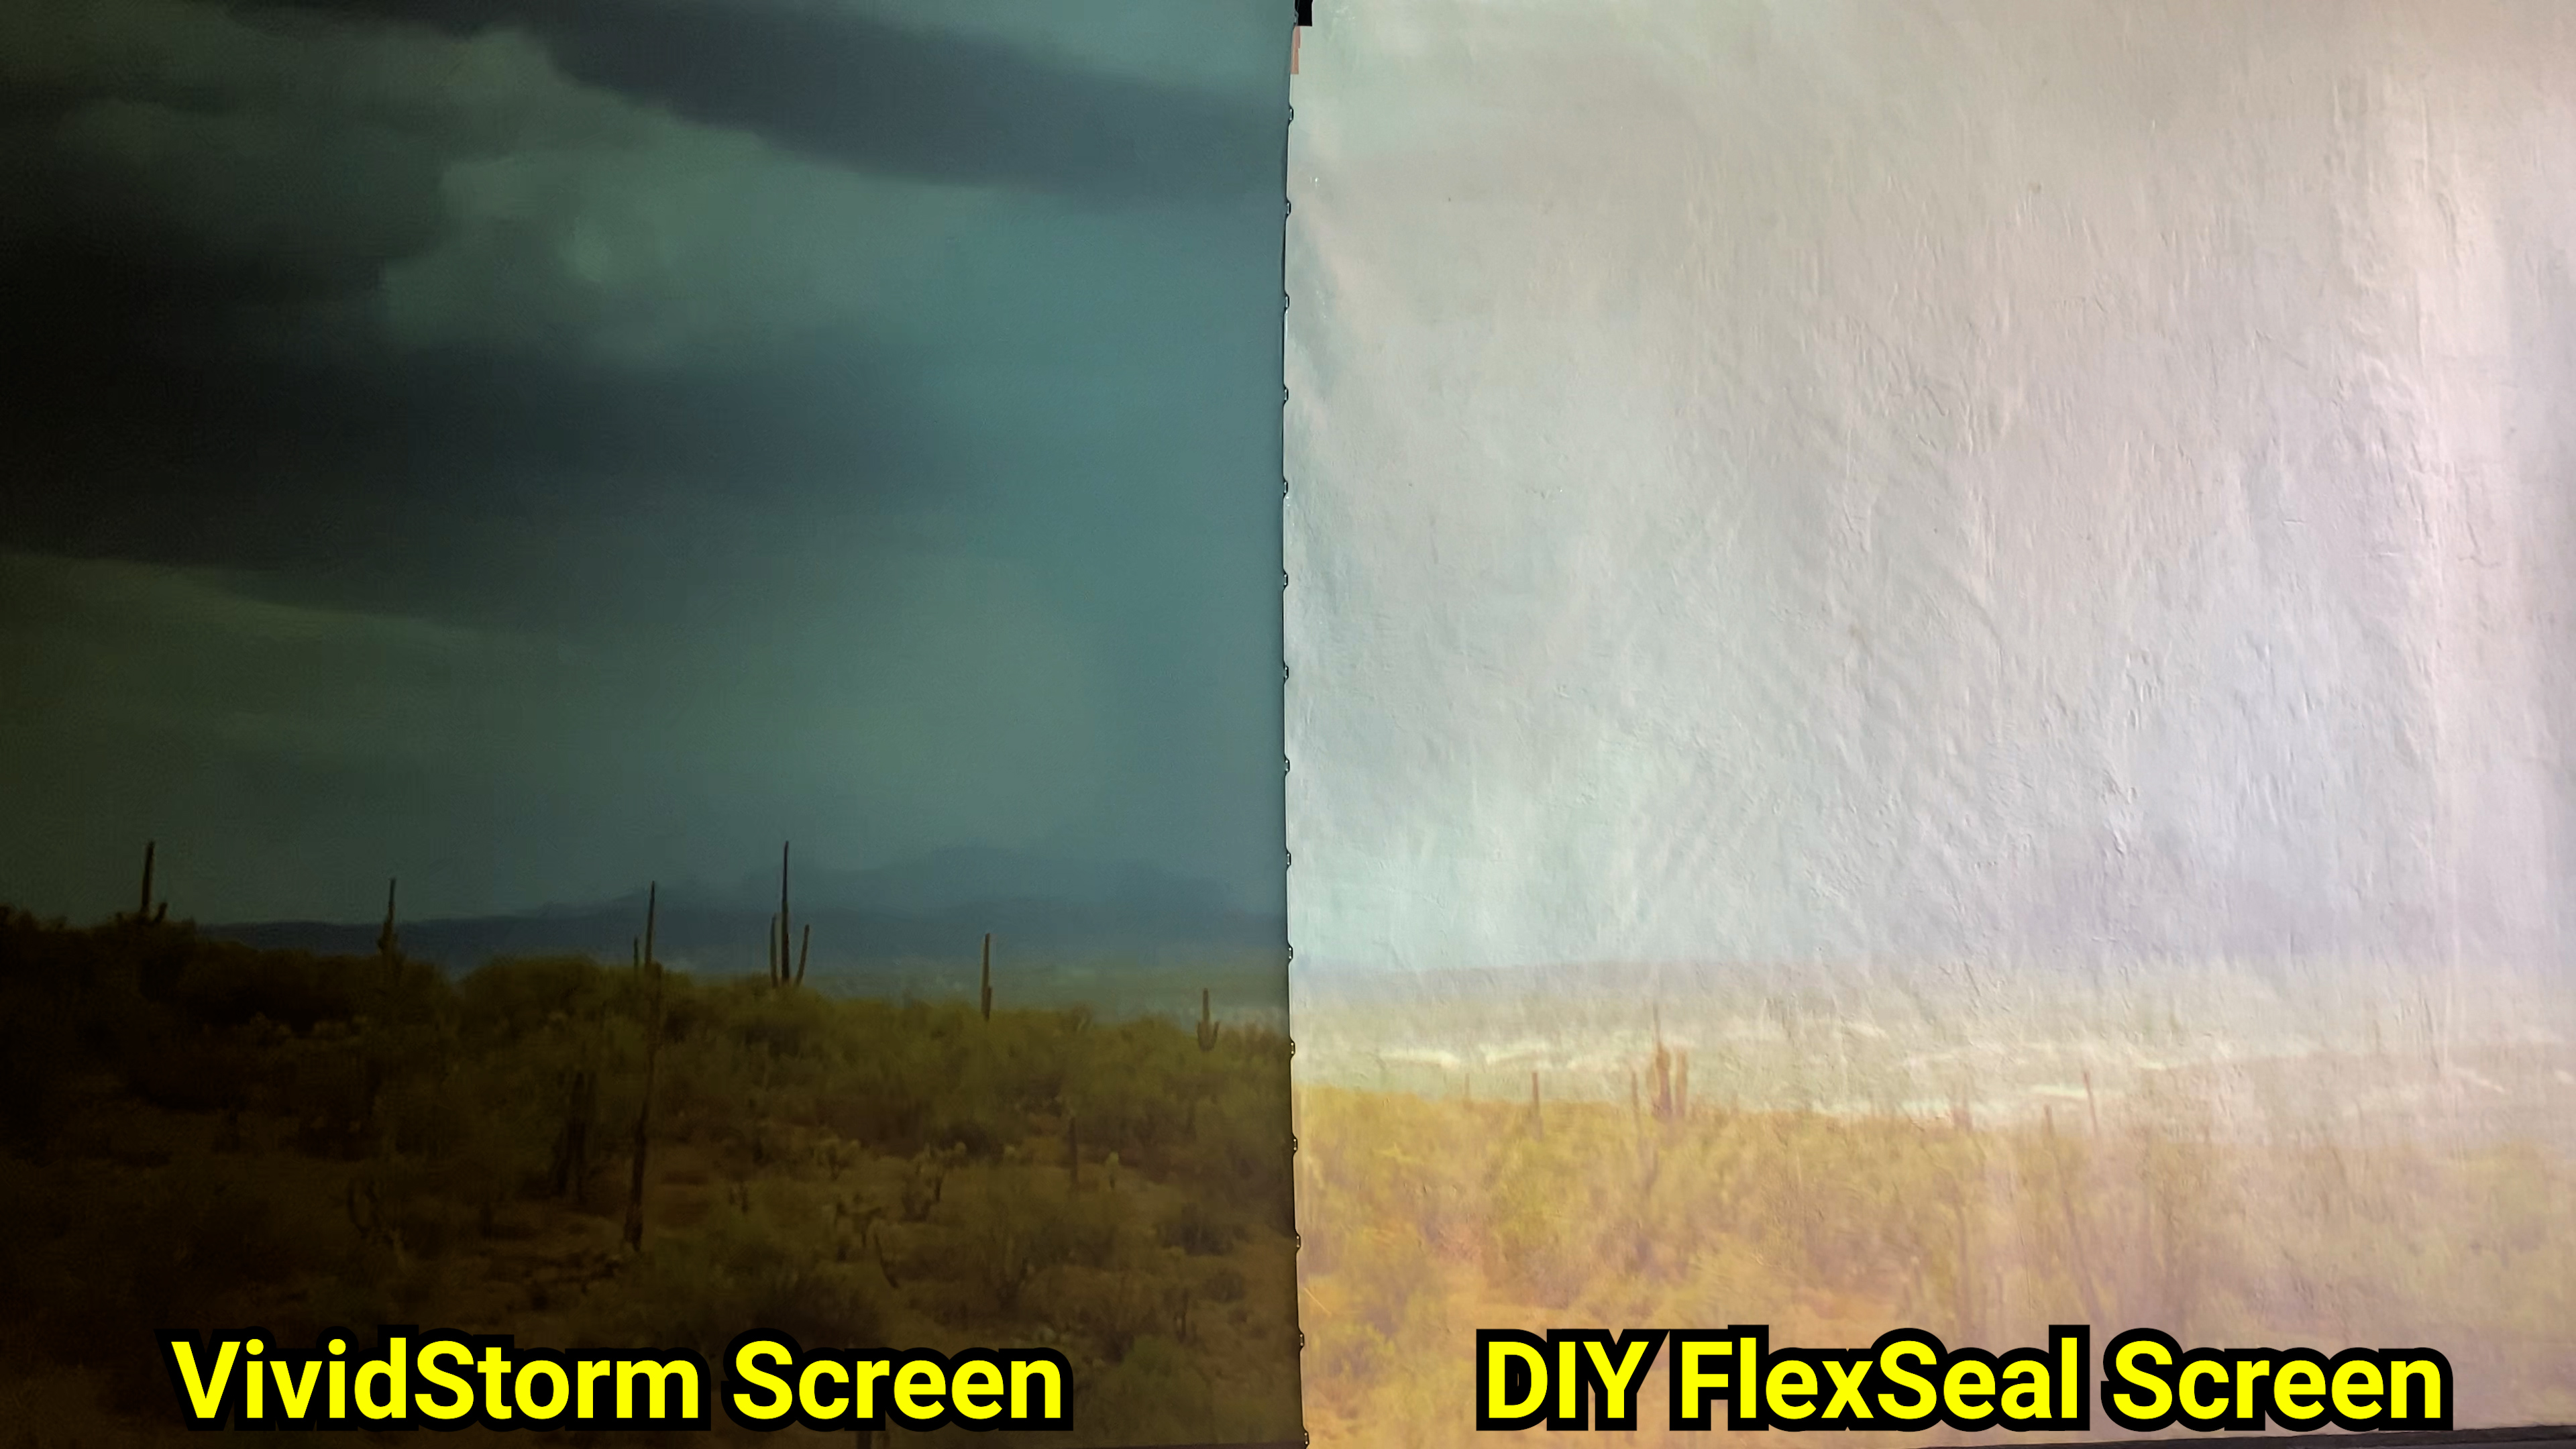
In contrast the vividstorm screen has a super thin material that is spread out not only with tensioned fishing line type material, but it also has tension bars on the back to make sure it’s always completely tight and uniform. During the day, the ambient light rejecting screen makes a huge difference in the contrast of the image, which makes sense. On the flex seal screen things that are supposed to be black just become the color of the screen, which is white, but on the ambient light rejecting screen dark areas are more of a dark gray color leading to significantly greater contrast. In my opinion the flex seal screen isn’t really usable during the day, but the vividstorm screen produced an acceptable image even outside in bright daylight.
In dim conditions close to sunset the differences are still visible, but the flex seal screen becomes very watchable, and once the sun goes down both screens are about equal with the vividstorm screen producing a slightly darker image overall, but one with greater contrast and better black levels.

So, if I had to do it all over again, would I still use flex seal? Probably. We’re not talking about a theatre room here, we’re talking about an outdoor movie screen and not only does it look pretty great once the sun goes down, but it should be pretty durable, weather resistant, and easy to clean.
The vividstorm screen deserves a proper theater room better, and luckily my wife was so impressed by the outside projector that I got the go ahead to design and automate a new entertainment center to incorporate the motorized vividstorm screen inside. If you’re interested in seeing what will hopefully be a highly functional but stealthy, automated, home theater setup make sure you are subscribed so you don’t miss that video when it comes out.
Thank you so much to my awesome patrons over at patreon for your continued support of my channel, if you’re interested in supporting my channel check out the links down in the description. If you enjoyed this video please hit that thumbs up and consider subscribing, and as always, thanks for watching the hookup.