
Can’t Rewire? Try These Fixes Instead.
February 26, 2026Welcome to my beautiful new house. This is, no question, just a gorgeous place to live, but it is a victim of some maybe questionable renovations. My number one biggest issue with this place is the placement of the light switches. When you come into the house, this is the main room, a big dining room with an awesome lake view and you’ve got these two switches right here, which are where your hand would naturally go to turn on the lights. Well, this switch right here controls a switched outlet that’s in the corner of the room and does almost nothing and this one controls the exterior lights that are on a motion switch. So, neither of these switches actually does anything for the lights in this main room.

Here’s another example where they’ve done some renovations and they have put these switches on different circuits. That means by code, they can’t share an electrical box. Then down below, you have the hallway lights and then you have a three-way switch that controls that same switched outlet that we were talking about earlier. Then here you have another one for the over the table light. This one’s fine, I don’t mind this at all. But it doesn’t make any sense to have this be the only control for what amounts to the main lights in the room.

Next, walking into the master bedroom, you’ve got this light switch where your hand automatically goes which is right inside the door. Of course, you would think this is what’s going to turn on the lights in the room. But that is not the case. It is controlling a switched outlet that’s nowhere near any possible lamps. Then the fan and light are controlled on a single light switch further over. So instead of having a separate switch for a fan and a separate switch for a light, this is going to control both of them at the same time and if you want to change the fan speed or the light, you’ve got to pull the strings on the fan kit.

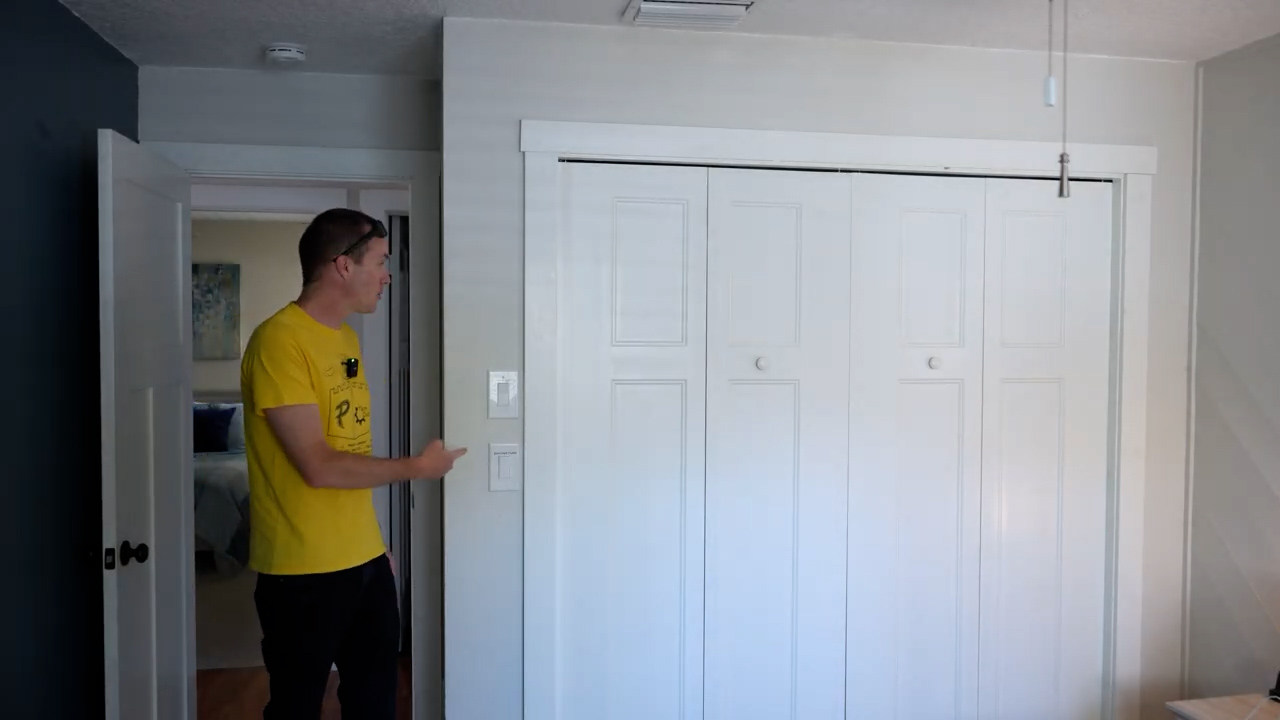
Then, here’s a strange little renovated room. I think this was an office and it’s got these double doors on barn doors here that overlook the lake. Great view, I like it and we put a bunk bed in here since this is going to be a fourth bedroom. However, you walk into the room and is there a light switch here? No, there’s obviously not a light switch here. The light switch is all the way back here. So, you have to walk 80% into the room before you can control the lights at all. Again, you’ve got one light switch for the fan and the light and then another one for a switched outlet.

I don’t want to bore you too much, but this is a four-bedroom house, and every single bedroom has the same problem where when you walk into the room, and you would expect there to be a light switch, but there really isn’t. Then there’s a confusing setup of the light switches when you get in where you have a switched outlet that doesn’t do anything in the room and then you’ve got a single light switch for both the fan and the light, and you’ll end up just controlling it using the pull string on the fan. Not the end of the world, but also not the most convenient thing ever. So, in this video, I’m going to show you some different ways to solve those problems with some various products from Amazon here.
The Solutions
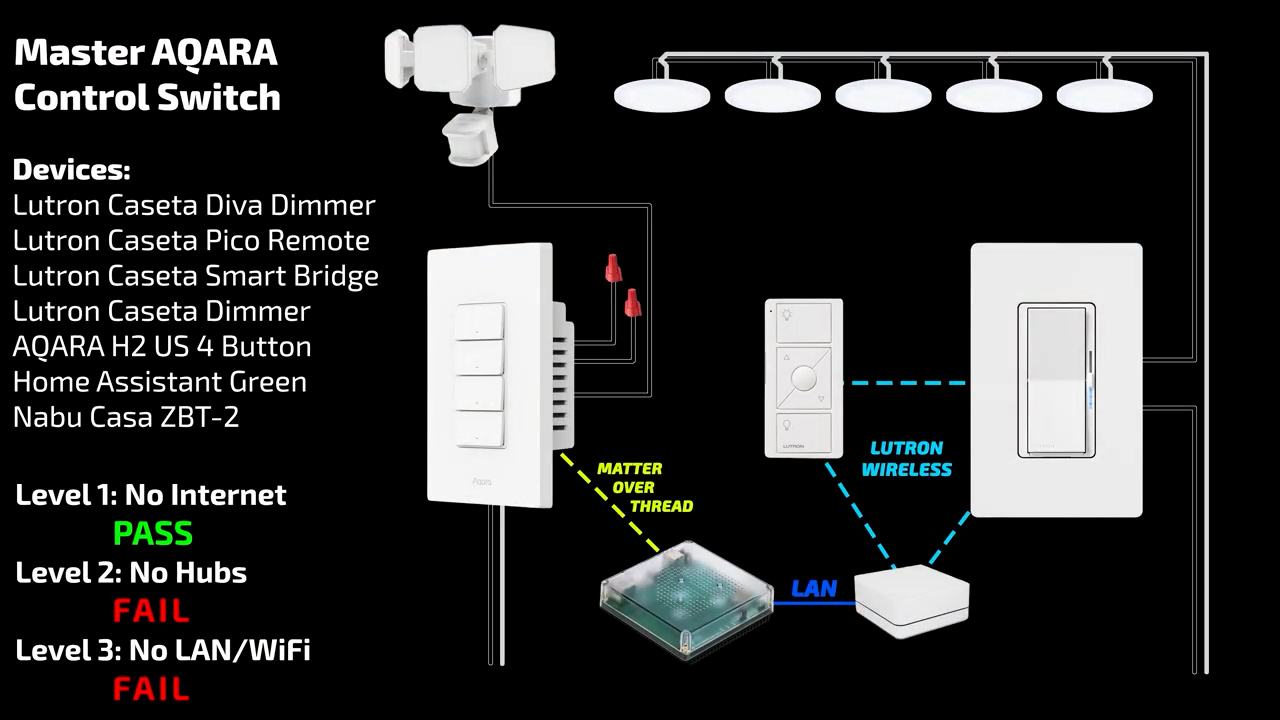
First, we’ve got a generic brand Suraielec and these are wireless light switches and receivers—the light switch itself is going to communicate directly with the receiver. I’ve got two versions of it. This one is a battery powered light switch, and this one is a kinetic light switch, meaning you’ll never have to change the batteries in it because the actual pressing of the switch generates enough energy in order to send the signal. Then we’ve got the Shelly products. The various Shelly relays will go inside the electrical boxes, and then the Shelly blue button 4 that’s going to end up controlling these are acting as another way to control them as a remote switch. Then we’ve got two Zigbee options. One from Aqara and one from Tuya. This one says that it’s Zigbee 3.0, so even though it is a Tuya device, it’s actually going to work with Zigbee. Then we’ve got the cream of the crop, which is Lutron. Lutron works with its own hub so it’s not Zigbee like the Aqara and it’s not RF like the Suraielec and the Shelly that can use Wi-Fi or Zigbee, but these are going to use their own hub.

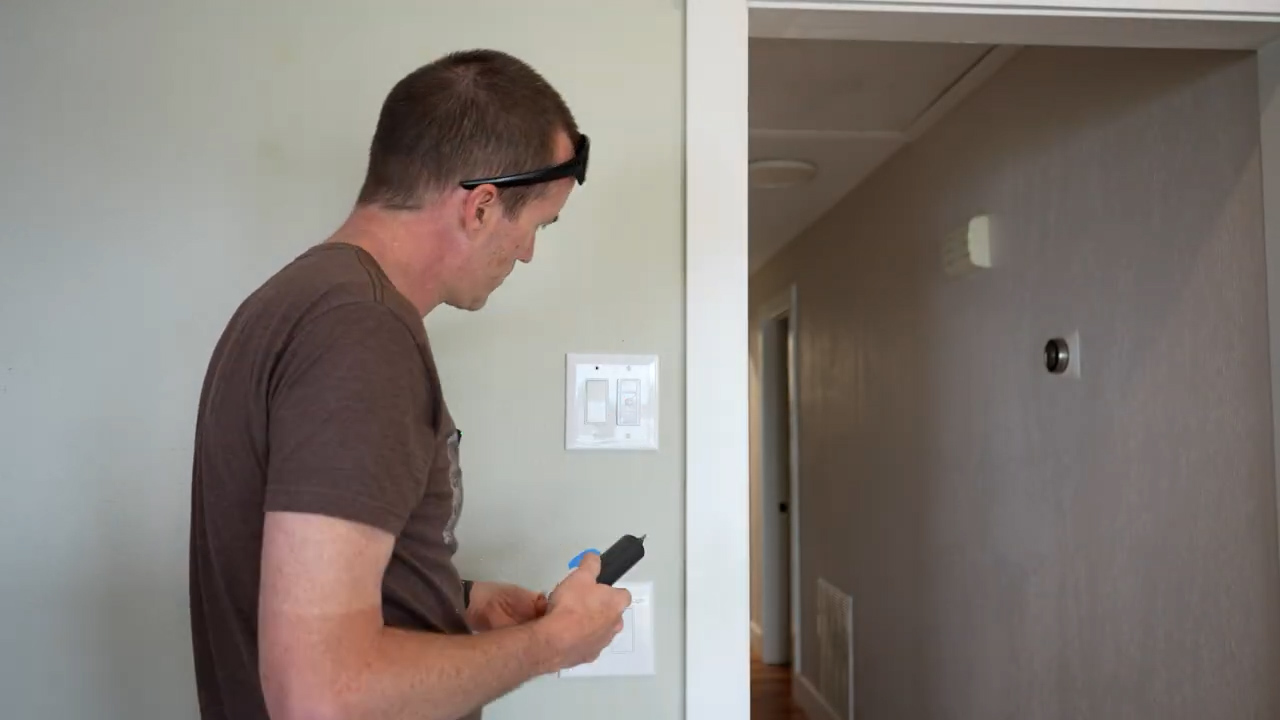
The goal of this video is to show you how smart devices like this can be used to digitally or virtually rewire your home without you having to crawl around in the attic and drop new lines to switches. Now, even though you aren’t going to need to change any of the circuits going to the circuit breaker, there is going to be some wiring involved. So, if you’re not comfortable with that, you can hire an electrician to do it, but it’s not that hard to do it yourself either. At a minimum, the thing that I would recommend everybody have is one of these non-contact voltage testers. There’s a little button on the unit that you press, and if you hold it up to an outlet, it’ll tell you that those are energized. So, when you’re shutting off your circuits, you can be sure you’ve cut off all the power to the switches.
Shelly 2PM Fan/Light Combo
As I mentioned before, one of the main reasons that we’re in this situation is because these switches are on separate circuits. So, I’ve only flipped one breaker, and you can see here with my non-contact voltage tester, one is off, but the other one’s still on. Let’s look at this first one.
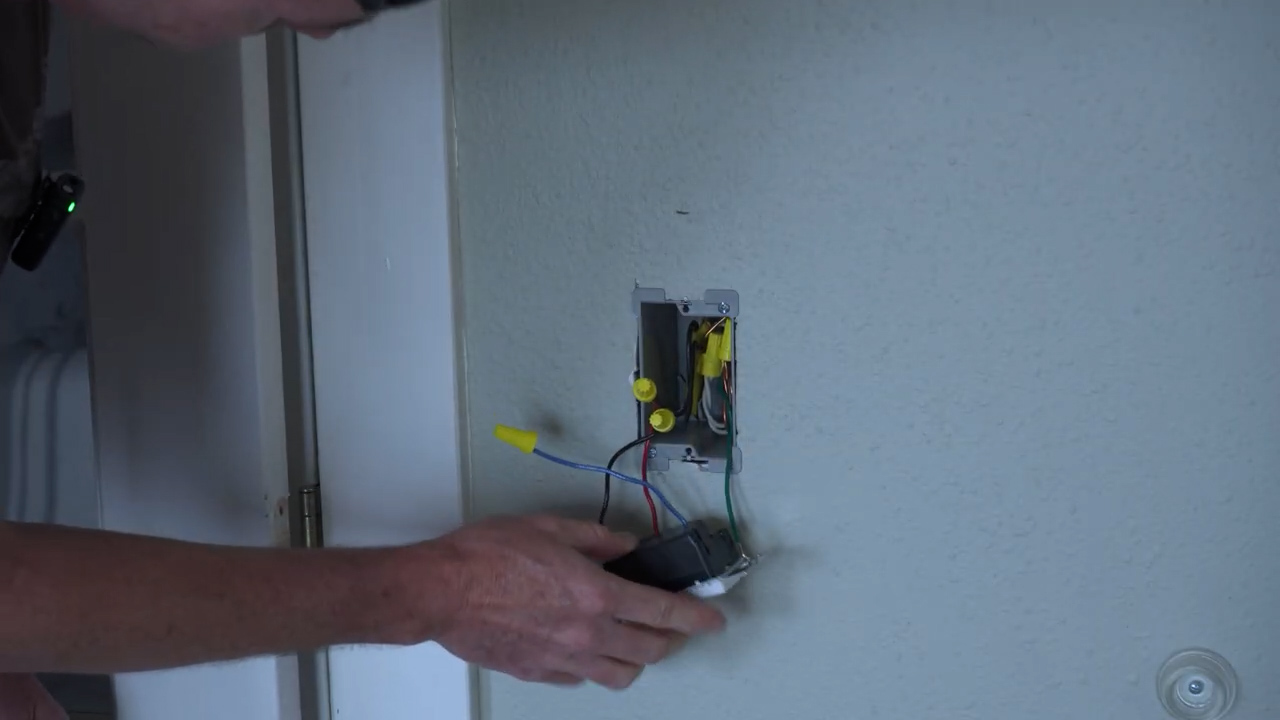
You can see that what we’ve got in this box is just two wires, white and black. But that unfortunately does not mean that they are neutral and live like you would expect. This is just a two-wire switch and that means that there’s no neutral in this box at all. That’s going to limit what we can put in here.
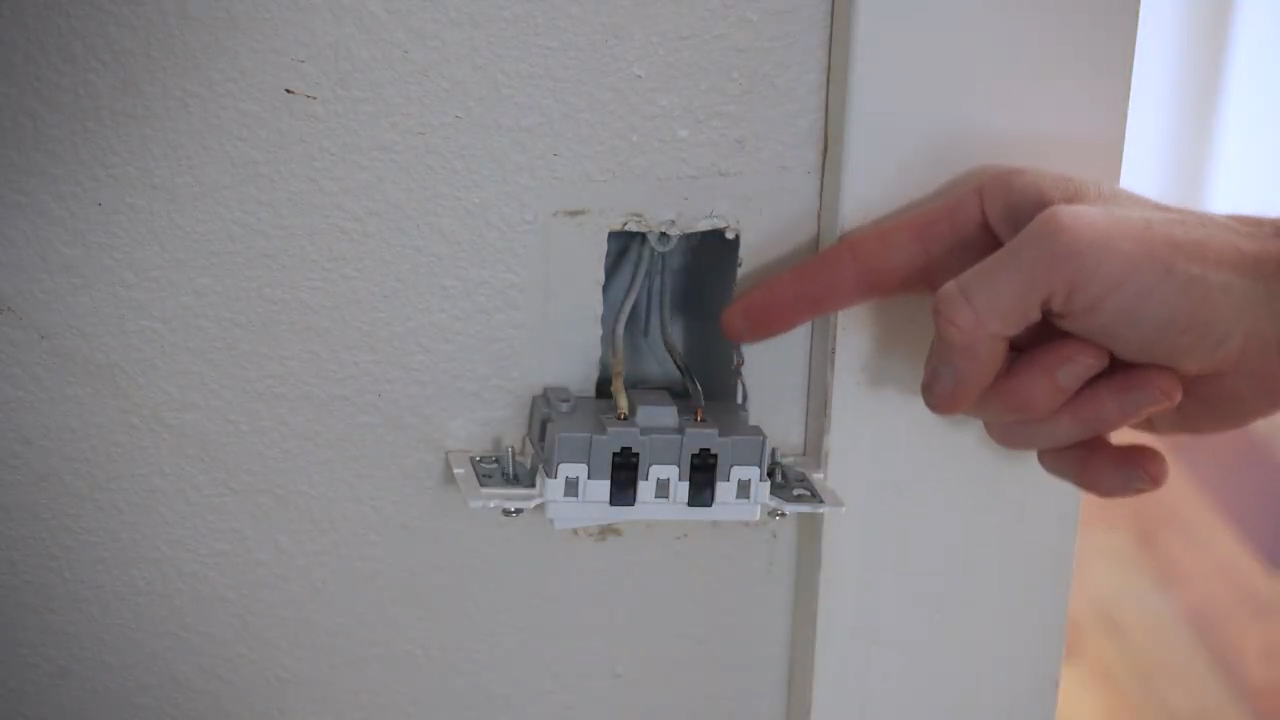
Coming back to our options, the Shelly 1L does not require a neutral, but it does require some amount of load to power it. So, this might not work. These two Zigbee switches also are no neutral required. So, either of these should theoretically work in this spot, but maybe not because some of them have some minimum required load as well. And it doesn’t say it on the box, but the Lutron also does not require a neutral and you can see that the only wires that it has are the two wires for hot and one for ground.
However, the end goal for this room is to have one light switch operate the light on the fan and the other one operate the fan itself. So, we’re going to have to get a little creative. As I mentioned before, the one switch was controlling a switched outlet on the side of the room that doesn’t really have any purpose. But I do know that since it’s a switched outlet, there is going to be both a neutral and a live wire in this outlet that’s live all the time because only one of these is a switched outlet. The other one would operate all the time. So, this is going to have all of the wires in it that we need to put a Shelly in here, and that’s what we’re going to do.
So, the way that this works is we’ve got a bundle of hot wires that are coming in here. These hot wires are going into one of the receptacles—or one of the outlets—on the receptacle. Then there’s another one that’s red and this red one is the switched hot wire. This is the one that is going to turn on and off based on when the light switch is turned. Then over here, we’ve got neutral wires and these are just going to get bundled together so that they can get used later on.
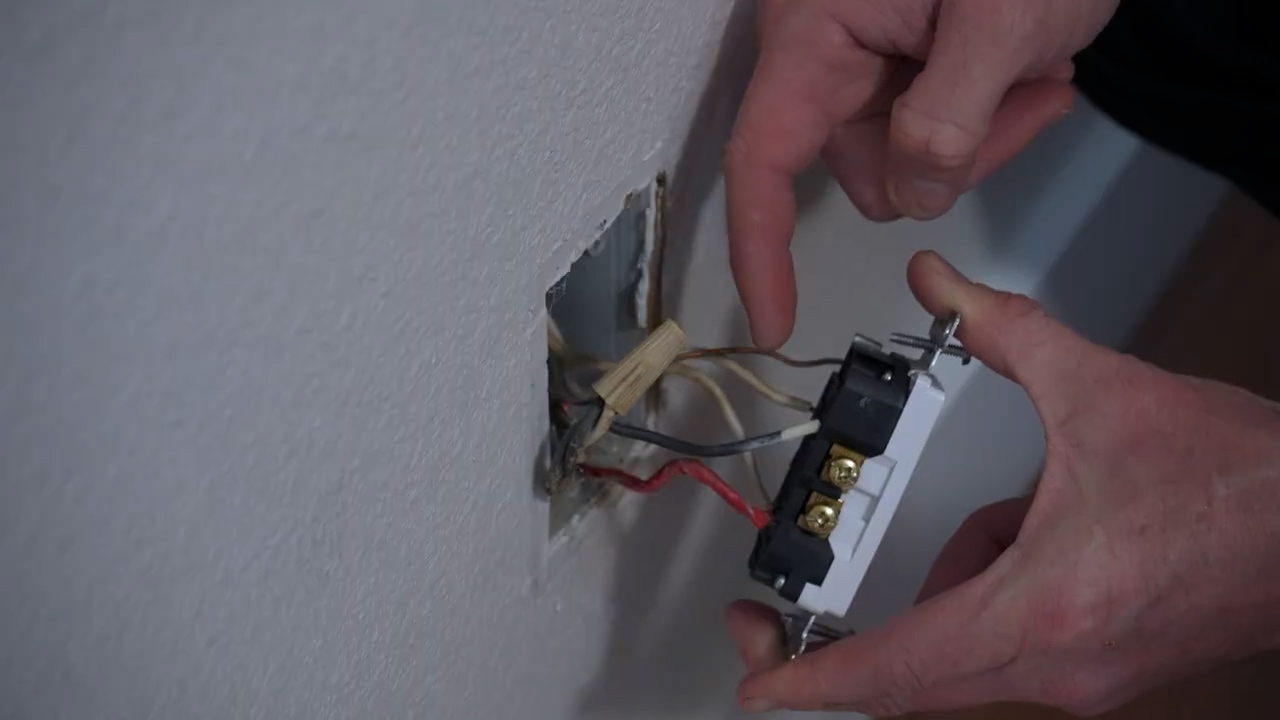
There are a few things that we’re going to need. The first thing is a new outlet and the reason for that is because, on the previous outlet, you can see this tab has been broken off here that connects these two outlets together and we need that tab to be intact. So, we’ll use a new outlet here and we’re just going to remove the fact that this is a switched outlet.
Then there are a couple options that you could use for your Shelly that you put in this box. The two that I would recommend are either the Shelly 1PM Mini or the Shelly i4. The Shelly 1PM Mini is an option because it’s nice and small and fits in this box easily. This could also be used to retain the functionality of this switched outlet if you did want it to be a switched outlet. The Shelly i4, on the other hand, is basically a Shelly that only has inputs and it doesn’t have any relay output. So, this is just going to keep track of when that switch is toggled.
When you’re in an older house, you can never be too sure about the colors of the wires. You can see here that they have neutral—or white wire—bundled in with their blacks. But I’m going to assume that these are all hot wires because that’s where they were wired on the switch and then these are our two neutrals and this is that switched outlet.
Again, this is a little bit of overkill for this situation because the Shelly i4 can actually control four different switches—or monitor four different switches—and we only need to monitor the one. But this is what we have so we’re going to use one of these.
We’re going to take our switched wire, and we are going to put it into Switch 1 on this Shelly. You can see that when I bottom that out in there, it’s still got probably an eighth of an inch of wire exposed, and I don’t love that. So, I’m going to take my wire cutters here, and I’m going to cut that eighth of an inch off and then try again. You can see that it’s perfectly going to sit in there with no wire hanging out, no copper hanging out.
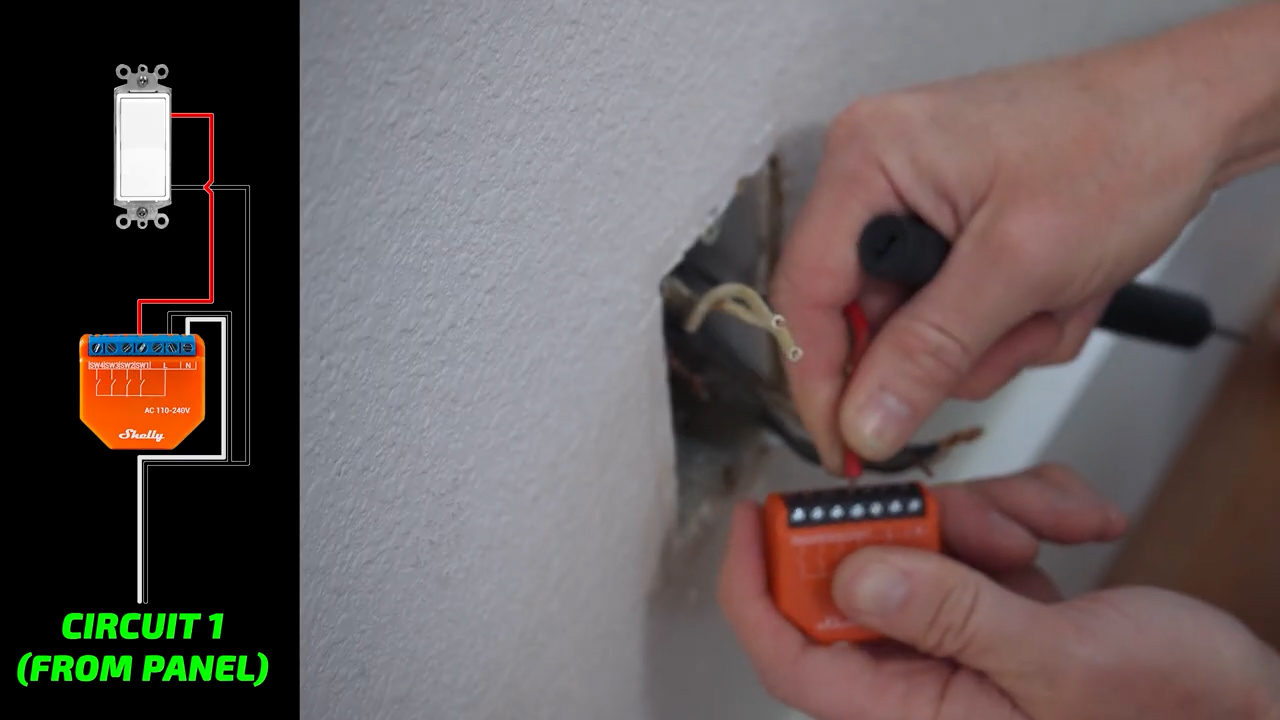
So, there’s our switch. We also need to give it a neutral wire and a hot wire. So, we’re going to take our neutrals here, bundle them together. Then, here’s our Shelly wired with the neutral, the live, and then the switch and that can get sent back into the box.
The point of all that was so that we can monitor this switch with the Shelly app. You’ll see that every time I flip it, it changes almost instantly in the app. The next step is to find the breaker for the fan.

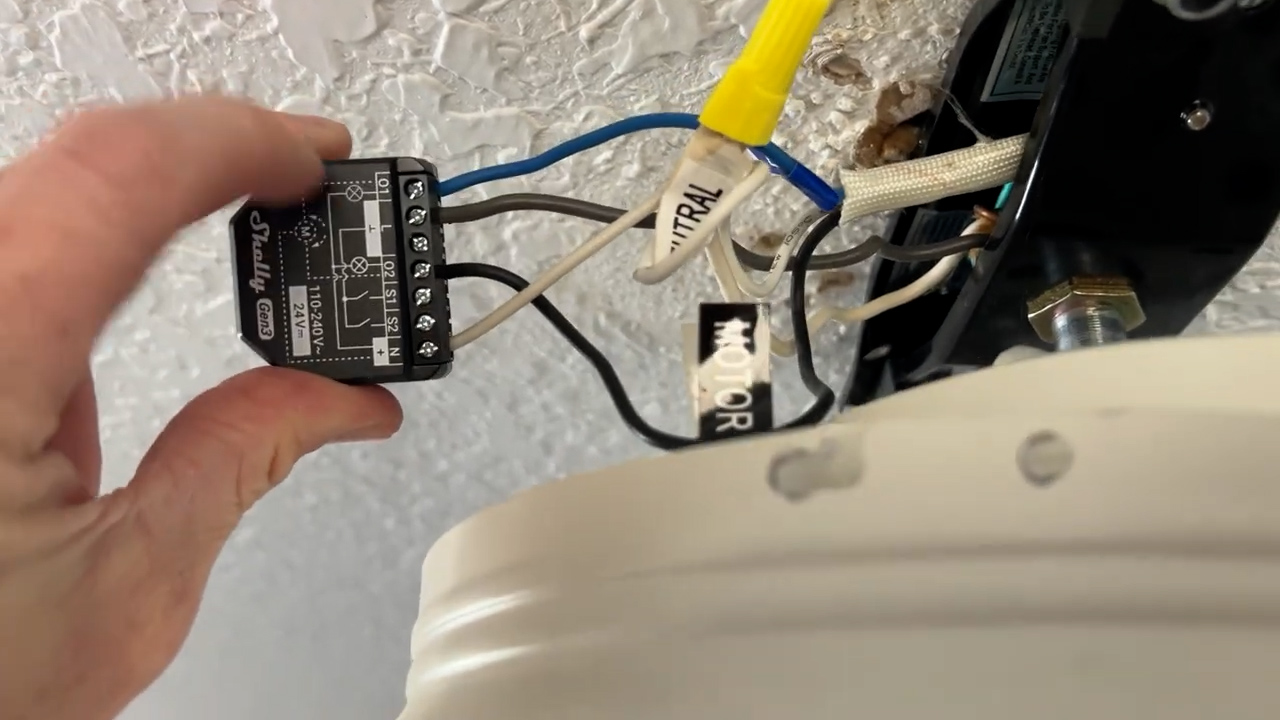
For this, we’re going to use the Shelly 2PM. You can see that on the Shelly 2PM, we’ve got a spot to hook up our hot wire, we’ve got a spot to hook up a neutral, and then we’ve got two spots for outs. So, on the fan, we used to have both the light kit and the fan hooked up to a single hot wire, but we’re going to separate it and have one hooked into Out 1 and one hooked into Out 2 so that we can control the fan and the light kit separately and then this is going to get hooked up to neutral.
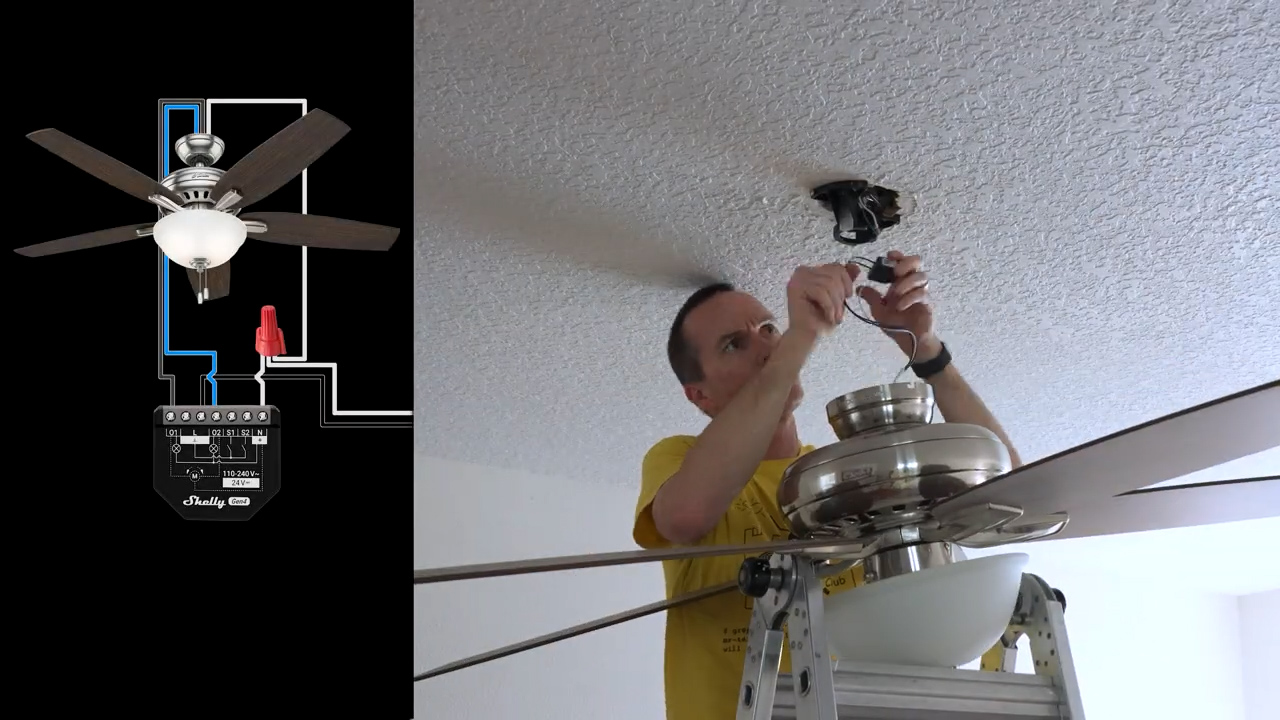
Then the last thing that we need to deal with here is that this light switch really has to remain on all the time in order for that Shelly 2.5 to be working. I’ve cut the power to it, and we’ve got to see what we have behind this switch. If we have neutral, our life is very easy. If we don’t, we’re going to have to make some adjustments.
We got lucky here and we’ve got a bundle of neutrals in this switch. So, we don’t have to use a Shelly 1L that works without a neutral. Instead, we can use a Shelly PM Mini and that’s what we’re going to do. We also could have used the Shelly i4 here, the same one that we used on the other outlet.
Here’s a quick explanation of what I’ve got going on here. This is my Shelly PM Mini, and this was all of my hot wires. What I’ve done is I used to have one hot coming in and then the load going out to the ceiling fan. But I don’t want those to be switchable anymore. So, I just connected them in the box and then I’ve got one wire coming out that’s going to connect to the live of my Shelly. Then I’ve got another one coming out that is going to be the power for my switch.
I’ll connect that to my switch like this. It doesn’t really matter where it’s connected to, but I’ve connected in the right spot anyways. Then I’ve got my switch terminal on my Shelly. That’s going to get hooked up to the other spot on the switch. Then my neutral wire that I have just pigtailed off of, that’s going to go to my Shelly and my output relay—that’s nothing; it’s not relevant anymore. So, we’re just going to shove this back in the box now.
Programming Shelly Actions
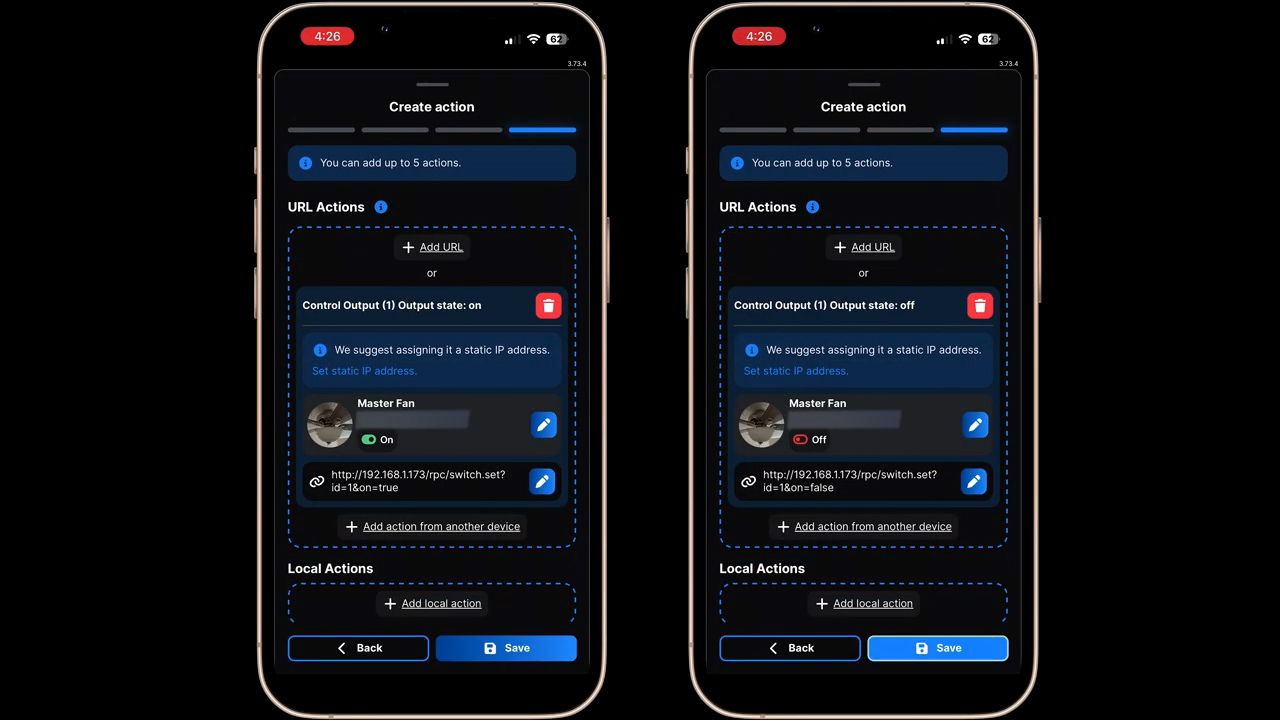
Next, we’ll need to just virtually connect the switches in the Shelly app. With the Gen 4 devices, it’s pretty simple to do. I’ll start by selecting my Shelly i4 and creating an action called “turn on fan light.” I’ll skip the active time option since I want it to be active all the time. Then for the trigger, I want Input On and for the action, I will select “add action from another device.” On that screen, I will select my master fan light and since the trigger input is on, I will also select Output On.
I’ll do the same thing for Input Off on the i4. Then I’ll make two more actions for Input On and Input Off on that Shelly 1PM Mini. So, now we have two switches that make sense. You come into the room, you press the first switch, and that turns the lights on like it should. This other switch over here, I still don’t love that it’s so far away, but it controls the fan. Last thing to do is just change these labels, and we’re all good to go.
Shelly Reliability Testing
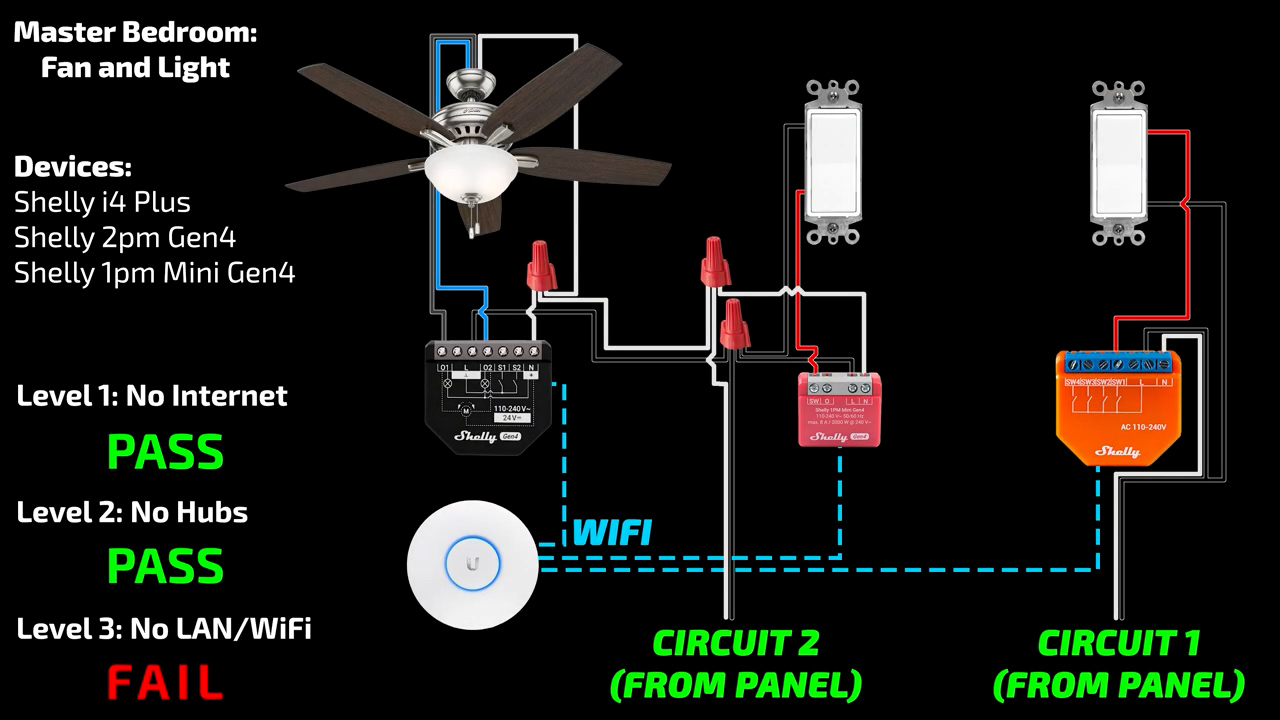
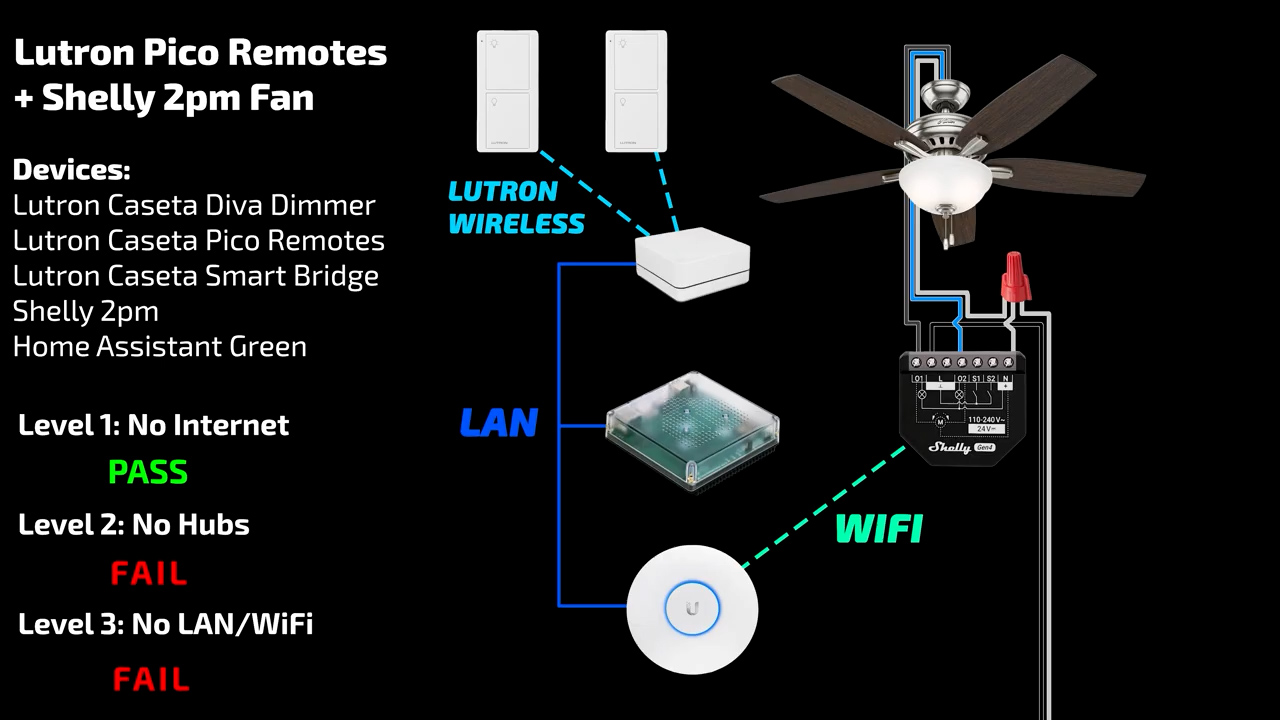
For each of these digital rewiring solutions, I’m going to give them what I’m calling a reliability score. You can see that in this case, we have involved three devices: a Shelly i4, a Shelly 2PM, and a Shelly 1PM Mini. These are all generation 4 devices, so they could run over Wi-Fi or Zigbee, but I’ve got them on Wi-Fi because I personally have a pretty rock-solid network from UniFi. But if your network isn’t as strong, it may affect the reliability of this setup.
Level One of my reliability tests is to determine whether or not they’re going to work without an internet connection. So, I’m going to unplug the connection to my ISP. This is Level One—no internet connection. The light switch works. The fan switch works. No problems.
Level Two will be disconnecting any smart home hubs. So, I will quickly unplug Home Assistant. All right, this is Level Two—no Home Assistant. Still works perfectly.
Finally, for Level Three, we’re going to shut down the entire local area network. So, this is Level Three—no local area network at all. How is that working? What?
The reason for that is that I have a small second switch that’s powering just one additional access point. So, all of the Wi-Fi devices must have switched to that access point, and they must just be able to communicate via Layer 3 because this access point is the only thing that’s still on in the house. So, let’s turn it off and check.
This is the second Level Three test for these two switches. This time I disconnected every single piece of network equipment on my entire property so there shouldn’t be any local area network at all. Neither of the switches work, which is what I expected. Now there’s no connection in between the switch and the fan and unfortunately the fallback behavior is that you can’t control anything at all because there’s no direct connection between this switch and that fan.
That means this Shelly setup is going to earn a Level Two reliability score, which means local only control without a hub, but a local network is required.
Lutron Virtual 3-Way Dimmer
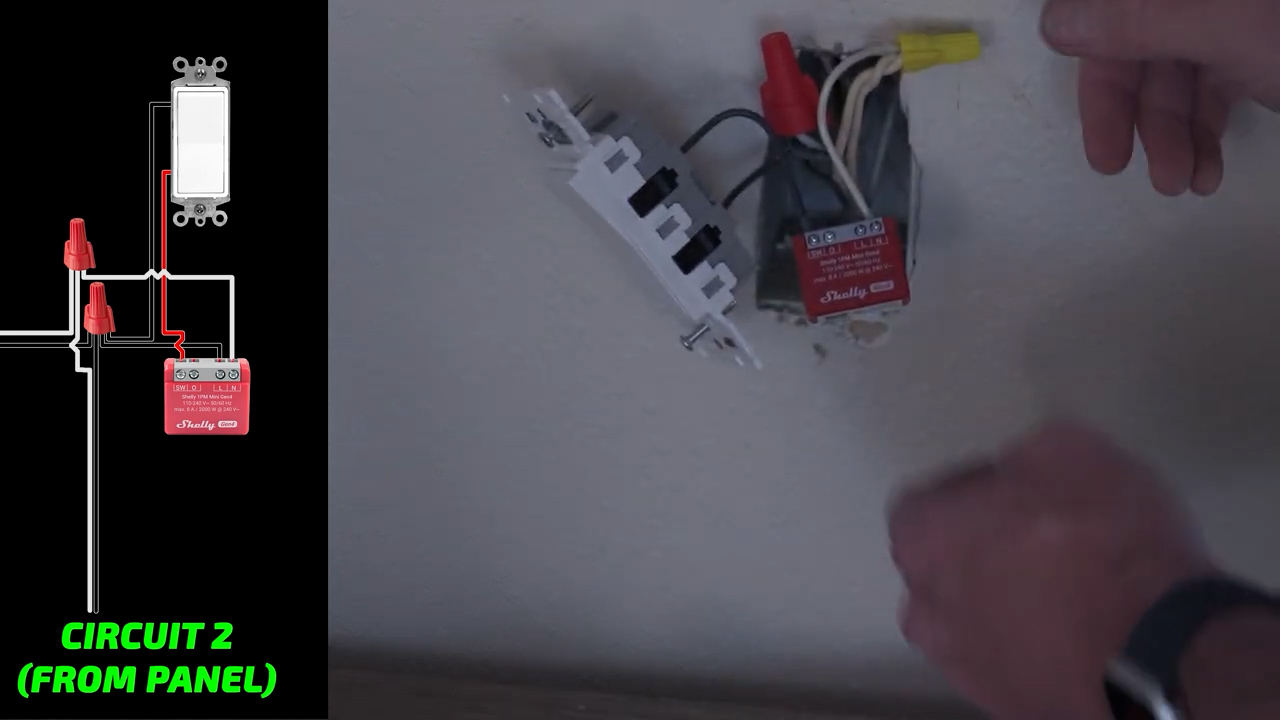
Next up, this light switch controls five LED ceiling lights that are great lights. But again, the light switch doesn’t make any sense in this position. Nobody would ever think of coming over here to turn on these lights. Not really sure how it got wired here, but we’re going to change that.
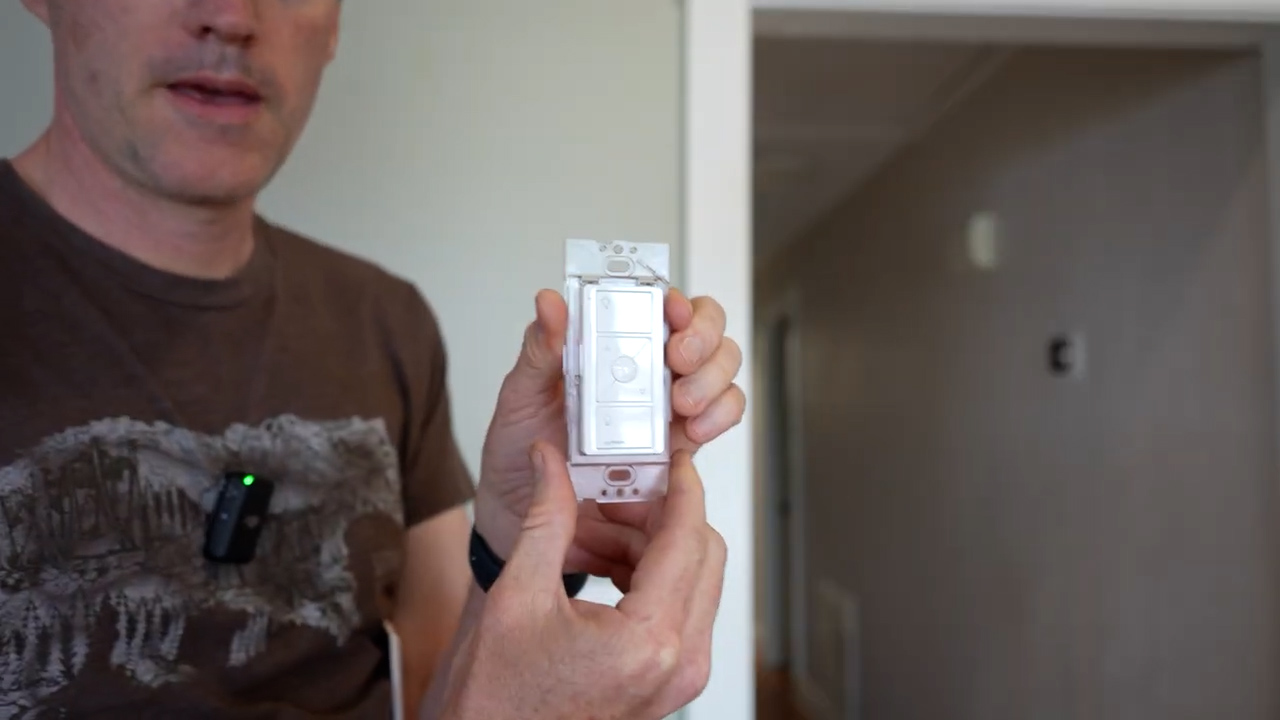
In this location, we’re going to install a Lutron switch. There are two different varieties of their dimmer. This is their classic dimmer that’s been around forever. You can see it’s got two wires on the back for the line and the load. Then this one has four wires on the back. So, you’ve got your ground, and then you’ve got a blue wire which it says just to cap off. I assume this is for installation in different countries maybe. Then you’ve got one wire for your hot—or for your source voltage—and then one for your load, and that’s red. It should be pretty easy to hook up here. We’re just going to take these and wire nut them on.

You can see that there was a neutral bundle in here, but we didn’t need to use it because the Lutron switches do not require a neutral. So, we can just put all these back into here now. The one complaint that I’ve heard about Lutron switches is that they’re a little bit larger. So, in some boxes, it might be difficult to get all of the wires in. Luckily, this is a huge box, so there is no problem there. It fits perfectly.
Now that we have the lights back on, this functions just like a normal light switch. But to get the smart stuff, we’ve got to hook up the hub. This is what the Lutron hub looks like. This is going to let it wirelessly communicate with each of the switches and the remotes.
One thing about this is it does need to be plugged into your network. What I’m going to do is instead of installing it in the rack is I’m going to put it on top, which is also where I’ve got my Zigbee antenna. I could have it next to my Home Assistant Green inside the rack but I’m a little concerned that the rack will block the wireless signals.
This is where I want to put the Pico switch so that it sort of looks the same as the other switch. I’m not sure if they’re going to perfectly line up, but hopefully they’ll be close. We’re going to replace the single wall plate with a double wall plate. Then the Lutron dimmer—or Lutron Pico remote—just slides into this little plastic piece which is like a blank for a wall remote. You just slide the Pico remote into the blank. Then we’re going to use just the mounting screws on this plate.
Unlike the Shelly solution where we had to go in and manually set up our actions, once you’ve added both the Lutron dimmer and the Pico remote to the app and assign them to the same light, they’re going to automatically sync together. So now we can control those overhead lights from either position. We can turn the lights on, dim them, and put them back to full from this location. Then we can come down to the other spot, and we can also control and dim them from here.
Lutron Reliability Testing
With this two-switch setup from Lutron, we are using the wired Lutron Caseta Diva dimmer and a Lutron Caseta Pico remote. And both of those require a hardwired Lutron Caseta hub. So, there’s three devices in total.
Level One, no internet connection. Testing the Pico switch. No problems. Level one, no internet connection. Checking the Diva dimmer. No problems.
All right, this is Level Two. We are going to disconnect Home Assistant and the Lutron hub. Level two: testing the Lutron Pico remote with no hub. It still works. Why does it still work?
Level Two testing the Lutron Diva dimmer with no hub. It of course still works. It’s plugged right in.
This is the Level Three test of the Lutron Pico remote. We have no hub, no internet connection, and no local area connection at all. It still works. That’s crazy.
This is the Level Three test of the Lutron Caseta Diva dimmer. I was going to say that this will always work because it’s directly connected to the lights and so no matter what you’ll always be able to just press the button, and the lights will dim. But the Pico remote still works too. So, Lutron Caseta just appears to be bulletproof. This Lutron setup is going to get a level three plus reliability score since it retains full control of the lights without any hub, network, or internet connection.

Aqara 4 Button Matter over Thread
The last thing to tackle in this room is this light switch where you first come in the door. This is where I want one master control panel.
I installed this Tuya Zigbee switch and to be honest, it’s almost perfect. It’s got three separate buttons. It runs through Home Assistant and it’s a no neutral switch. But it’s got one problem. The goal was to sync this switch up with the Lutron switches. So, when the Lutron switches turn on, this would turn on and show this little green light and when the Lutron switches turn off, this would turn off and the little green light would go away. But for whatever reason in the Home Assistant app, when you toggle one of them, they all toggle.
So, unfortunately, there’s no way for me to sync up the switches. It does sort of work, but I want the green lights on here to correspond to whether or not the lights are on and right now, I can’t do that because every time that you switch one of them on, it will switch the rest of them on as well.
So, next we’re going to try out this four-button switch from Aqara that also runs on Zigbee, and we’re going to see if that will work a little bit better with Home Assistant, which will allow me to sync up these switches.
So, something interesting about this four-button switch is that, like I said, it’s got four buttons, but it only has three outputs. So, I’m curious how this is going to show up in Home Assistant. It does say it’s Matter compatible also. That must be Matter over Thread because I’m pretty sure this is a Thread/Zigbee switch.

So, a small update here. This switch appears to be Zigbee compatible only when you’re using the Aqara hub, and my Home Assistant Zigbee coordinator won’t pick it up at all. So, I ended up just adding it to Home Assistant via Matter over Thread, but it does appear to be missing some of the advertised functionality like the ability for the switches to run in detached mode, which probably requires using the Aqara hub and app.
Home Assistant bridges the gap between Lutron and Aqara pretty seamlessly. To make these automations, I started on the device page for the Aqara switch and I selected new automation using the Aqara device as a trigger. In this first automation, I select that when switch one on the Aqara turns on, it performs an action to turn on the lights on the Lutron main dining room lights. I made separate automations for on and off for the first two Aqara switches.
Then I did the exact same thing on the Lutron switches in order to sync their state with the Aqara switch. So, to sync up these two sets of lights, I made a total of eight separate automations.
This room is finally sorted, and let’s take a recap of what we did. So over here, these two switches used to not do anything involved with the lights in the room. We had one that was controlling an exterior motion light and one that was controlling a switched outlet that doesn’t have anything hooked up to it.
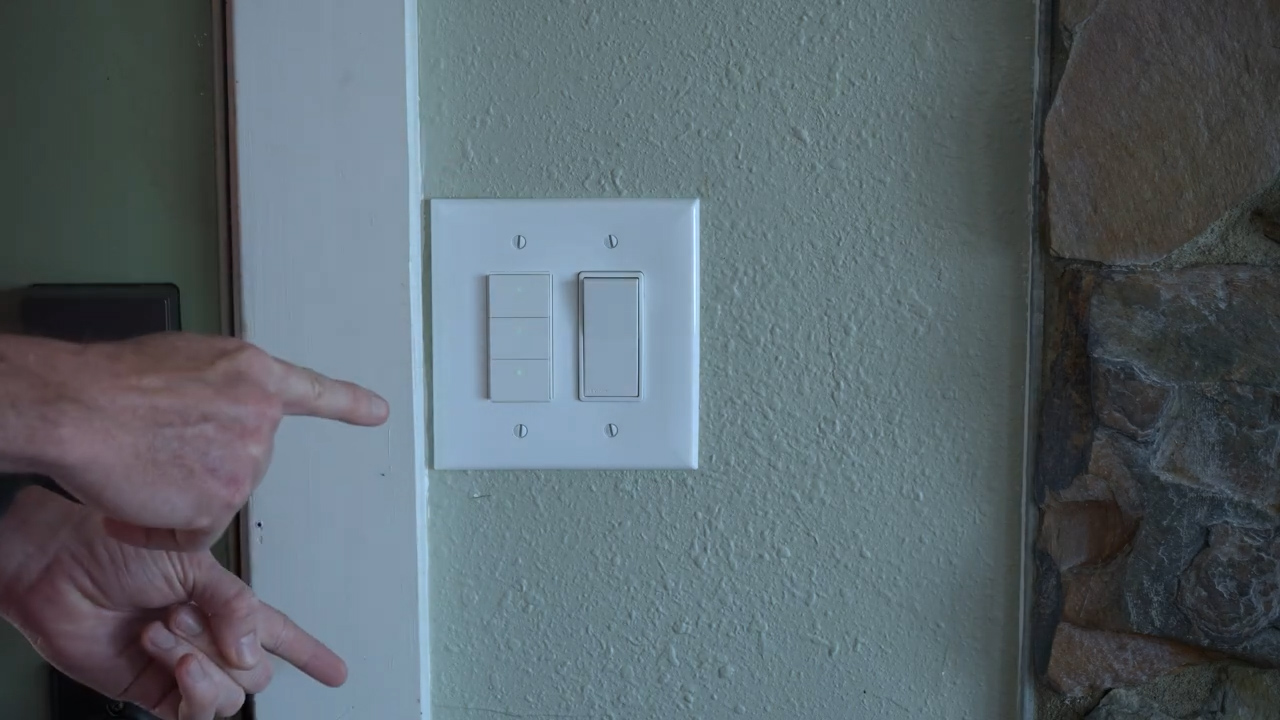
So now the top button will turn on the ceiling lights. The second button will turn on the dining room lights. You can control the dimmer of the ceiling lights on this other wall switch. This was where the original dimmer was, and we have replaced it with a Lutron dimmer that now we can control the actual dimming level from right here. You still can control the switch from either location and these will sync. So, whenever you turn the one on the wall on, the little green light will come on over at the one by the door, and if you turn it off at the switch on the wall, the little green light will turn off by the door. So, these are all synced up.
That’s great. We can also come over by the hallway. We can control the ceiling lights and the dimmer again from this spot. This is with a Lutron Pico. So, the dimmer will bring them all the way down, or we can send them all the way back up. And again, it’s being synced with the switch by the door. You can control the dining room lights from over here as well—or the dining table lights. You can see they can dim as well, and they can bring them back up. It doesn’t matter where you turn them on, they will sync back over to the switch by the door. So now the second green light is on, and we can turn it off from there if we want.

We would say that the ceiling lights are in a four-way configuration where you can control them from the switch by the door, the switch on the wall, or from the Pico remote near the hallway. Then the over-the-table lights are a three-way configuration where you can control them from the switch by the door or from the switch near the hallway, and we didn’t lose any functionality. We’ve only added functionality. These should be bulletproof automations but there’s only one way to test that.
Aqara Reliability Testing
For Level One testing, I disconnected my ISP from the network. Level one, no internet connection. Checking the Aqara Matter over Thread. No problems.
Level Two, testing the Aqara Matter over Thread switch. That of course doesn’t work for any of the automations that we have to sync up the lights in the room, but the switch by the door, which is directly connected to these outdoor lights, still works. So, this master light switch portion of the setup only earns a Level One reliability score.
The last room that I’m going to cover in this video is this guest room. The one thing that I want to change is I want to add a light switch that’s located right when you enter the door. I’m going to have it on the left here just on the actual door molding.
I had originally thought that this wireless switch from Suraielec was going to be a great fit because it comes with this single switch unit that you can just screw right into the door molding. But the more I thought about it, the more I figured out the problem. If I install this wireless switch, these switches further inside the room are no longer going to be functional. So, we’re going to have to go a different direction with this.
Dual Wireless Switches (Shelly and Lutron)
What I’m going to do is I’m going to use Shelly’s wireless switches. This is a Bluetooth four button switch, and I plan to install two of these: one of them directly onto the door molding here and the other one I’m going to replace the existing light switch with one of these Bluetooth buttons.
But before we control them with the Shelly buttons, we have to install a Shelly 2.5 in the fan just like we did in the master bedroom. Let’s do that first.
So, this is almost identical to what I did in the master bedroom. For a recap here, I’ve got a pigtail coming off of the neutral to power the Shelly. Then, I’ve got the live that’s coming from the switch powering the Shelly here. Then I’ve got the light kit on output 1 and I’ve got the motor for the fan on output 2.
I decided that before I put the whole fan back together, I’m going to turn the power back on and make sure this works. So, Shelly app: assign Bluetooth devices, add Bluetooth device, we’re going to add…
…
…
…
It’s a whole day later of frustration. The Shelly Blue button did not work like I was expecting. So, you can connect the Shelly Blue button to the Shelly 2.5 that I’ve got up in the fan there, but it doesn’t work without the cloud.
So, you set up this button and can connect it to the Shelly 2.5, but the only two ways to make the Shelly Blue communicate with the 2.5 are either using scenes in the Shelly app or using Amazon Alexa routines. I don’t want to use either of those. I want to stay free of the cloud.
What I was hoping to be able to do was use direct connection from Bluetooth to the Shelly 2.5. I found some tutorials online using the BT Home integration—or BT Home function—of the Shelly Blue. I tried lots and lots of times, and I tried a bunch of different tutorials, and I didn’t find anything that worked. The stuff that was in the tutorials did not match what I was doing.
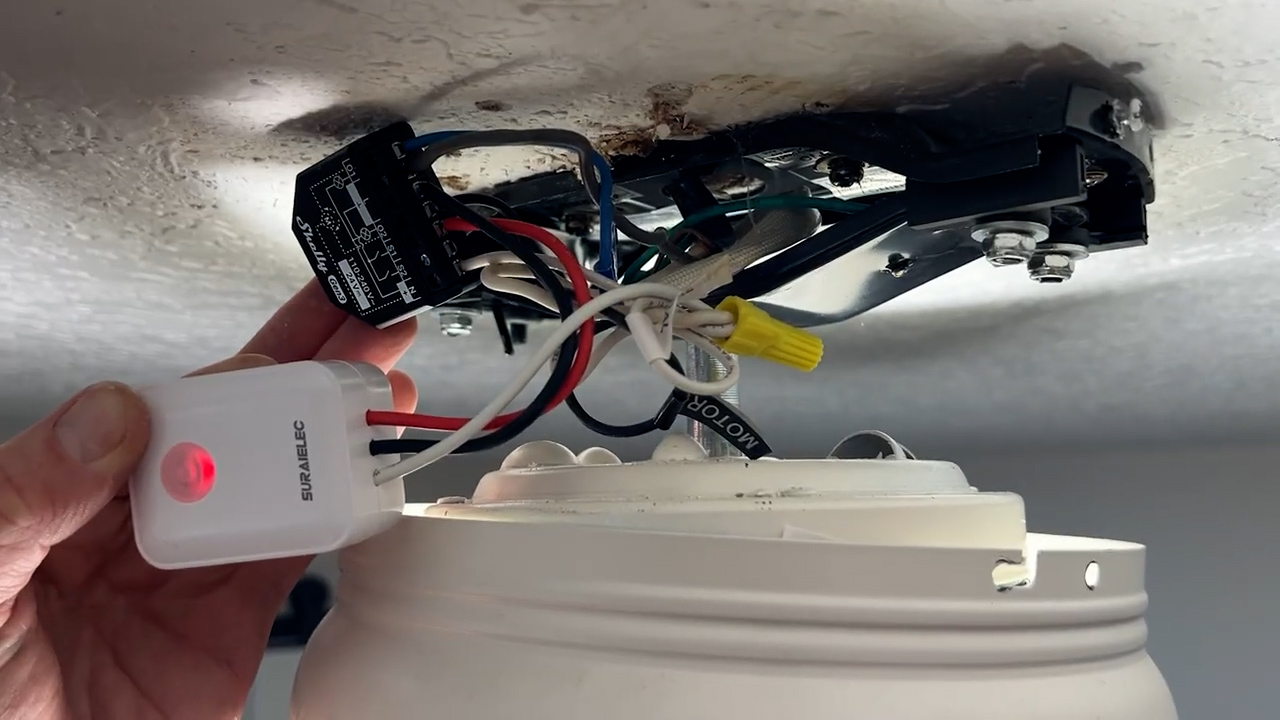
So, I went to plan B, which was to go back to the Suraielec kinetic switch here. What I did was I mounted the receiver for the Suraielec kinetic switch up in the fan itself, and that’s connected to the Shelly 2.5. It works pretty well. You can see that this is set up with a rocker switch, but the problem is it only works about 75% of the time. So, you can press off and on a bunch of times and eventually it will fail.
This doesn’t work because it needs to work every single time. What I ended up doing was setting up the BT Home integration in Home Assistant and added the Shelly Blue button which made it work.
The way I’ve got it set up is you can press one button to turn the light off. Another button to turn the light on. A third button turns the fan on—there’s no blades on right now—and a fourth button turns the fans off. Sure, that’s fine. So, off, on, off, on. Very reliable. It goes through Home Assistant. It’s a little bit slow, but not too bad. However, I don’t like this button. This doesn’t have any tactile feedback. It’s very mushy when you get these button presses. I’m not happy with the way that the switch feels.
What I ended up doing is buying a Lutron Pico switch. The Lutron Pico switch has on and off, but I’ve set it up in Home Assistant so that the top button operates the light and the bottom button operates the fan. But since this two-button Lutron Pico switch is really supposed to just be an on/off button for a single circuit, we’re going to use Home Assistant to make each button perform a separate task instead.
To do that, I’ll go into the Lutron device page. Then I’ll create a new automation using this device as the trigger. We’ll say that when the On Button, which is the top button, is pressed, we want to toggle output zero on the Shelly, which is the light. We’ll do the same for the Off Button, which is the bottom button, but we will toggle output 1, which is the fan. Then we’ll set up those same two automations on the second Pico switch as well.
So, after way more setup and frustration than I was anticipating, the final solution is a Lutron Pico switch at the door that controls the light and the fan. Then in the original position, another Lutron Pico switch replacing the original light switch that again controls both the light and the fan. We did it.
Wireless Switch Reliability Testing
For the reliability scores here, both the Lutron and the Shelly wireless remotes are going to score exactly the same since they both rely on Home Assistant to pass the button presses through to the Shelly 2PM.
Level One, no internet connection. Checking the Lutron Pico switch. No problems. Level One, no internet connection. Checking the Shelly Blue button. No problems.
This is Level Two: testing the Lutron Pico switch with no Home Assistant and no Lutron hub. This shouldn’t work. And of course, it doesn’t because there’s no automation to go in between the Lutron hub and Home Assistant.
Level Two: testing the Shelly Blue Button 4 without Home Assistant on. And this shouldn’t work since all the automations get run through Home Assistant. And that doesn’t work.
That’s going to give them just a Level One reliability score, meaning they are locally controlled, but they will require a connection to Home Assistant and a local area connection.
If you were somehow able to get the BT Home functionality of the Shelly directly connected to the Shelly button like in the tutorials, that would shift the Shelly Button 4 all the way up to a level three reliability score and it might have convinced me to use them instead of the Lutron Pico remotes. But for me, it never gave the option to add the buttons as sensors like it did in the tutorials. As a result of that, that also meant that they weren’t available as action triggers.
I do have links below for everything that I tested in this video. And as always, I appreciate it when you use those links since as an Amazon affiliate, I do earn a small commission on the sale at no cost to you.
I’d also like to thank all of my awesome patrons over at Patreon for their continued support of my channel, and if you’re interested in supporting my channel please check out the links below. If you enjoyed this video, please consider subscribing to my YouTube channel and as always, thanks for watching The Hook Up.