UniFi Protect got Amazing
August 29, 2025UniFi Protect has gotten really good lately and while it’s not quite perfect yet, it’s good enough for me to make the switch from Blue Iris after five years. So, in this video I’m going to show you why I think Protect is so powerful and how to utilize it to its full potential.
Cameras
Starting with cameras, it’s true that UniFi Protect supports third party cameras now, and for the last year I’ve been giving UniFi Protect a trial run as a backup for Blue Iris using my nine ONVIF cameras from AXIS, Hikvision, Dahua, and Reolink. But non-UniFi cameras are limited to 24/7 recording only, and to get the most out of UniFi Protect, you really need to use UniFi cameras. Unfortunately, UniFi cameras have historically been pricey with just middle of the road performance, but the G5 lineup of cameras started to change that, and the G6 cameras have extremely competitive performance for very reasonable prices.
So, to get the full UniFi Protect experience I upgraded my pool camera from the $199 Annke NC800 to the $279 UniFi G6 Dome that has a 1/1.8” 4K image sensor that records at 30 frames per second.
I switched out my $950 AXIS P3268 front door camera with a $199 G6 turret, which again records at 4K 30 frames per second with a 1/1.8” image sensor.
In my side yard I replaced my $500 Annke Speed Dome PTZ with the $399 G6 PTZ that has dual lenses for hybrid zoom with auto tracking and two 1/1.8” sensors recording at 4K 30 frames per second.
To effectively cover the side door to my patio and sliding glass door I upgraded my $150 Hikvision 2385 to the top the line $479 G6 Pro Bullet, specifically for its optical zoom and massive 1/1.2” image sensor.
Last, I added a camera pointed at the other entrance to my patio using the $179 WiFi G6 Instant, which is the best WiFi camera I’ve ever tested with the same 1/1.8” 4K image sensor recording at 30 frames per second with all the same detection types as the rest of the G6 lineup.
Eventually I’ll replace my Dahua Panoramic Dual Lens camera with UniFi’s G6 180, but until that comes out, I’m just adding my current Dahua to UniFi Protect using ONVIF, but I’m also connecting the $199 AI Port which basically converts any camera into a fully Protect-compatible one with smart detections.
Zone Setup
Now that I’ve got a full set of compatible cameras installed, we can take full advantage of the new features in UniFi Protect 6.1.
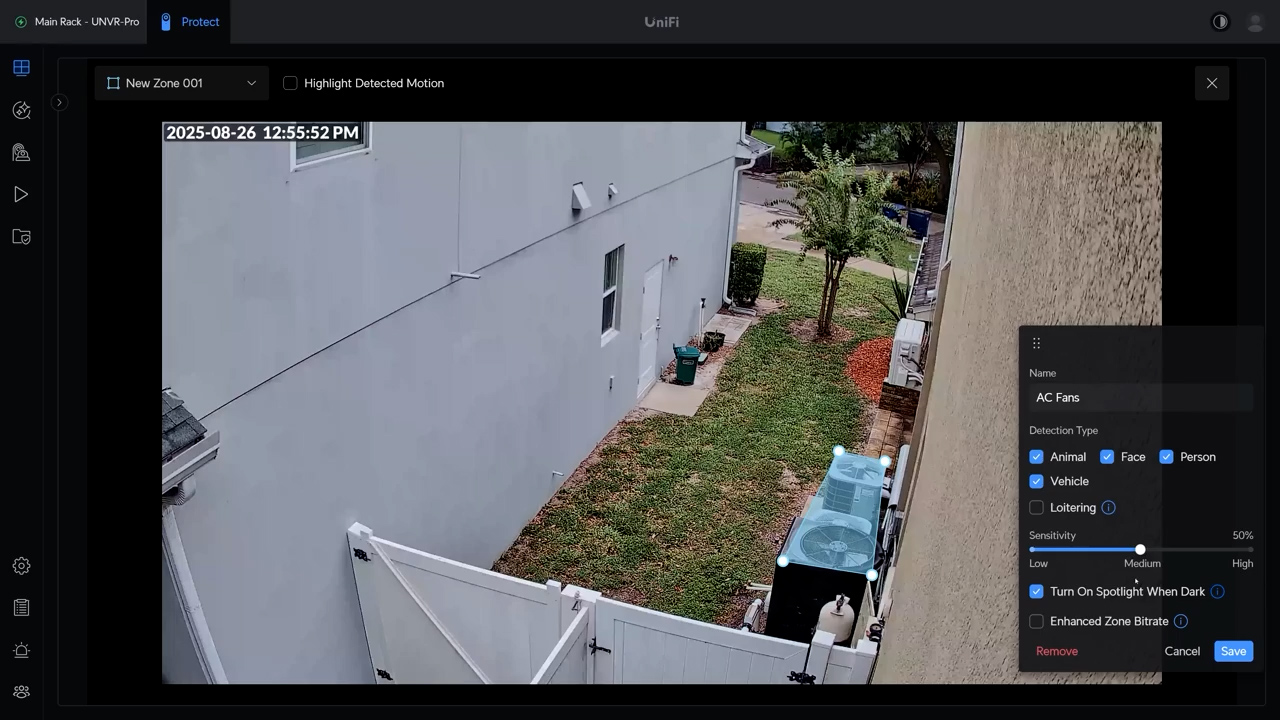
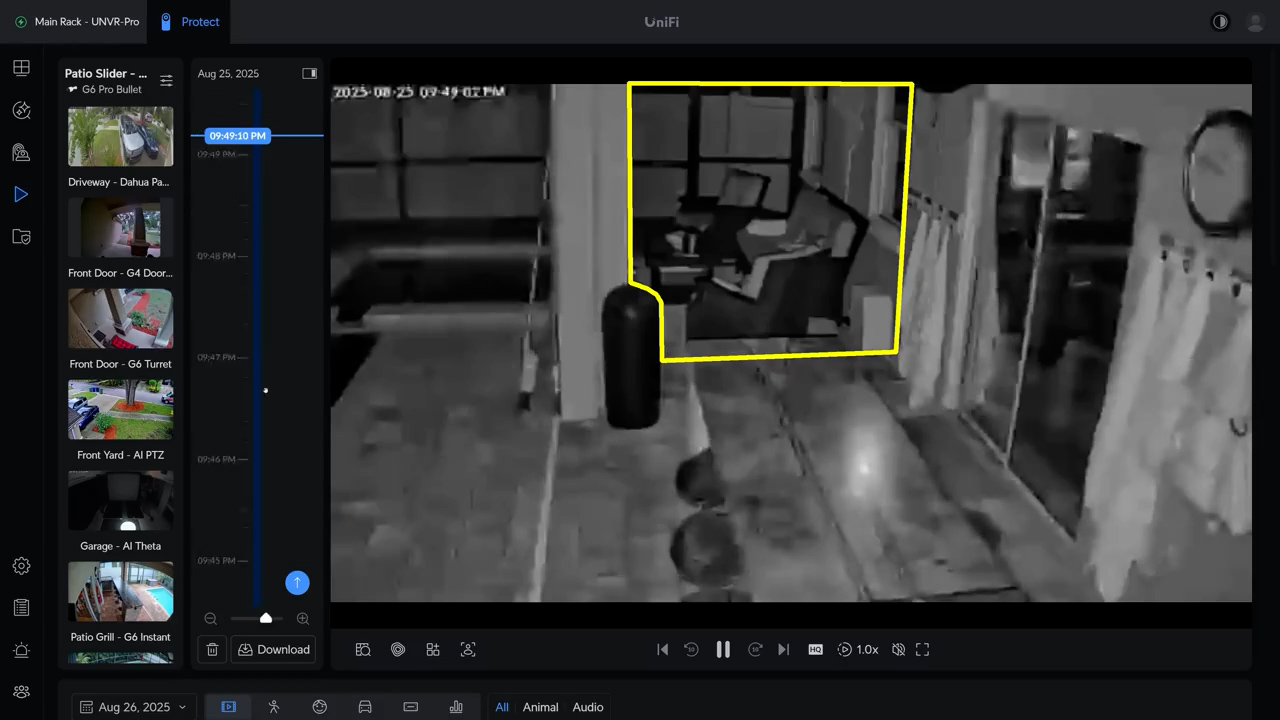
Starting with the one I think is most impactful and unique: UniFi cameras now allow you to set specific zones where your camera will dedicate a higher proportion of its bitrate. So, if you have a particular region you’re interested in, you can tell UniFi Protect to do less video compression in that area.
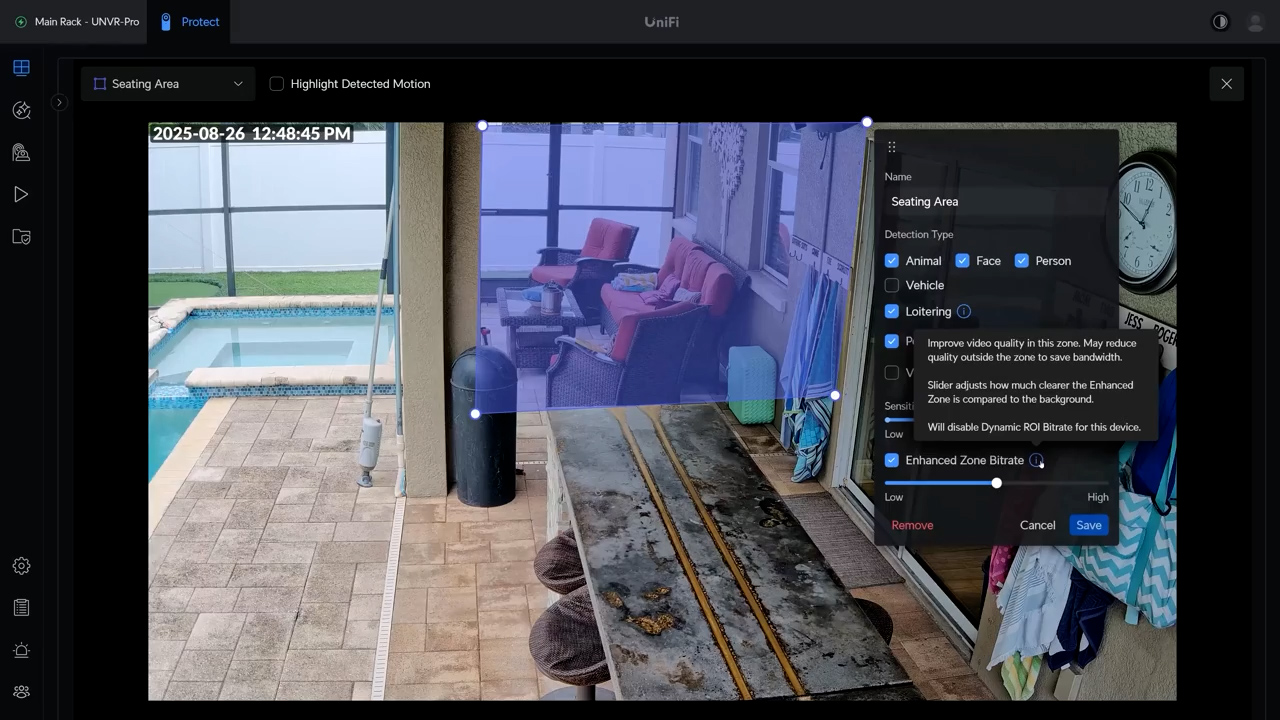
If you have something that moves a lot like a tree or an AC fan that you don’t necessarily need to record, but would normally eat up your bitrate, you can also create a zone to tell Protect to increase the compression in that area, freeing up extra bitrate for the rest of the image.
The results are immediately noticeable, even in the live view, but are especially obvious when scrubbing timeline footage, where the enhanced bitrate zone stays clear while the rest of the image shows compression artifacts.
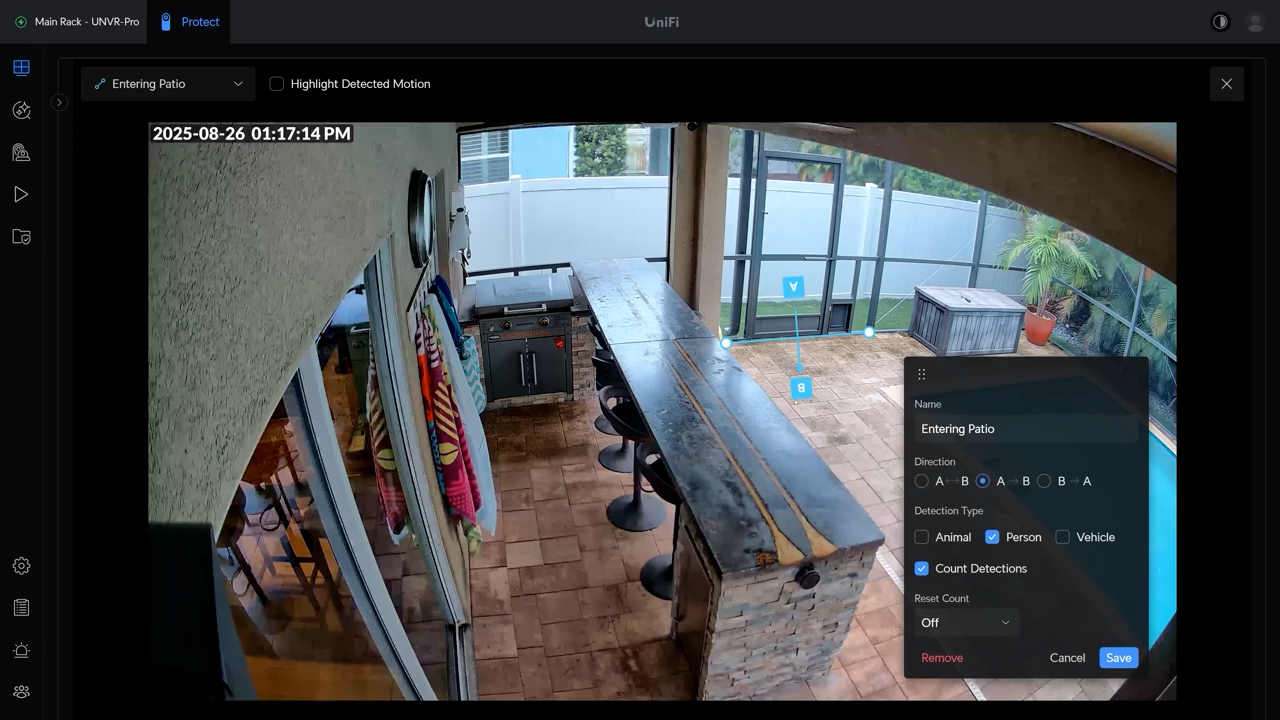
Zones are also extremely useful for defining notifications and alarms later on, so I’d recommend at a minimum going in and setting up zones for different security levels for your property. For instance, a yard crew may come into my back yard during the day, and I don’t need to be notified of that, but if an unknown person is inside my patio I want to be notified of that immediately, so I setup zones on each of my patio cameras designating the inside of my patio from the outside.
Speaking of which, while G4 and G5 cameras both had line crossing options, they were of limited usefulness since you couldn’t define a direction for crossing. But the G6 cameras finally added directionality, so you can get notified if someone enters an area without also being notified when someone leaves that area.
Zones also allow you to define areas to do different detection types, which in turn allows you to control when PTZ cameras start auto tracking. In my front yard I have always kept auto tracking off on my PTZ camera because it would follow people down the street who were just riding bikes or working out and I always thought that was creepy. But by using zones I can set up person detection only on my property, which then stops the camera from auto tracking outside of that zone.
Detections
Moving on to detections, we’ll start with the normal playback menu where you’ve got your normal smart detections on the bottom for person, face, vehicle, license plates, and animals. But the real killer feature for me is grid search. Let’s say I want to search through the last week of footage for people sitting on this couch. That would be a ton of detections to sift through, but with grid search I can narrow it down to only show detections that happened in this specific region.
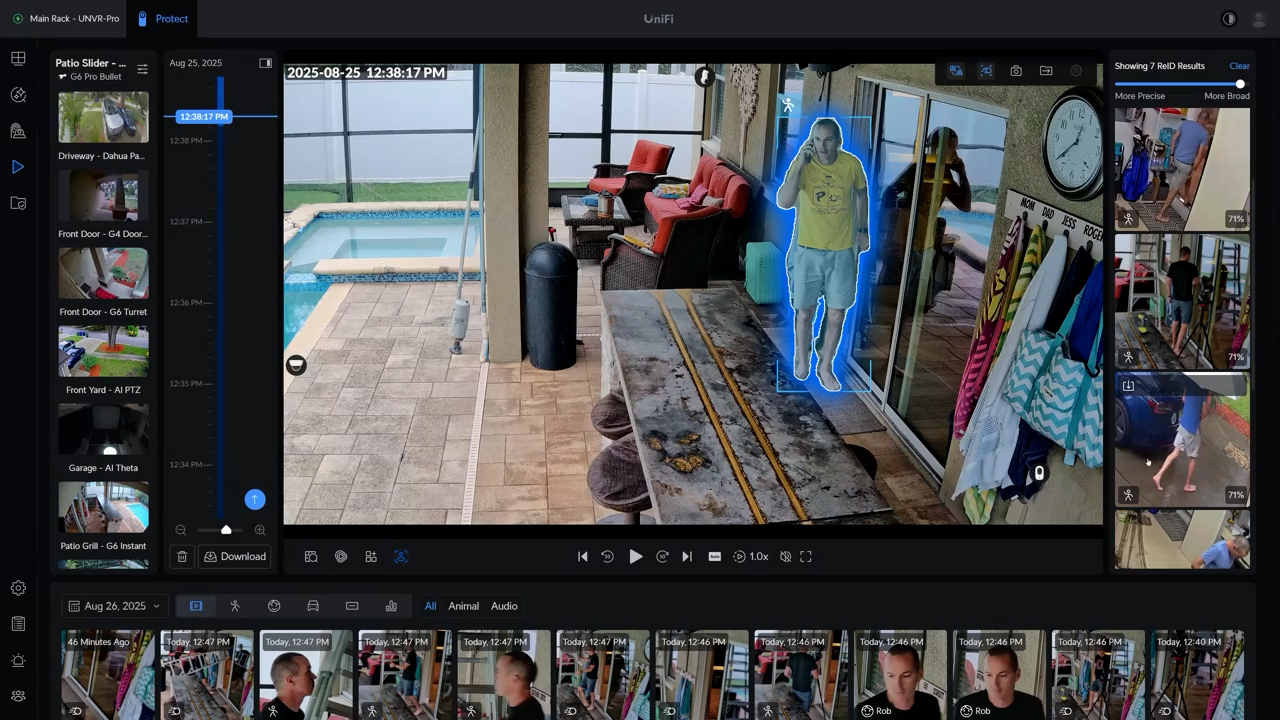
If you want to go one step further, UniFi also has a local AI processor called the AI Key that adds another level of detection to your Protect NVR. On the playback window you can use it by clicking Edge AI ReID, and it will scan the image for detection objects. Then you can click the object to search across all of your cameras for other times that same person appeared and you get a slider to change the confidence level to either show more or less results, which is pretty cool.
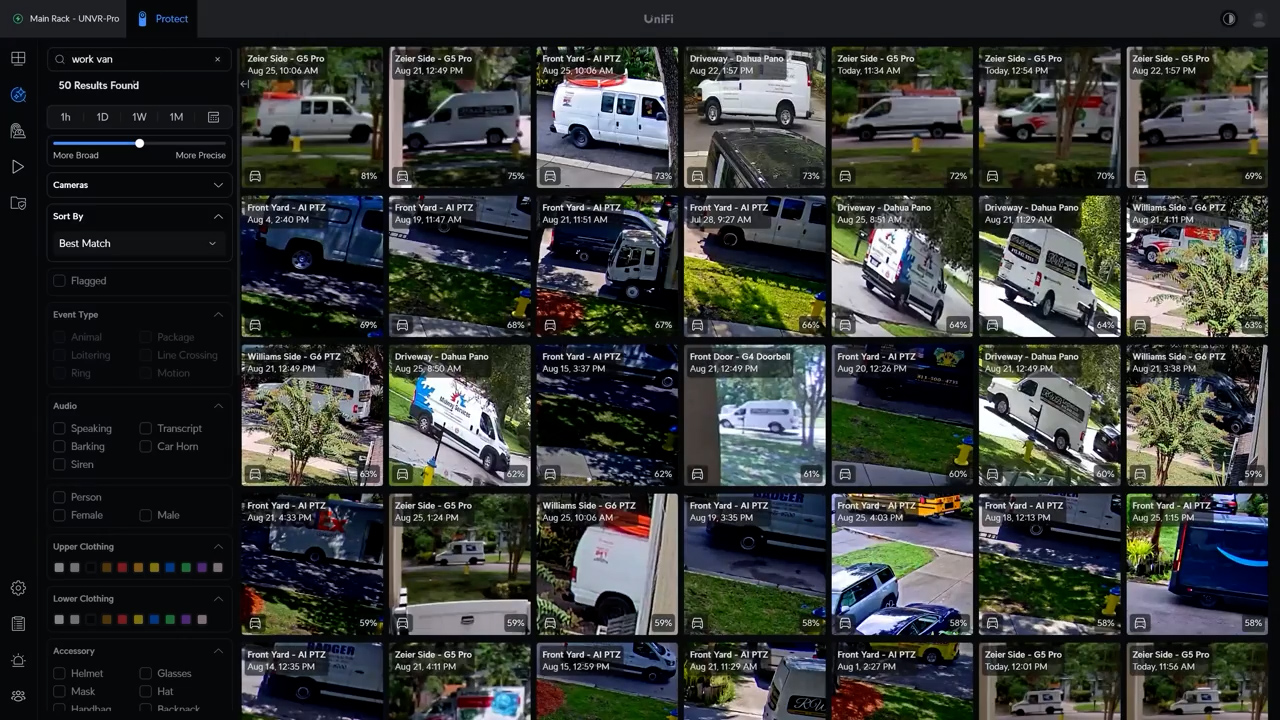
But the biggest feature that an AI Key adds is under the relatively new “find anything” tab, which gives you a bunch of options for narrowing down search criteria using things like helmets, glasses, backpacks, and clothing types. But you can also just skip all of that and use natural language in the “find anything” search bar and because the AI key generates a summary of what each image shows you can search for something like “work van” to parse through all the contractors who were in your area during the selected time period, all handled completely locally without any connection to the cloud. But that’s not even the most impressive part about the AI Key, because the real strength comes when you start to use it with Alarm Manager.
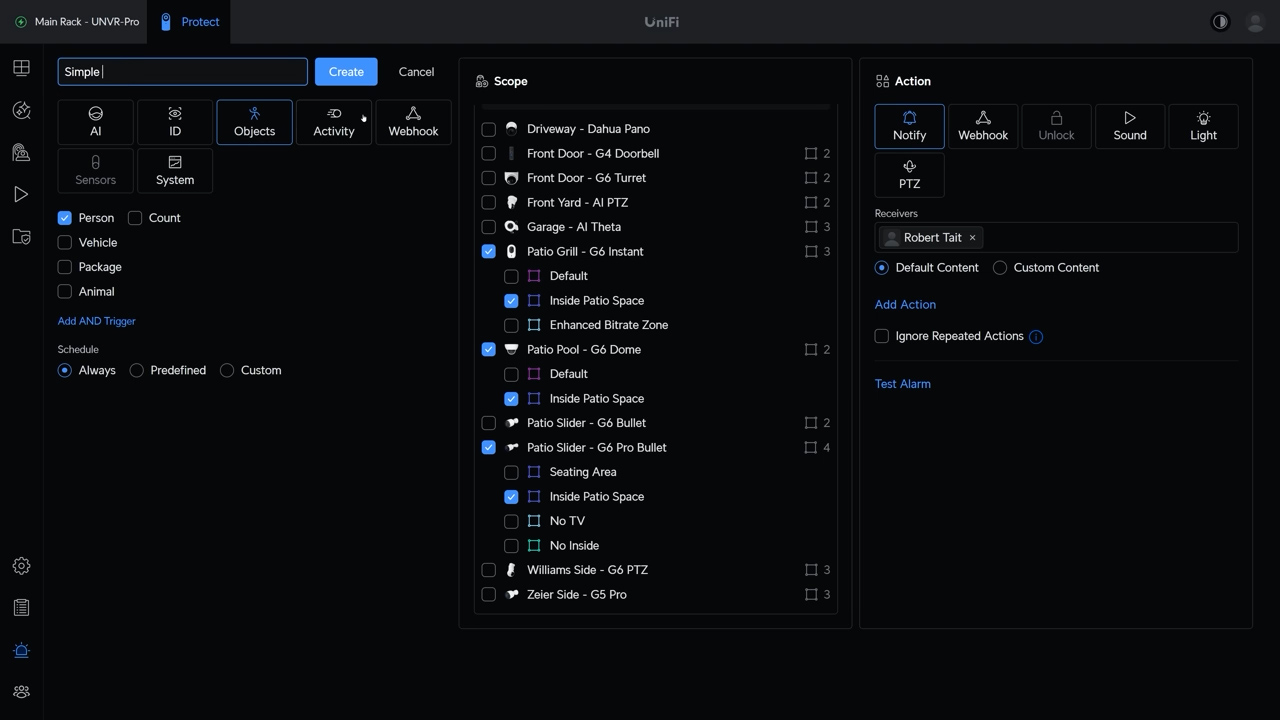
Alarm Manager
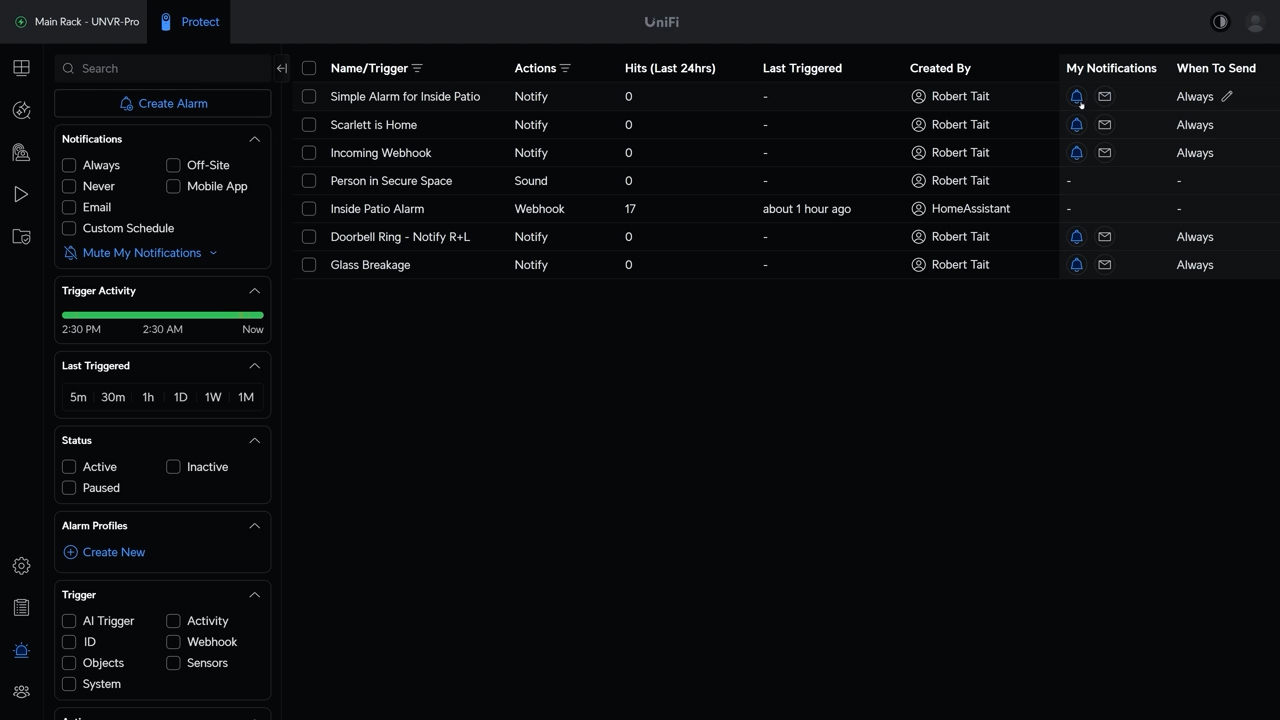
Alarm Manager is one of those things that looks really overwhelming at first but is actually pretty easy to use. If you’re not using any of UniFi’s starter alarms, I’d recommend just deleting them and making your own starting with something simple like sending a mobile notification when a person is detected in some secure zone that you’ve defined. First select Object -> Person as the trigger, then select your specific secure zone as the scope, and last select notify and all of the Protect users that should get notified for this specific zone. Then name your alarm and hit save. On the main page you can toggle both mobile and email notifications on and off and also define schedules and geofencing for each notification.
You can also get much more specific, and there are a lot of ways to accomplish similar alarms. Let’s say, for instance, I want to get a notification when my daughter comes home from school every day. One way I could do that is to set up a line crossing alert going from the walkway to the door, and then within 3 seconds it needs to detect my daughter’s face, and when both of those things are true it can send me a notification with the custom message that Scarlett is home.
You could also do it completely with AI and I could just type in “Scarlett with a backpack” and then dial in the precision to get an appropriate amount of accuracy, and then setup a schedule that only fires that alert after school gets out for the day, for instance between 3 PM and 6 PM.
If you’re a Home Assistant user, Alarm Manager also has the ability to interface with Home Assistant using both incoming and outgoing webhooks. For instance, I have an entity in Home Assistant called “exterior notifications” that activates while we’re sleeping and any time both my wife and I are out of the house. The current functionality is to send us a notification any time a door or window opens but using Alarm manager, I can add a notification for someone being inside our patio while the exterior notification switch is on in Home Assistant.
To do that I’ll create a new alarm, select objects, person, then define the scope as the zones that are inside the patio space, and for the trigger I’ll select webhook.
Then in Home Assistant, I’ll create a new automation with a trigger being a webhook, copy the webhook id, then go back to UniFi Protect, select custom webhook, and put in my Home Assistant url, /api, /webhook, and paste that unique webhook ID, and this alarm will send a webhook to Home Assistant any time a person is detected in that area.
But I only want to get a notification when the exterior notification input Boolean is on, so back in Home Assistant I can add a condition that exterior notifications are on, then add an action to send a notification via Home Assistant to my phone with a custom message, and even a live feed from the camera right in the notification window.
Home Assistant
That leads into the last reason UniFi Protect is so good these days, which is a rock-solid integration with Home Assistant where each camera has a separate entity for each smart detection type, a live view of each camera, and the ability to toggle almost every option on or off with automations.
For instance, I’m using my three patio cameras to determine if the patio is empty, and if someone forgot to turn off the fan on the pergola or the ceiling fan it will automatically turn those off after 15 minutes of no person detection.
I’m also using a similar automation in my garage to turn the garage lights off after two minutes if there are no people or motion in the garage.
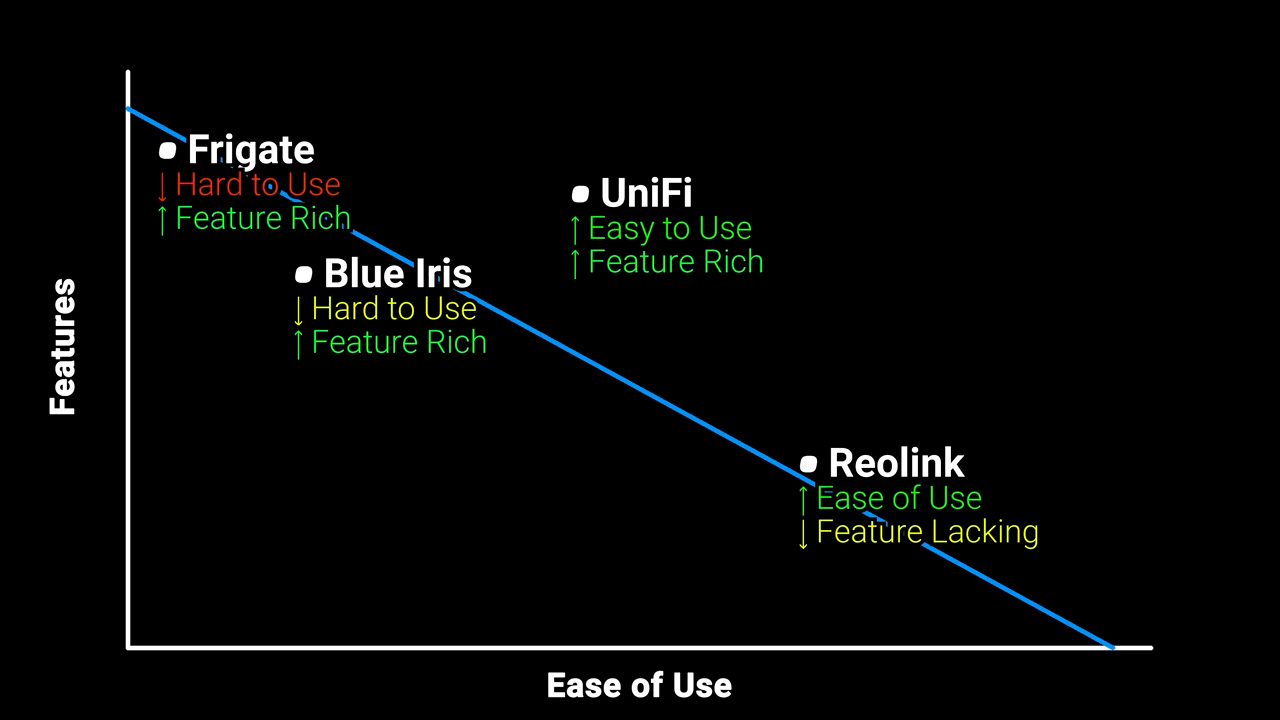
I want to be clear that I’m in no way saying that UniFi Protect is the only way to accomplish all of these things, but what I am saying is that compared to Blue Iris, Frigate, and Reolink which I’ve also used fairly extensively, UniFi Protect has just the right balance of user friendliness and features to be able to accomplish everything I want without troubleshooting every few weeks.
If you are coming from Blue Iris, I still have a few nitpicks with the UniFi Protect web interface like the inability to change window sizes to accommodate panoramic resolutions or hallway orientations, and I have never understood why they make you use the little box in the bottom corner to move around a zoomed in image instead of just clicking on the screen, but ultimately those are super minor things and overall I’ve been extremely happy with the change.
As always, I don’t make sponsored content on this channel, but if you’re interested in picking up any UniFi gear I’ve got links for the stuff I’m using below, and as always, I appreciate when you use those links since as an affiliate I do earn a small commission on the sale at no cost to you.
I’d also like to thank all my awesome patrons over at Patreon for their support of my channel, and if you’re interested in contributing please check out the links below. If you enjoyed this video, please consider subscribing to my YouTube channel and as always, thanks for watching The Hook Up.