Hidden Home Theater Setup
November 5, 2021Today on the hookup I’m going to show you how I built this automated home theater in my family room that sets itself up or hides itself away at the touch of a single button.

I wouldn’t say that I live in a small house by any means, but I also don’t have a whole room that I can devote to a home theater, and even I did, I’m not sure that’s what I would use the extra space for. That said, I love movies, and watching them on a projector just feels different than a TV. So I wanted to add a projector, and screen to my existing space that’s already jam packed with my desk, my daughter’s desk, a TV and a couch.
Oh, and I wanted it to blend in completely when not in use, so no projector hanging from the ceiling, no loose wiring, and no screen on the wall. Also, I wanted the setup to be completely automated, making it possible to seamlessly switch from watching the TV to watching the projector with the push of a single button, so let’s talk about how I did it!
The screen was the first part of the puzzle, and because I didn’t want it to be visible all the time, my two options were to mount it in the ceiling, which I admit would have been awesome but a little out of my comfort zone, or get a floor rising screen, which is much easier to install and use.

I ended up going with a 120” motorized ambient light rejecting or ALR screen from Vividstorm, that comes in a bunch of different screen styles depending on what type of projector you are using. The most effective ambient light rejecting screen material is specifically for use with ultra short throw projectors and it basically works because the light from an ultra short throw is comes from an extreme low angle.
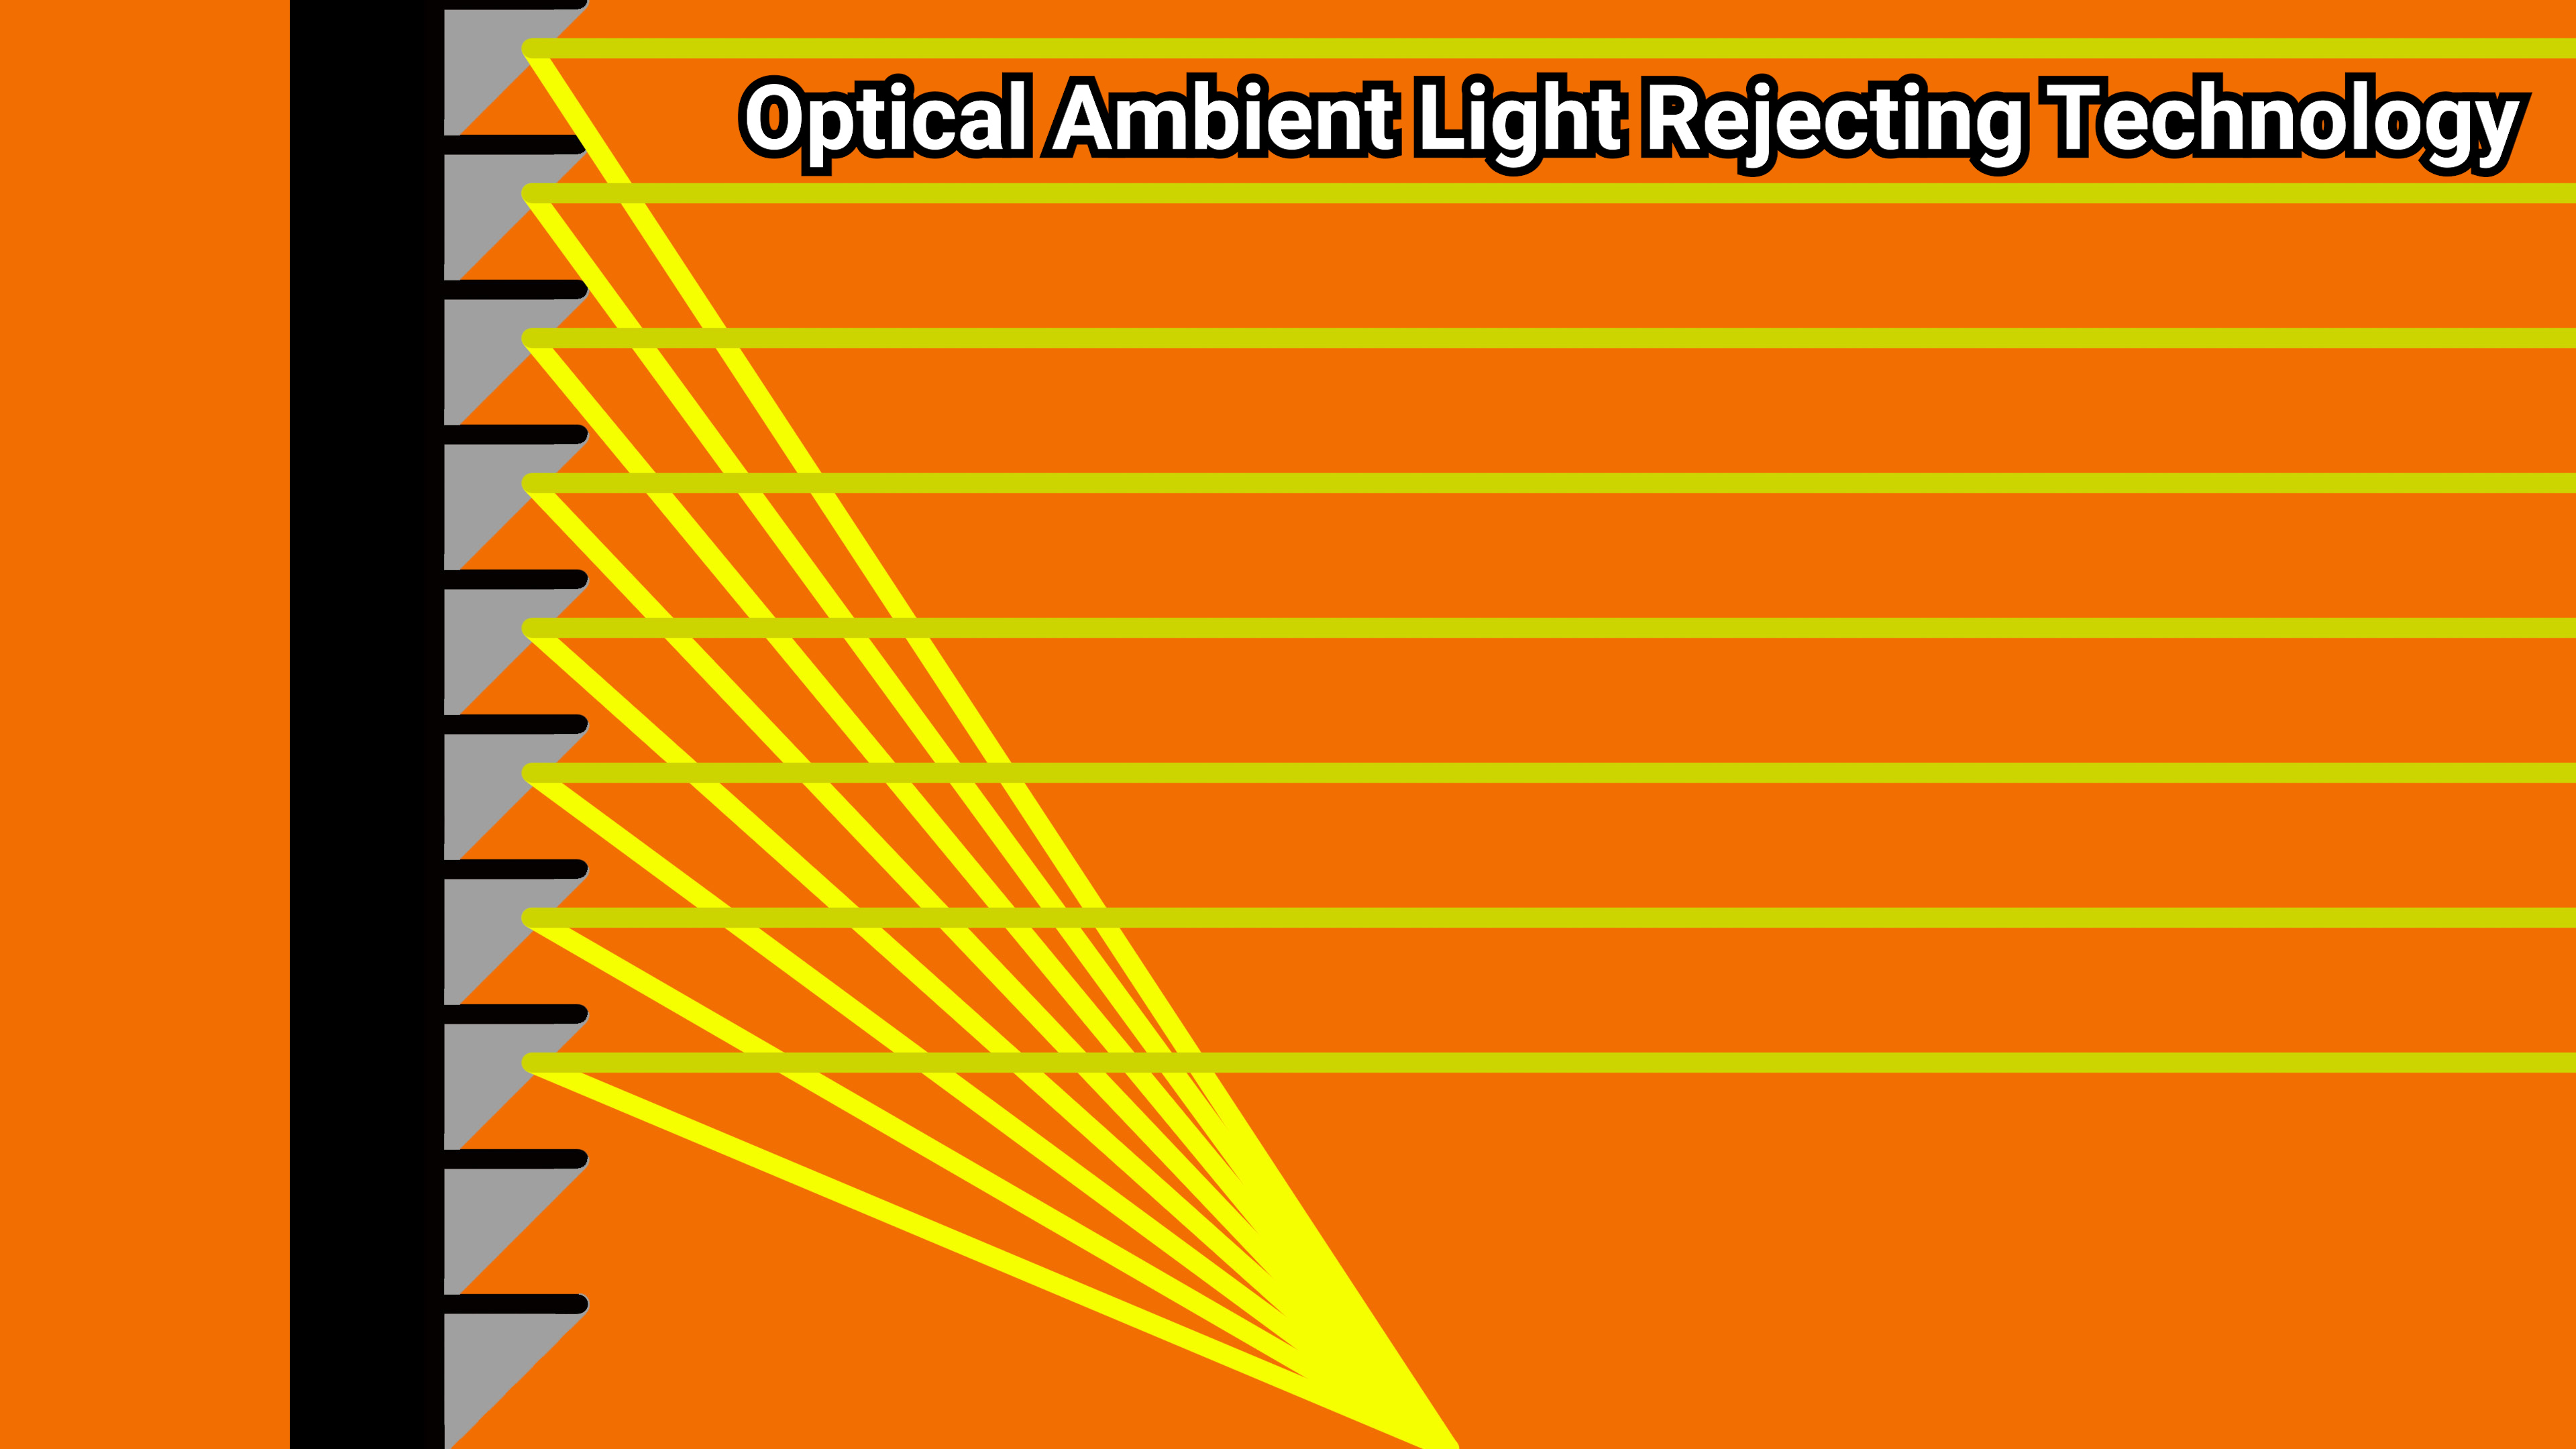
That means it’s possible to engineer the screen material to only reflect light back that comes from the below, and reject light that comes in from other angles like from ceiling lights or your windows, these types of screens are called optical ALR and only work with ultra short throw projectors.
There are also ALR screens that work for standard throw projectors called contrast based ALR, but they essentially work by lowering the overall brightness of the image by a specific amount which helps to cancel out any less concentrated light. Because of my youtube channel, this screen is going to be pulling double duty as a screen for entertainment, but also for testing a full range of different projector types so I opted for a contrast based ALR screen instead of one designed specifically for ultra short throw projectors, but here’s a sample of the difference you could expect during the day, and then at night for contrast based vs optical ALR material.

The vividstorm screen casing is black metal which might have been fine by itself, but I wanted it to blend in a little better, so I built a wooden cover for it and stained it to match the rest of the entertainment unit. After mounting the screen to the top of my existing furniture, you can see that I was able to position the screen so it’s far enough back to be out of the way, while still clearing my wall mounted TV on the way up and down.

The motorized projector screen comes with its own remote, which luckily uses standard RF433 protocol so it’s really easy to automate using off the shelf solutions like the broadlink RM pro and sonoff RF bridge, which then enables you to add them to your amazon echo or google home devices. If you’re a home assistant user like me, I’d highly recommend picking up a sonoff RF bridge and adding tasmota to it, which can then basically control any RF device when using the special portish firmware.
If a separate bridge is too much hassle or you don’t already have a home automation hub, you can also get an accessory plug from vividstorm that monitors power draw for you projector to figure out when it’s on or off and then raise or lower the screen accordingly. I’ll talk more about my specific automations in home assistant later on in this video though.
Next was the projector, and an ultra short throw was definitely the way to go for me since I wanted an out of the way setup with no ceiling mounts or visible cables. However, something that most people don’t aren’t talking about when it comes to ultra short throw projectors is that even though they can make a large screen from a short distance, it’s not an infinitely short distance and most of the time, its going to require you to pull your furniture away from the wall to get the size screen you want. You can see that even in the official installation video for the Epson LS500 they needed to pull the entertainment console over 16 inches off the wall just for a 100” screen, so it would need to be even further out for a 120” screen…

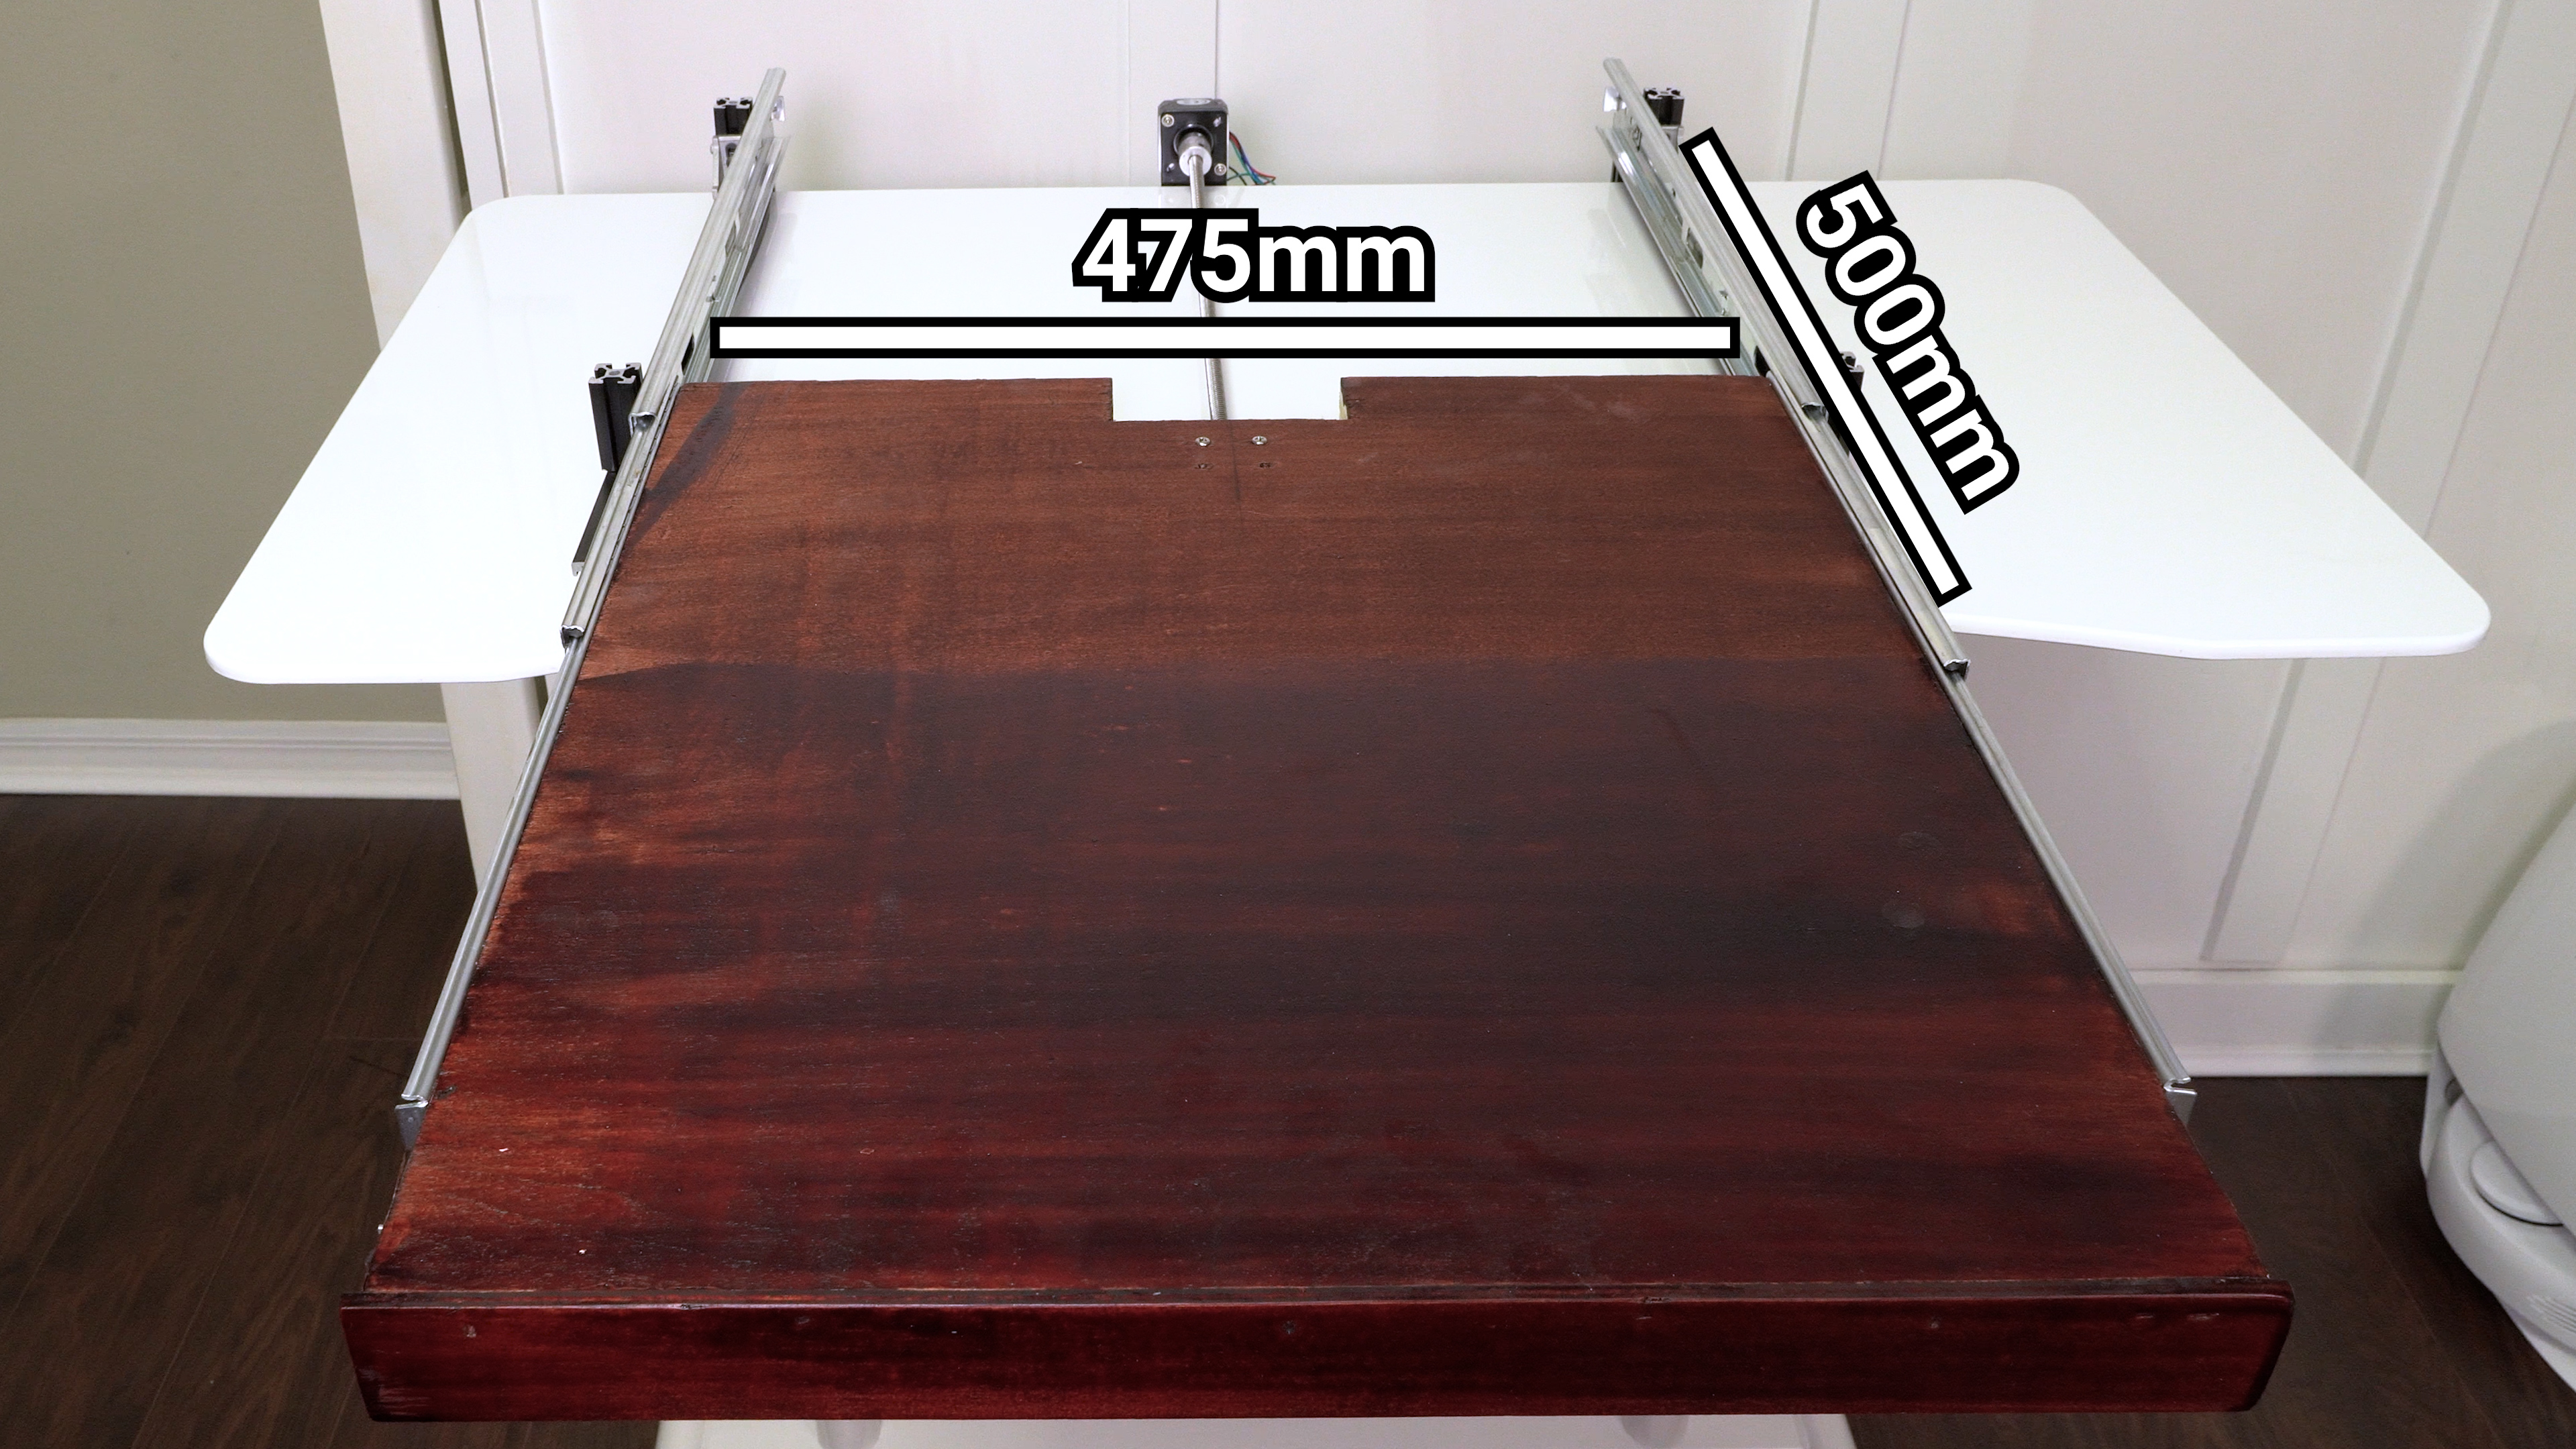
This was going to be compounded even further by the fact that my screen isn’t mounted to the wall, but instead sits 6 and a half inches away from the wall, meaning my projector would be sitting about 2 feet off the wall… and that definitely wasn’t going to fly with me, so a motorized shelf seemed like an obvious solution.
If you’re not into DIY stuff you can actually buy furniture with one of these projector slides built in for the low low price of $16,260, or just the shelf for $2600, but both of those were well out of my price range, so I built one for about $150. If you’re interested making one yourself, make sure you are subscribed because a full how to video for that is coming up in about a week.
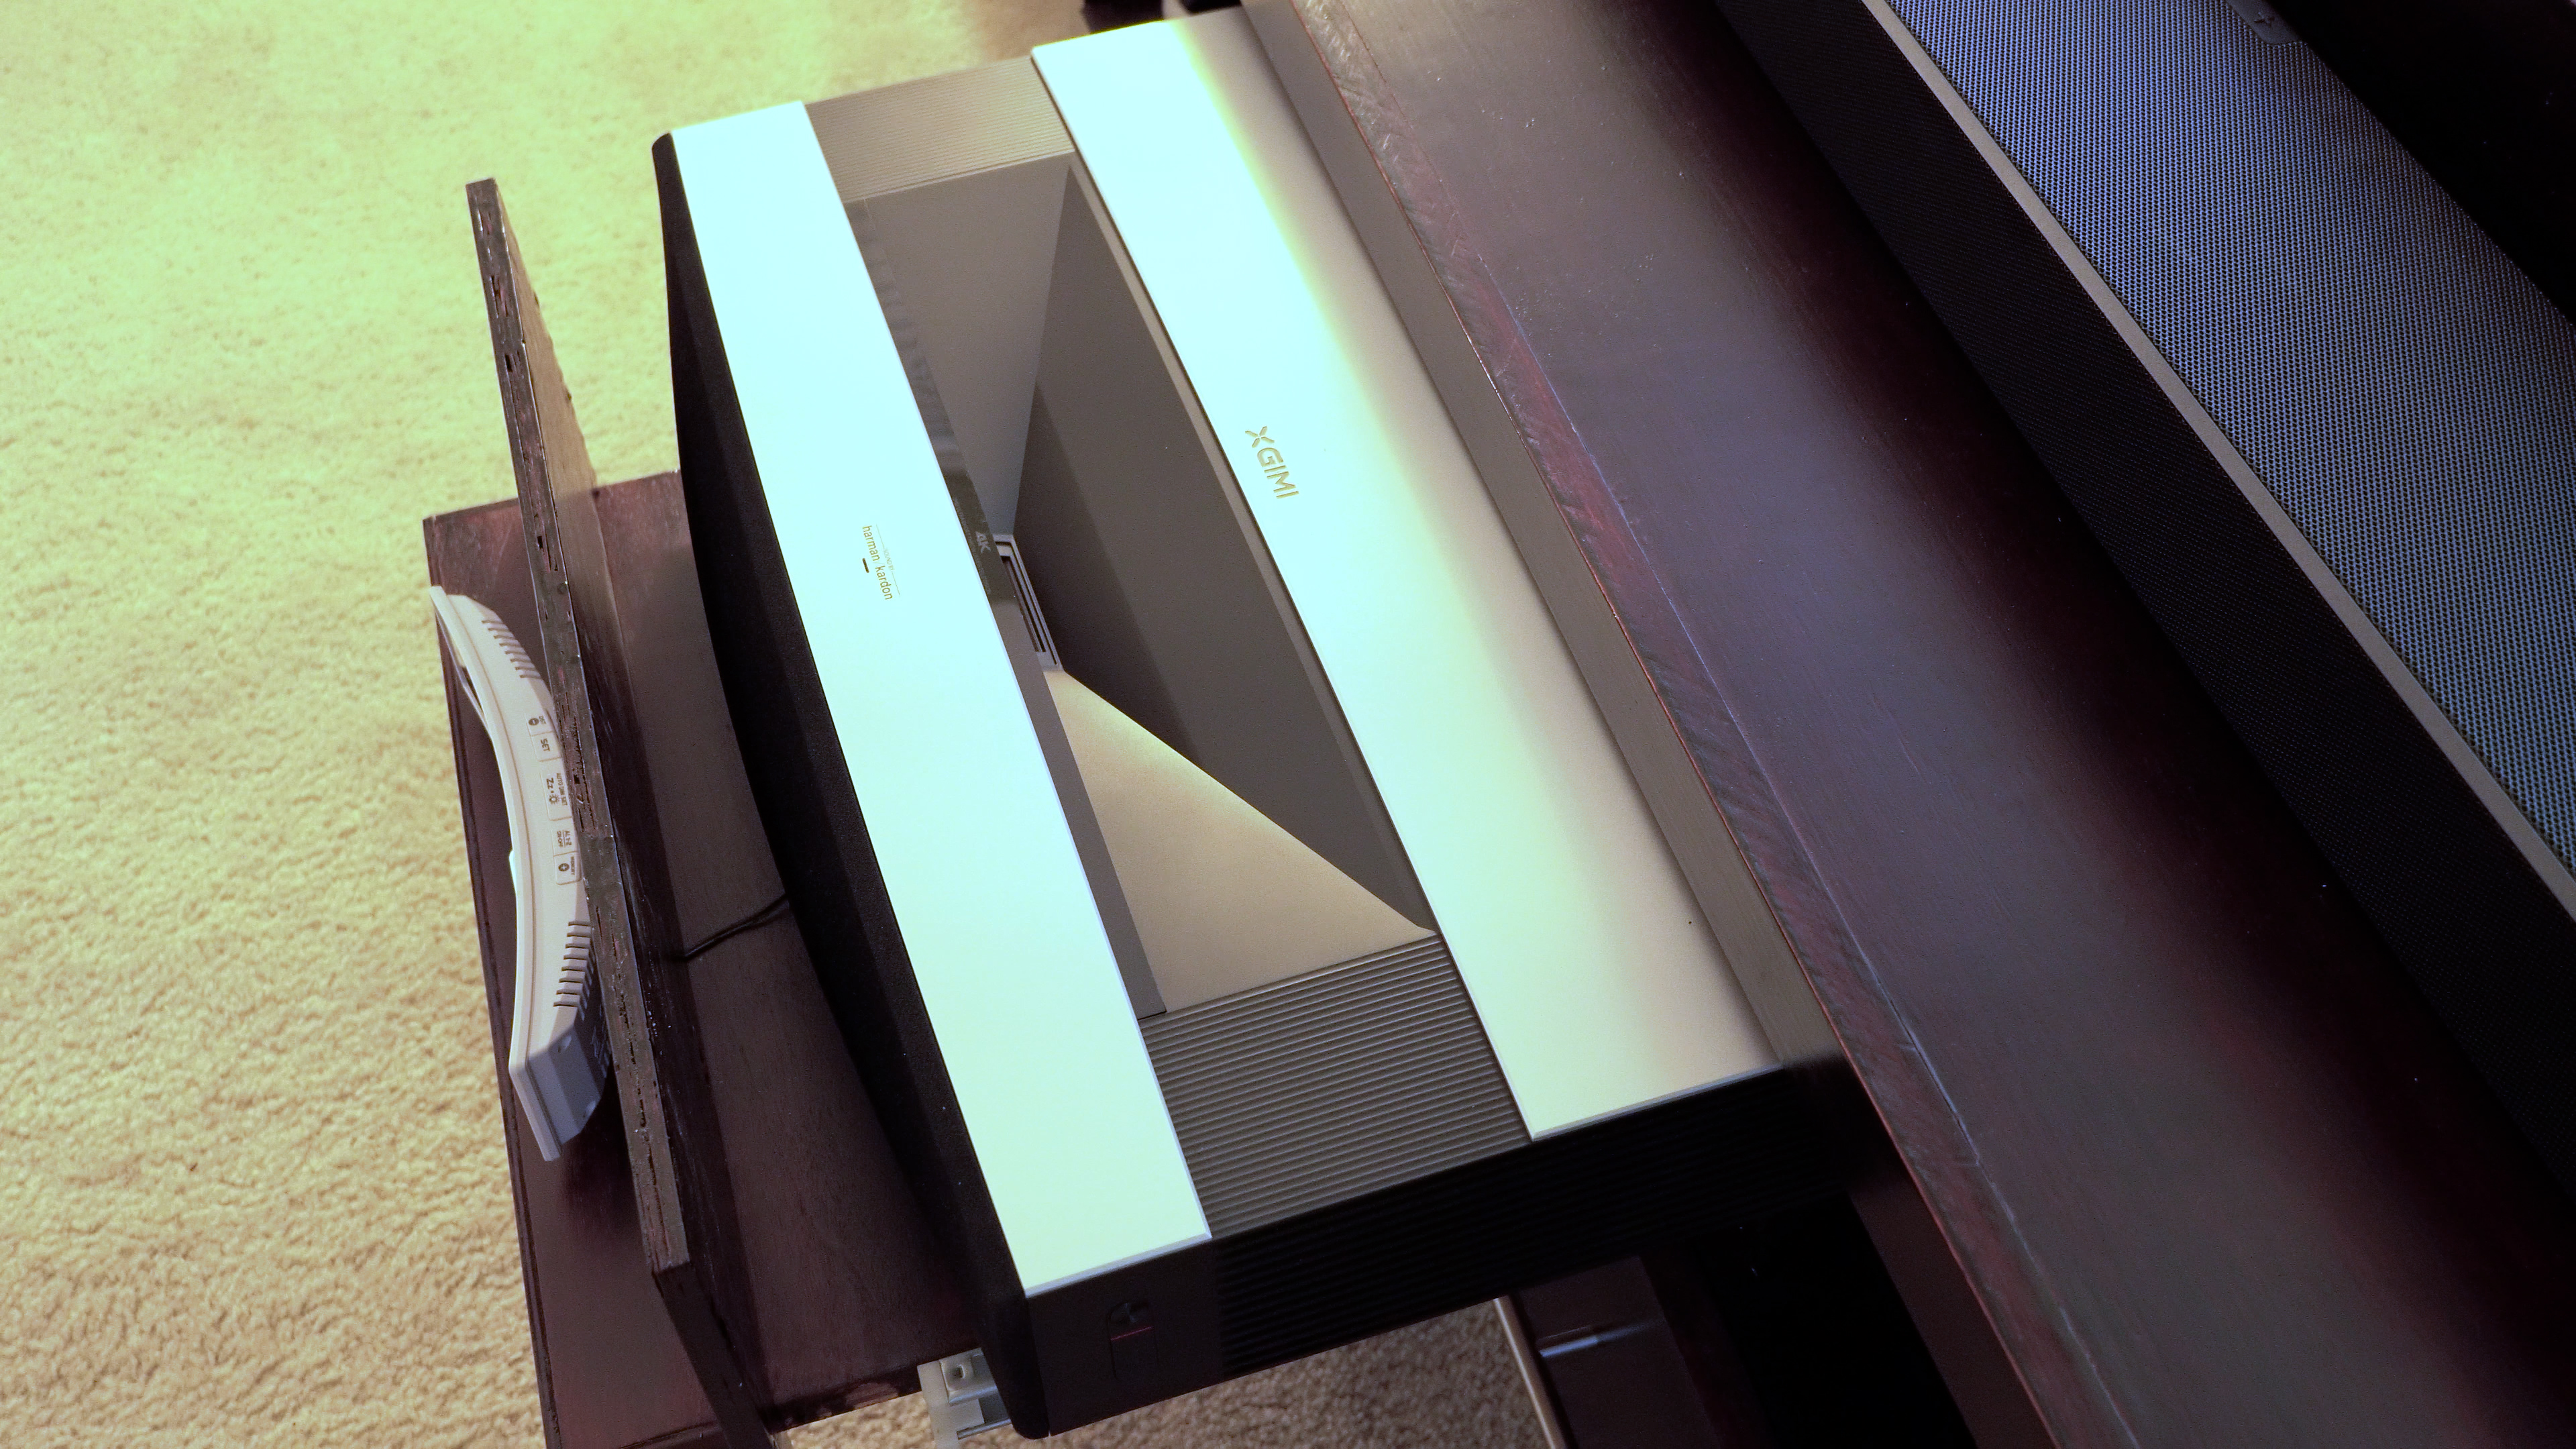
But basically, I used a set of full extension drawer slides paired with some 3d printer parts to create sturdy motorized drawer that always pulls out to the exact same point, so I don’t have to mess with projector angles and keystoning every time I want to use the projector. Also, because the projector I’m using, the Xgimi aura has a dedicated focus button on the remote, I can program different stop points corresponding with different screen sizes, and adjust the focus right from the remote.
Speaking of the projector, the Aura from xgimi will probably be my replacement for my Epson LS300, which I’ve decided to sell after figuring out I was never going to be able to play my Nintendo switch on it due to the unbearable screen latency. Mario cart was maybe tolerable, but platformers like ultimate chicken horse were completely unplayable due to the input lag. Xgimi sent this sample unit of their new Aura ultra short throw projector to test out and not only does it have 4k resolution, and just better performance in general, for only a slightly higher MSRP, it also has a dedicated gaming mode that reduces input lag so much that I can’t tell the difference between my LG OLED TV and the projector. It also addresses my wife’s biggest issue with the LS300 which was the high fan noise when using anything over 75 brightness. When compared to the LS300 the fan in the xGiMi aura is basically silent at any brightness.
Unfortunately, I need to send this projector back to xGiMi when I’m done testing it, but so far it’s got absolutely everything I could want and is currently at the top of my list for replacing my LS300.
Both the aura and LS300 run androidTV, so after enabling development tools, they can be easily added to home assistant to monitor their state. That means I can automate the motorized shelf and screen based on whether the projector is on or off. A simple automation watches the state of the projector and if it goes from off, which home assistant sees and unavailable to any other state then, home assistant sends the RF command to the projector screen and the correct position command to the motorized drawer. The opposite automation watches for the projector to turn off and then rolls down the projector screen and closes the drawer.
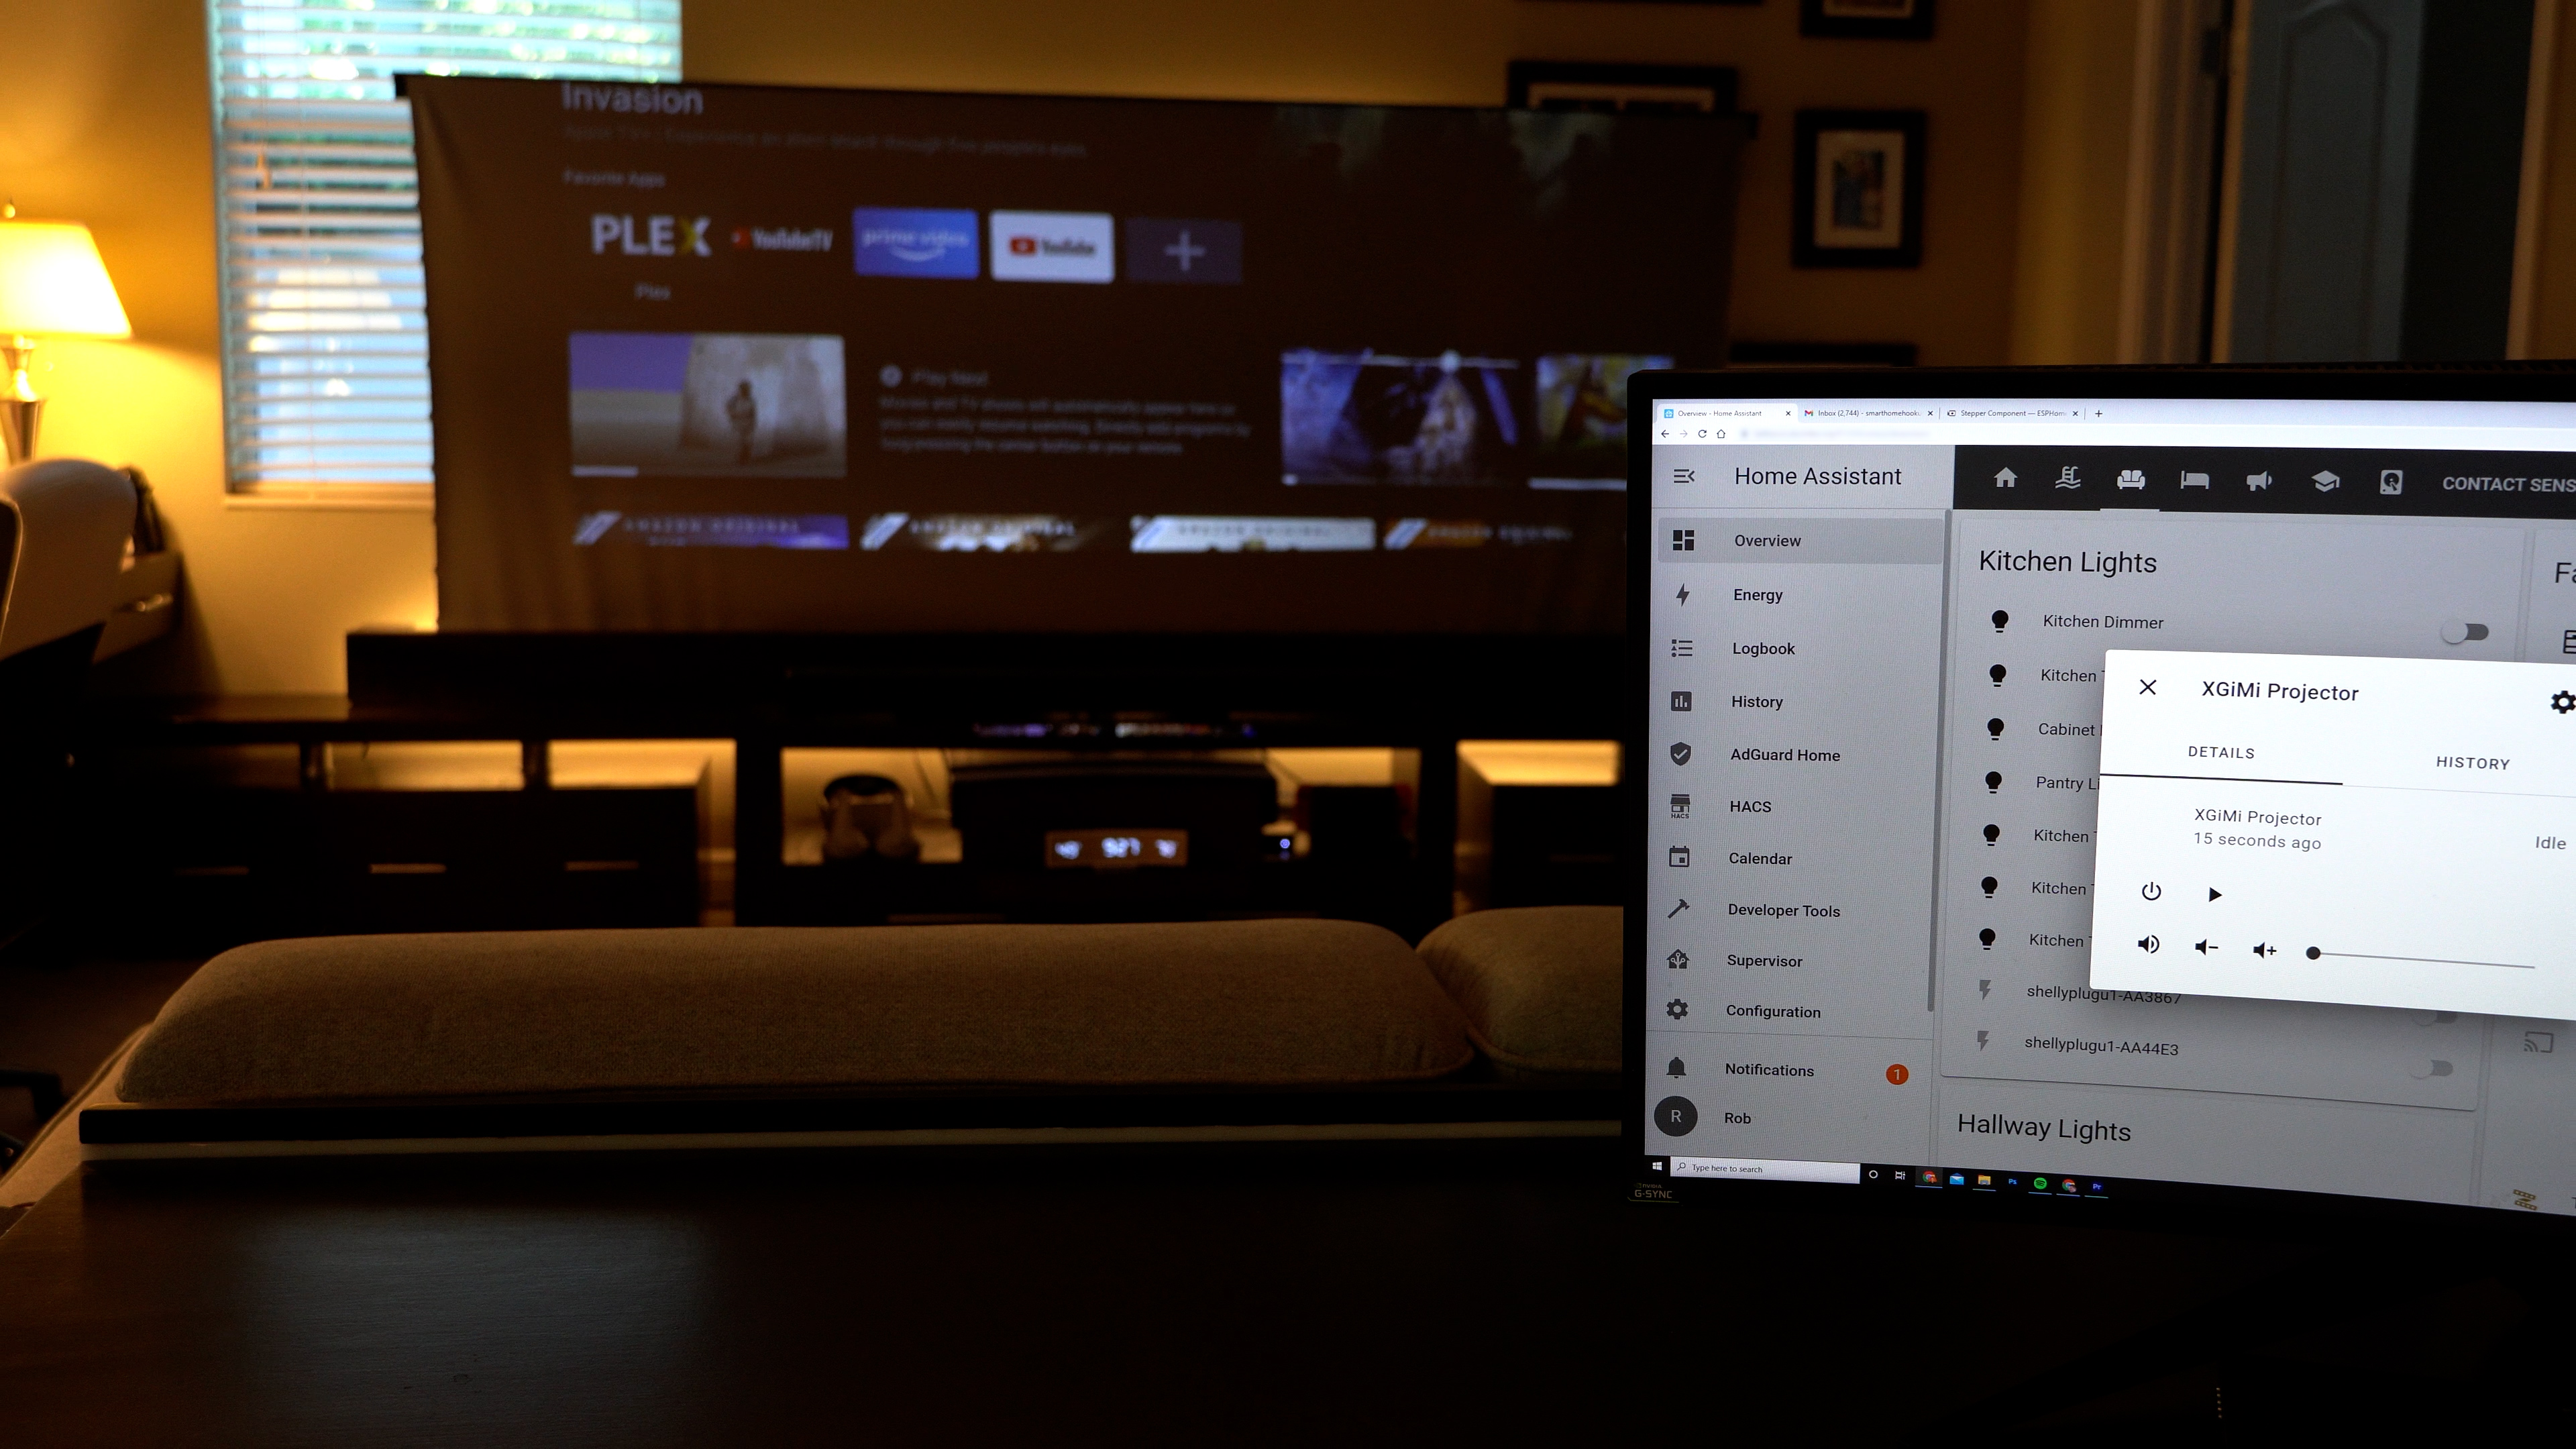
The next thing to tackle was the video signal, and the goal was to be able to start watching something on the TV and be able to seamlessly switch to the projector, without stopping and starting apps, changing interfaces, or using different remotes, just one button and you’re done. To accomplish this I’m using an HDMI splitter that was recommended by Chris MajesTech, the gofanco prophecy. The wiring works like this: Since I only use two devices in my house, either the appleTV for watching shows, or the Nintendo switch to play games, I run each of those devices into the soundbar, then out of the soundbar a single HDMI cable goes out into the splitter which then outputs up to four split signals. I’m using one of those outputs for the TV, and one for the projector. This is also my preferred setup instead of using an audio return channel because I know that the sound is going to come through exactly how I expect without using an audio return channel and worrying about different HDMI versions and passthrough modes.

Also, since I got the 4 channel gofanco prophecy I had extra HDMI outs and I used one of them to run hyperion on a raspberry pi for the ambilight effect which takes whatever is on the screen and replicates it on the TV bias lighting LEDs for a more immersive experience. The gofanco is perfect for this because it automatically downsamples 4k to 1080p and converts HDR to SDR so that the capture card on the raspberry pi doesn’t need to. If you’re interested in a full walkthrough of hyperion setup I’d recommend the tutorials from either chris at majestech or louis over at everything smart home, both are great and will get you up and running in now time.
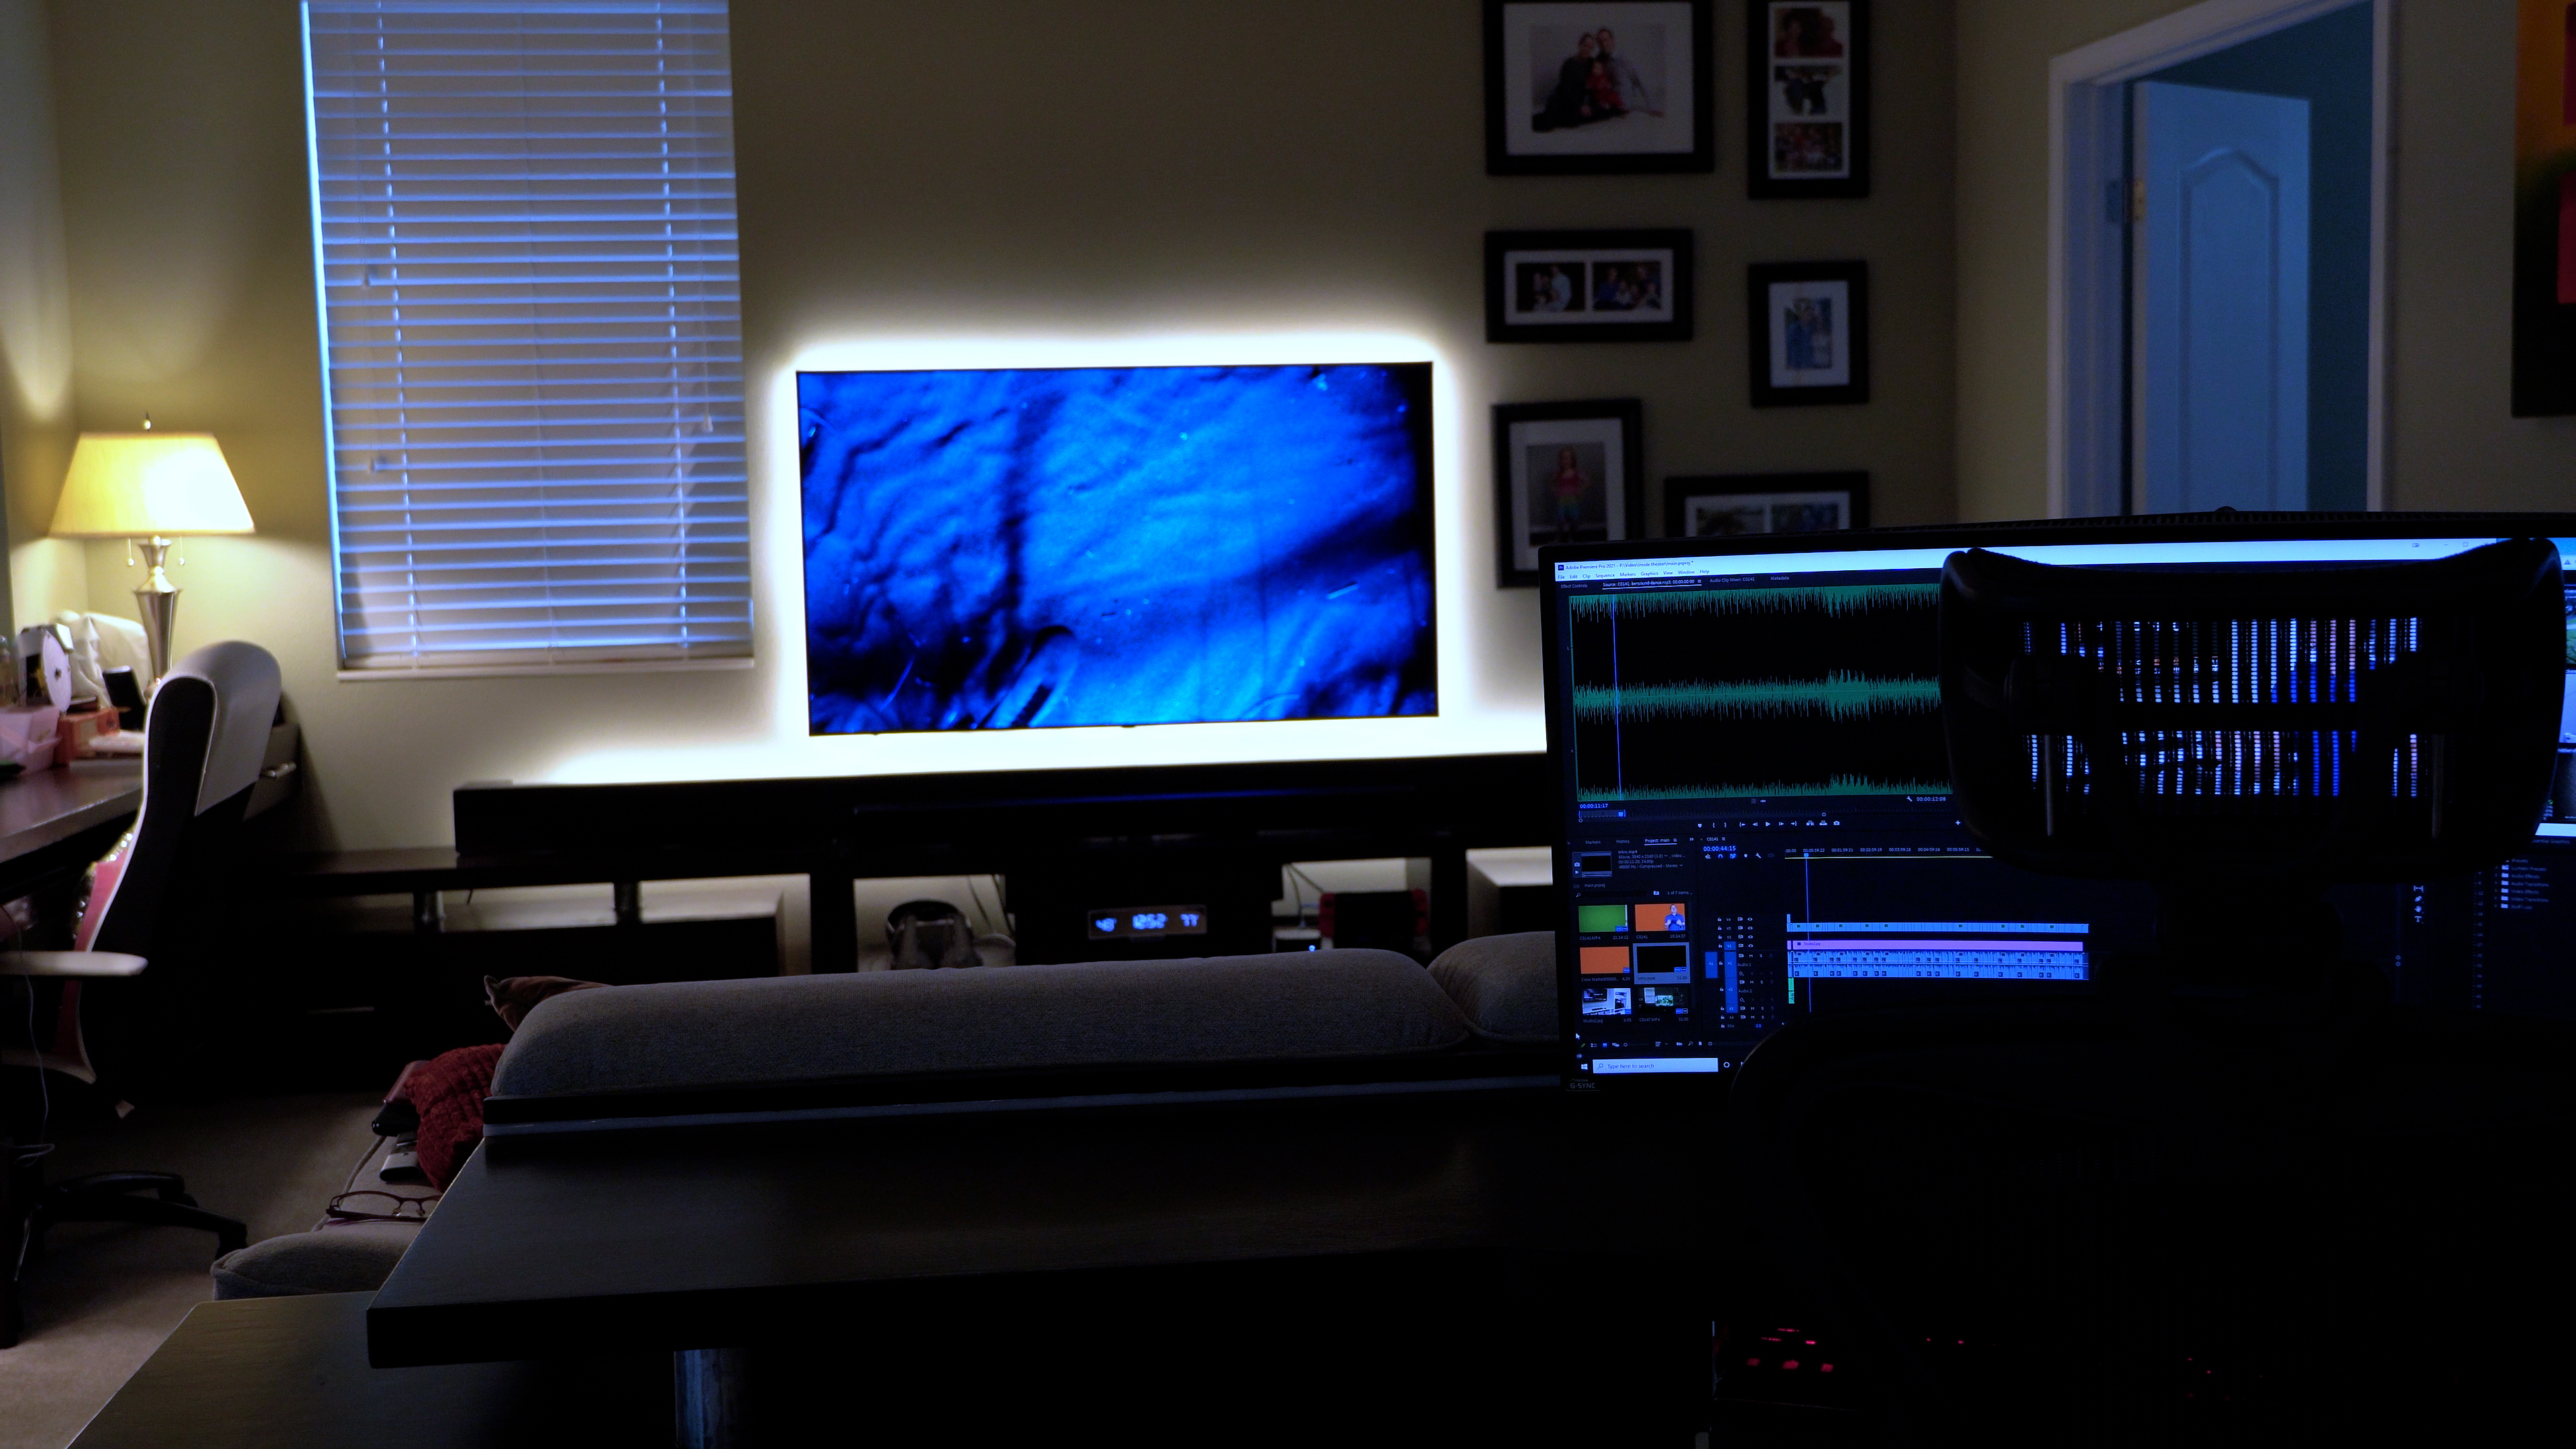
Speaking of LEDs, I’m using a newer kind of addressable LED strip behind both the TV and the projector, 12V SK6812 RGBW strips. The upside to using 12V is that I don’t need to do any power injection to keep color accuracy, and because they are RGBW strips they produce a nice true white when not in RGB mode. Unlike 5V SK6812s these are controlled in groups of 3, so your animations won’t be as high resolution, but in practice because they are being used for indirect light, you can’t really tell the difference. I’m controlling them with WLED running on QuinLED DigQuad with the new ethernet ESP32 board which not only means the reaction time to turn them on and off is instant, it also means that sending ambilight data from the raspberry pi to WLED is perfectly in sync with what is happening on the screen.
Sound is the last part of the puzzle and something that I’ve really struggled with. I know there is a whole group of people out there that will tell you a sound bar will never give proper sound for a home theater, but even though they might be right, I don’t want to believe them. Last year I got a killer open box deal at best buy on Samsung’s Q90R soundbar, sub, and surround sound speakers and I’d love to tell you that they are great, but in my experience they are mostly just OK, with the biggest issue being that it introduces a slight audio delay in any source that comes into it so I can’t use it for Amazon echo whole home audio, and if not calibrated properly, there are lipsync issues on both the projector and the TV. There is a custom integration to add it to home assistant which works most of the time, but overall my experience with it has been lackluster and I’m not sure I’d recommend it to anyone. I’ve been thinking about trying out the Sonos Arc but the price for the soundbar, surround speakers and sub is holding me back, let me know in the comments if there’s a better solution that won’t look out of place in my main living area theater room.
Aside from the occasional audio issue, overall I’m extremely happy with the outcome of my stealthy automated theater room, and I’m more than happy to share my experience with any of the devices that I showed here today, so feel free to ask any questions in the comments section. As I said, I’m working on a video right now with a full how to for building the motorized shelf, but building it in a way that is easy to replicate and modify with limited tools, and limited coding has taken a bit longer than I expected. I’ll probably have that video done within a week though, so make sure you’re subscribed if you’re interested in that.
Thank you so much to my patrons over at patreon for your continued support of my channel, if you’re interested in supporting please check out the links down in the description. If this video gave you some ideas for your own home theater please hit that thumbs up button to show your appreciation. If you enjoyed this video please consider subscribing, and as always, thanks for watching the hookup.