Save money by automating your EXISTING water heater (using a contactor) | #EnergyChallenge
April 22, 2022For Earth Day 2022 I teamed up with other smart home YouTubers to participate in the 2022 Energy Challenge where we’ll be showing you how to reduce energy consumption using smart home technology. Today on the hookup we’re going to take a surprising look at the largest energy consumers in a typical house, I’m going to show how to safely automate high power devices using something called a contactor, and after that we’ll tabulate the data and see exactly how much energy and money we were able to save.
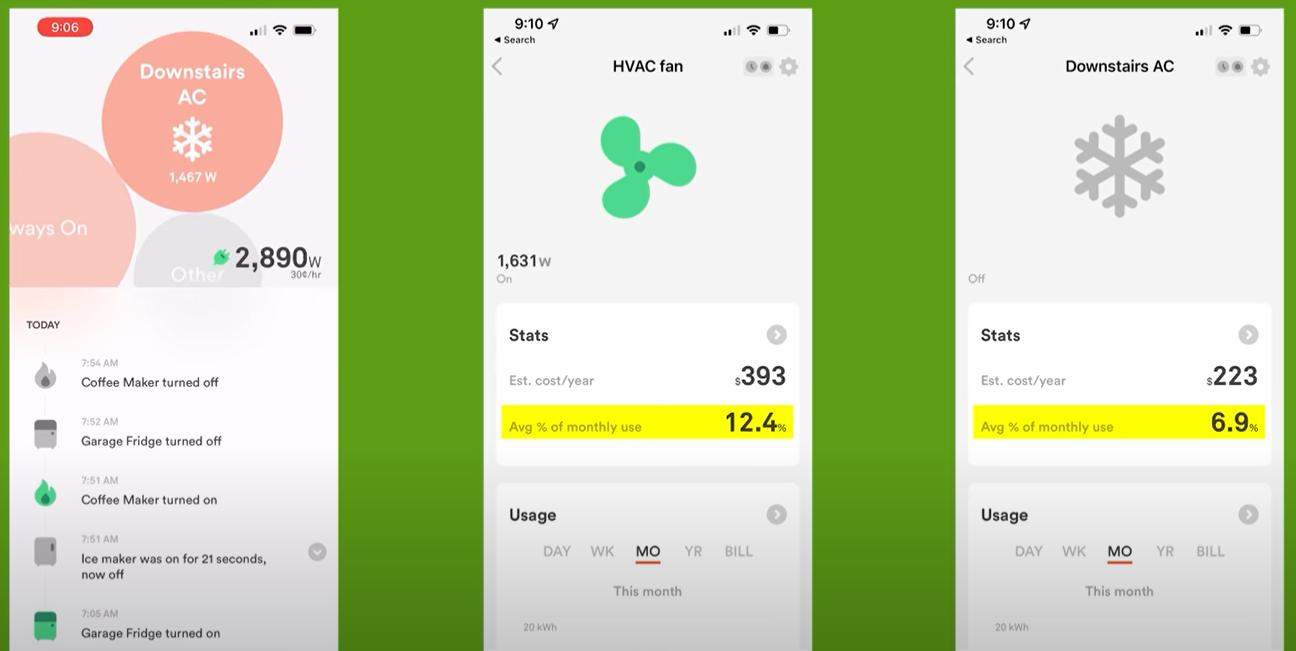

Step one in reducing your energy consumption is figuring out what consumes the most energy. Living in Florida I would expect a large portion of my energy usage to be Air Conditioning and using the Sense energy monitor I was able to confirm that it accounts for a little under 20% of my average monthly usage, which is a lot but not quite as much as I expected. After that It’s common for people to talk about turning off the lights to conserve energy, but with LED technology it’s a bit less impactful, and in my house I only have around 500 watts of lighting in total, and on average we only use around 150 watts of that, which is surprisingly low.
But you know what isn’t surprisingly low? According to the sense energy monitor my water heater accounts for over 10% of my home’s energy usage, that means that just heating the water for 3 showers a day uses an average of around 9 kWh, and when the water heater turns on it pulls over 4500 watts.
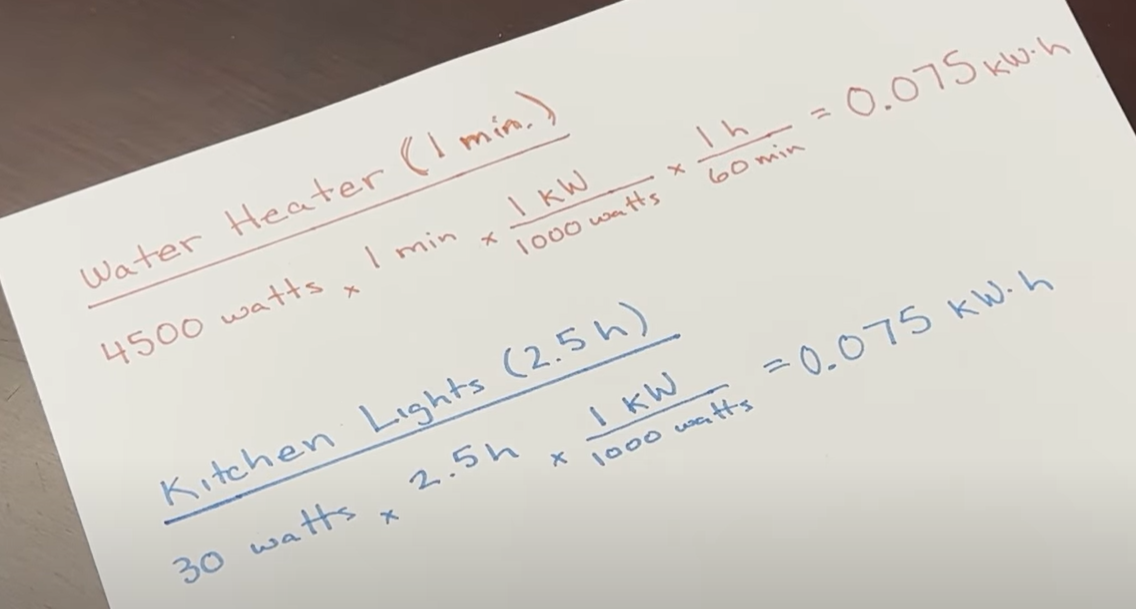
To put that in perspective, my water heater uses more energy in 1 minute than my kitchen lights use in 2 and half hours. If I can reduce the amount of time that my water heater runs by just 36 minutes a day I can completely negate the typical energy usage of the lights in my house. If you’re not from the US you might be shaking your head right now saying “yeah, no kidding” since it’s common in other countries to turn water heaters on and off but typically, here in the US, water heaters are direct wired and run 24 hours a day 7 days a week. So with that said, there are three goals for this video: First will be to show you how to safely add smart functionality to a high current device like a water heater, second I’ll show you how I automated my water heater’s schedule to reduce unnecessary energy consumption, and third, we’ll take look at the actual energy impact of those automations and determine how long it will take for this project to pay for itself. Lets get started.
In the US water heaters are typically 240v split phase and are generally not wired with a neutral. That means that at the water heater itself you’ve got a black wire that is one phase of your 120v supply and then either a white wire or red wire that is 120v on the other phase. If you’ve got a white wire it will probably be wrapped in black electrical type to signify that it is a hot wire and not neutral.
My water heater is 4500 watts, which at 240v would be 18.75 amps, but in the Sense app I’ve seen that wattage spike as high as 4800 watts, which would be 20A. For that reason we’re not going to rely on any smart switch or relay to pass all that current because even if was rated for 20A, you really shouldn’t use them continuously at their full rating. Instead, we’re going to use a contactor which is basically a high current heavy duty relay, and we’ll control it using an inexpensive wifi relay called the shelly 1pm.

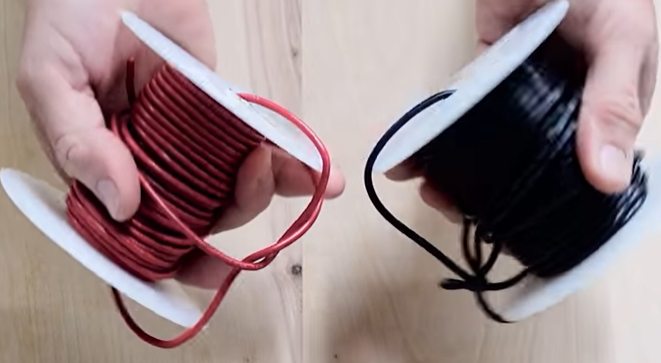
Some other supplies that I used are a UL rated metal electrical box, a premade wire whip with 10 gauge wire, some lower gauge red and black wire, and some miscellaneous wire connectors.
Amazon links for the exact parts I used are down in the description.
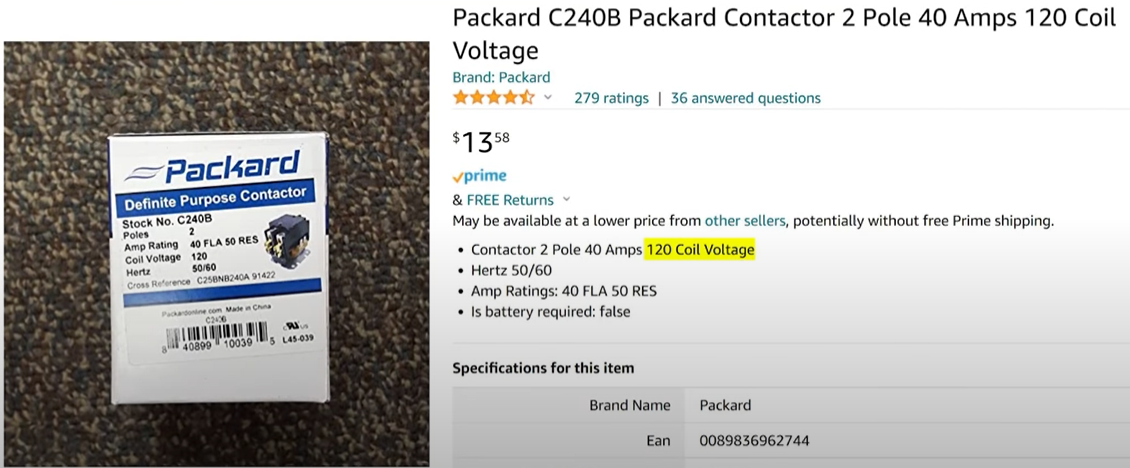
Here’s the basic rundown of the wiring and how the contactor works. On one side you’ve got big terminals for your supply voltage, and on the opposite side more big terminals for your output. The other two sides have terminals that power an electromagnetic coil that is used to turn the contactor on or off.
You can see that on this contactor the coil voltage is 240v because that’s what we have available to us at the water heater, but if you were automating a high current 120v device you’d want to get a 120v coil instead.
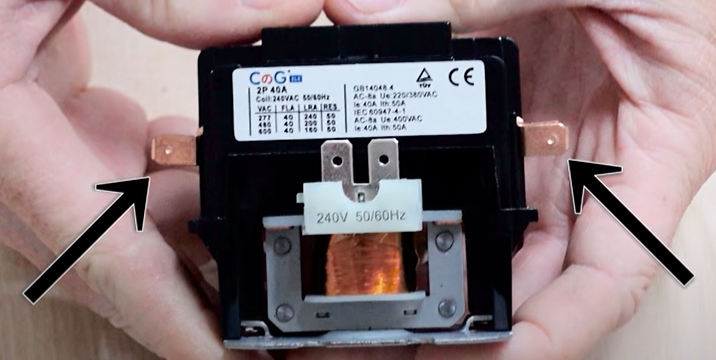
These copper terminals on either side are sometimes called accessory terminals and they allow you to run other lower current devices off of either the supply or output voltage, and we’re going to use them
to connect our shelly relay.

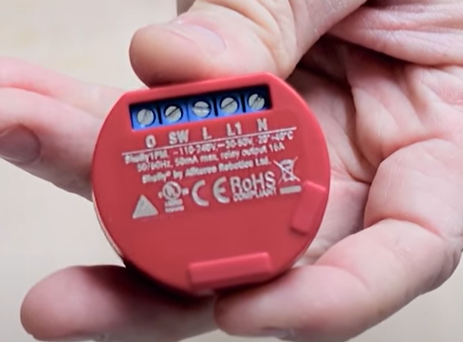
To wire it up the supply voltage comes in with 120v on each wire and connects to one side of the contactor in the big screw terminals. Then we’re going to use the accessory connectors to power our Shelly 1PM by hooking up the black wire to L1 and the red or white wire to N, do not connect the red wire to L2 because they are internally connected in the shelly and would result in a 240V dead short, a blown circuit breaker, and a dead shelly device.
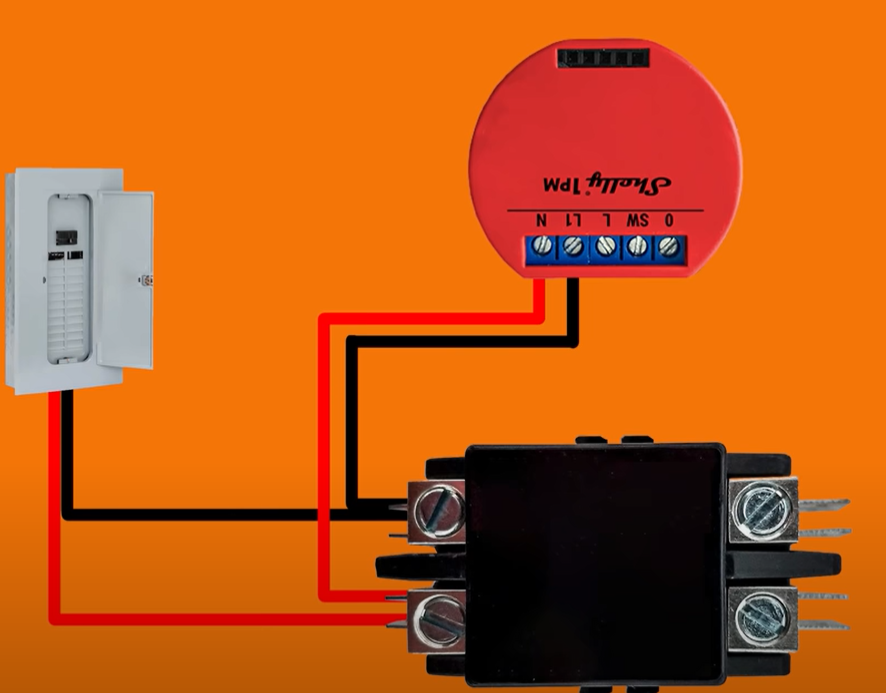
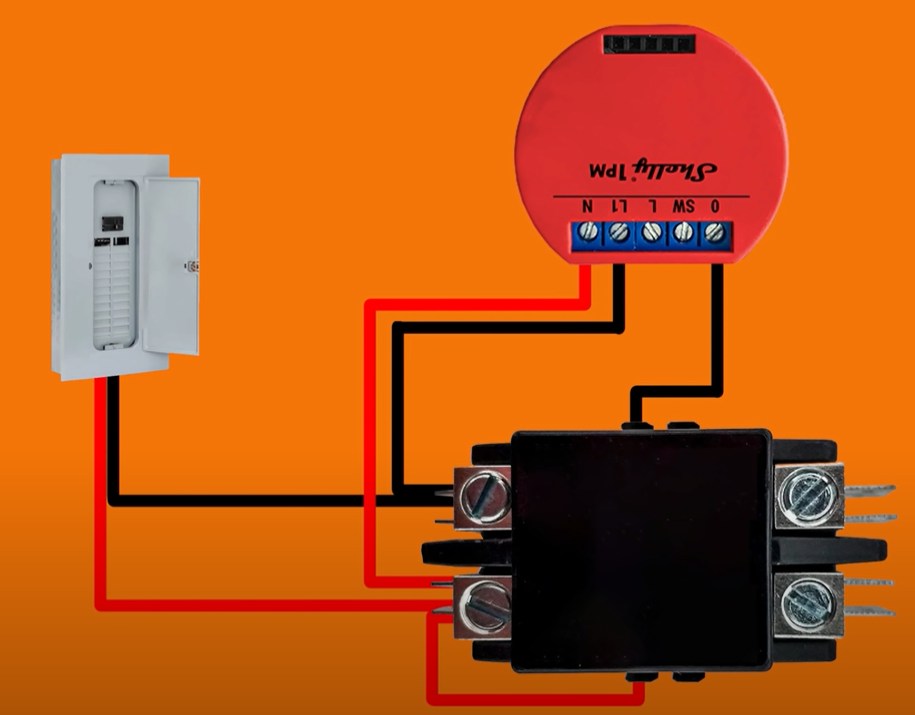
The L1 terminal of the shelly will output its voltage to the O terminal when the relay is on, so we’re going to connect the O terminal to one of the coil terminals on the contactor. The other coil terminal will just get phase of the supply voltage, so I’ll use a short length of the red wire with some spade connectors to make a jumper wire from the red accessory terminal to the other coil terminal.
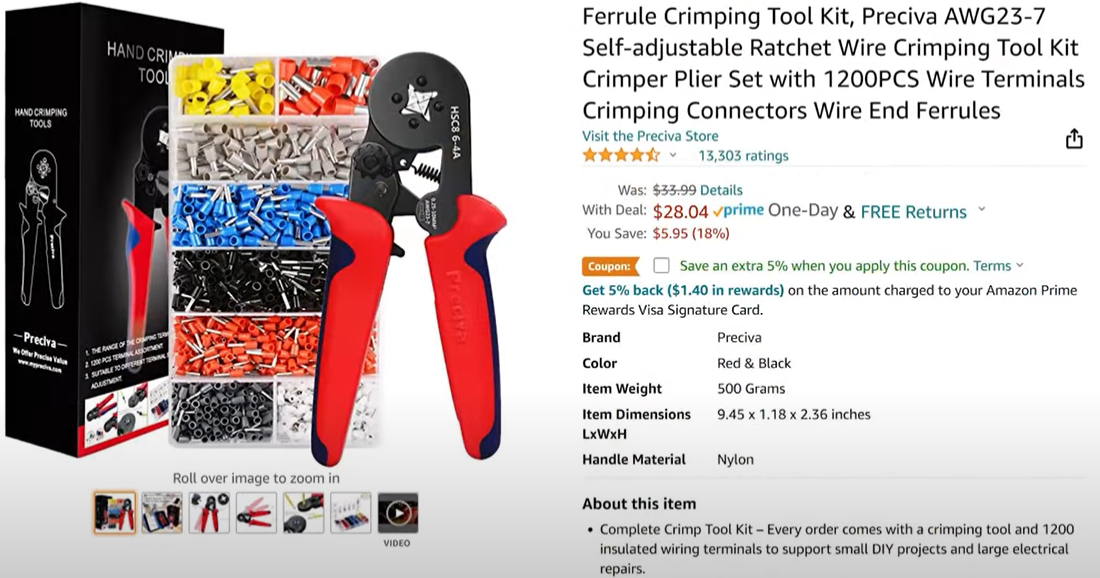
I have a crimper and set of spade connectors that I bought from Amazon for about $50 but I’m not going to include them in the total cost since I bought them to rewire my boat and if you want to save a bit of money you can solder the wires onto the contactor and cover them with heat shrink, but the spade connectors make everything nicer, and if you’re like me you use every DIY project is an excuse to buy new tools… and I’d highly recommend a decent set of terminal crimpers and ferrule crimpers.
Anyways, wired like this the shelly receives constant power, and then when we turn on the shelly relay it supplies the second phase to the coil which activates the contactor and passes both phases through the
contactor to the output terminals. This contactor is rated for 40A, so we’ll be using it at less than half of its rated capacity, which is good practice.

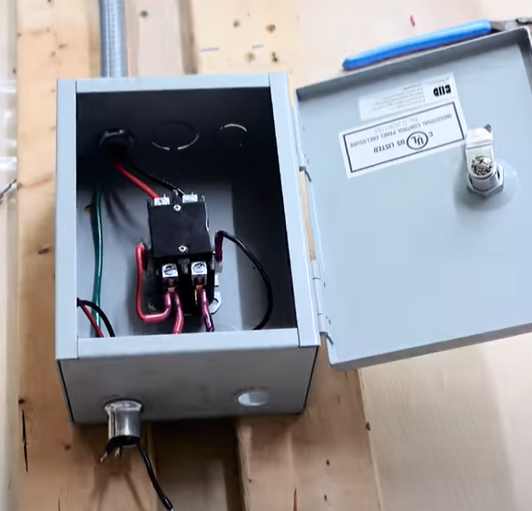
I wired as much as I could on my workbench before moving over to the water heater, and after I finished it looked something like this. I punched out two holes at the top because I wasn’t sure if the metal box was going to block the wifi signal on the shelly, but it turned out to not be an issue and I was able to have the shelly inside the box like I wanted.
Next, it was time to move over to the water heater, and for this step you absolutely have to turn off the power at the circuit breaker. Do not skip this step.

In fact, not only should you flip the breaker, but also double check your wires with a multimeter afterwards to make sure they’re off, 240V will kill you, not joking.
Find a good place on the wall to mount your box, and be very careful because the wall behind your water heater is usually full of water pipes that you don’t want to put a screw through. I used drywall anchors and non-self-tapping screws to lower the risk of puncturing a pipe.
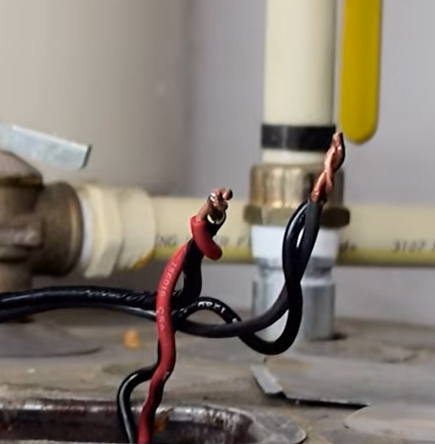
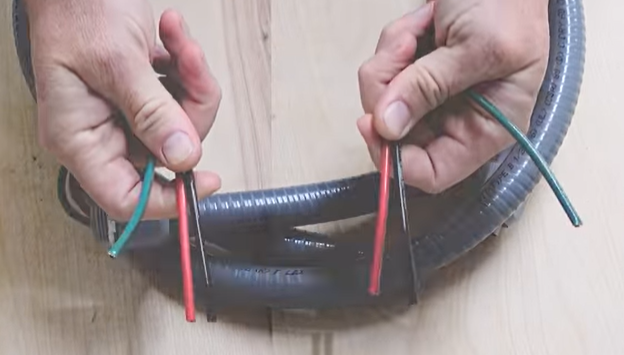
Disconnect the existing wires from your water heater and thread them into your new electrical box using the existing conduit connectors. You’ll probably need to shorten your flex conduit here, and a good way to do that is by unwrapping it using some vice grips or channel locks. After it’s unwrapped you can use diagonal cutters or snips to cut the flex without damaging the cable inside, wrap the end ina little electrical tape to protect from sharp edges.
Those wires are going to be the supply voltage for your contactor so give yourself a loop or two of extra wire inside the box and then screw them into the contactor. If you had to shorten your white wire you
should also wrap the last 6 inches in black electrical tape to signify that it’s a hot wire, not neutral.
Next snake your new conduit down to your water heater and attach black to black, red to red, and ground the green wire to the screw on the top of the water heater. If you need to shorten this type of flexible conduit the best way is score the outside with a utility knife and then twist or bend it until it snaps, that way you won’t damage the wires inside.
The last connection you need to make is to attach the ground wires inside the metal box, so grab an appropriately sized wire nut and connect those two together.
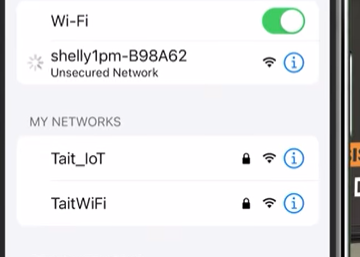
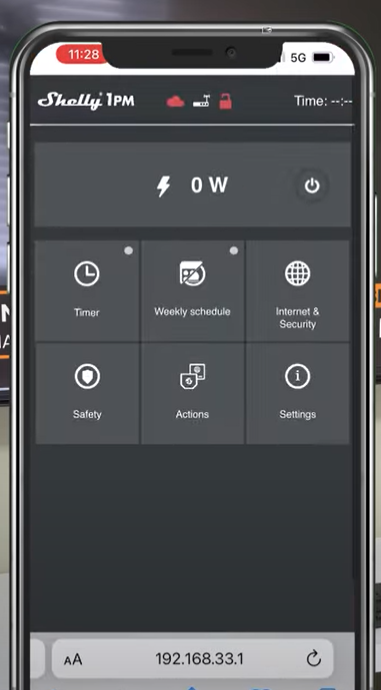
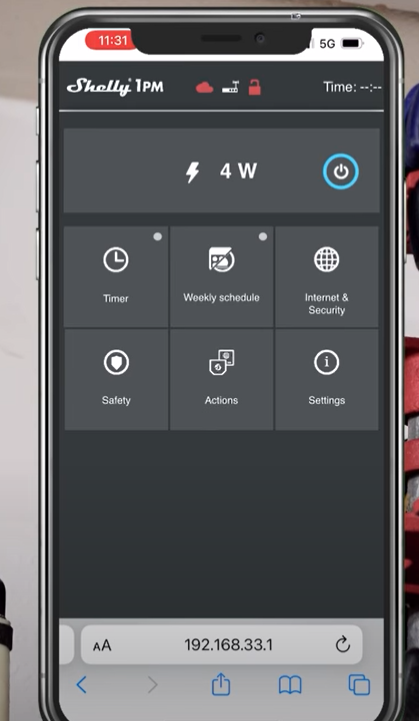
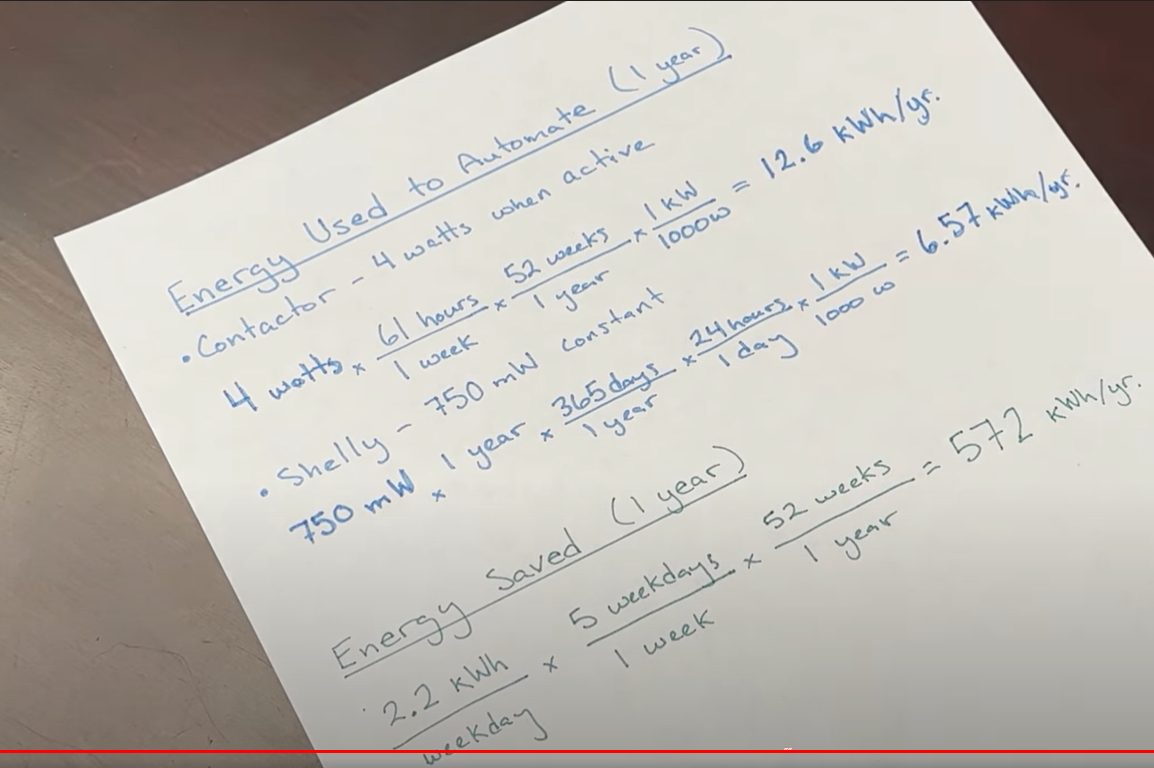
Make one last quick inspection of your connections and then flip the breaker back on. Your shelly device should broadcast a wireless network that you can connect to with your phone. Then go to 192.168.33.1 to get to the shelly web interface. From there you can toggle the relay on which should close the contactor and provide 240 volts to your water heater. You can see that it takes roughly 4 watts continuous to close the contactor, so we’ll need to account for in our final cost analysis later.
Next go into the shelly app and enter your wifi settings. Once connected you can update the firmware to get all the latest features. Shelly devices can operate 100% locally, or you can control them with the shelly cloud which would then give you access to Amazon Echo control. Even without cloud access there are a bunch of advanced features like scheduling in the web interface, which may be enough for you, but I wanted to do a bit more automation so I used home assistant and node red to get a little fancier.
Shelly devices are automatically discovered and setup in home assistant, so once I clicked the button to add it I could automate it however I wanted. Home assistant automations have come a long way, but for me they are still a bit confusing, so I decided to use node red with the light scheduler node to make it dead simple.
During the week the water heater needs to turn on at 4am to have hot water ready for my wife’s morning shower, and I should be showered by 7:30, so we can shut the water heater off then. I also need to turn it back on at 6pm to be ready for daughter’s nightly shower, then back off at 7:30pm for a total of 5 hours of runtime per day.
During the weekends our schedule isn’t nearly as predictable, so I’ll keep the water heater on from Saturday morning until Sunday night, and just like a number of other automations in the house, I want the ability to ignore this schedule and keep the water heater on when we have house guests, and keep the water heater off when the house is in vacation mode.
Now there are clearly lots of factors that will change how much energy your water heater uses like the temperature of the incoming water, the location and insulation of the water heater, and how much hot water you use per day but for me, in Florida with my water heater installed in the garage and 3 people taking a shower a day my typical water heater usage was just over 9 kilowatt hours per day before the automation.
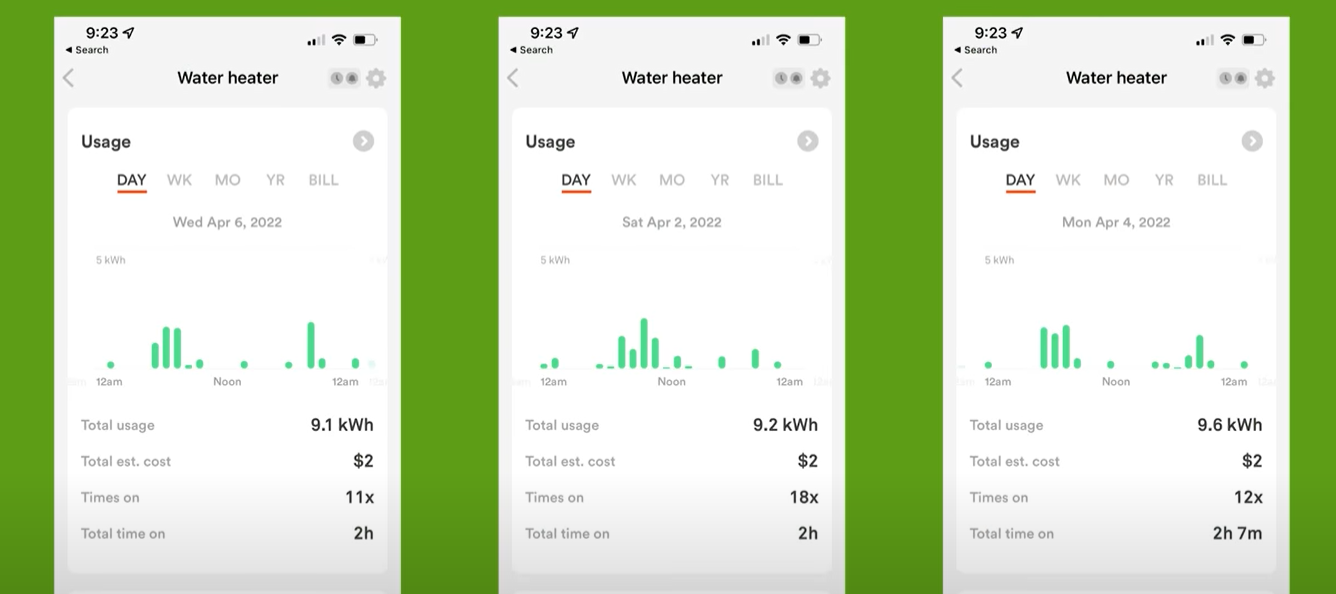

After automating the typical usage is just under 7 kilowatt hours a day, so we’re saving on average 2.2 kilowatt hours per weekday. My electric company just raised my rates, but we still pay a fairly reasonable 12 cents per kilowatt hour meaning this automation saves me roughly 25 cents per weekday.
However, I also need to account for the additional energy consumption of the contactor which consumes 4 watts anytime the water heater is on for a total of 20 kilowatt hours a year, and also the shelly which consumes around 750 milliwatts all the time which works out to 6.5 kilowatt hours per year. So in total, per year we save 572 kilowatt hours at the cost of 26.5 kilowatt hours, netting us roughly 545 kilowatt hours saved per year which translates to $65.
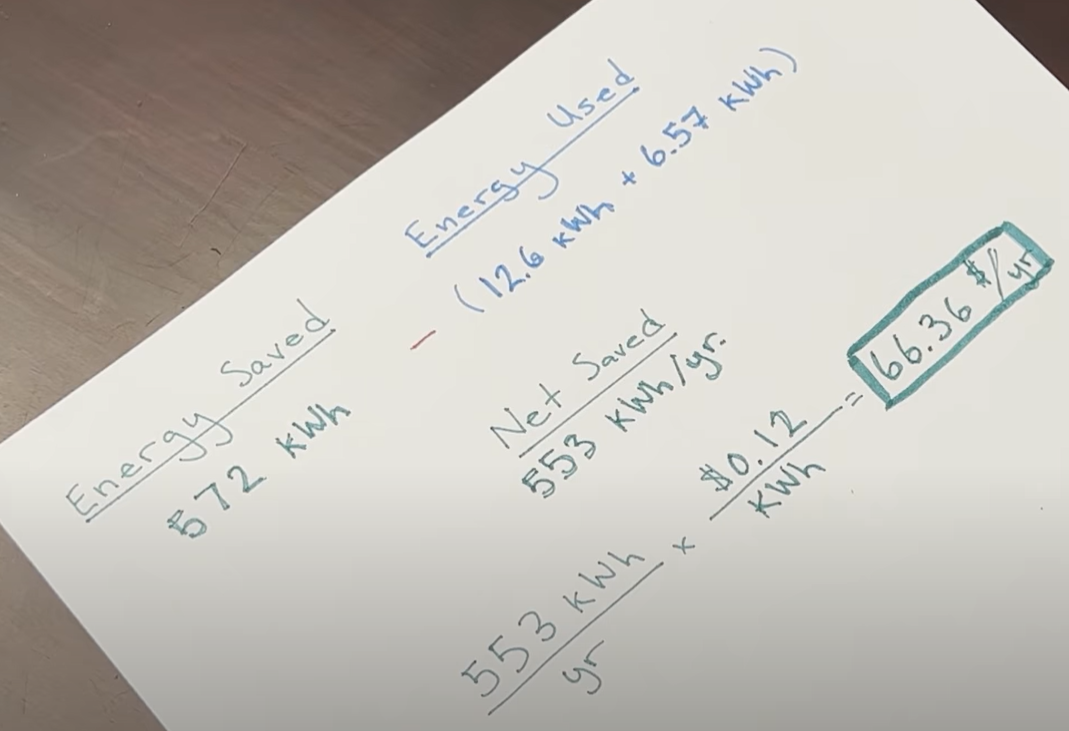
That means for me this project will pay for itself in about a year and a half… which seems pretty good, but depending on your water heater usage and energy cost your milage my vary.
In a 2020 interview Bill Gates said that in order for green technologies to take hold they need to do so automatically and without sacrifice, and this project definitely ticks both of those boxes for me, but what do you think? Is automating your water heater worth it? Let me know down in the comments.
Thank you so much to all of my awesome patrons over at patreon for your continued support of my channel and if you’re interested in supporting my channel please check out the links in the description.
If you enjoyed this video please hit the thumbs up button and consider subscribing and as always, thanks for watching the hookup.