DIY Motorized Ultra Short Throw Projector Shelf
November 2, 2021Today on the hookup I’m going to show you step by step how to build the DIY motorized projector shelf from my hidden home theater video. This could potentially be a pretty niche video, so if you fall in the middle of this Venn diagram of people who own an ultra short throw projector, enjoy DIY projects, and have found this video on YouTube make sure you hit the thumbs up button so the algorithm can find more people like you, or maybe there’s some reason you want to build a motorized shelf, if so let me know what that is down in the comments.
Actually, I lied, I’m not going to show you how to build the motorized shelf from my hidden home theater video, I’m going to show you how to build a better one. In fact, this is the forth motorized drawer that I’ve built in the last month, and after trying out almost $500 in different parts I think I’ve finally perfected it, so instead of you spending over $2000 for an off the shelf solution I’m giving you the plans for free thanks to Eufy who sponsored this video.
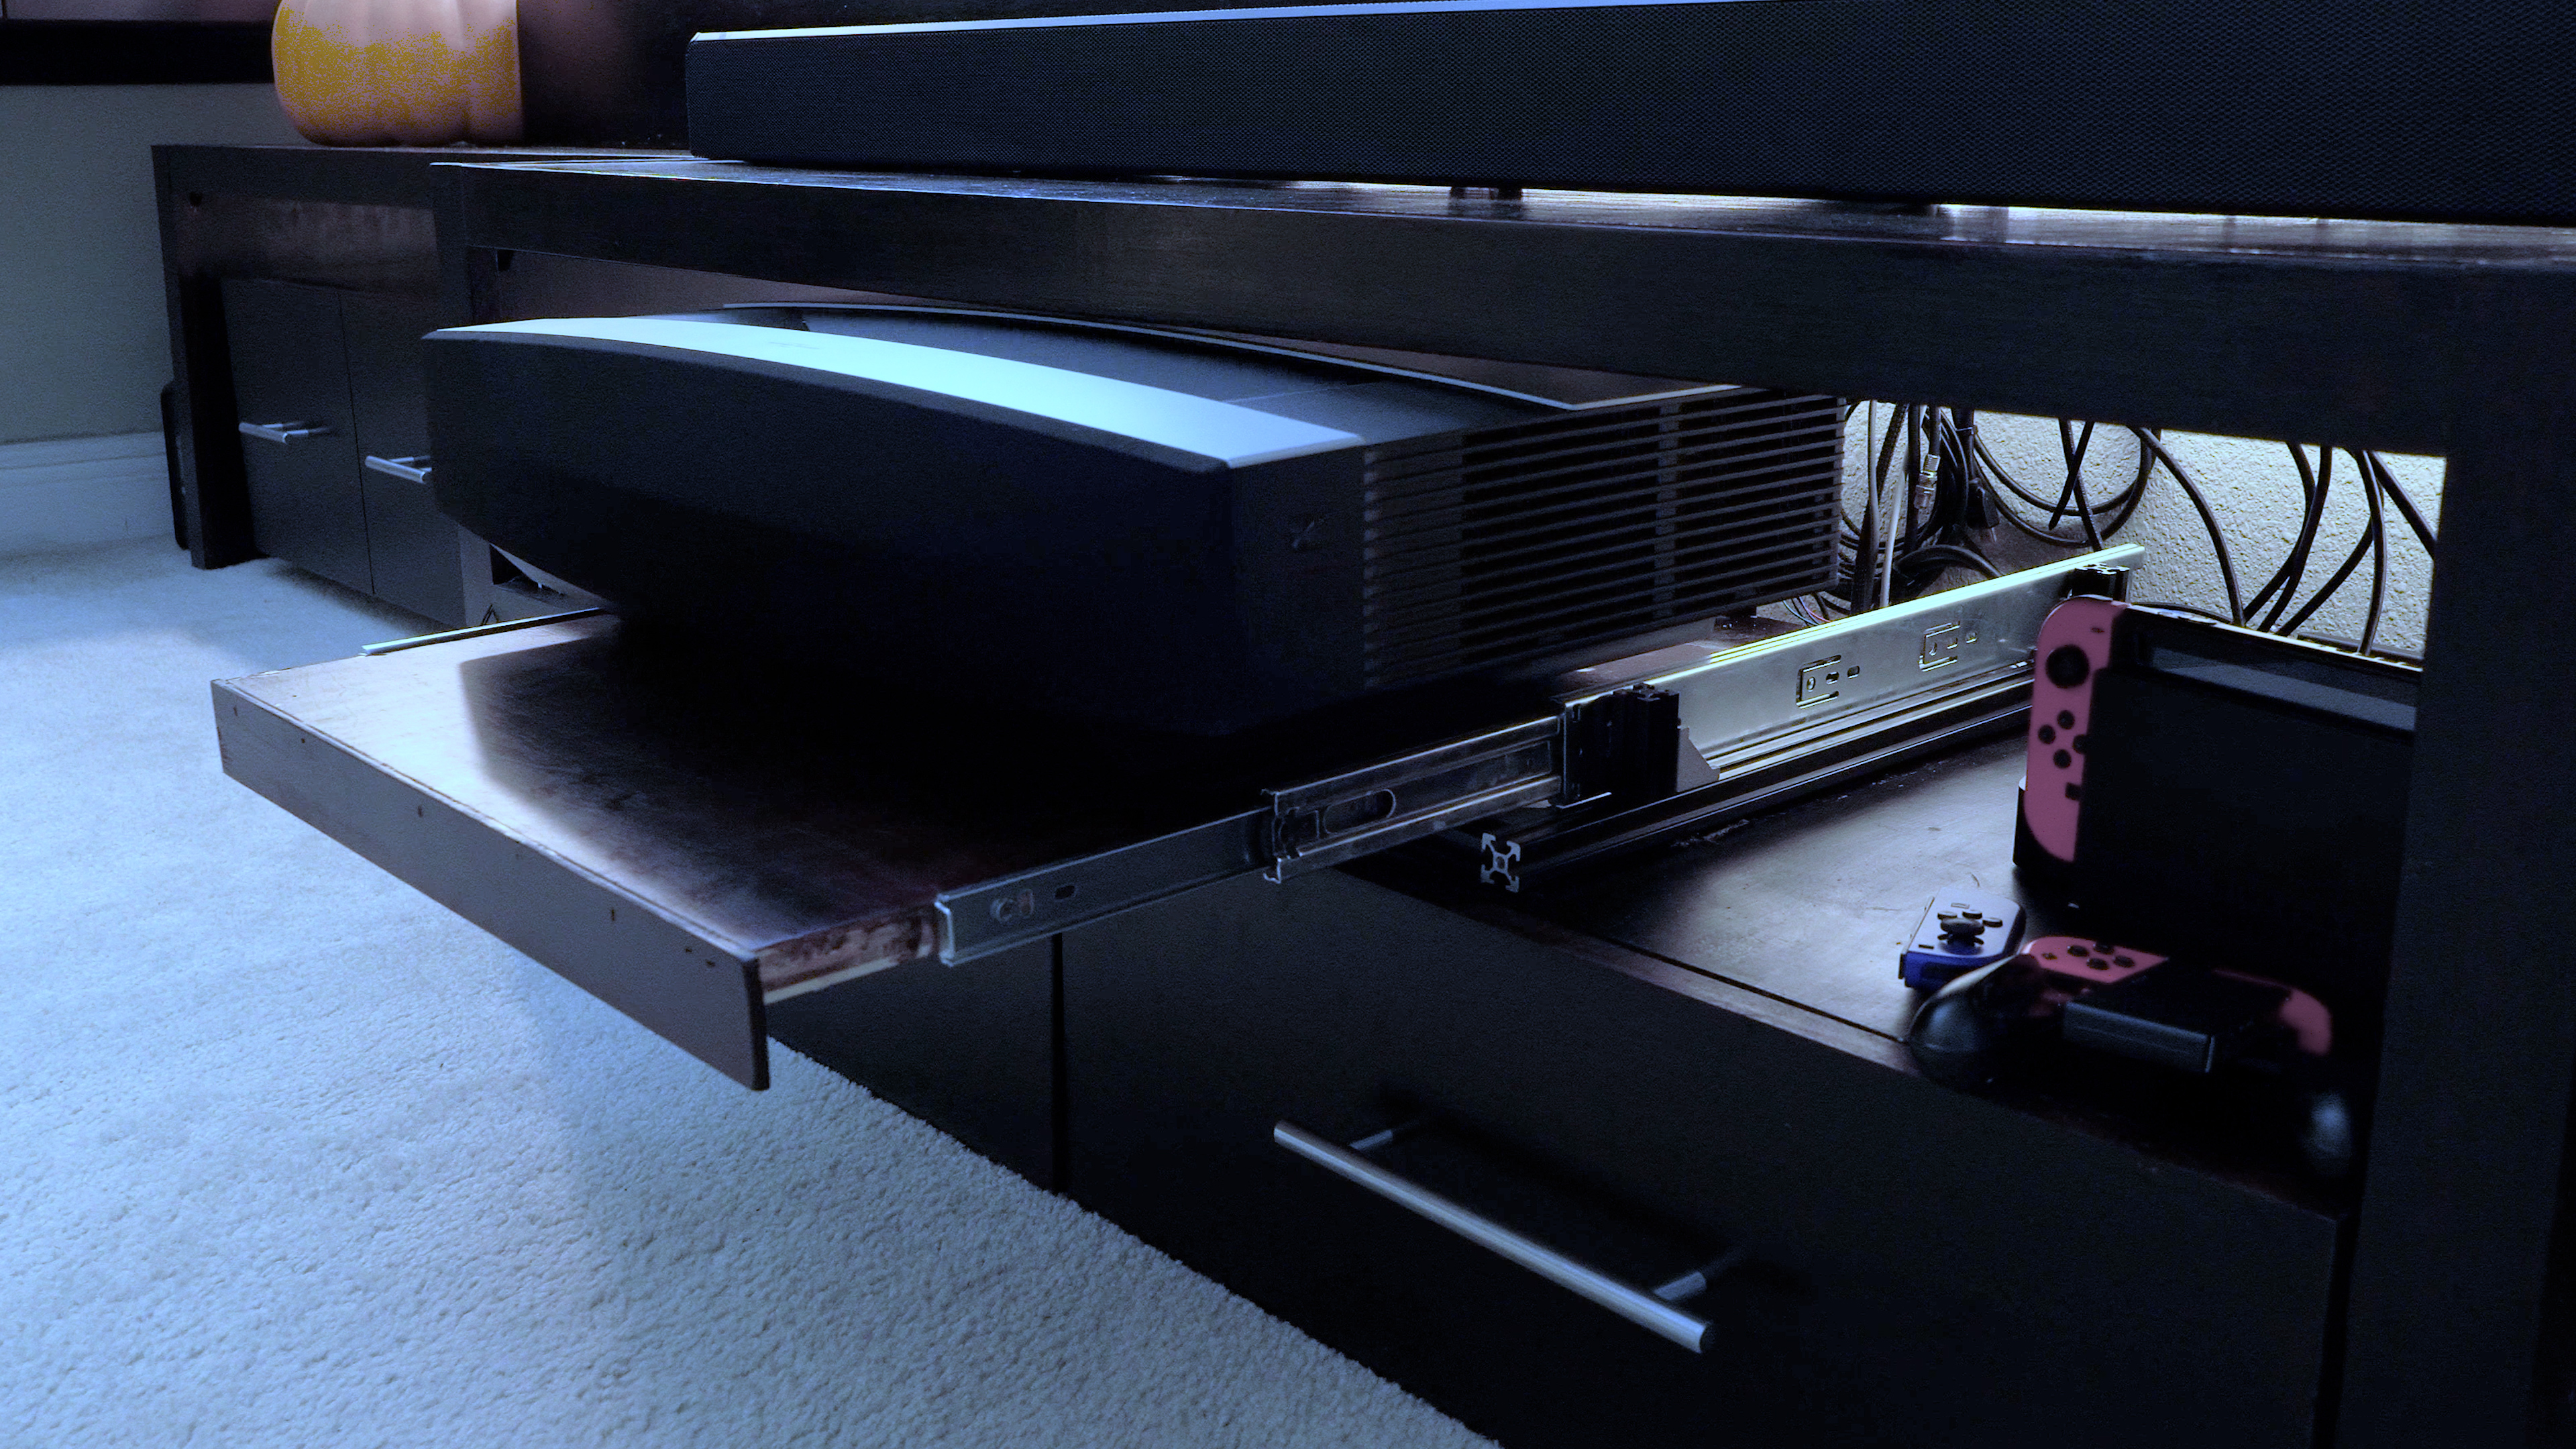
So after 4 iterations here’s what I finally ended up with. You can see that the main structure is made from 2020 aluminum extrusion, and that everything is self-contained on this removable unit, so you won’t need to make any permanent changes to your furniture. The drawer is driven by the long lead screw using a stepper motor and the whole shelf hooks over the back of your existing furniture and tightens down to almost any shelf thickness. Also because we’re using aluminum extrusion, which is kind of like legos for adults, it’s pretty easy to make modifications to this design if you need to increase the length or width of the shelf for your exact projector or furniture.
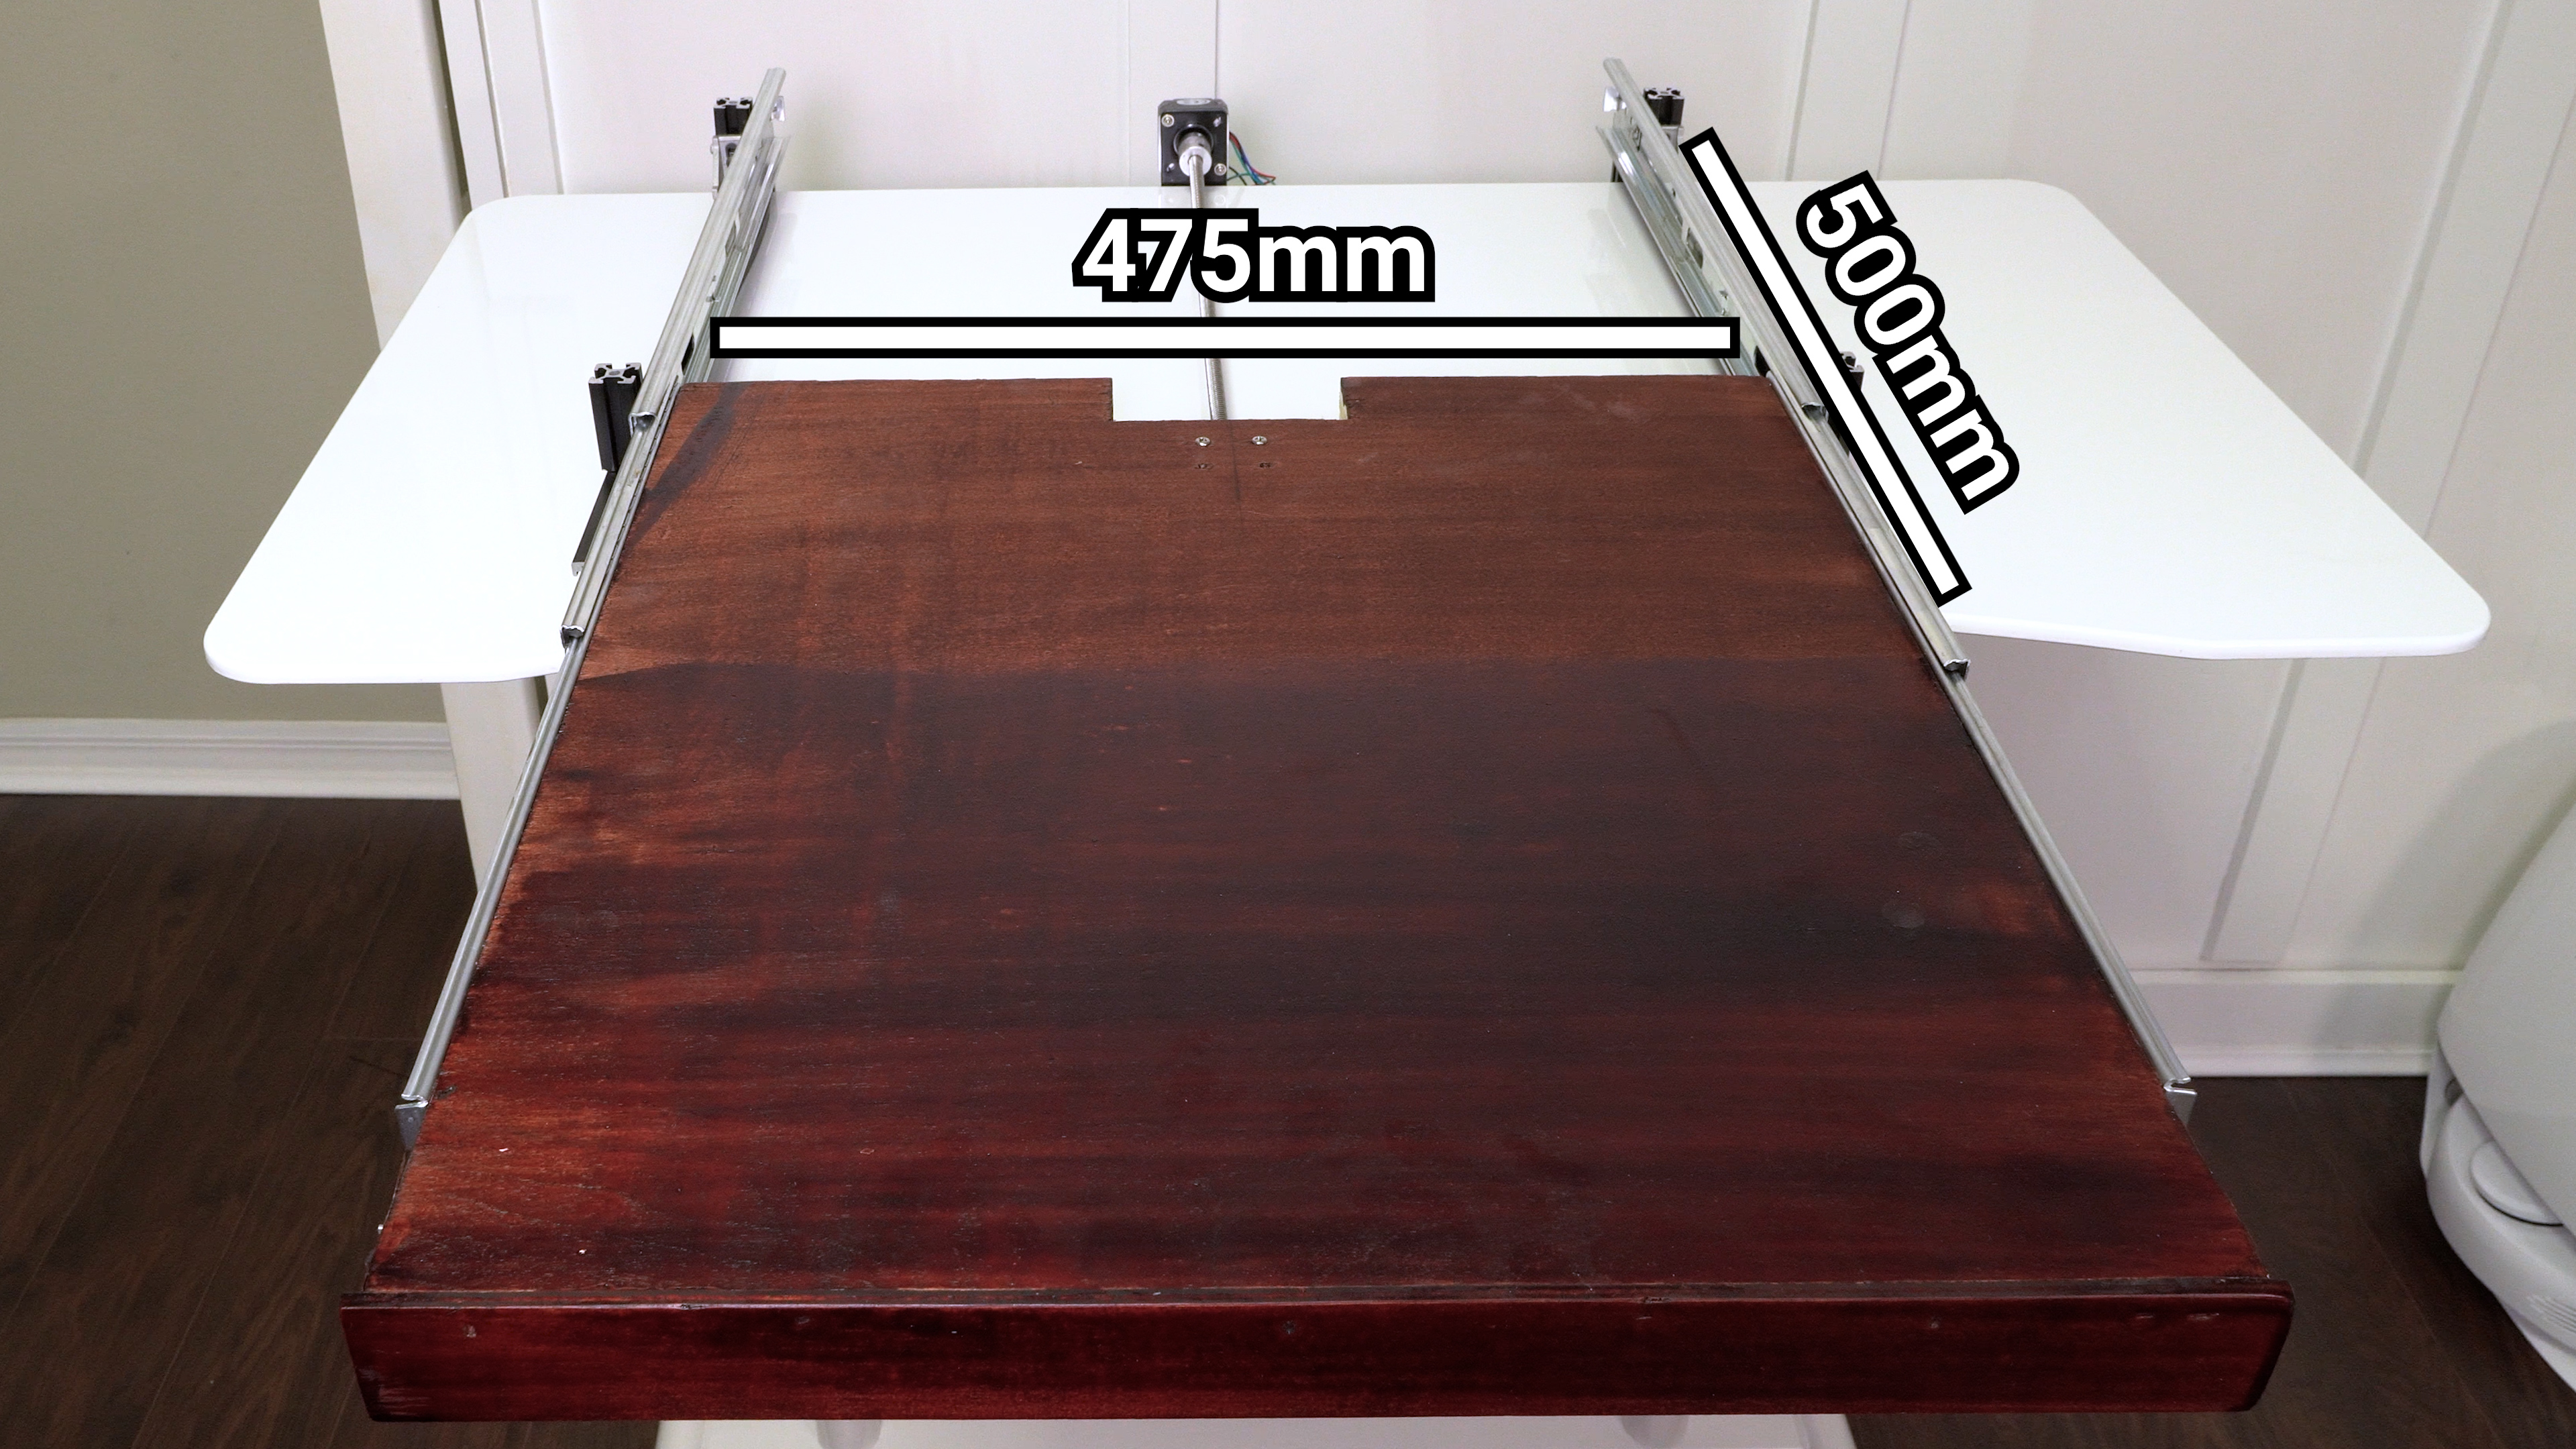
I’m going to show you the measurements for building a shelf that is specifically 475mm wide and 500mm deep with 380mm of extension motorized extension and I’ve made an amazon page that has all the parts to make that specific size, but it’s pretty easy to adjust the dimensions to use a different length of drawer slides if this shelf is too small or too big for your location. It’s also worth noting that these amazon listings go out of stock all the time, but all the parts in this project are super generic, so don’t be afraid to order from a different listing to get a better price or faster shipping on any of the parts.
https://www.amazon.com/shop/thehookup?listId=3D7JB6Q9I2AJH
Before we start, you should check to make sure this motorized shelf will work for your setup. You can install it on top of your existing furniture, or on a shelf with a top, but make sure that you have at least 50mm of clearance above your projector to account for the height of the motorized shelf, also make sure that the projected image doesn’t get blocked by the top of your shelf.
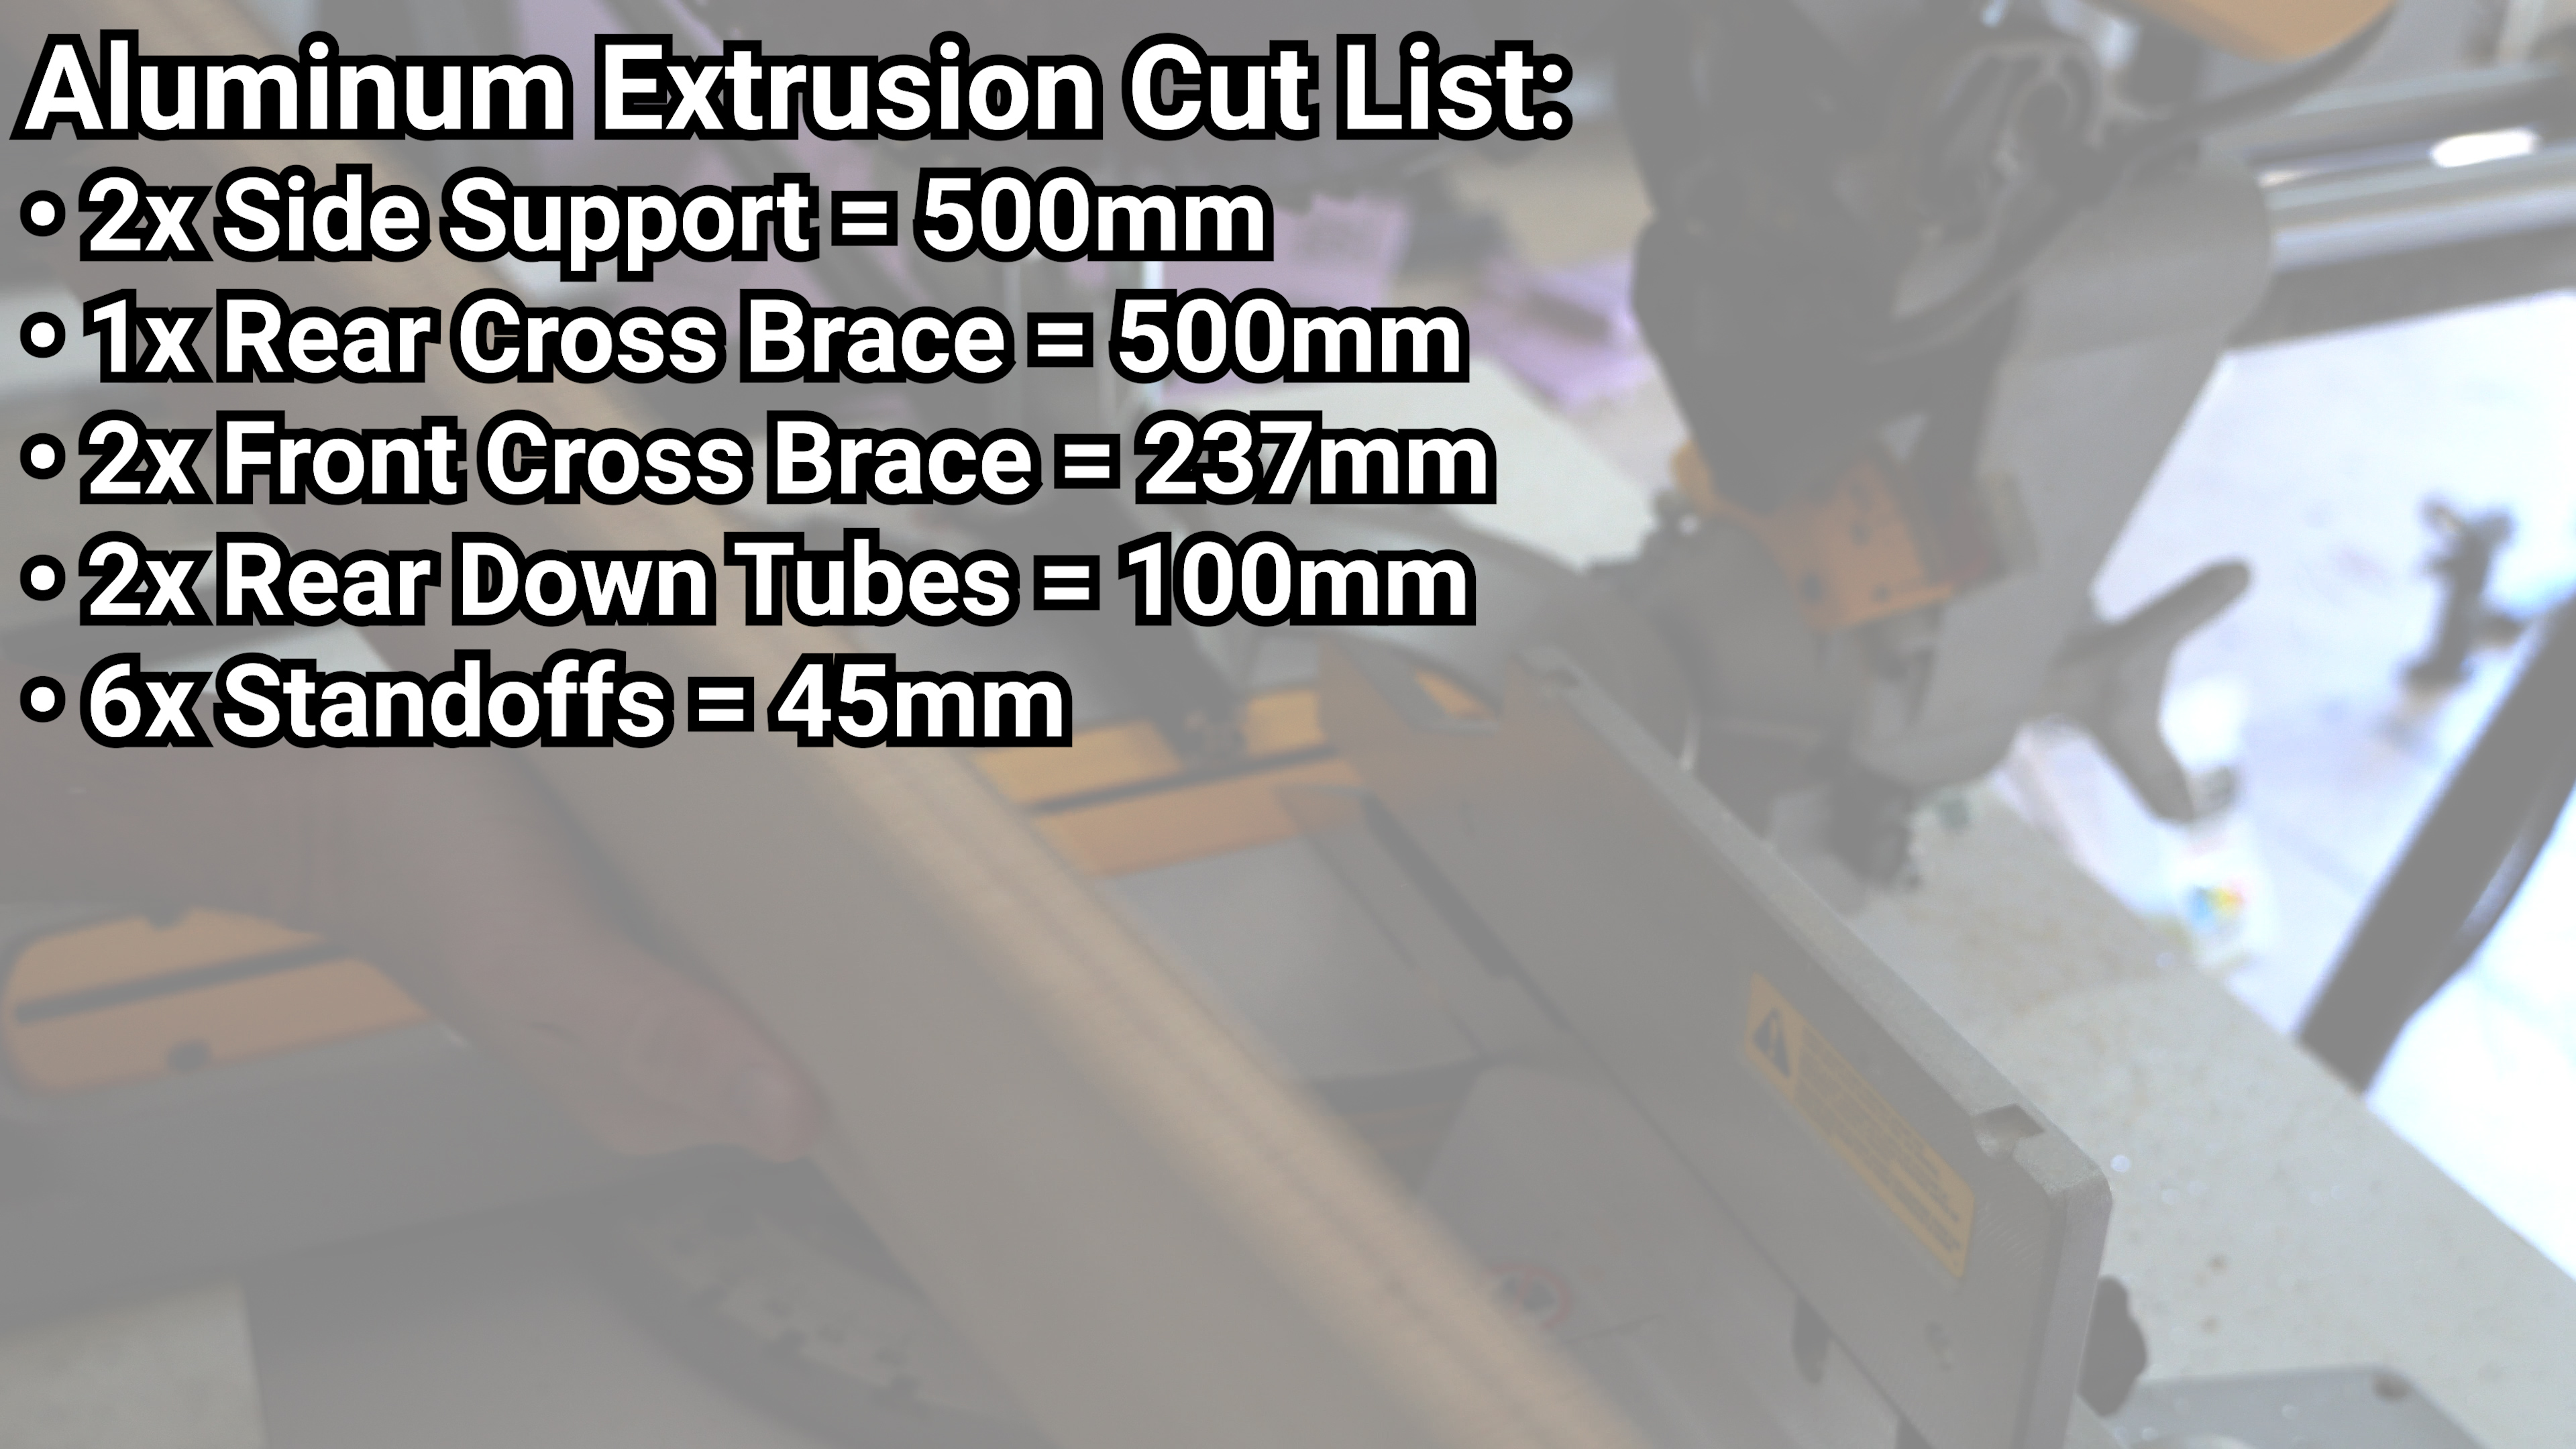
If all that looks good, it’s time get cutting. The side pieces and rear cross brace are going to be 500mm exactly, so if you ordered the 500mm aluminum extrusion those are ready to go. The front cross brace that holds the pillow bearing needs two lengths that are 237mm each, and the two back pieces need to be at least 100mm, but if you are mounting to a thick shelf to mount to you should make it bigger. Last you’ll need 6 pieces that are 45mm.
If you’ve never cut aluminum extrusion before, you can use almost any saw to do it, just go slow and wear safety goggles because power tools tend to send aluminum chips flying everywhere. If you don’t have power tools a hacksaw makes short work of aluminum extrusion also.
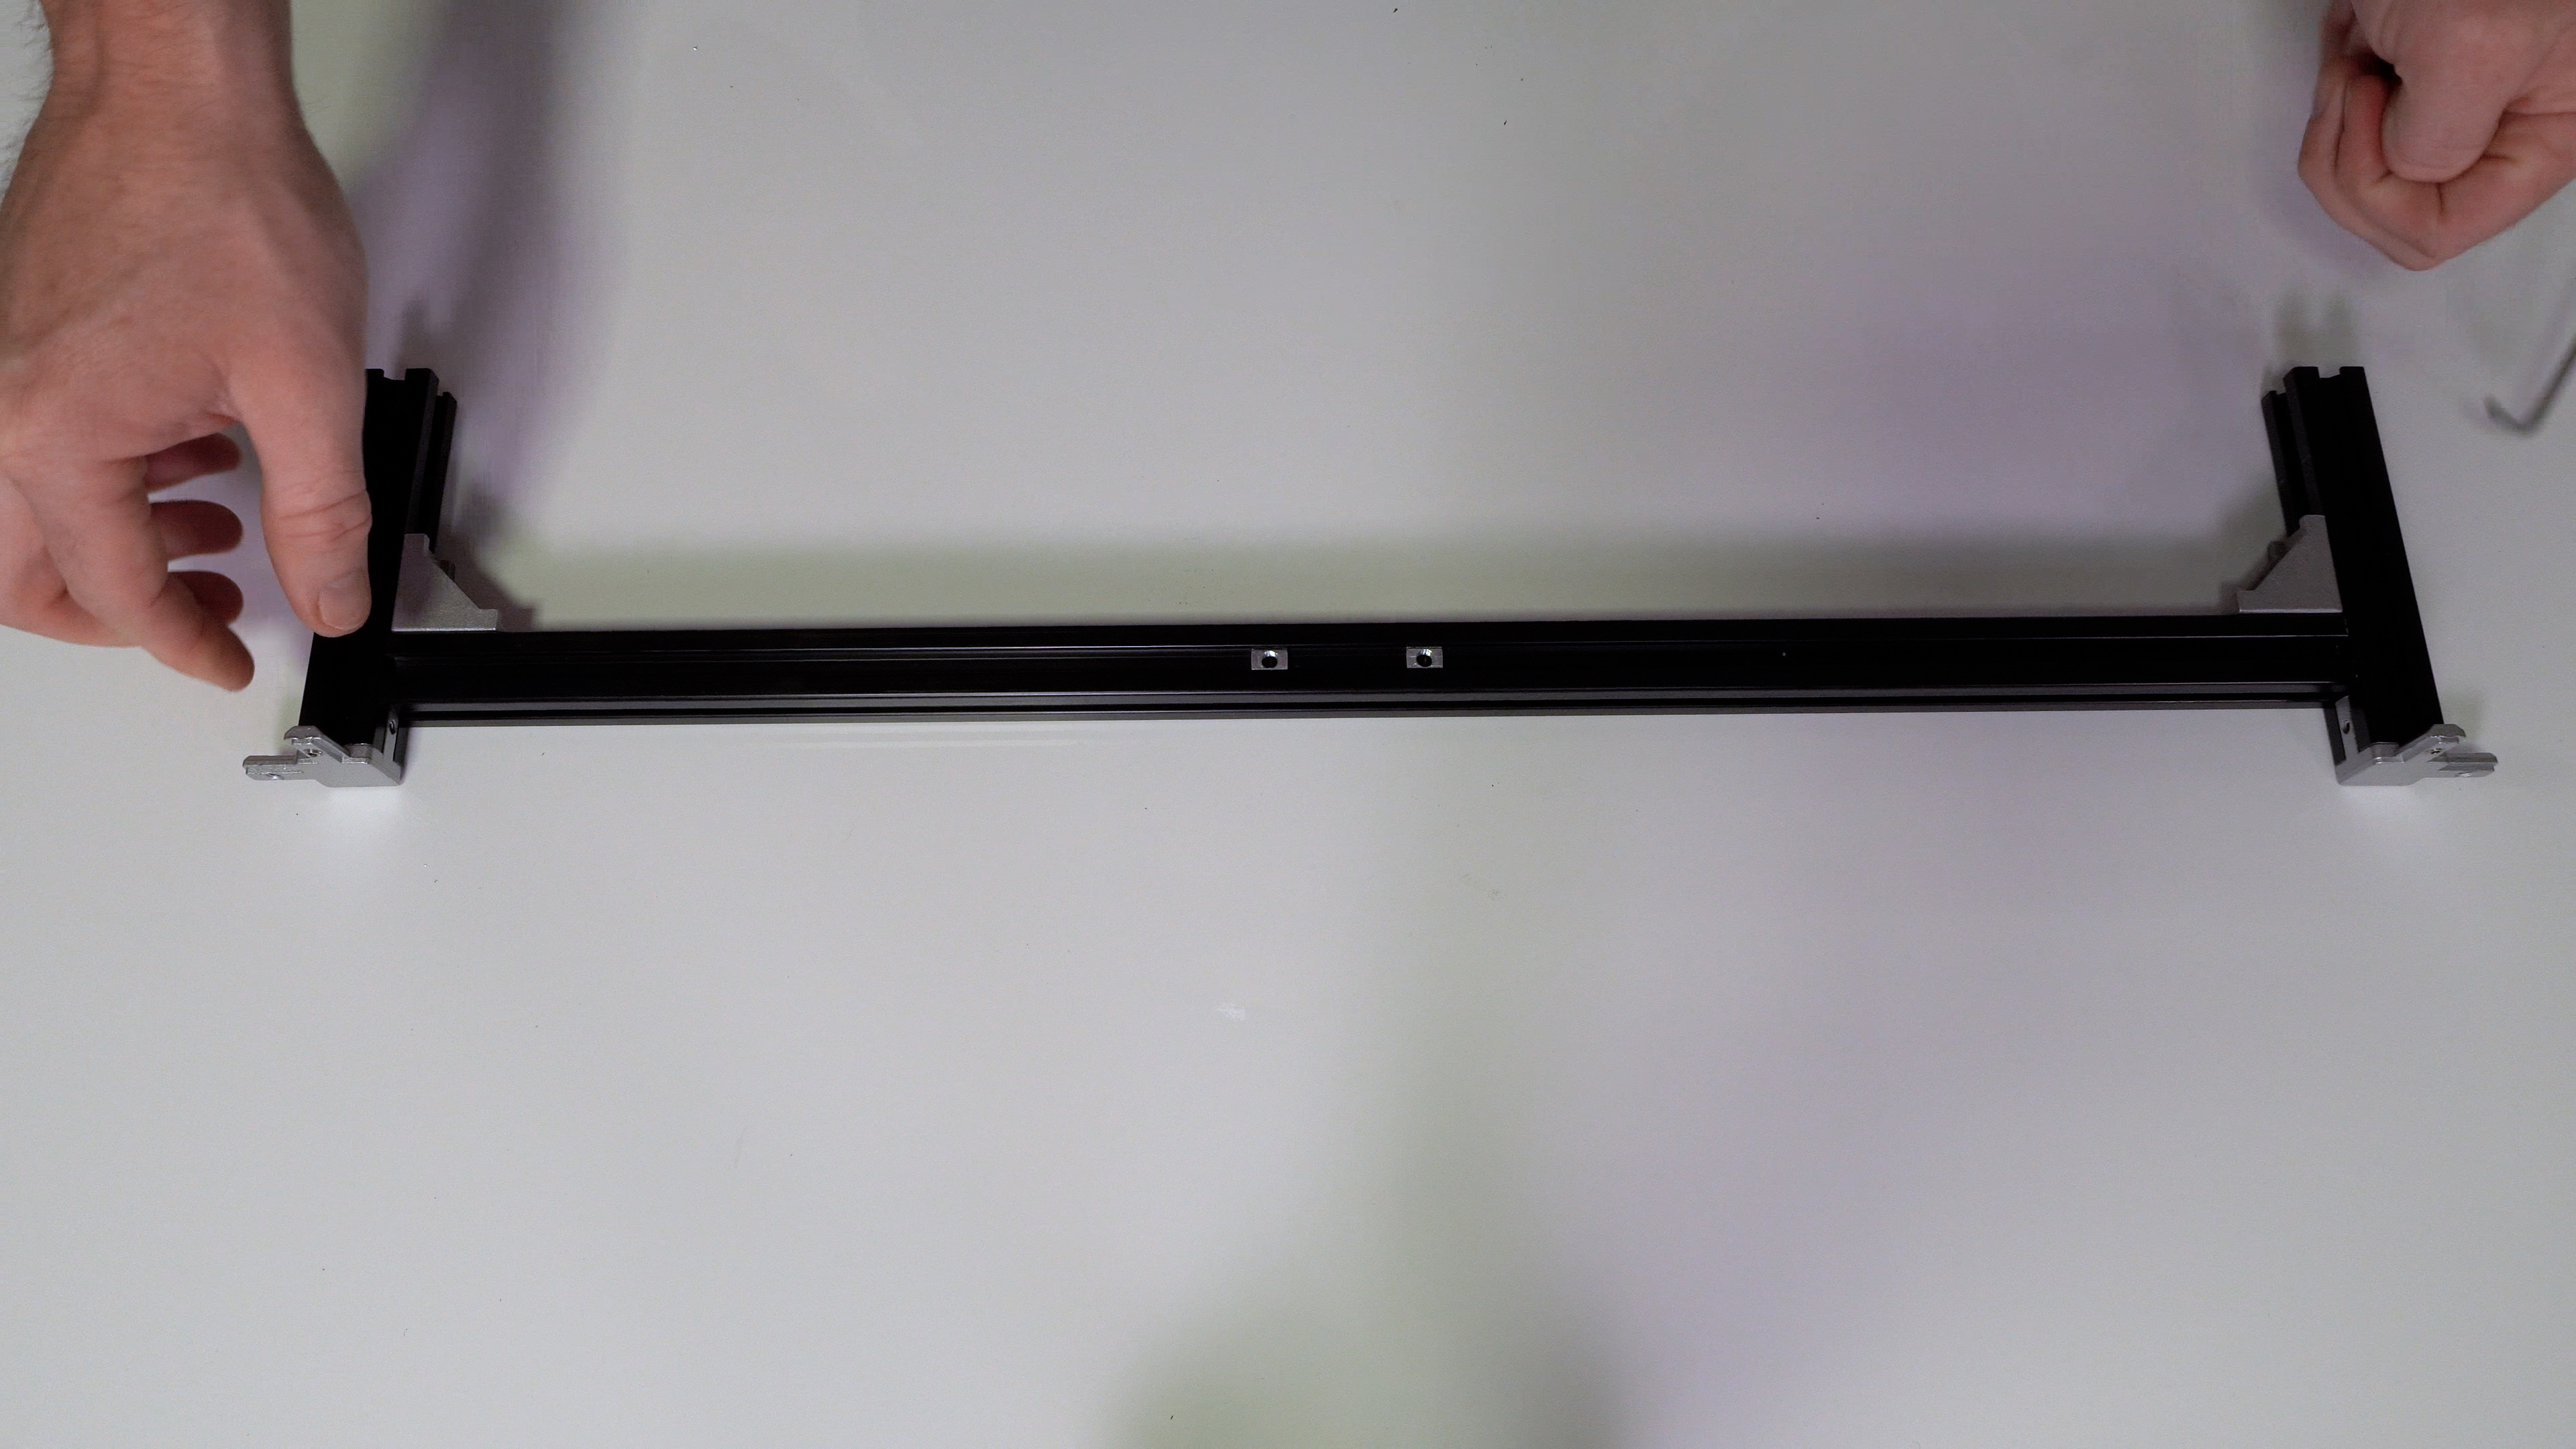
Start with the back crossbar and slide 2 t-slot nuts into the extrusion, then rotate 90 degrees and put two more t-slot nuts in. Use those nuts and 2 corner brackets to attach the rear crossbar to the rear down tubes.
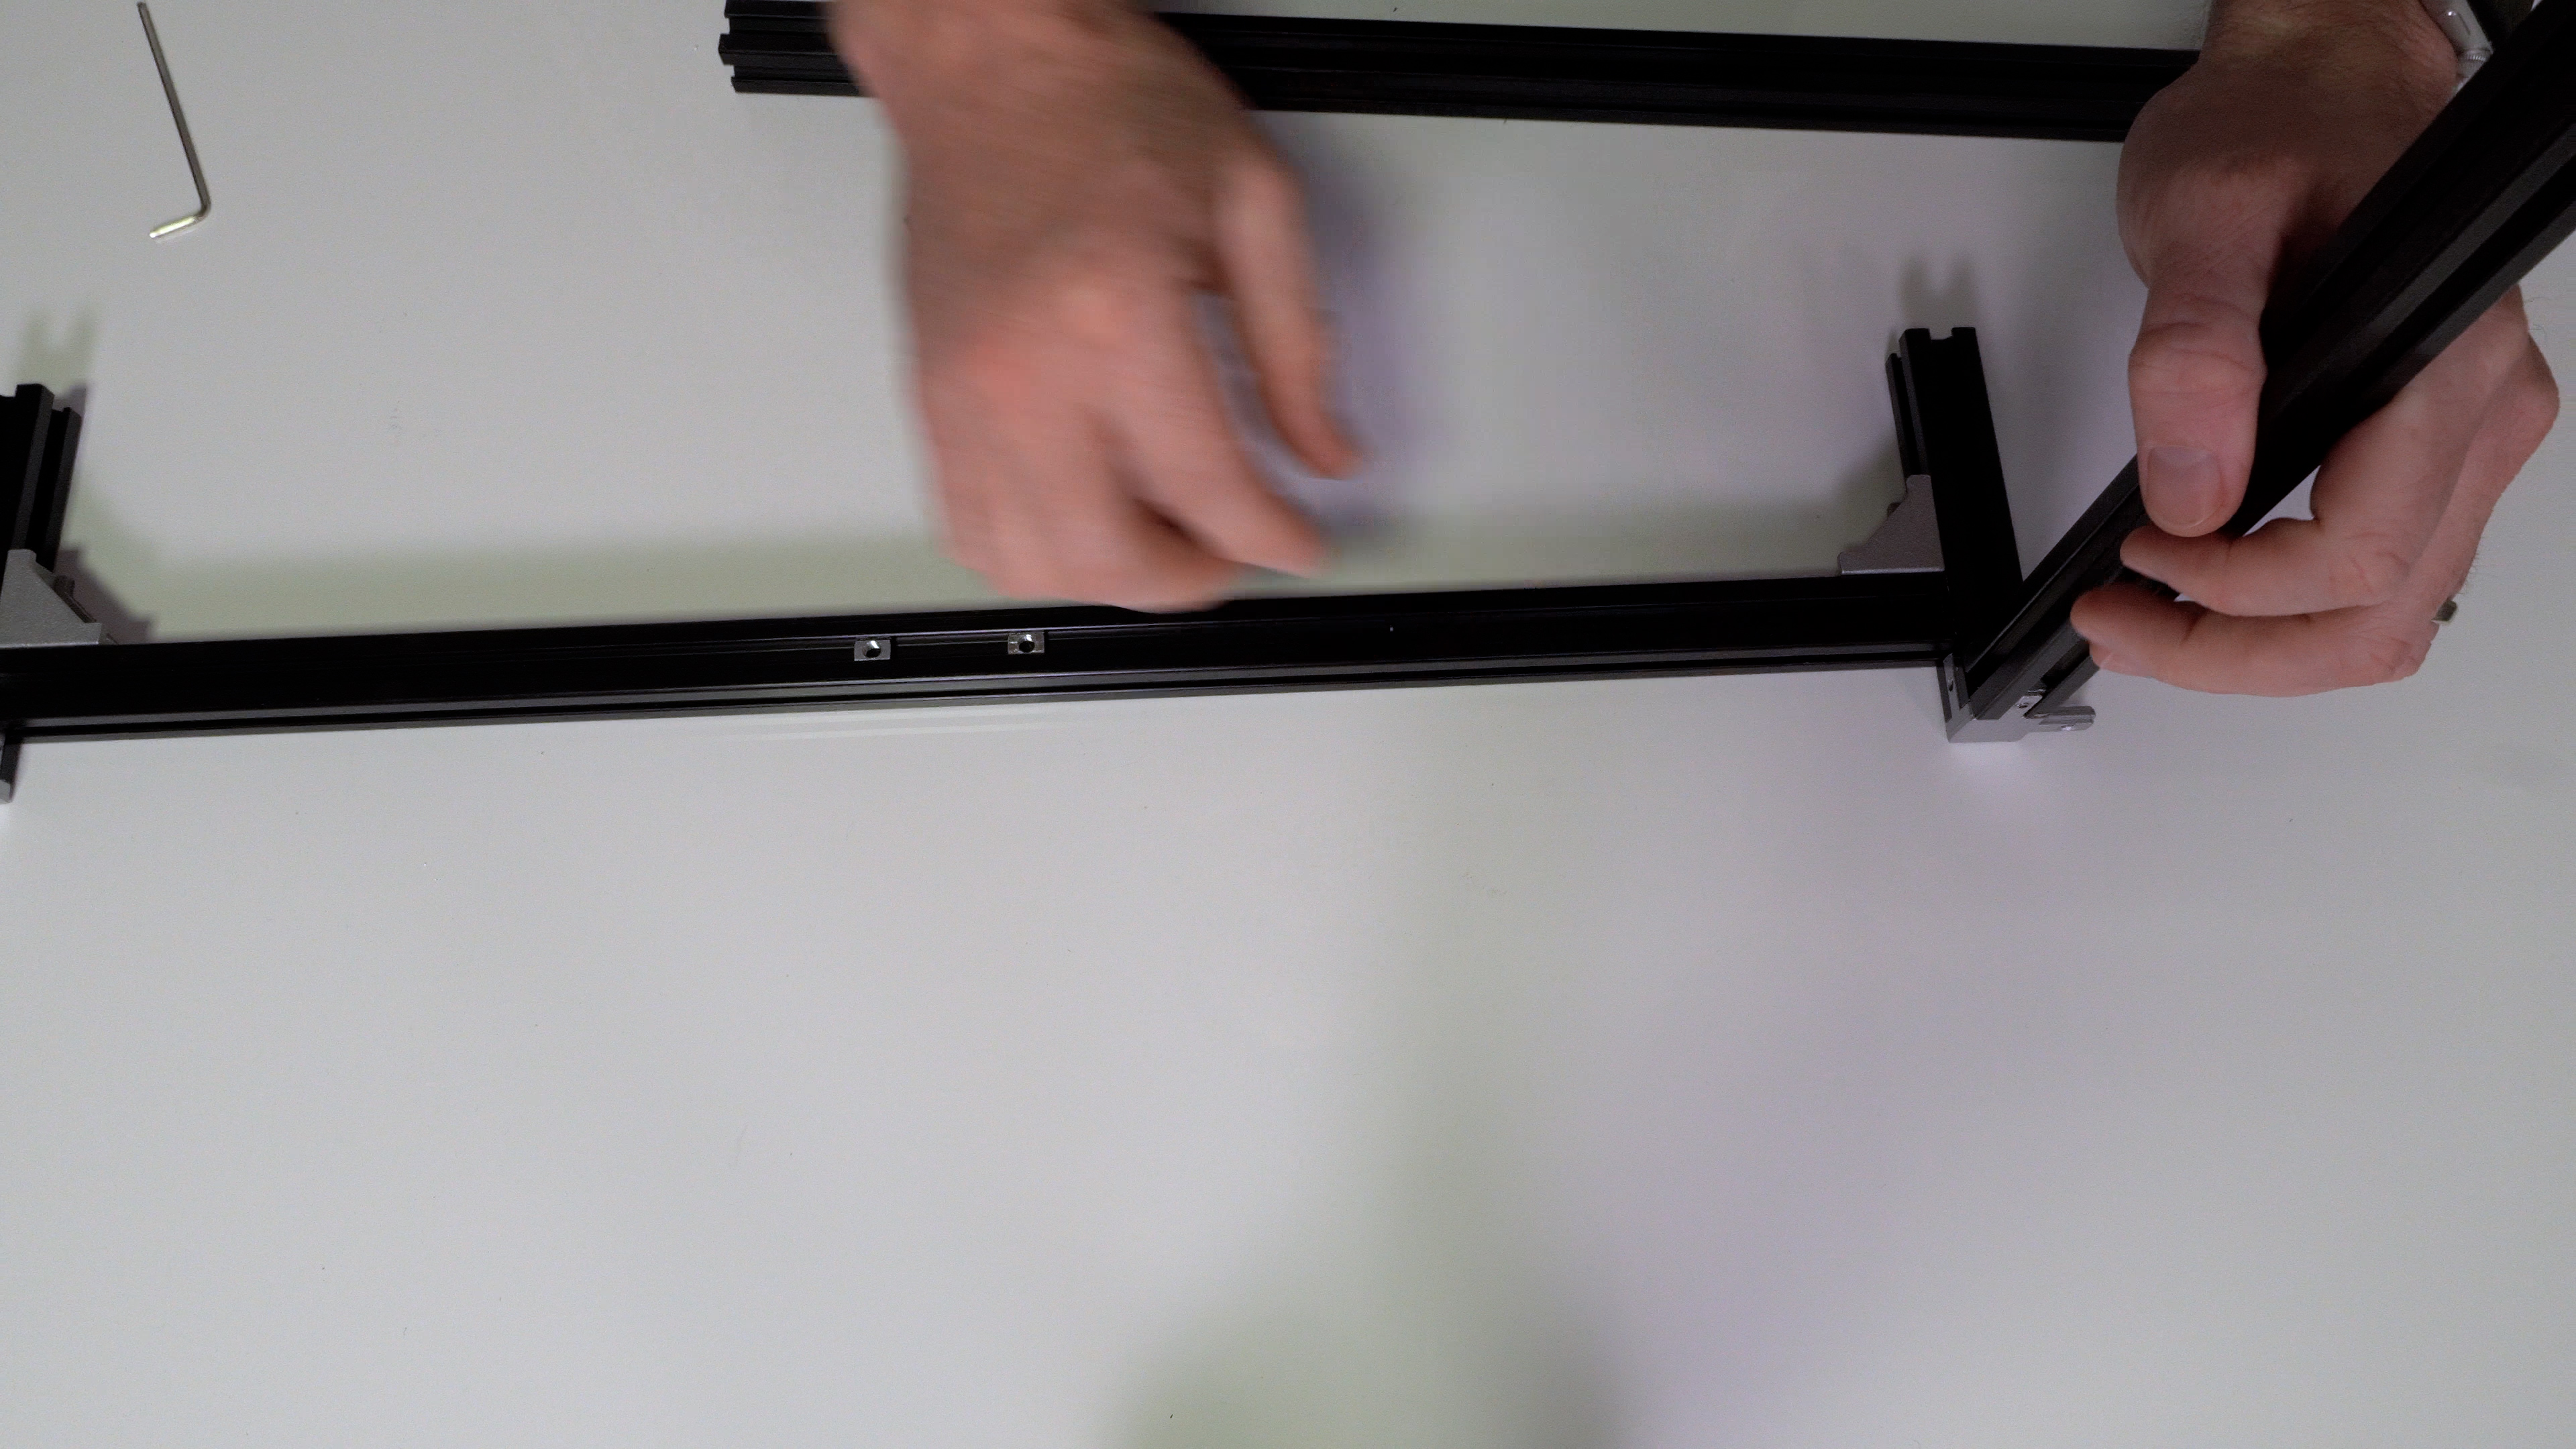
Next, use the 3 way corners to attach the rear down tubes to the side pieces. Obviously we’re only using 2 ways of the 3 way connector, and inside angle brackets do exist, but I like that these have two set screws on the downtube since it will be resisting most of the torsion force when the shelf is extended, I also like to have these little offshoots on the side for cable management since they are not in the path of the drawer.
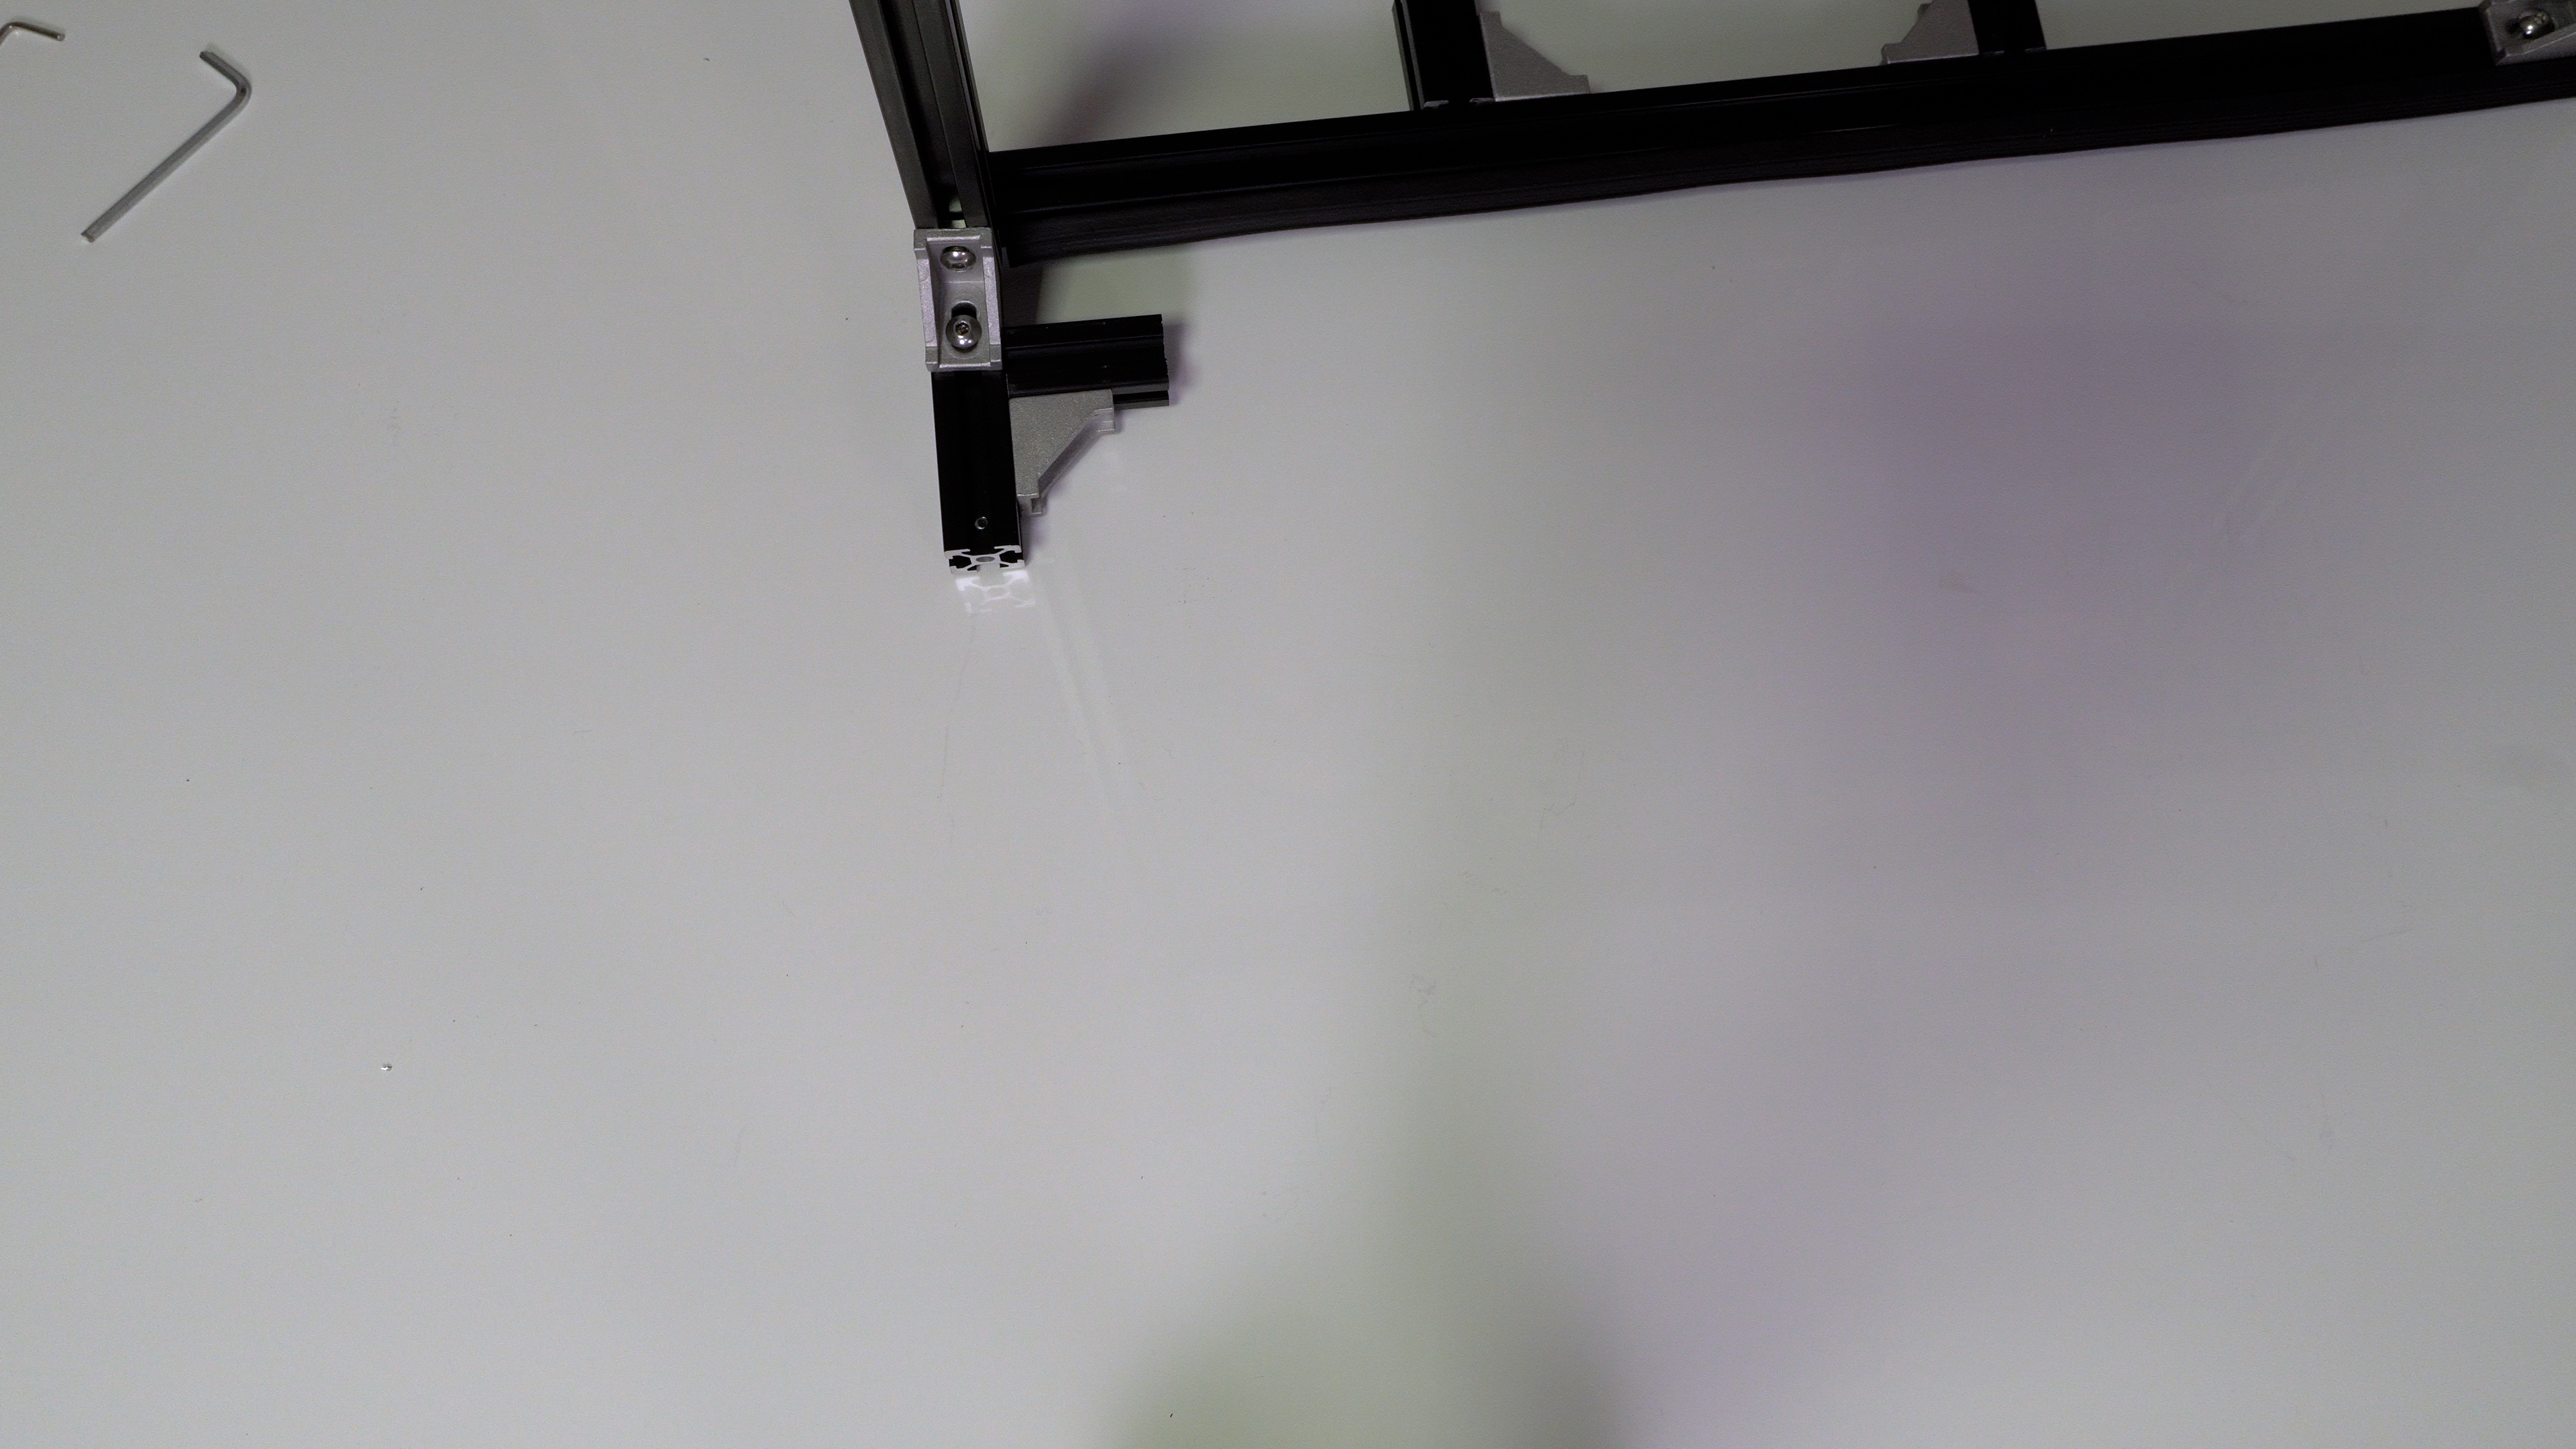
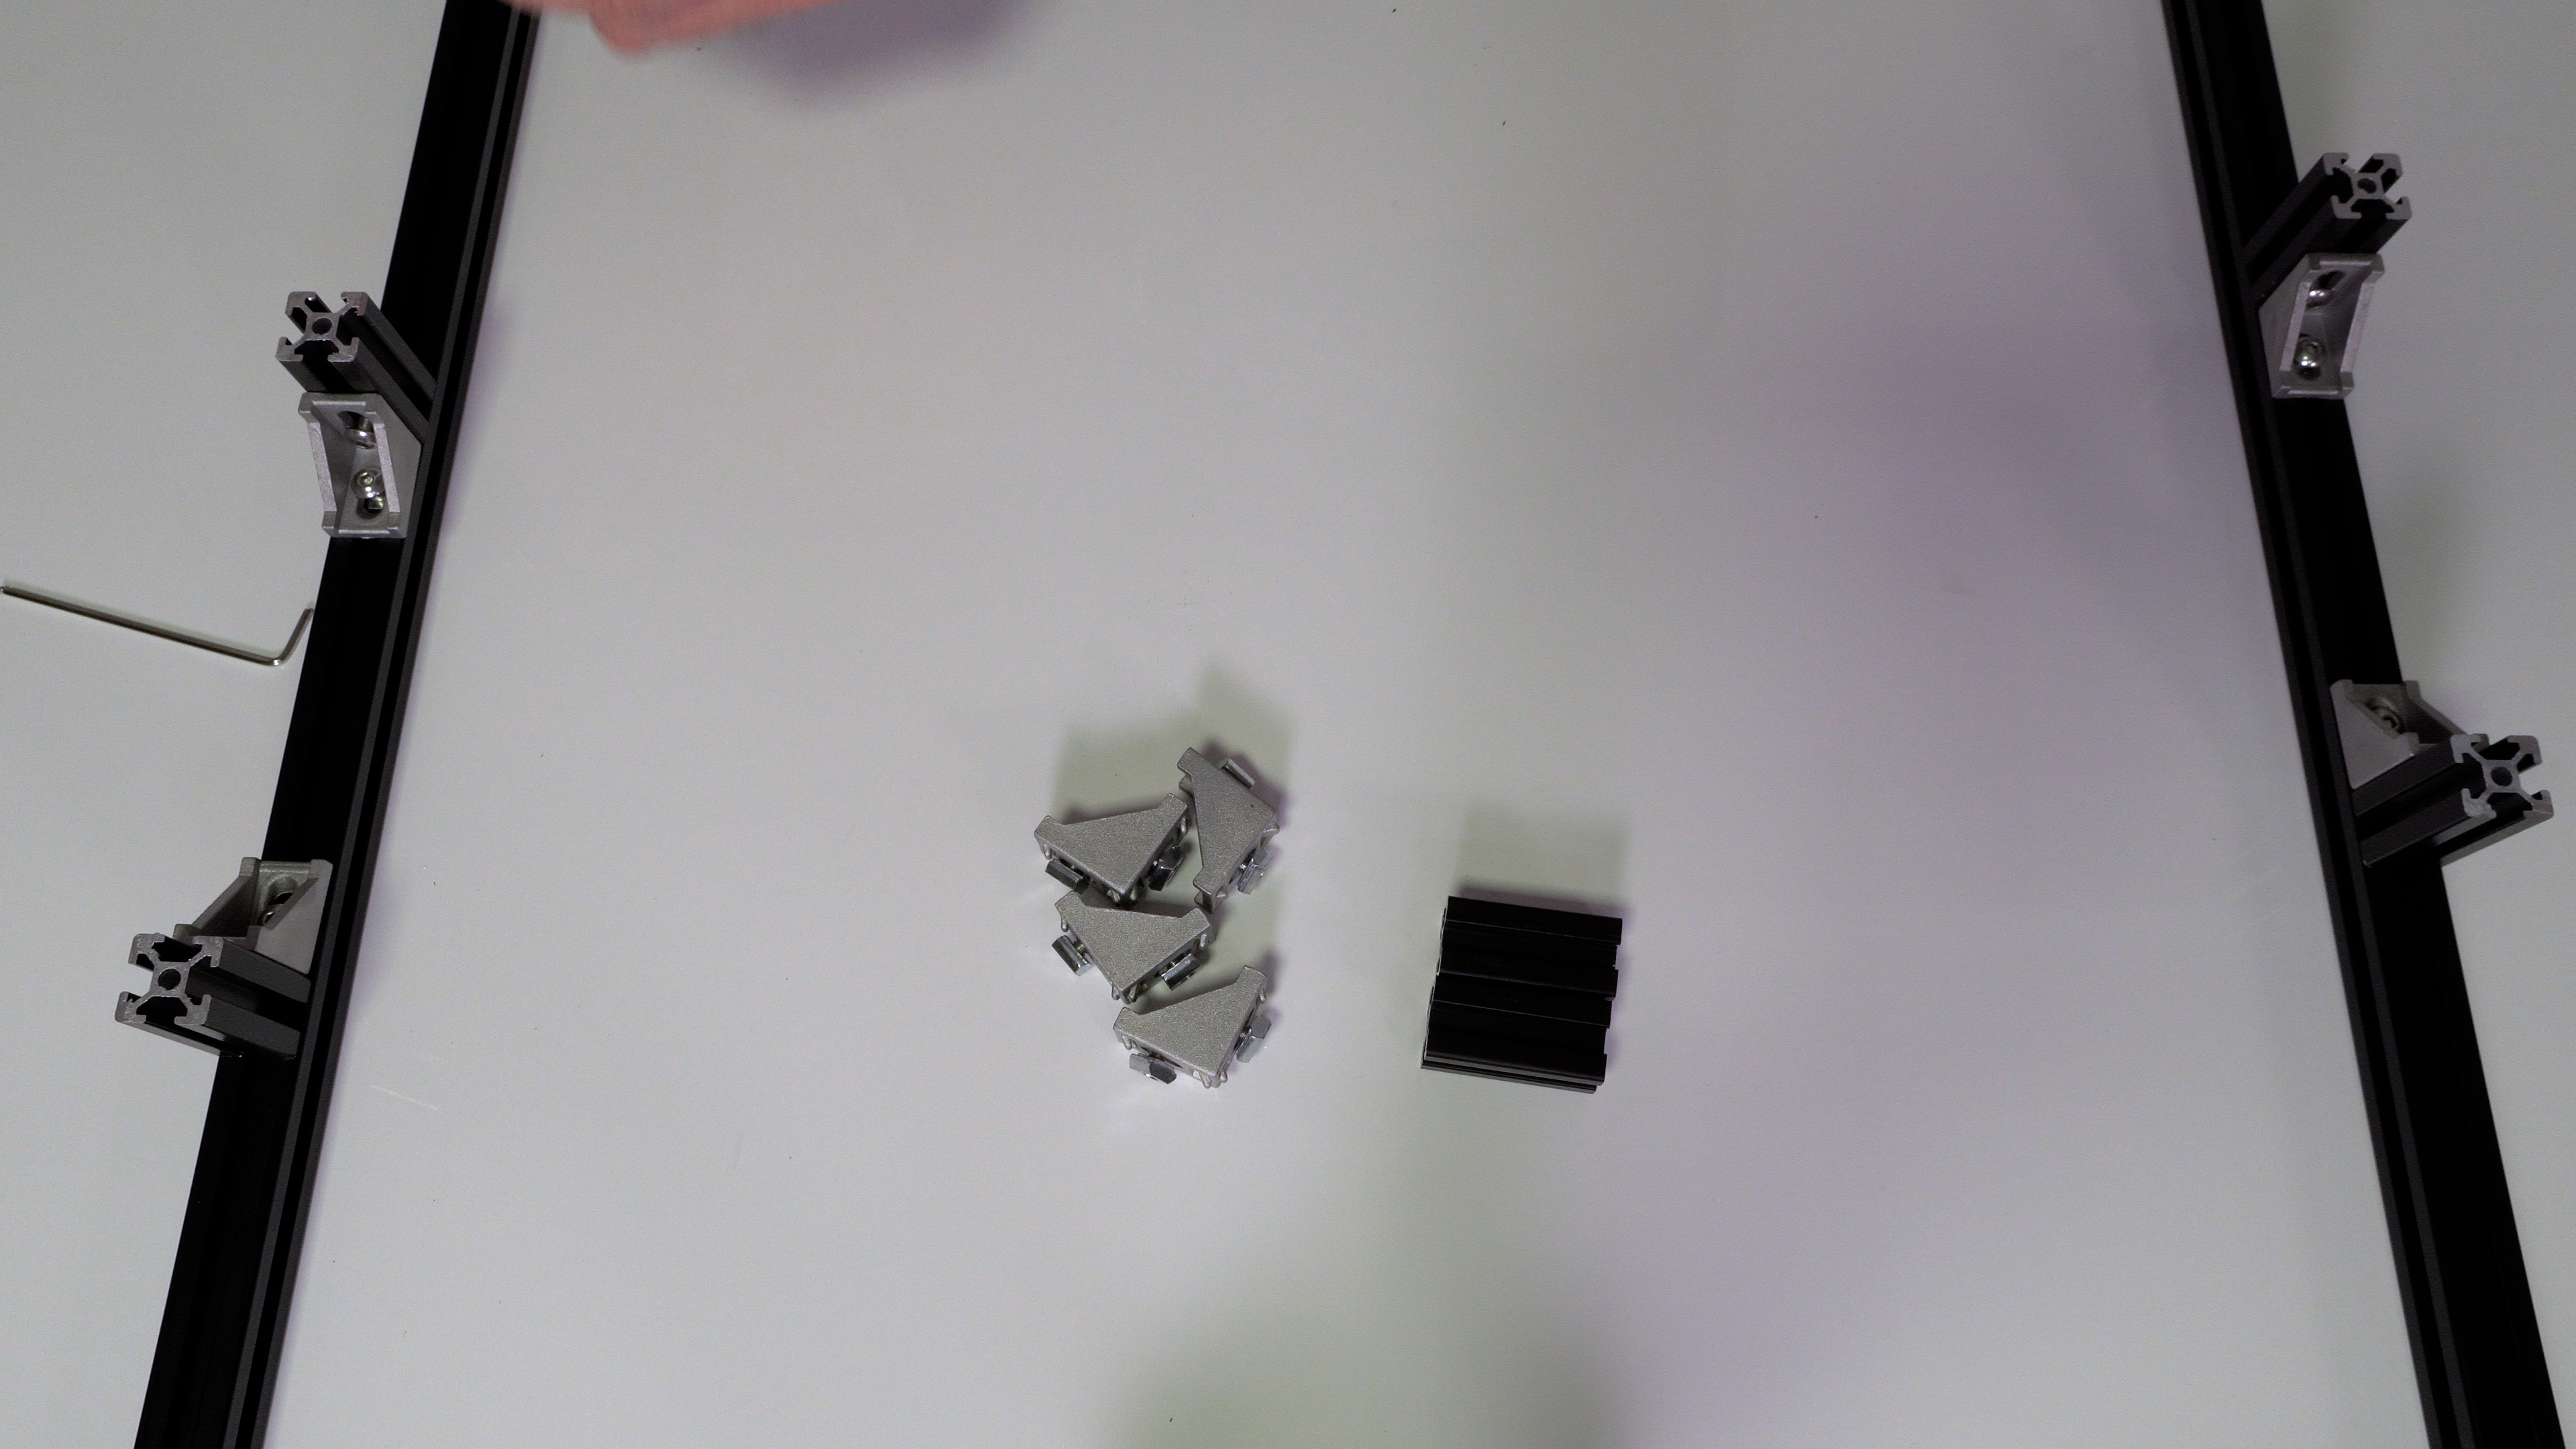
Next, put a 90 degree corner bracket on each of the small 45mm lengths and put two onto each of the side pieces and 1 on each downtube.

Last, install the pillow bearing in the middle of the two 237mm lengths to make the front brace and then attach it to the side pieces.
Flip the entire shelf over and install the rubber weatherseal to the bottom of the side rails and the top of the rear attachment arms.
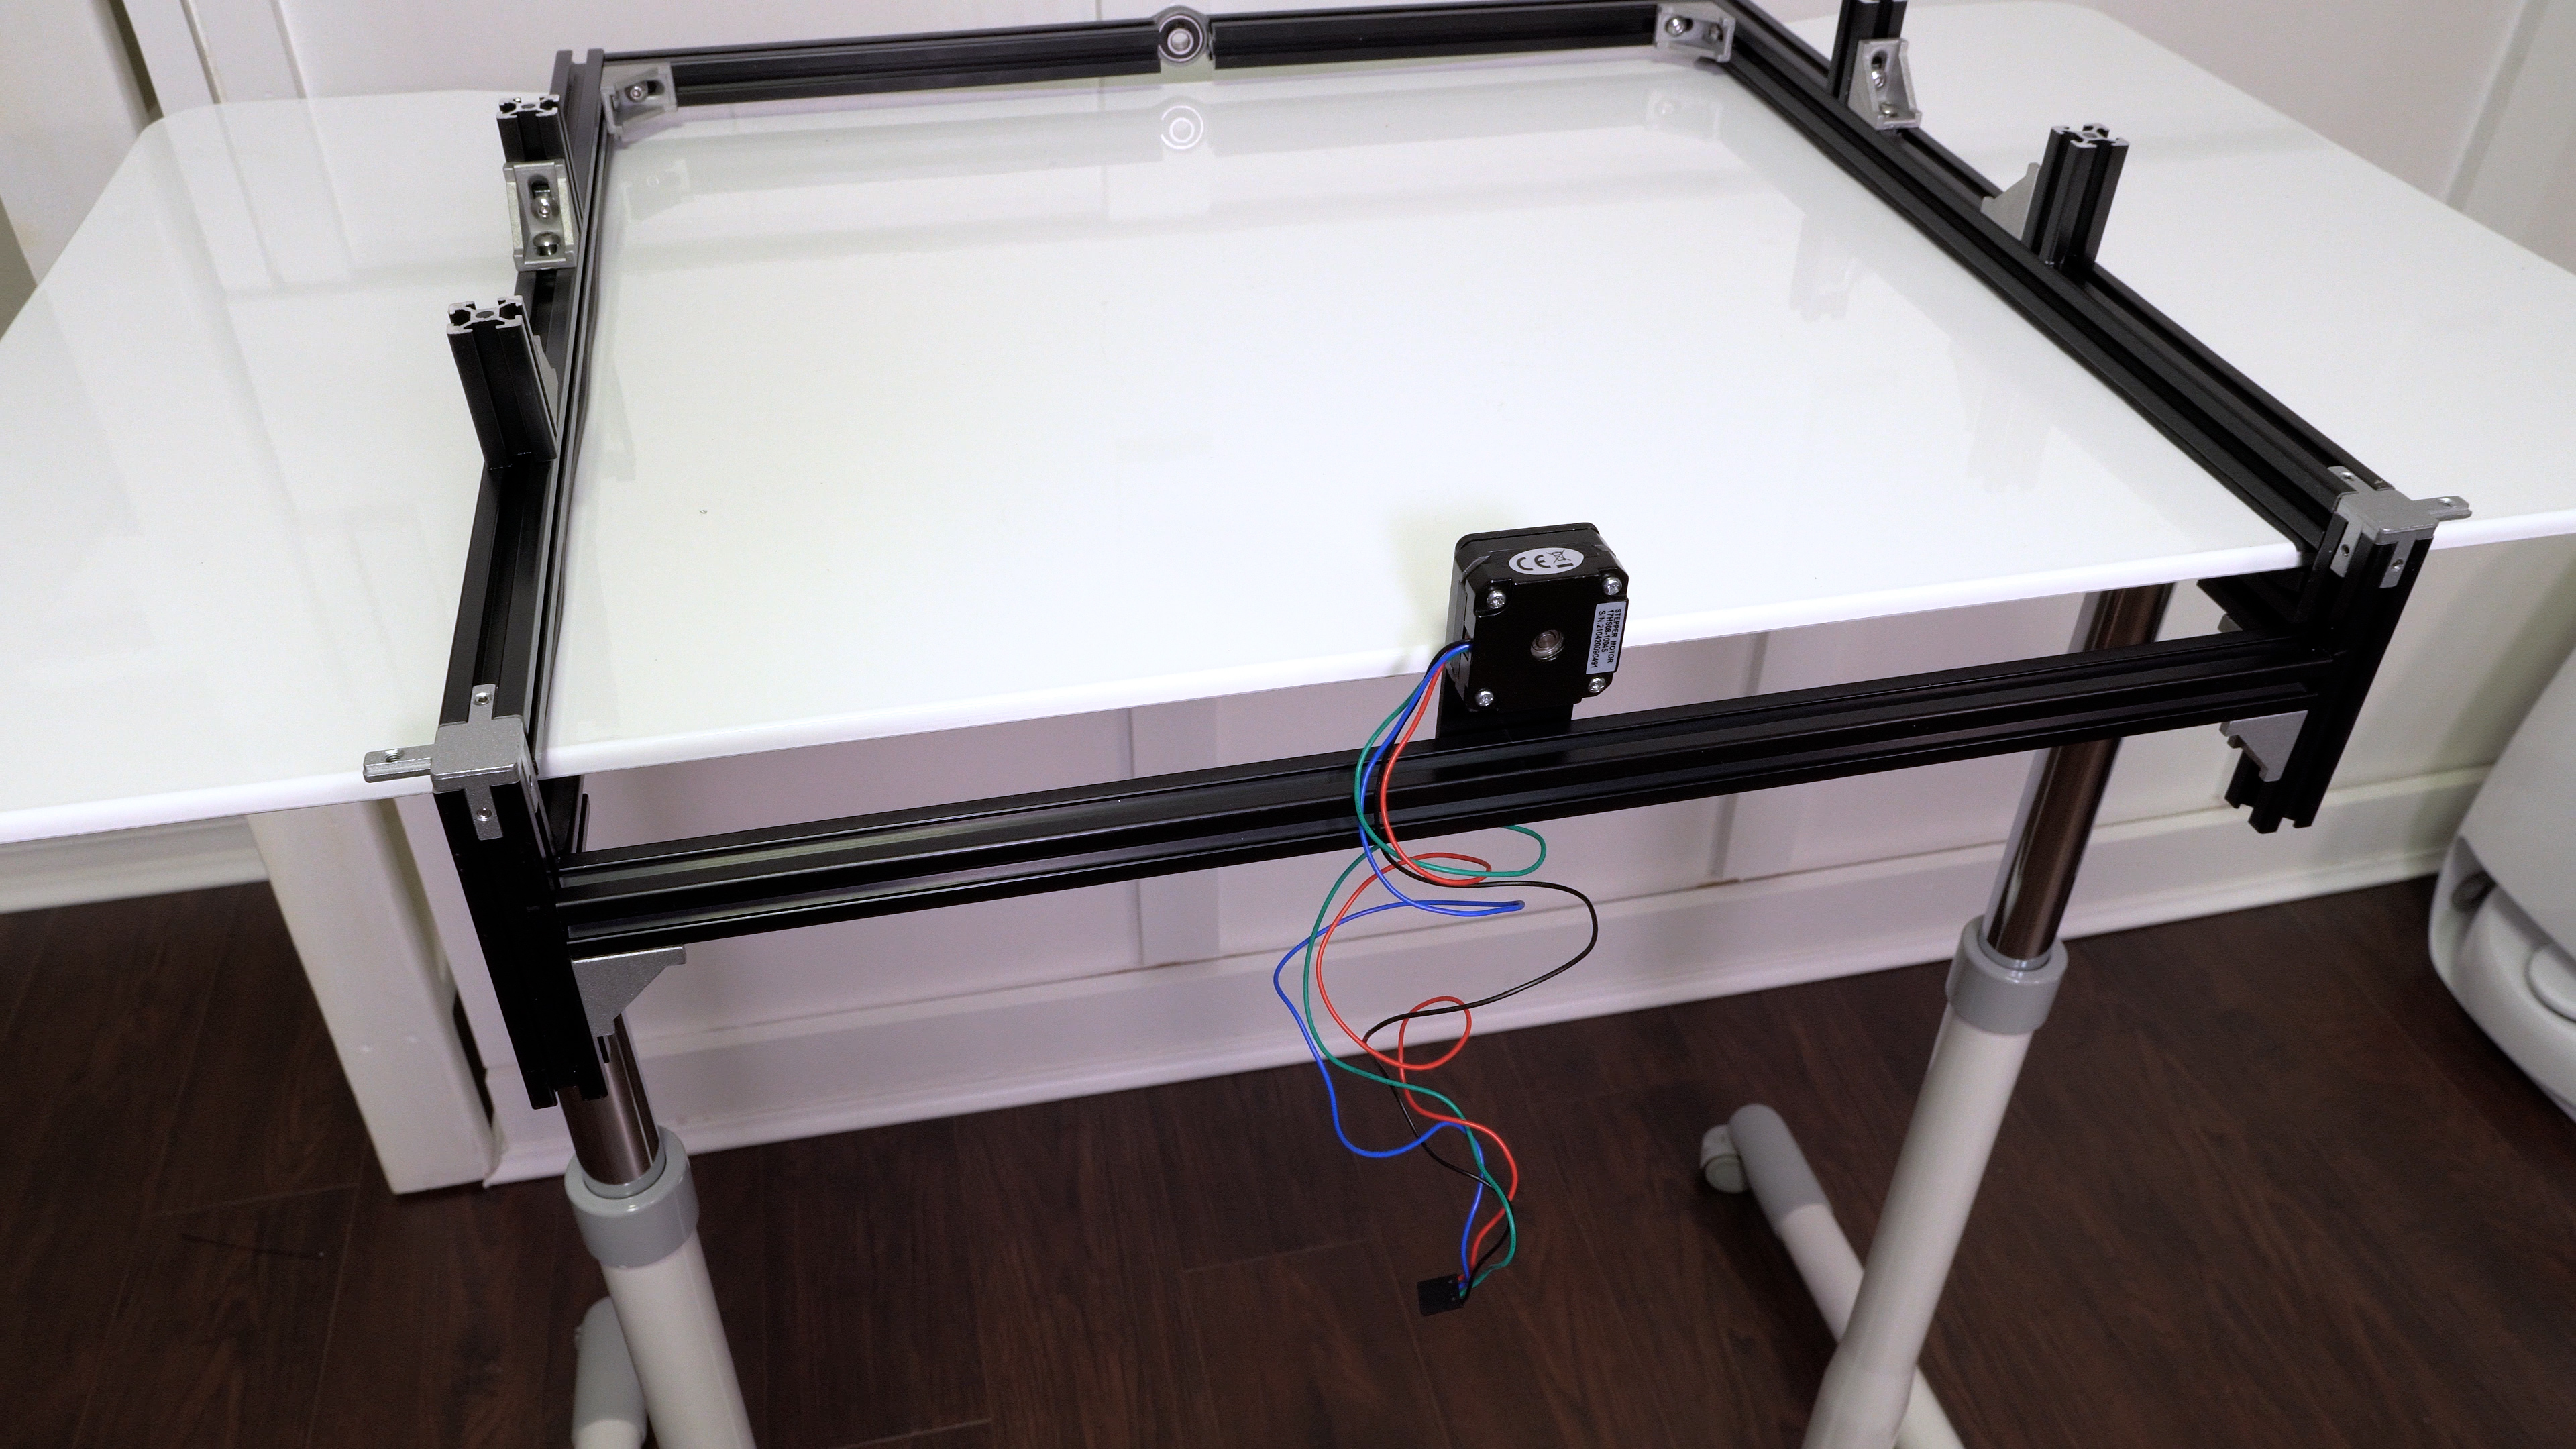
Next, using the t-nuts that you installed earlier mount the stepper motor bracket in the exact middle of your aluminum extrusion using the bottom two holes, then slide the rear cross brace down so that it’s 38mm from the top of the extrusion on both sides and tighten it down. Then using m3x5 screws attach the stepper motor to the stepper motor bracket.
Next attach the lead screw nut to the mounting block using a couple more m3 screws, then after making sure the set screws are loosened slide the lead screw through the pillow bearing, screw it through the mounting block and finally into the stepper motor coupler. If everything went well the lead screw should be perfectly lined up, but don’t tighten the set screws yet because you need to mark end of the lead screw where it comes out of the pillow bearing and cut it to size using a hacksaw. Don’t use your miter saw to cut a lead screw, it will end poorly.
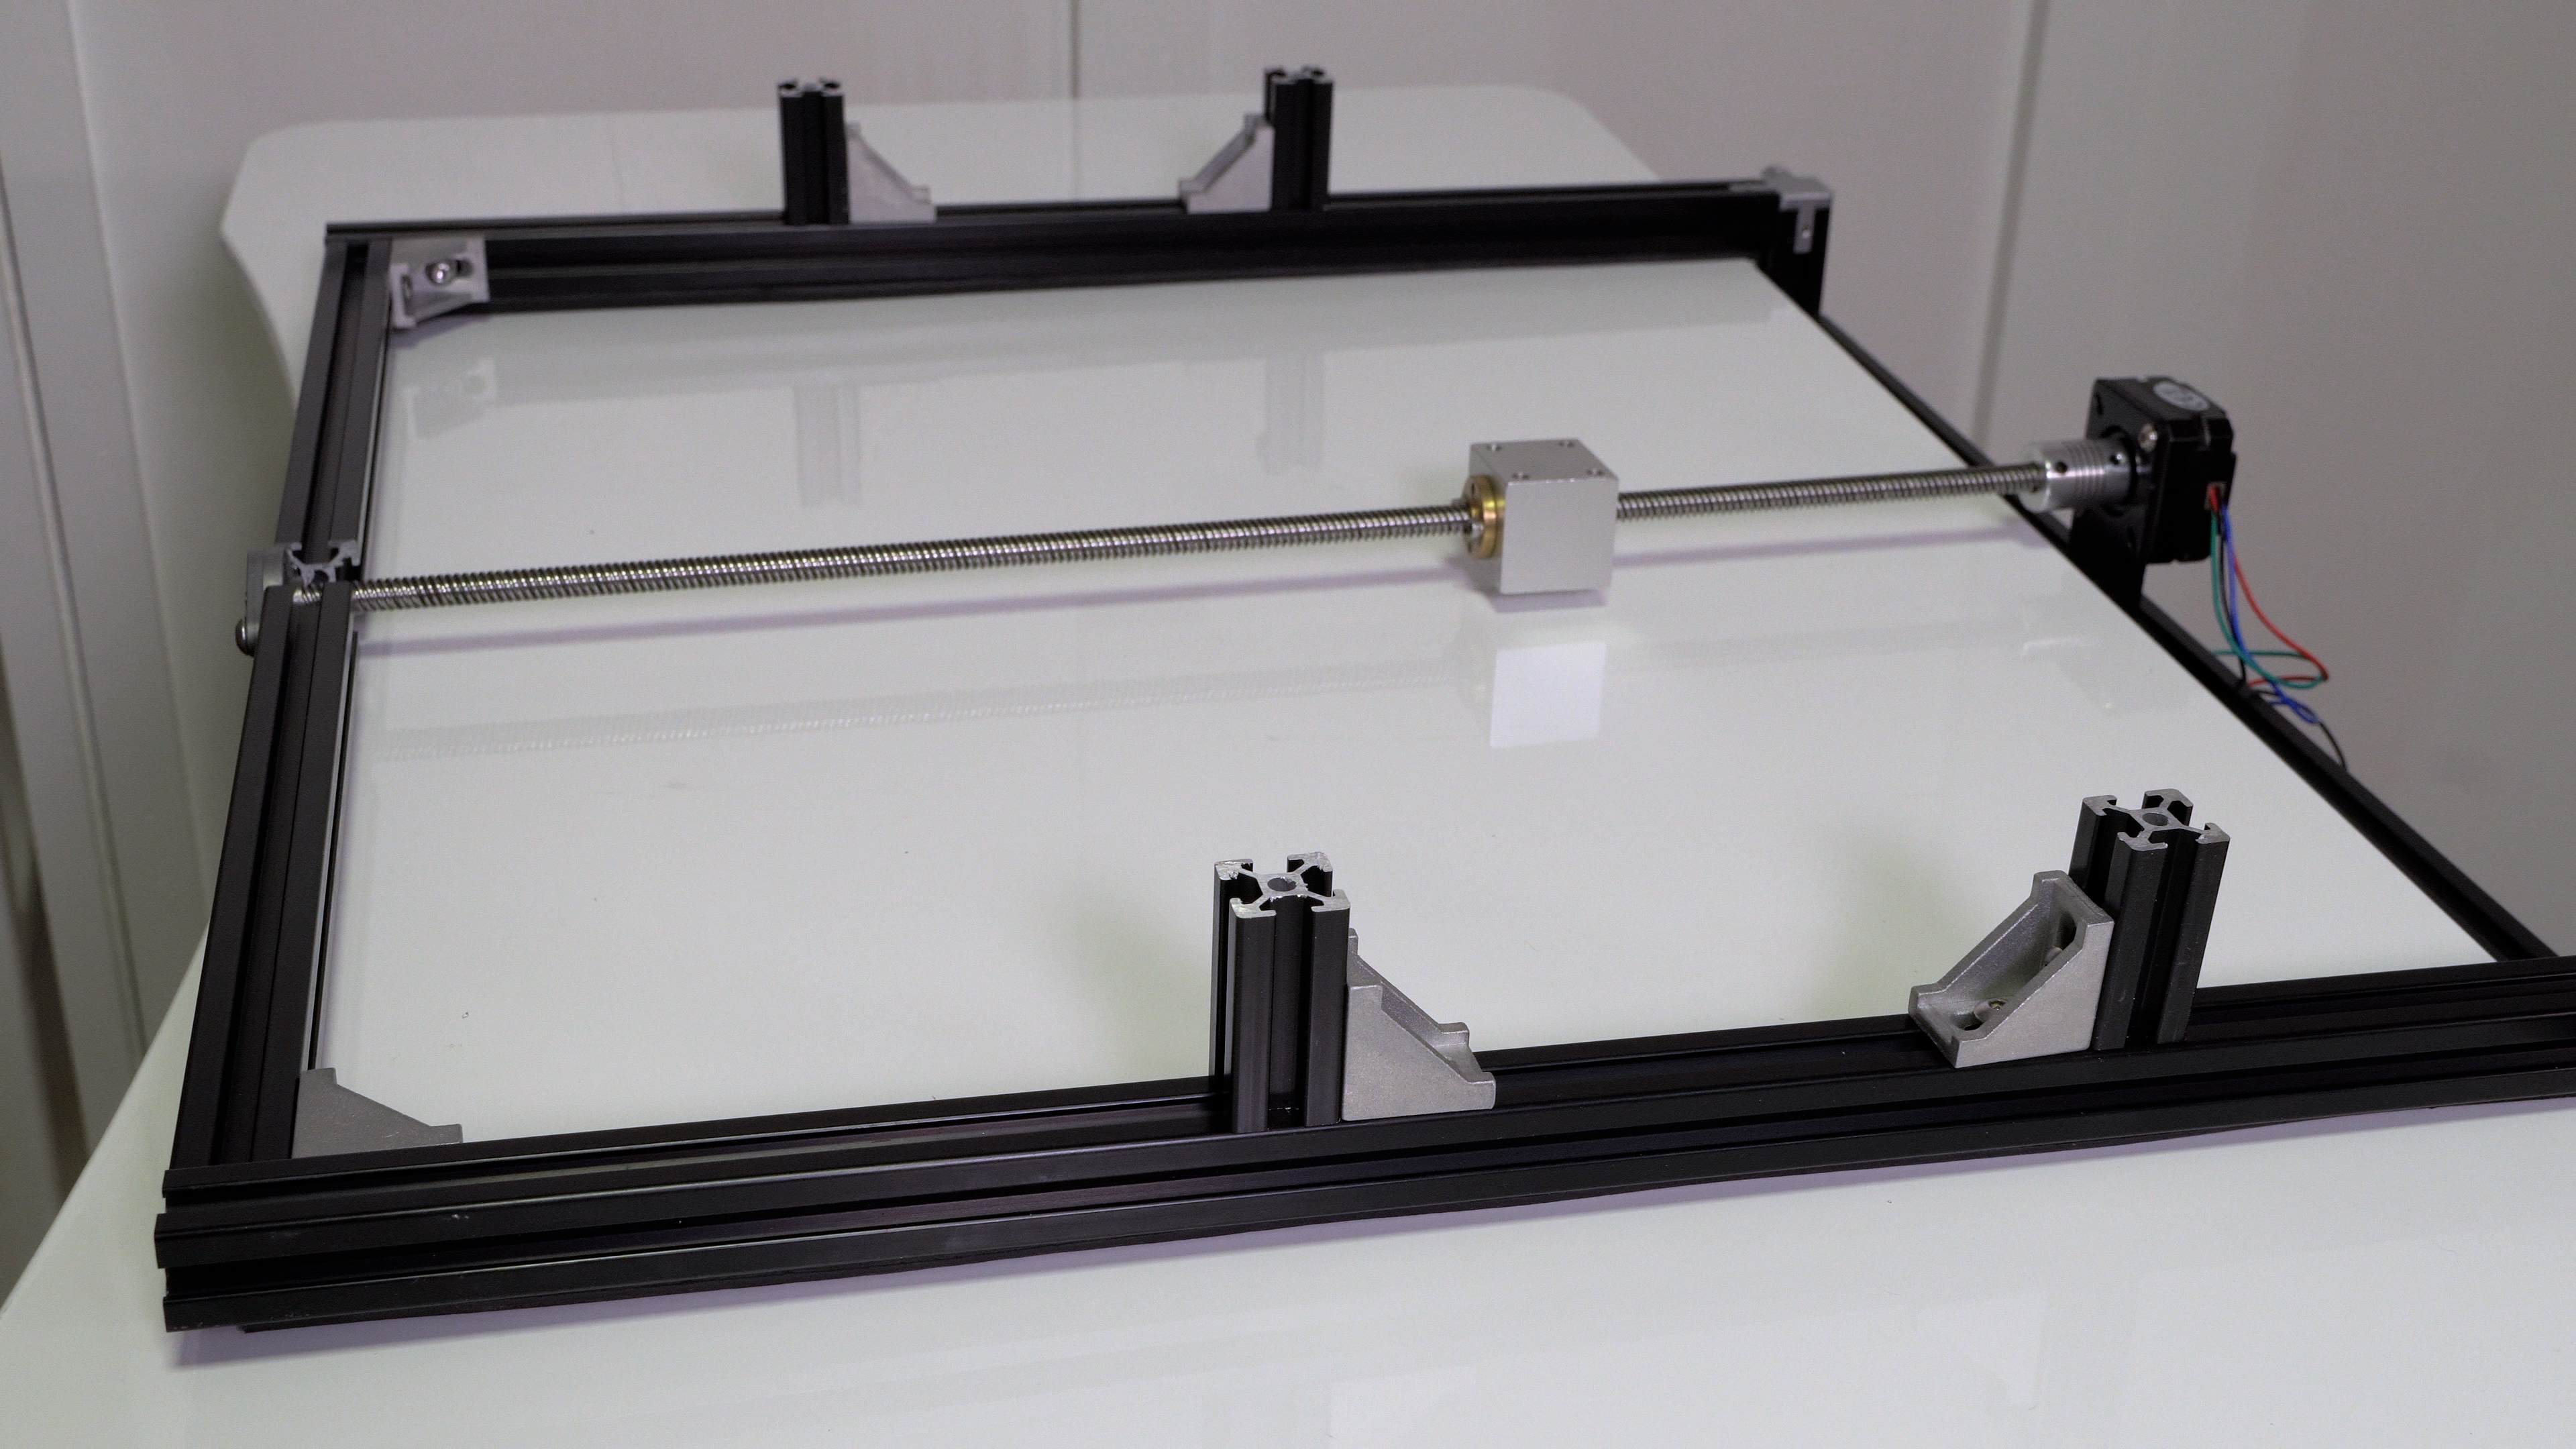
Once it’s cut, reinstall it and tighten the set screws on motor coupler, making sure one of the screws is on the flat portion of the shaft, and then tighten down the rest of the set screws on the lead screw side of the coupler, and the pillow bearing.
After that we’ll turn our attention to the shelf. Mine is made from three quarter inch plywood, but since these are just standard drawer slides you can pretty much use whatever you want If you don’t have the tools to cut plywood you can usually get it cut at your big box store for free. The size of the shelf for this build will be 500mm long and 474mm wide.
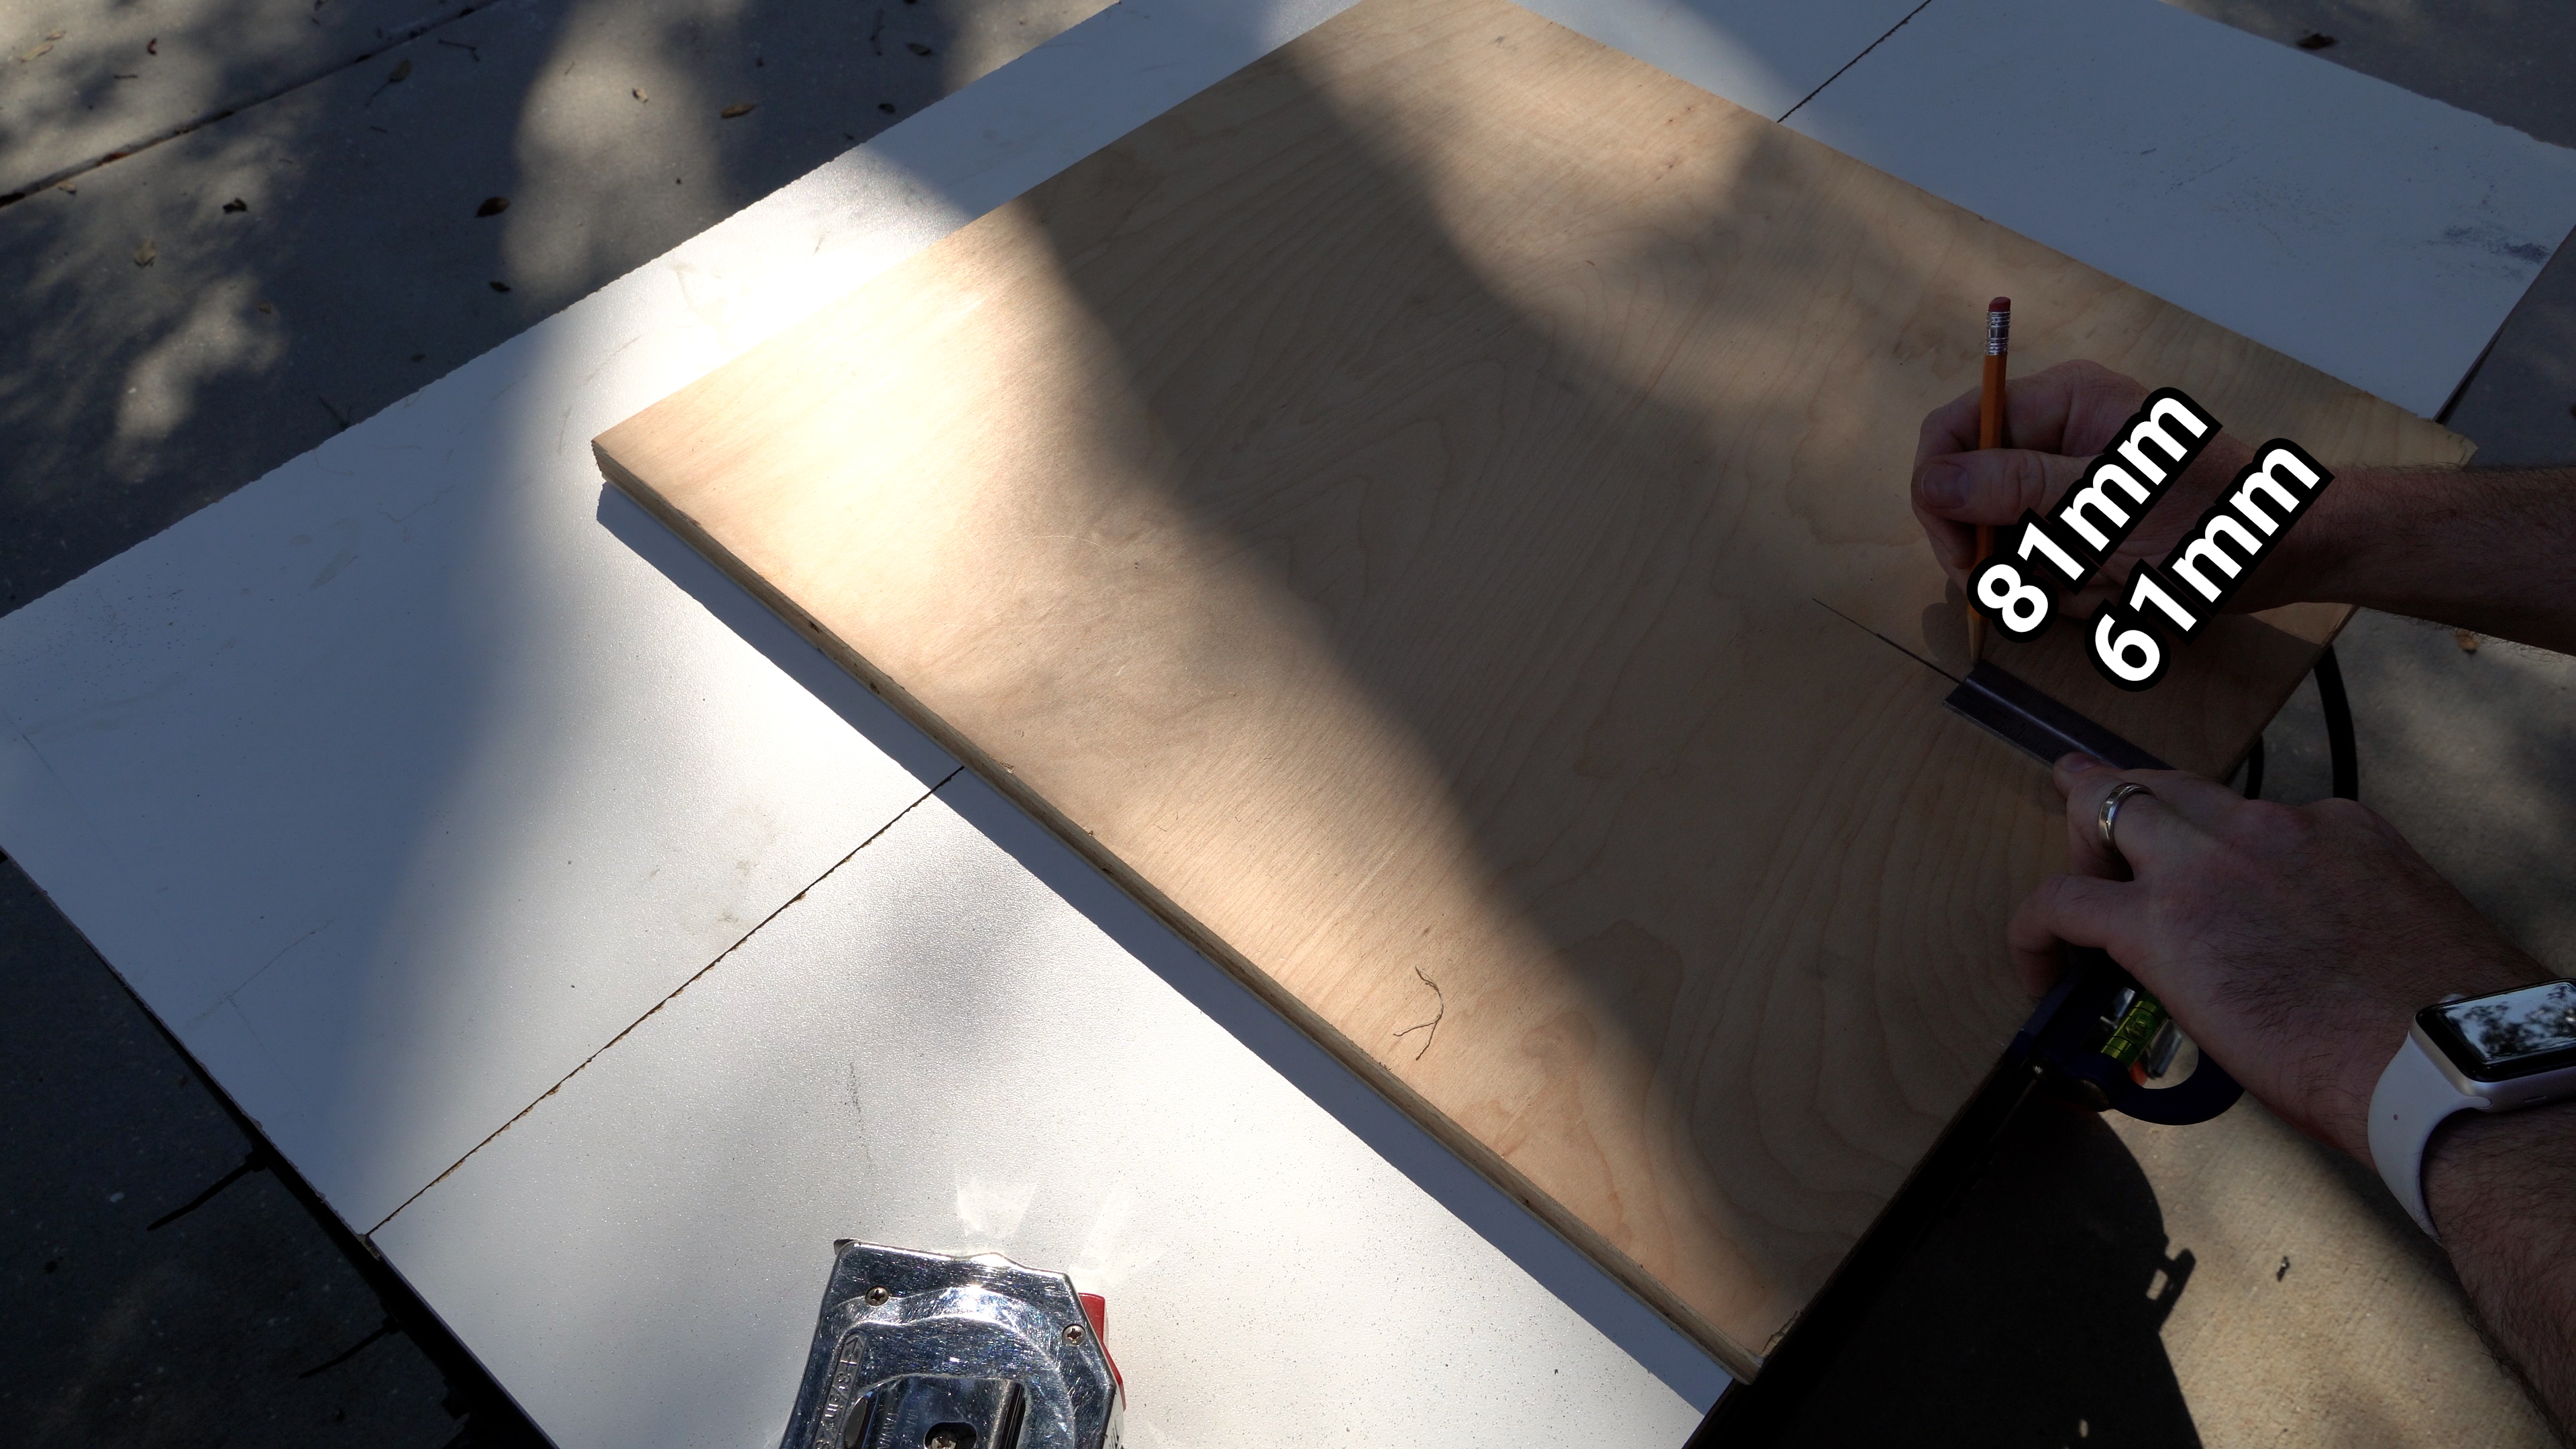
Before attaching the shelf to the slides we’re going to pre-drill the holes for the mounting block, so mark a center line down the board, then make perpendicular lines 61mm and 81mm from the back of your shelf and then mark 12mm off the center line on each of those perpendicular lines. We’re going to use M4x30 screws to attach the mounting block, so a 5mm or 3/16 drill bit will give us just a little wiggle room.
After those holes are drilled you’ll also need to cut some clearance for the stepper motor when the drawer is all the way closed so measure up 50 mm and make a notch in the back of the drawer about 100mm wide. Once that’s done it’s time to finish your shelf with any paint, stain, or sanding that you want to do.
Once that’s dry remove the mounting portion of the drawer slides by lifting the black lever and pulling them out, and then attach them to your shelf using the included screws lining up the back of the slide with the back of your shelf.
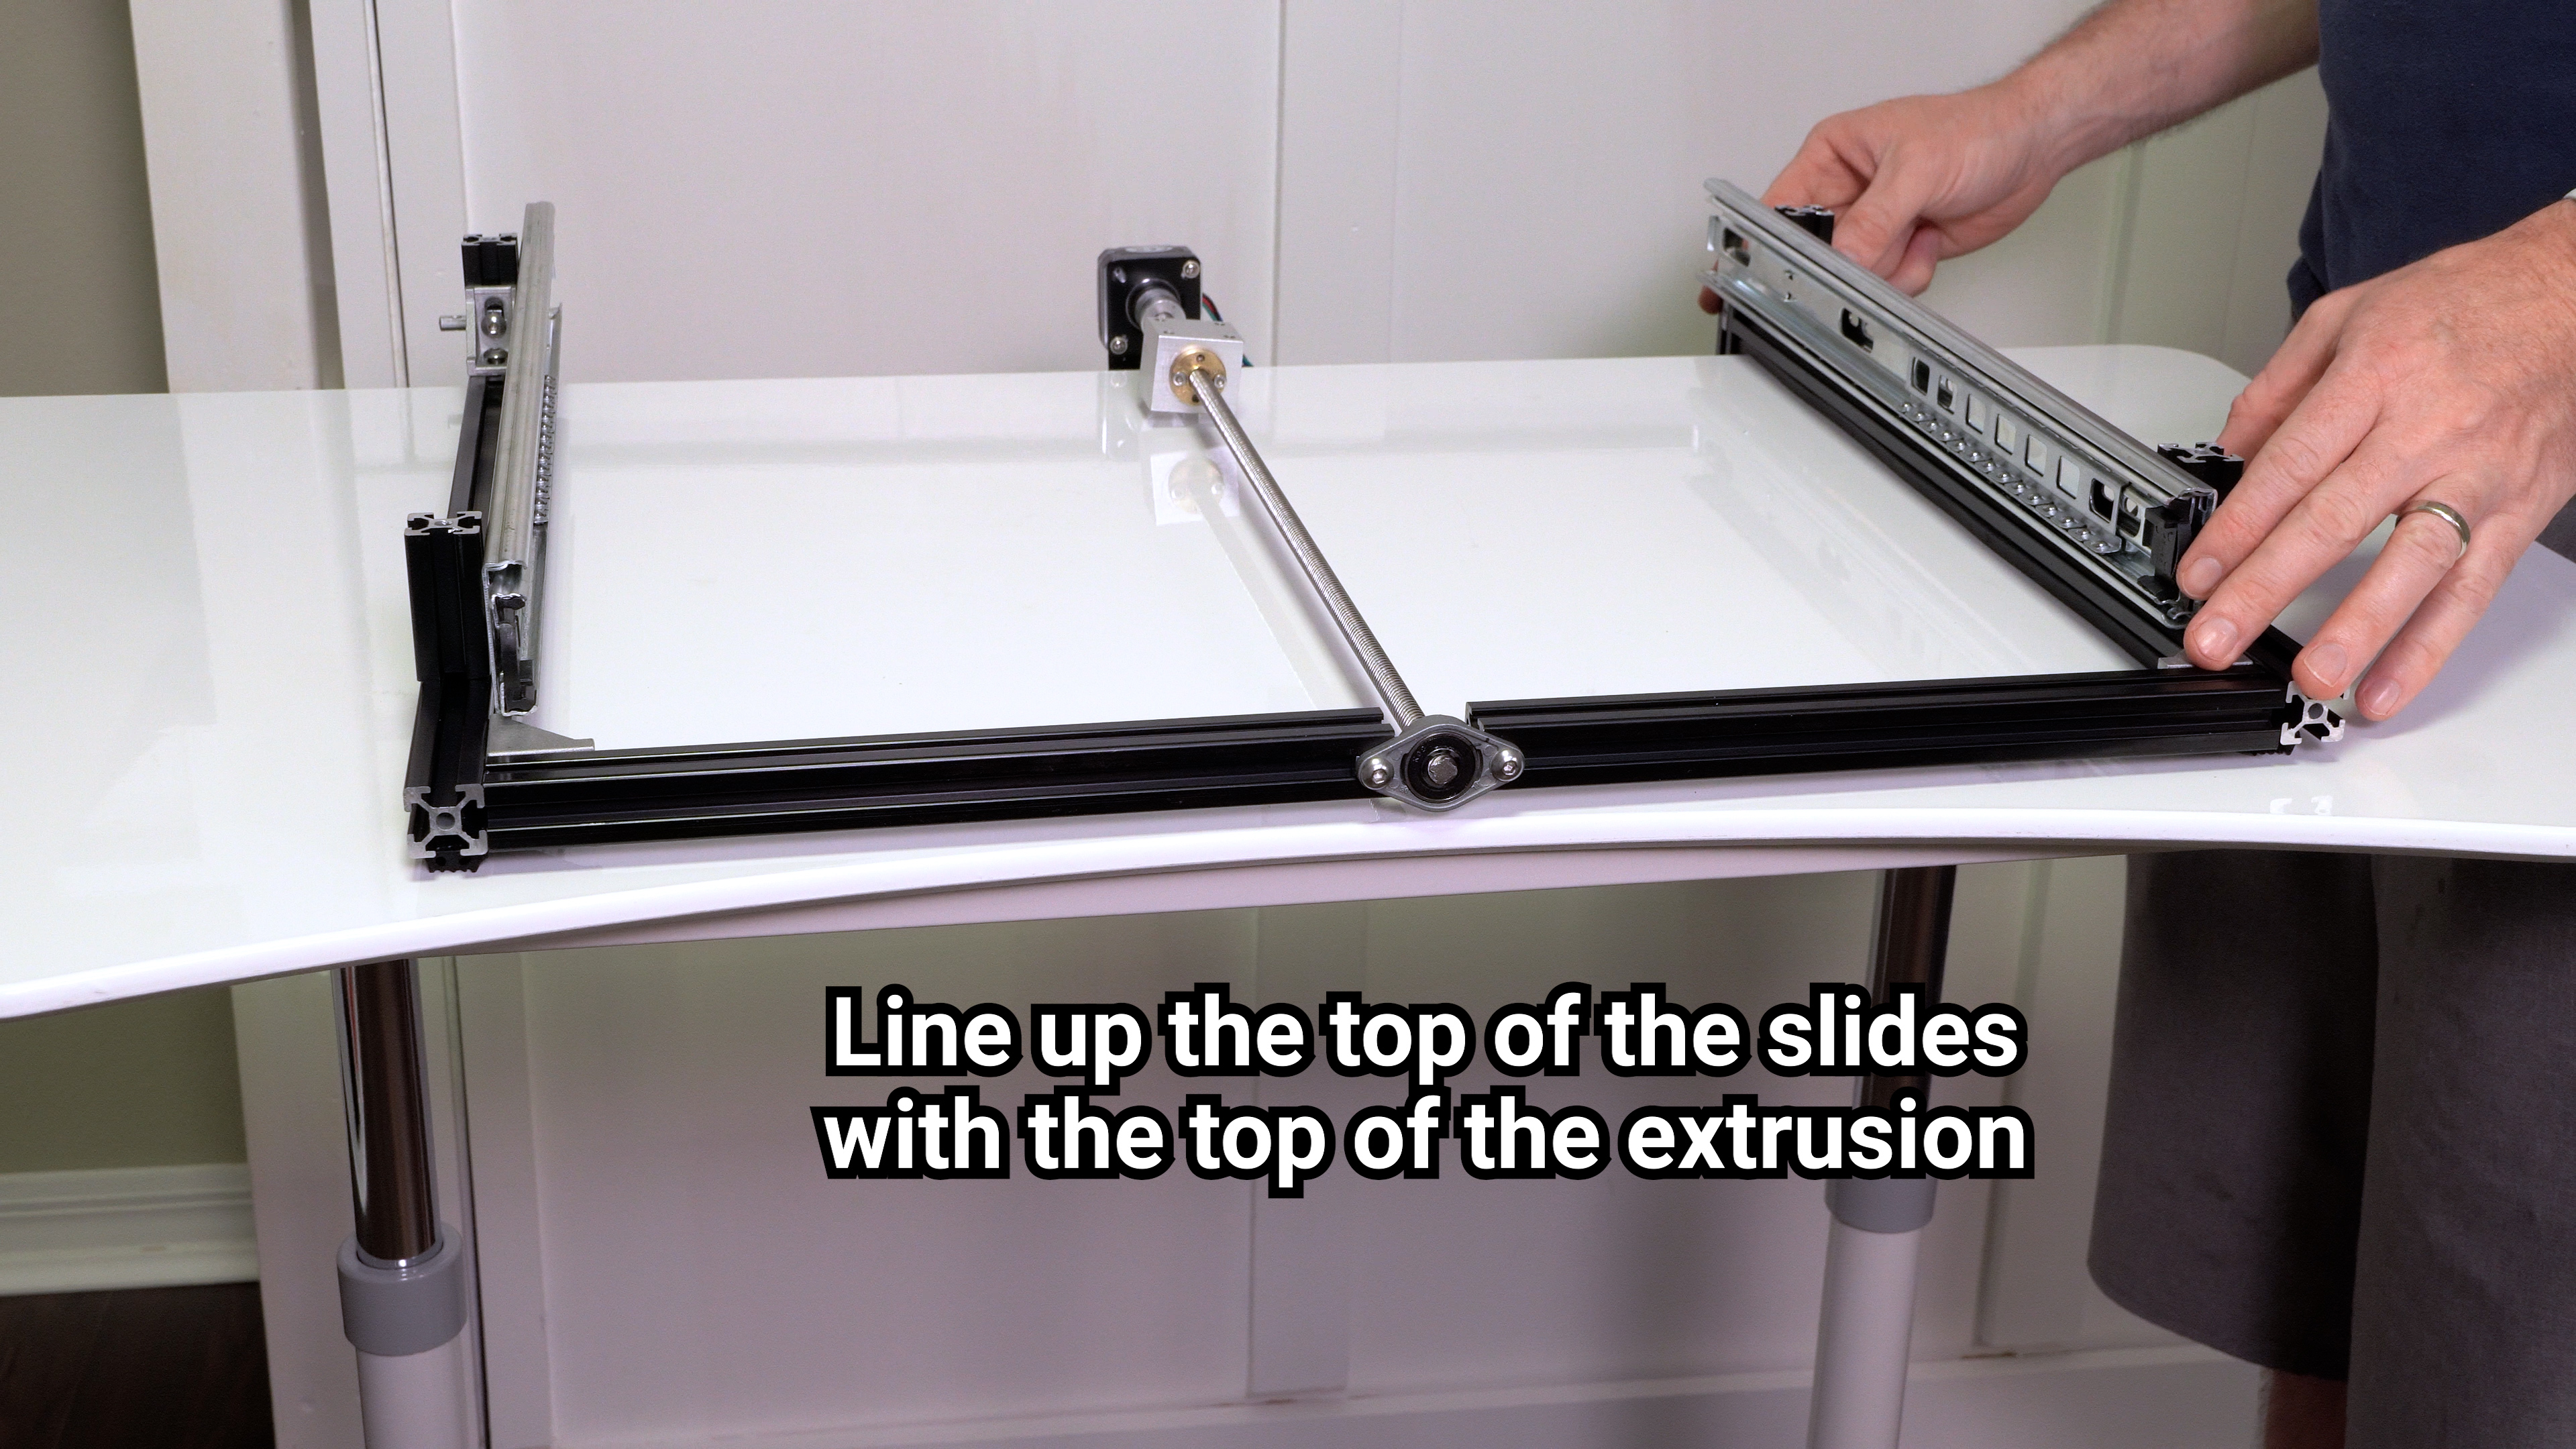
Grab the other part of the drawer slide and screw them onto the small 45mm sections of extrusion. Unfortunately, the slides are slightly too thin to mount the included m5x10 screws, so you’ll need a washer between the slide and the extrusion for each of the mounting points. Slide the mounting brackets back until the back of the drawer slide is lined up with the back of the shelf and tighten them down. The last thing to do is slide the shelf on, and line up the mounting block with holes on the shelf and attach it with 4 m4x30 screws, if these don’t line up properly, you don’t have your stepper motor mounted in the center, and you should fix it.
If you want to check clearances and test fit everything just slide your shelf over the back of your existing furniture and move the bottom attachment arms up until the rubber weather seal is compressed before tightening them back down. Your projector and shelf should easily slide in and out by just manually turning the lead screw. If it’s binding up at any point, check your alignment and your clearances. If all is well it’s time to get that motor moving.
Next is the programming, and I’ve gone back and forth in my head about the best way to release this software, but I decided tasmota was the best way to make the project accessable for everyone. For the non home assistant users Tasmota will allow you to create an amazon echo compatible switch to open and close your projector shelf, and home assistant people can still easily integrate tasmota. If you really want to use ESPHome here’s the YAML you’ll need for that:
esphome:
  name: projector-slider
  platform: ESP8266
  board: d1_mini
# Enable logging
logger:
# Enable Home Assistant API
api:
  services:
      - service: control_stepper
        variables:
          target: int
        then:
          - stepper.set_target:
              id: my_stepper
              target: !lambda 'return target;'
      - service: report_stepper_position
        variables:
          target: int
        then:
          - stepper.report_position:
              id: my_stepper
              position: !lambda 'return target;'
      - service: stepper_speed
        variables:
          target: float
        then:
          - stepper.set_speed:
              id: my_stepper
              speed: !lambda 'return target;'
      - service: stepper_acceleration
        variables:
          target: float
        then:
          - stepper.set_acceleration:
              id: my_stepper
              acceleration: !lambda 'return target;'
ota:
  password: "dbf6b12139b6bbe7229892fb71814c40"
wifi:
  ssid: "yourwifi"
  password: "yourpassword"
  # Enable fallback hotspot (captive portal) in case wifi connection fails
  ap:
    ssid: "Projector-Slider"
    password: "Ef4OQ54v5J35"
captive_portal:
stepper:
  - platform: a4988
    id: my_stepper
    step_pin: D5
    dir_pin: D6
    max_speed: 1000 steps/s
    # Optional:
    acceleration: 1500 steps/s^2
    deceleration: 1500 steps/s^2
    sleep_pin:
      number: D7
      inverted: true
To install tasmota on your D1 mini first download tasmotizer from the link in the description, and also download the tasmota.bin file. This is a custom version of tasmota that I compiled so it can control the DRV8825 stepper driver, the standard tasmota.bin file from the main tasmota github will not work for this project.
Plug your D1 mini into your computer’s usb port and open tasmotizer. Select BIN file and point it to the tasmota.bin that you downloaded. Check the boxes for self reseting device and erase before flashing and then press tasmotize.
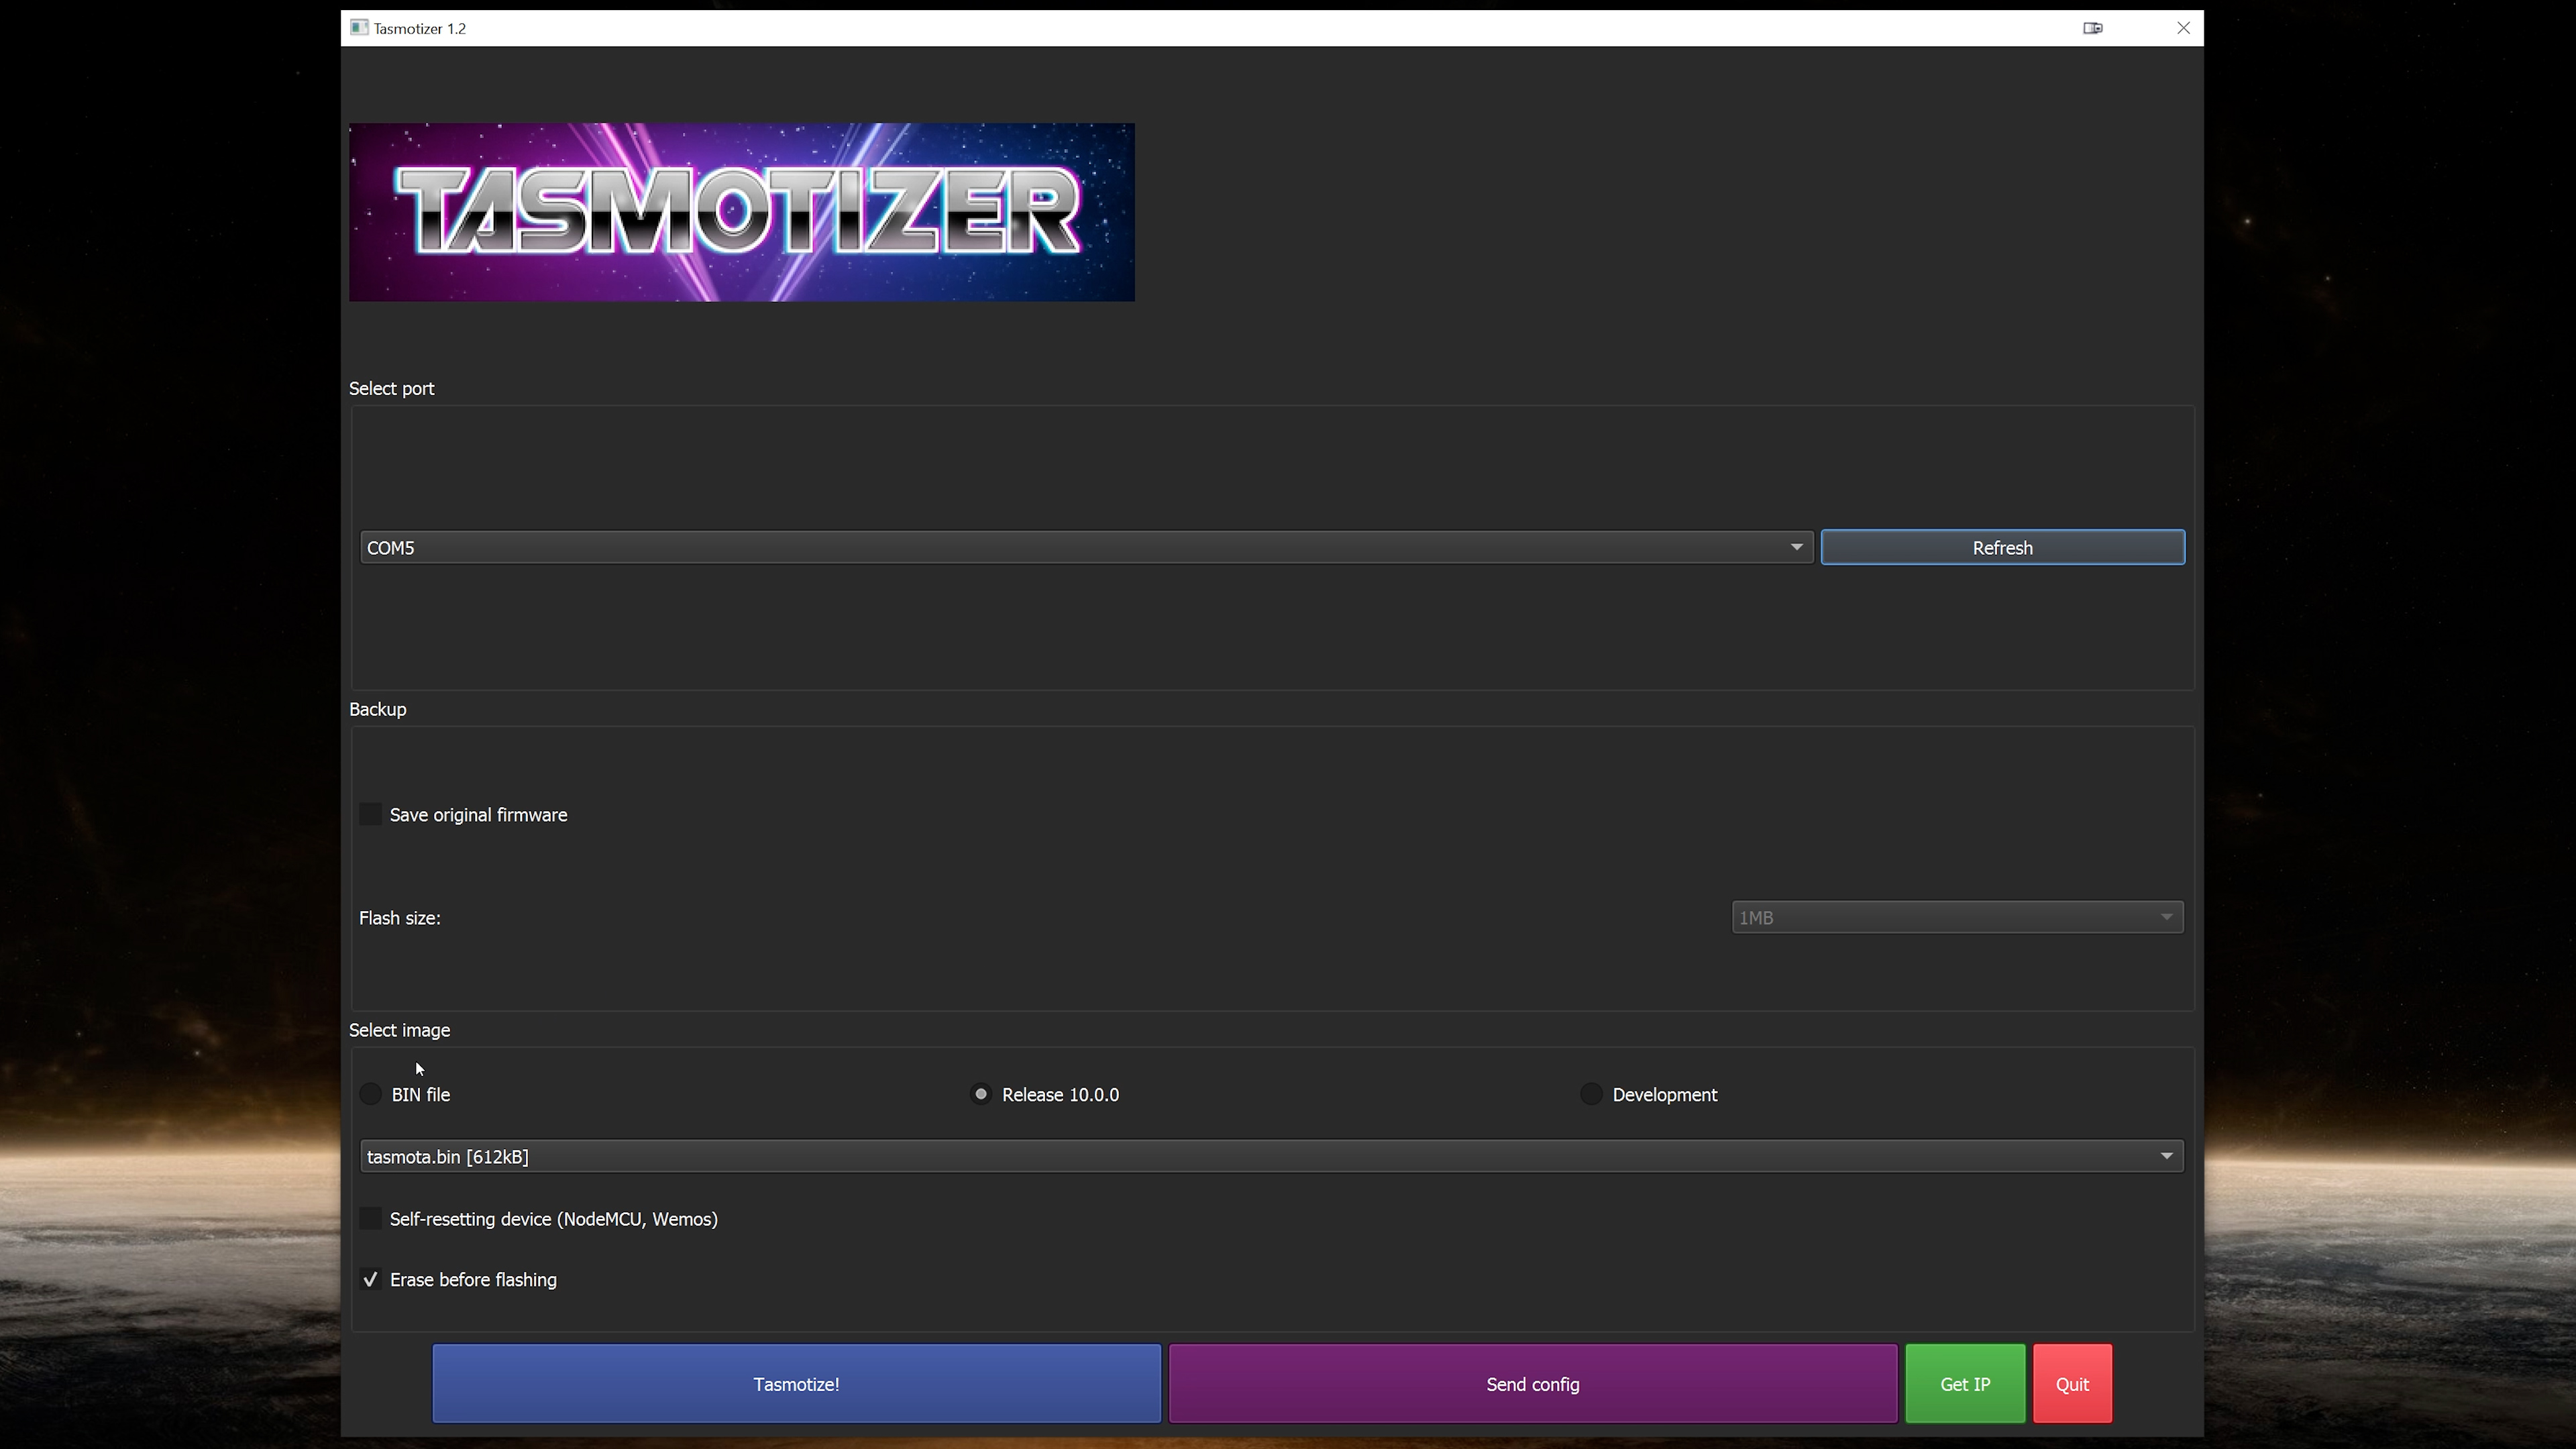
After that finishes click on send config and put in your wifi information, and then select template and paste in this template:
{"NAME":"D1 Mini Projector Shelf","GPIO":[224,1,1,1,1,1,1,1,3712,3776,3744,1,1,1],"FLAG":0,"BASE":18}
Once that information is sent hit the get IP button and copy that ip address into your browser.
Next we’re going to hook up all the hardware. The four main components you’ll need are a voltage converter, a D1 mini, a DRV8825 stepper driver, and a 12v power supply.
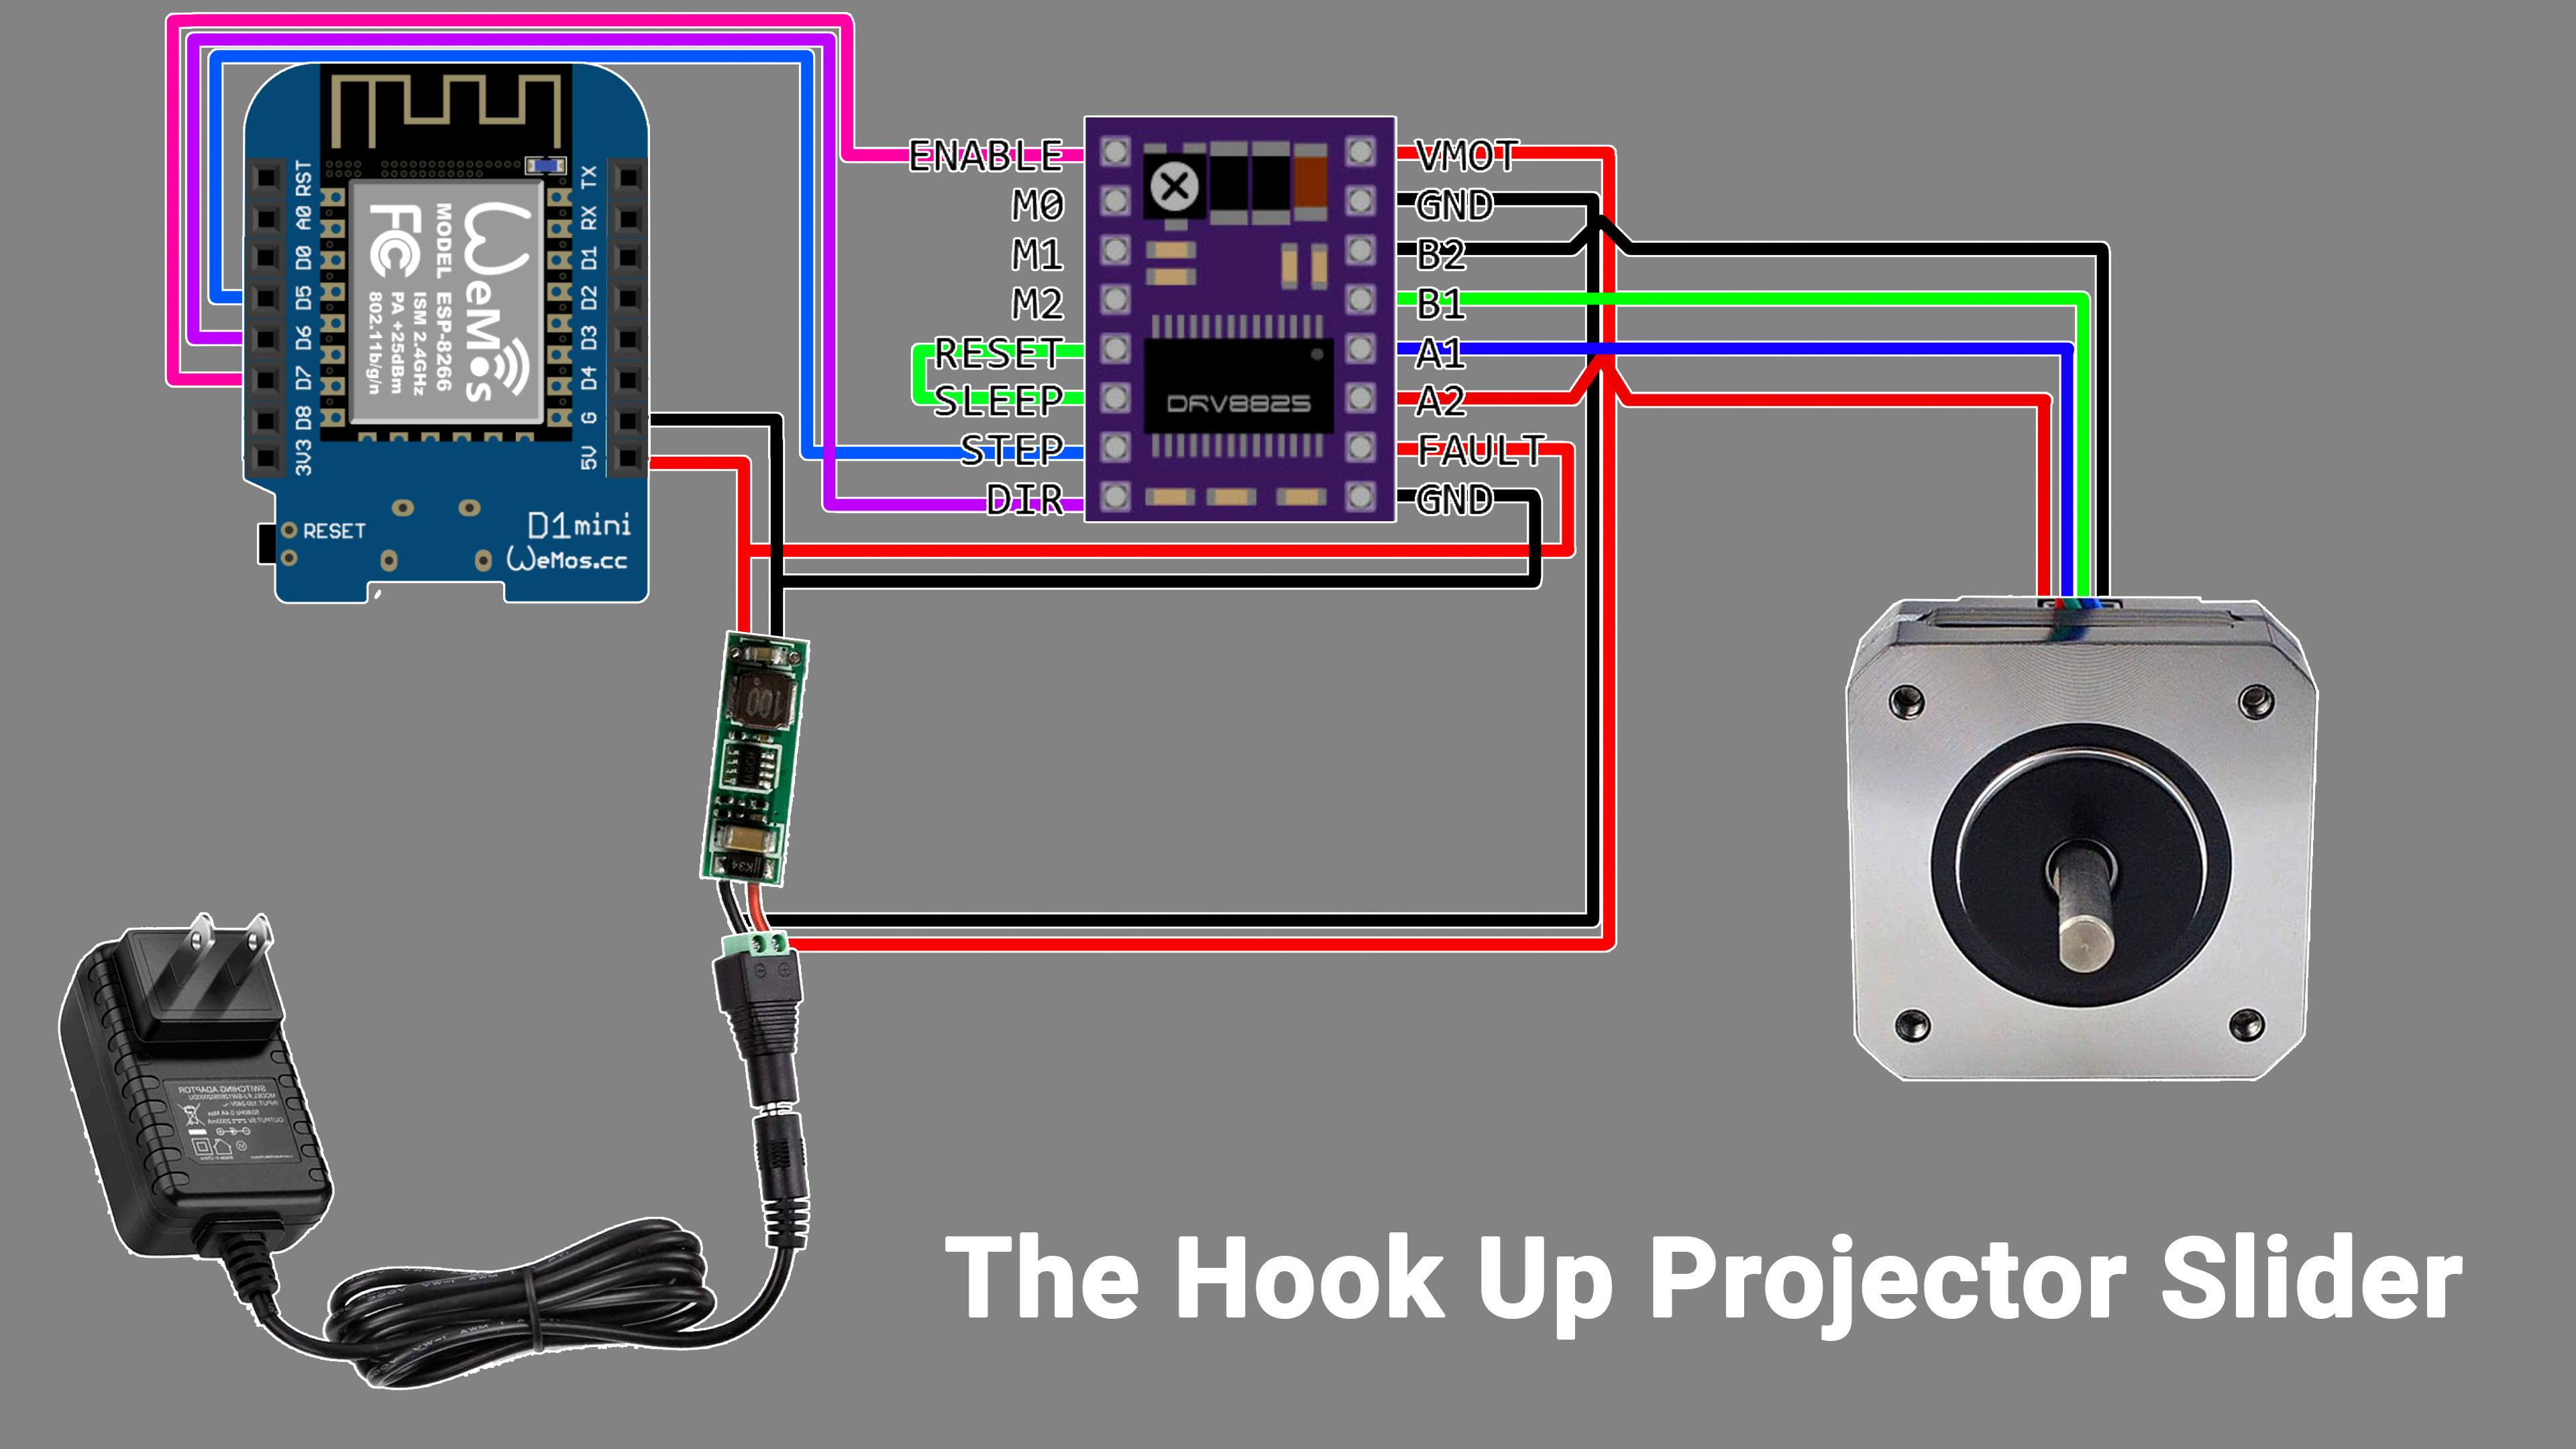
I’m not going to spend a lot of time talking about how to hook these up, because it’s easier to just look at the wiring schematic, but basically the D1 mini and stepper driver will be powered by the output of the buck converter set to 5V, while the motor power pins on the stepper drive connect directly to the 12v power supply. The stepper motor wires get attached to the driver in black, green, blue, red order, then the D1 mini connects to the driver via the D5, D6, and D7 pins.
On this driver we are going to permanently short the sleep pin to the reset pin, and use the enable pin to sleep the device.
Next go to the IP address of your new tasmota device and click on console. First type
motormove 20
and the motor should move in one direction, then type
motormove -20
and it should move the other direction. Set the speed of the motor using the command
MotorRPM 300.
Here are some common wiring issues you might run into: If your stepper motor is getting really hot when it’s not moving, your enable pin is not hooked up properly and you should disconnect it from power until you figure out the problem, the motor shaft should always move freely when not in use. If your motor is moving in the opposite direction that you think it should that means you have your A+, A- and B+, B- wires reversed so you can either flip around your positive and negative wires, or just change the positive and negative values you are sending, and last if your motor only moves in one direction it means your dir pin is not hooked to the right pin, or not connected properly.
If you built the exact shelf from this video then it will take 9900 steps to open and close the shelf completely, so after adjusting the speed type
motormove 9900
and your shelf should extend all the way out, then type
motormove -9900
and it should go all the way back in. If you need to fine tune the number of steps this is the time to do that, and just remember how many steps you need. Next we’re going to add three rules to tasmota using this long command.
backlog rule1 on Power1#state=0 do MotorMove -9900 endon on Power1#state=1 do MotorMove 9900 endon on system#boot DO MotorRPM 300 endon; rule1 1; MotorRPM 300;
Basically this monitors a dummy toggle switch and if it turns to on it moves the motor in the positive direction and off moves it in the negative direction. This also ensures that every time tasmota restarts it sets the correct speed for the stepper motor.
Now from the home screen of tasmota you should be able to press the toggle button to move the shelf in or out, and if that works then the last thing to do is turn on the amazon echo feature which is in configuration, configure other, then select belkin wemo and give your shelf a name. Hit save and ask your echo device to discover devices and you’re all set.
Home assistant users can integrate tasmota using MQTT, or like I said, there’s an ESPHome template on my website if that’s what you’re into.
If you’ve got questions on this project the best way to get a hold of me is to leave a comment on this video, or come join the thousands of automators on “the hook up home automation” facebook group. I know it’s tempting to leave a github issue, but the truth is that I’m just not very good at checking those, and my email is typically used for business purposes, so although I do respond to troubleshooting emails occasionally, it’s definitely not my preferred method.
Thank you so much to my patrons over at patreon for your continued support of my channel, and if you’re interested in supporting my channel please check out the links in the description. If you enjoyed this video please consider subscribing and as always thanks for watching the hookup.