Cheap Projector Settings
January 5, 2024If you’re one of the thousands of people who got one of these inexpensive projectors in the last few weeks, hopefully you’re already enjoying it. But in this quick video I’m going to show you a few cheap and free changes you can make to significantly increase picture quality from something that looks like this, into something more like this. For this video I’ll be using the Happrun H1 projector, which has been my budget pick for the last two years, but this stuff applies to almost any sub $200 projector.
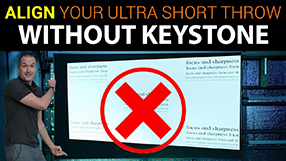
First, the biggest pain point on these projectors is focus, since cheap projectors use cheap optics which have a much smaller sweet spot where the entire image will be in focus. Another issue is that proper focus requires the use of both the keystone tilt mechanism and the focus wheel, which can be tricky.
To start, get your projector set up as close to centered on your screen as possible and use the focus wheel to get the middle horizontal section of the screen in focus as much as you can. After that, use the keystone adjustment lever to get the top and bottom of the screen to be in focus at the same time. It might not be possible to get it perfect but the good news is that slight focus issues are really only noticeable with text, so if you watch a lot of sports like golf where the scoreboard is in the top left, you should favor top focus, but football scores are usually at the bottom, so perfect bottom focus makes more sense.
Unfortunately, using the keystone adjustment for focus sometimes leaves you with trapezoid shaped edges, so having a screen with a thick black border can help you hide that. My favorite budget screen is the AKIA 100” Manual B, which is usually around $70, but dark curtains can also work if you’re projecting straight onto a wall.
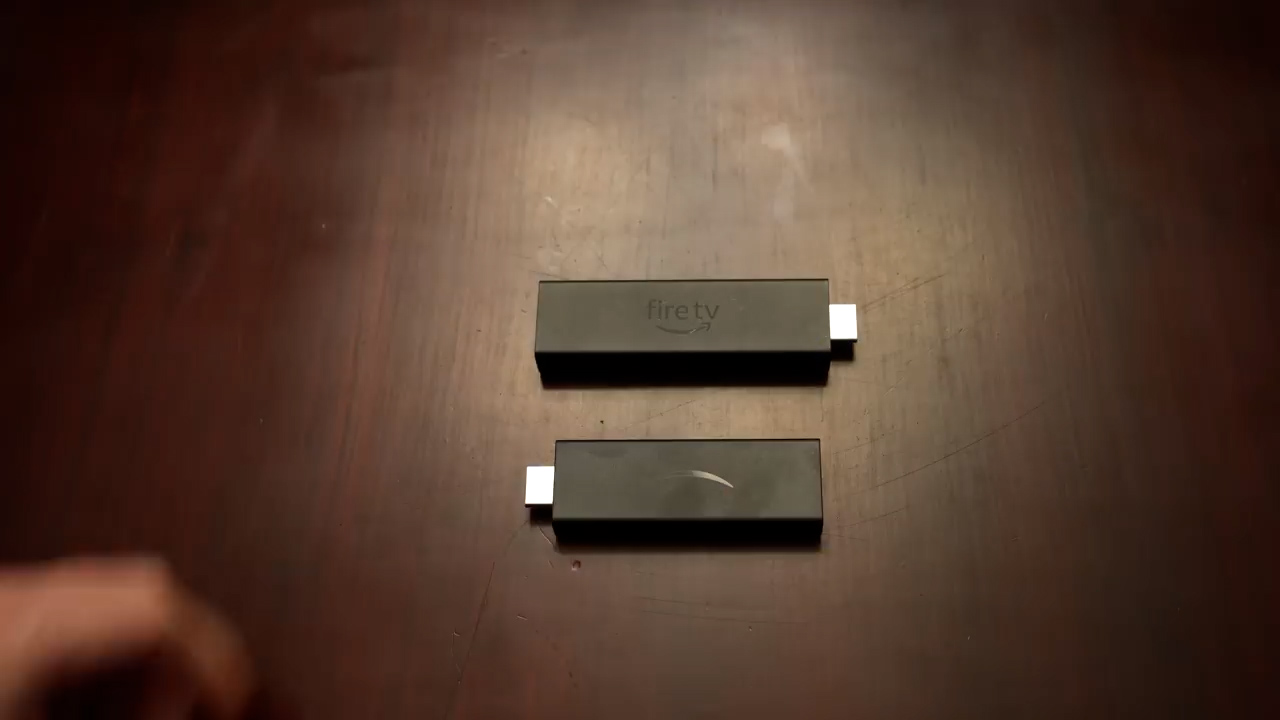
Next, one of the best things you can do for any projector or TV regardless of price is to forget about the built-in operating system and use a streaming stick instead. Purpose-built streaming sticks give much better control of settings like dynamic range, color format, and framerate and their apps are updated more often giving you better compatibility and all the newest features.
For most inexpensive projectors the 1080p FireTV stick is all you need and it goes on sale for around $25 a few times a month, but if you want to future-proof yourself, in my testing the 4K FireTV Max is the best streaming stick on the market and is usually under $40 on all the Amazon big sale days.
During the FireTV stick setup you’ll be asked what brand your projector is so you can control it with the FireTV remote, and the good news is that almost all of these cheap projectors use the same infrared profile, so you can scroll all the way down to Yaber and complete the setup wizard which will let you control your projector’s power and volume with the FireTV remote. This profile works for the Groview JQ818C and Happrun H1 which are my suggested budget projectors, but as I said there’s a good chance they’ll work for dozens of other brands too.
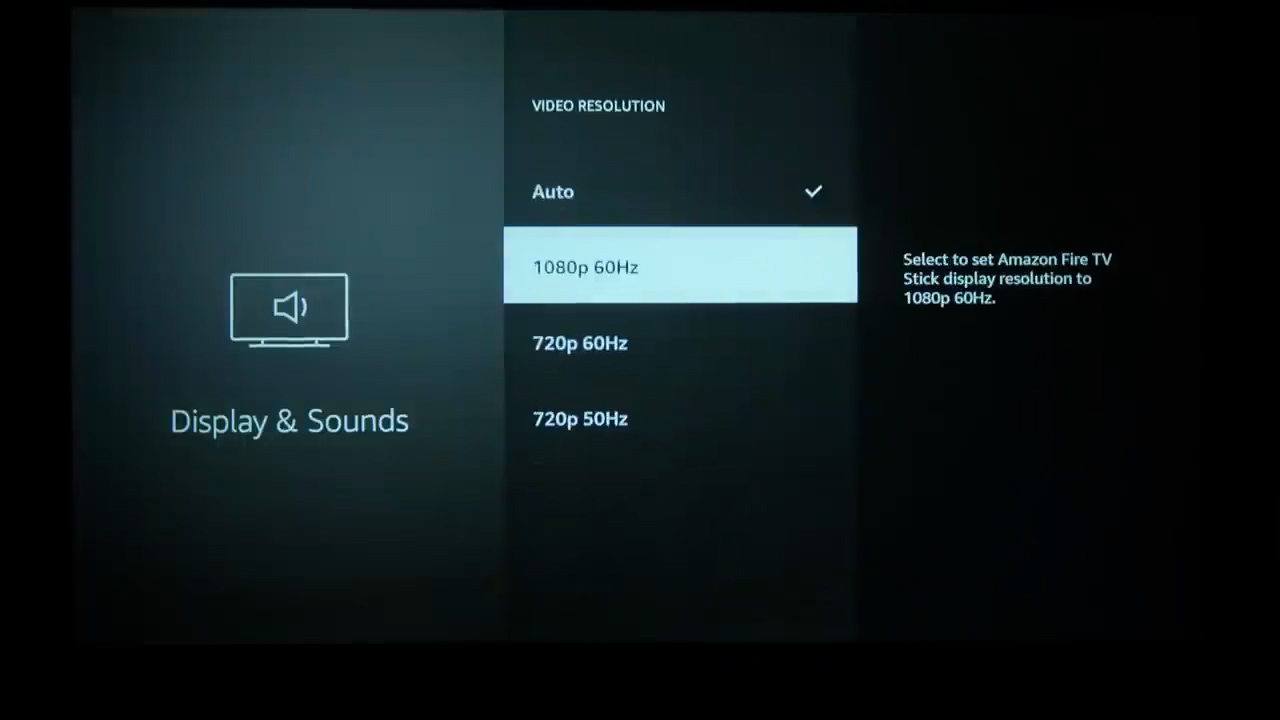
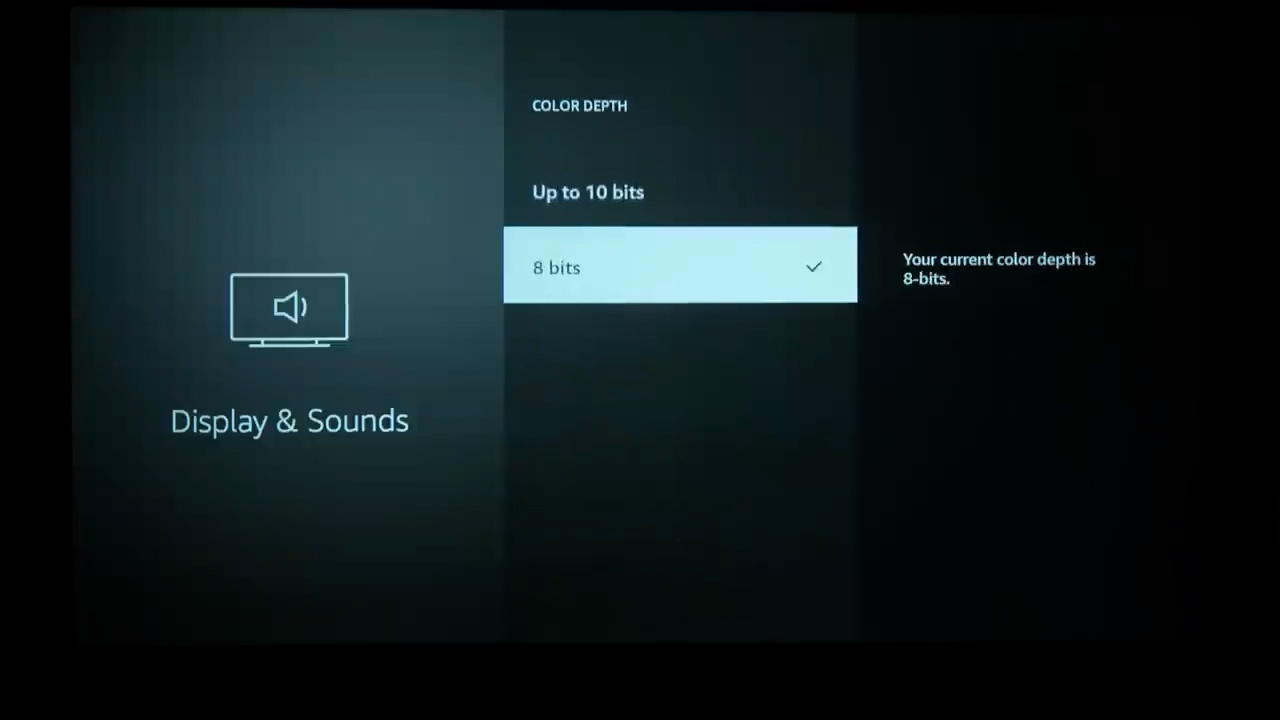
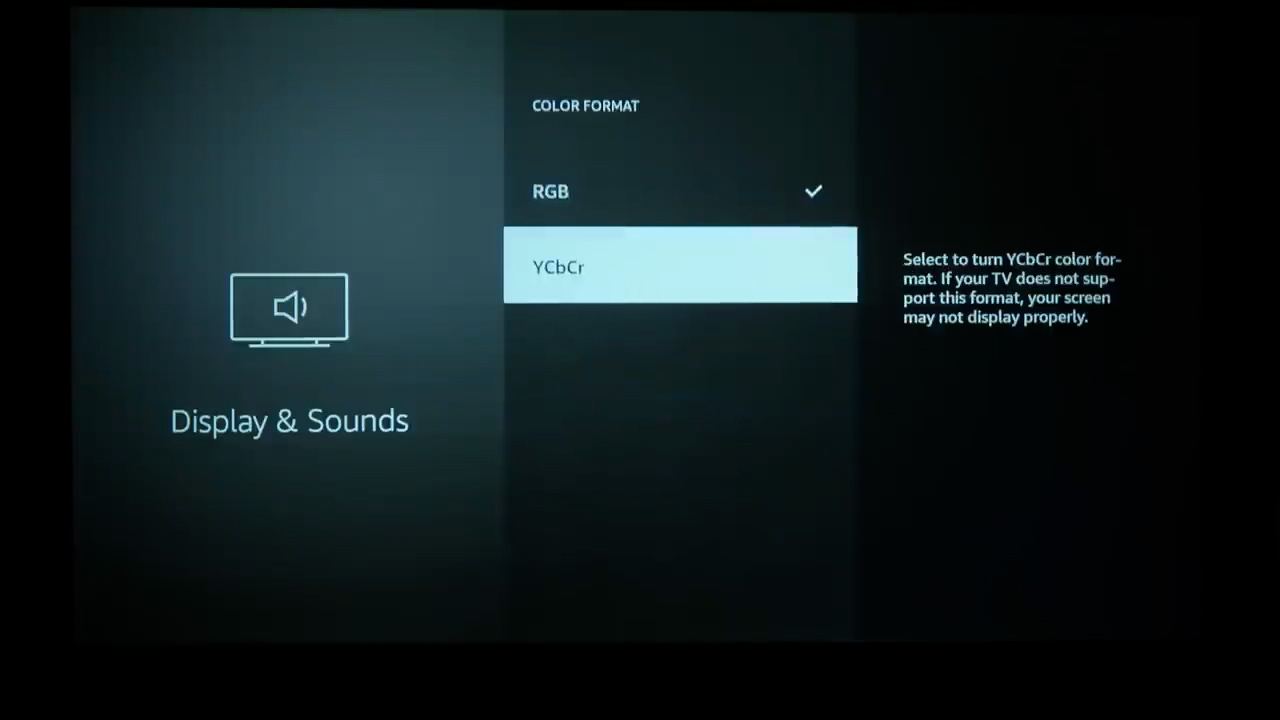
The next thing to change will be the FireTV display settings where we’ll lock the signal down to what the projector can handle because these inexpensive projectors aren’t always setup properly and sometimes the HDMI port will tell the source it has more capabilities than the projector actually has, which can cause a lot of unexpected behaviors. First, set the resolution to 1080p60hz and make sure color depth is set to 8bit, because that’s all the LCD screens used in these projectors can handle. Next, set the color format to YCbCr and last under Dynamic Range settings, change from Adaptive to Disable HDR.
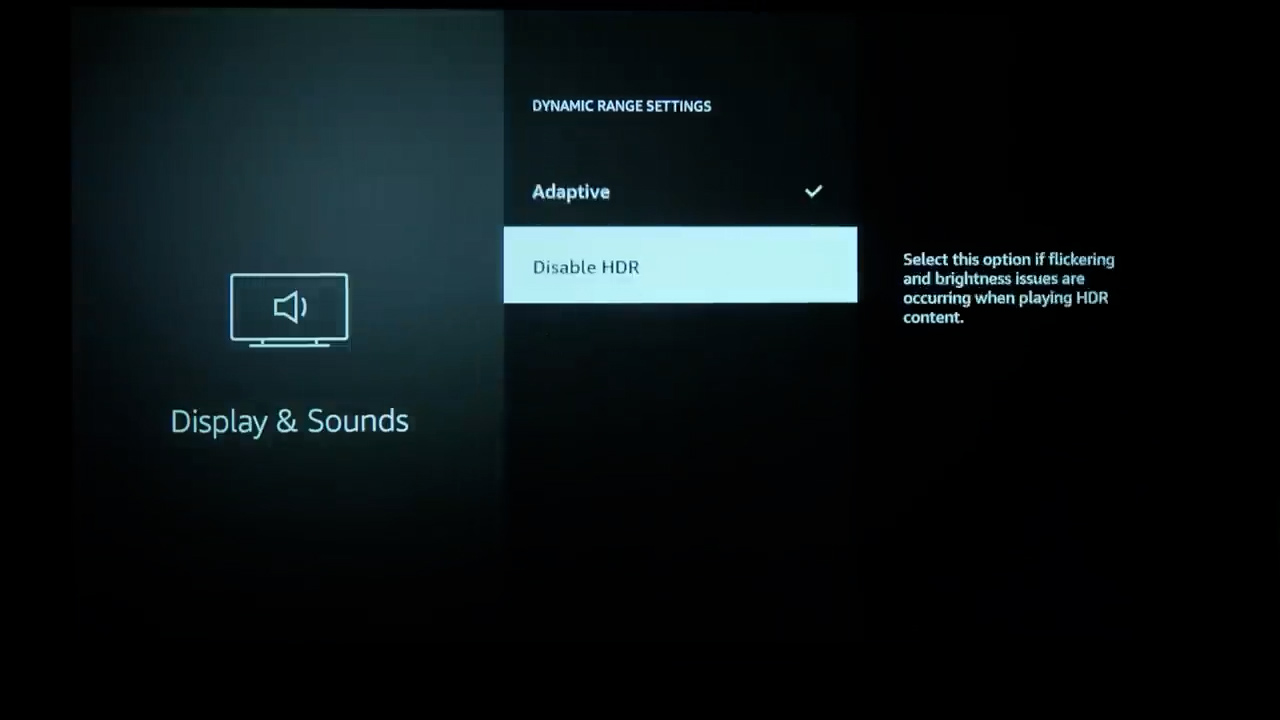
We’re disabling HDR because even if your cheap projector supports it, it isn’t nearly bright enough to properly display an HDR image and the result will be dull image with dim highlights and poor overall colors.
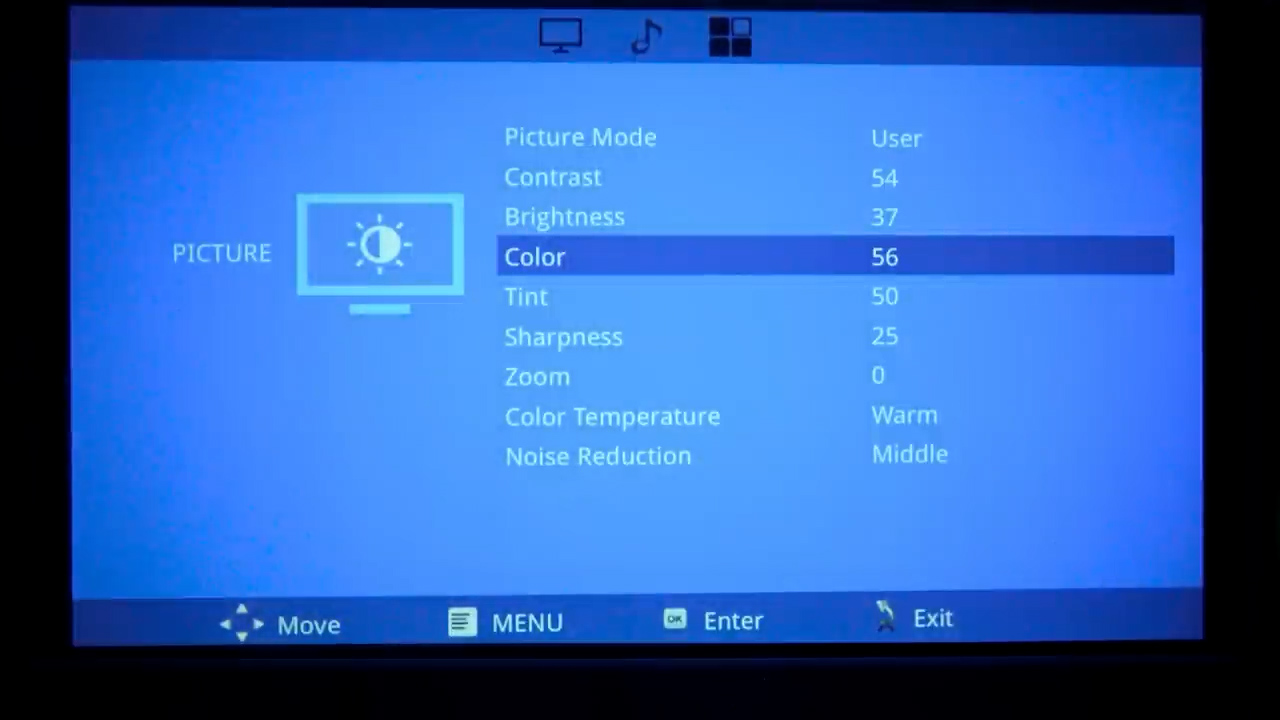
After that we’re going to jump into the projector’s setting to calibrate brightness and contrast, which are confusingly named for what they actually do. Brightness controls how dark the picture signal needs to be before your display interprets it as pure black, and contrast does the same thing, but for white values.
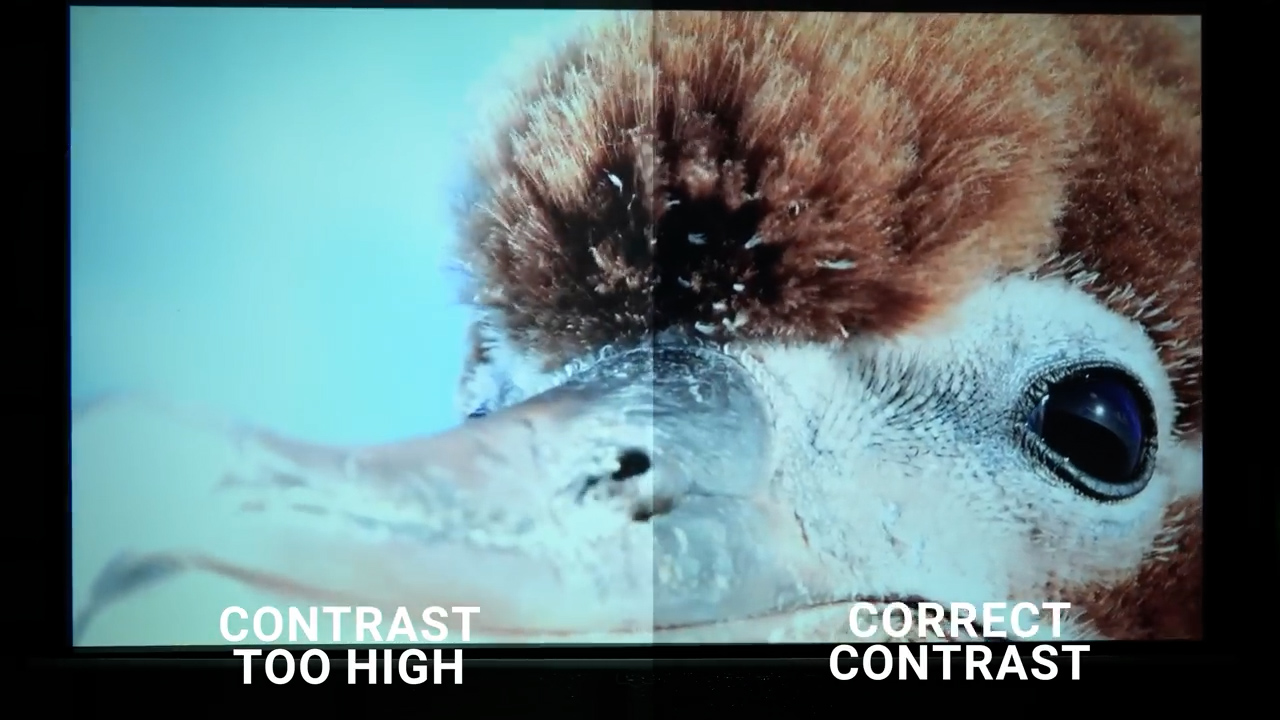
Set brightness too low and you’ll crush shadow detail but set it too high and your display will never show true black. And similarly, setting contrast too high will blow out highlights resulting in loss of detail in bright areas, while setting it too low will make the image look flat and dull.
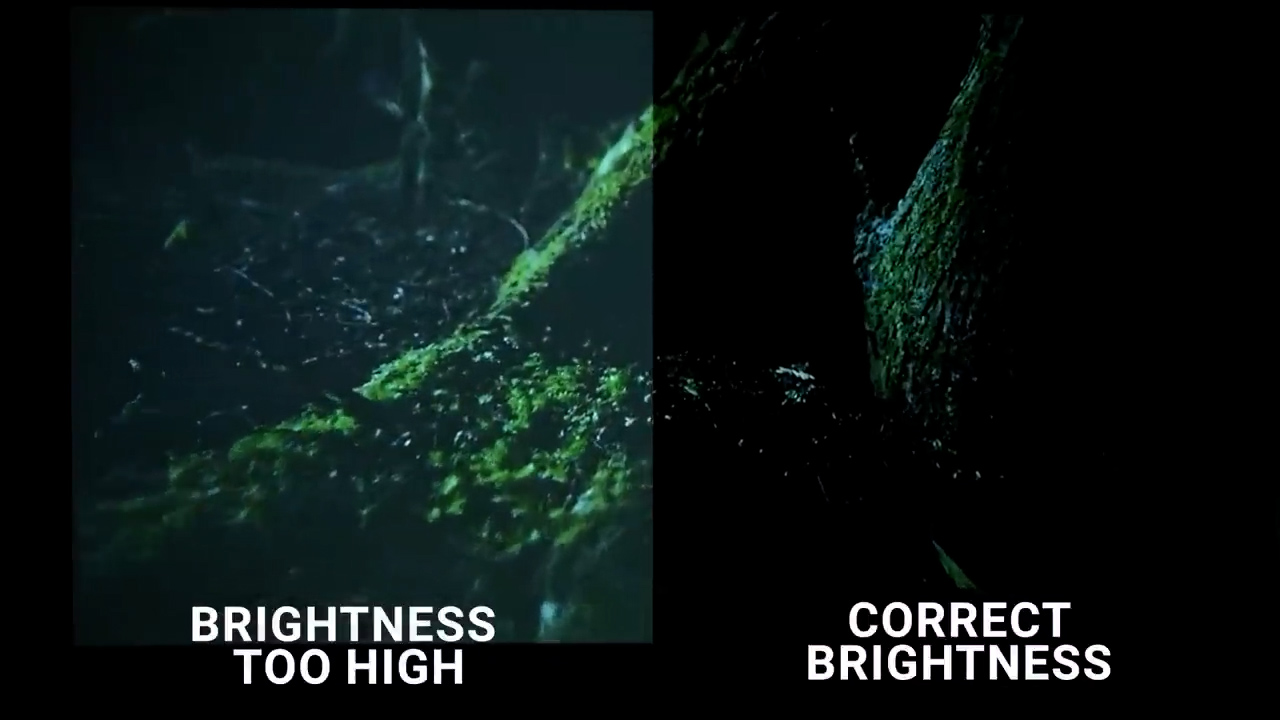
When we set the FireTV’s color format to TCbCr earlier we locked it to what is sometimes called RGB limited, which is how SDR content is mastered, so now we need to set the projector’s brightness and contrast accordingly. Go into your projector’s image menu and set it to User mode, then click on brightness.
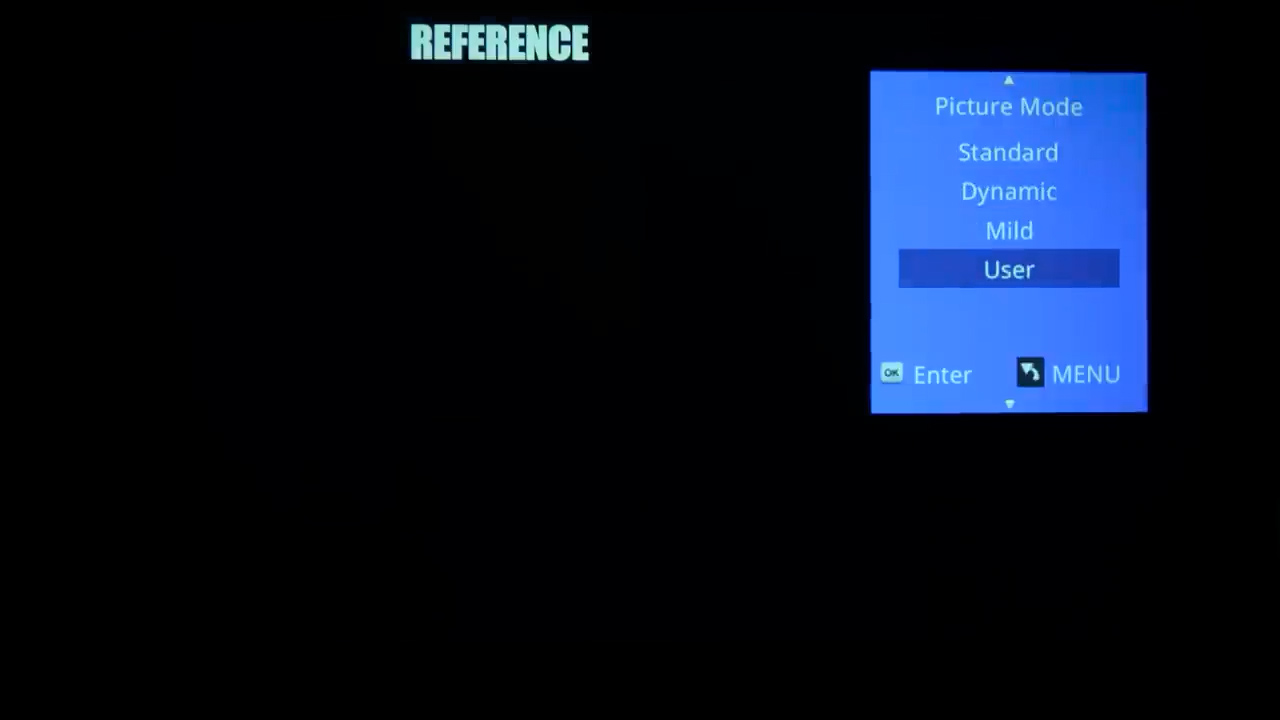
Next, we’re going to use this pattern to manually set the brightness. You’ll want to make sure that you’re using your projector in the same lighting conditions that you’ll be watching movies and give your eyes a minute or so to adjust to the room’s lighting. This image has a reference area that is equal to RGB 17,17,17, with RGB 16,16,16 directly next to it on the right and RGB 0,0,0 on the far right. You’re going to want to adjust the brightness up enough to see all four stripes, then reduce it until the right two sections are indistinguishable, but the reference section is still noticeable.
If you’re watching this video on a monitor and not a projector, you might be in RGB-Full mode, in which case all four bands should remain distinguishable, and this pattern won’t work for calibrating your brightness.
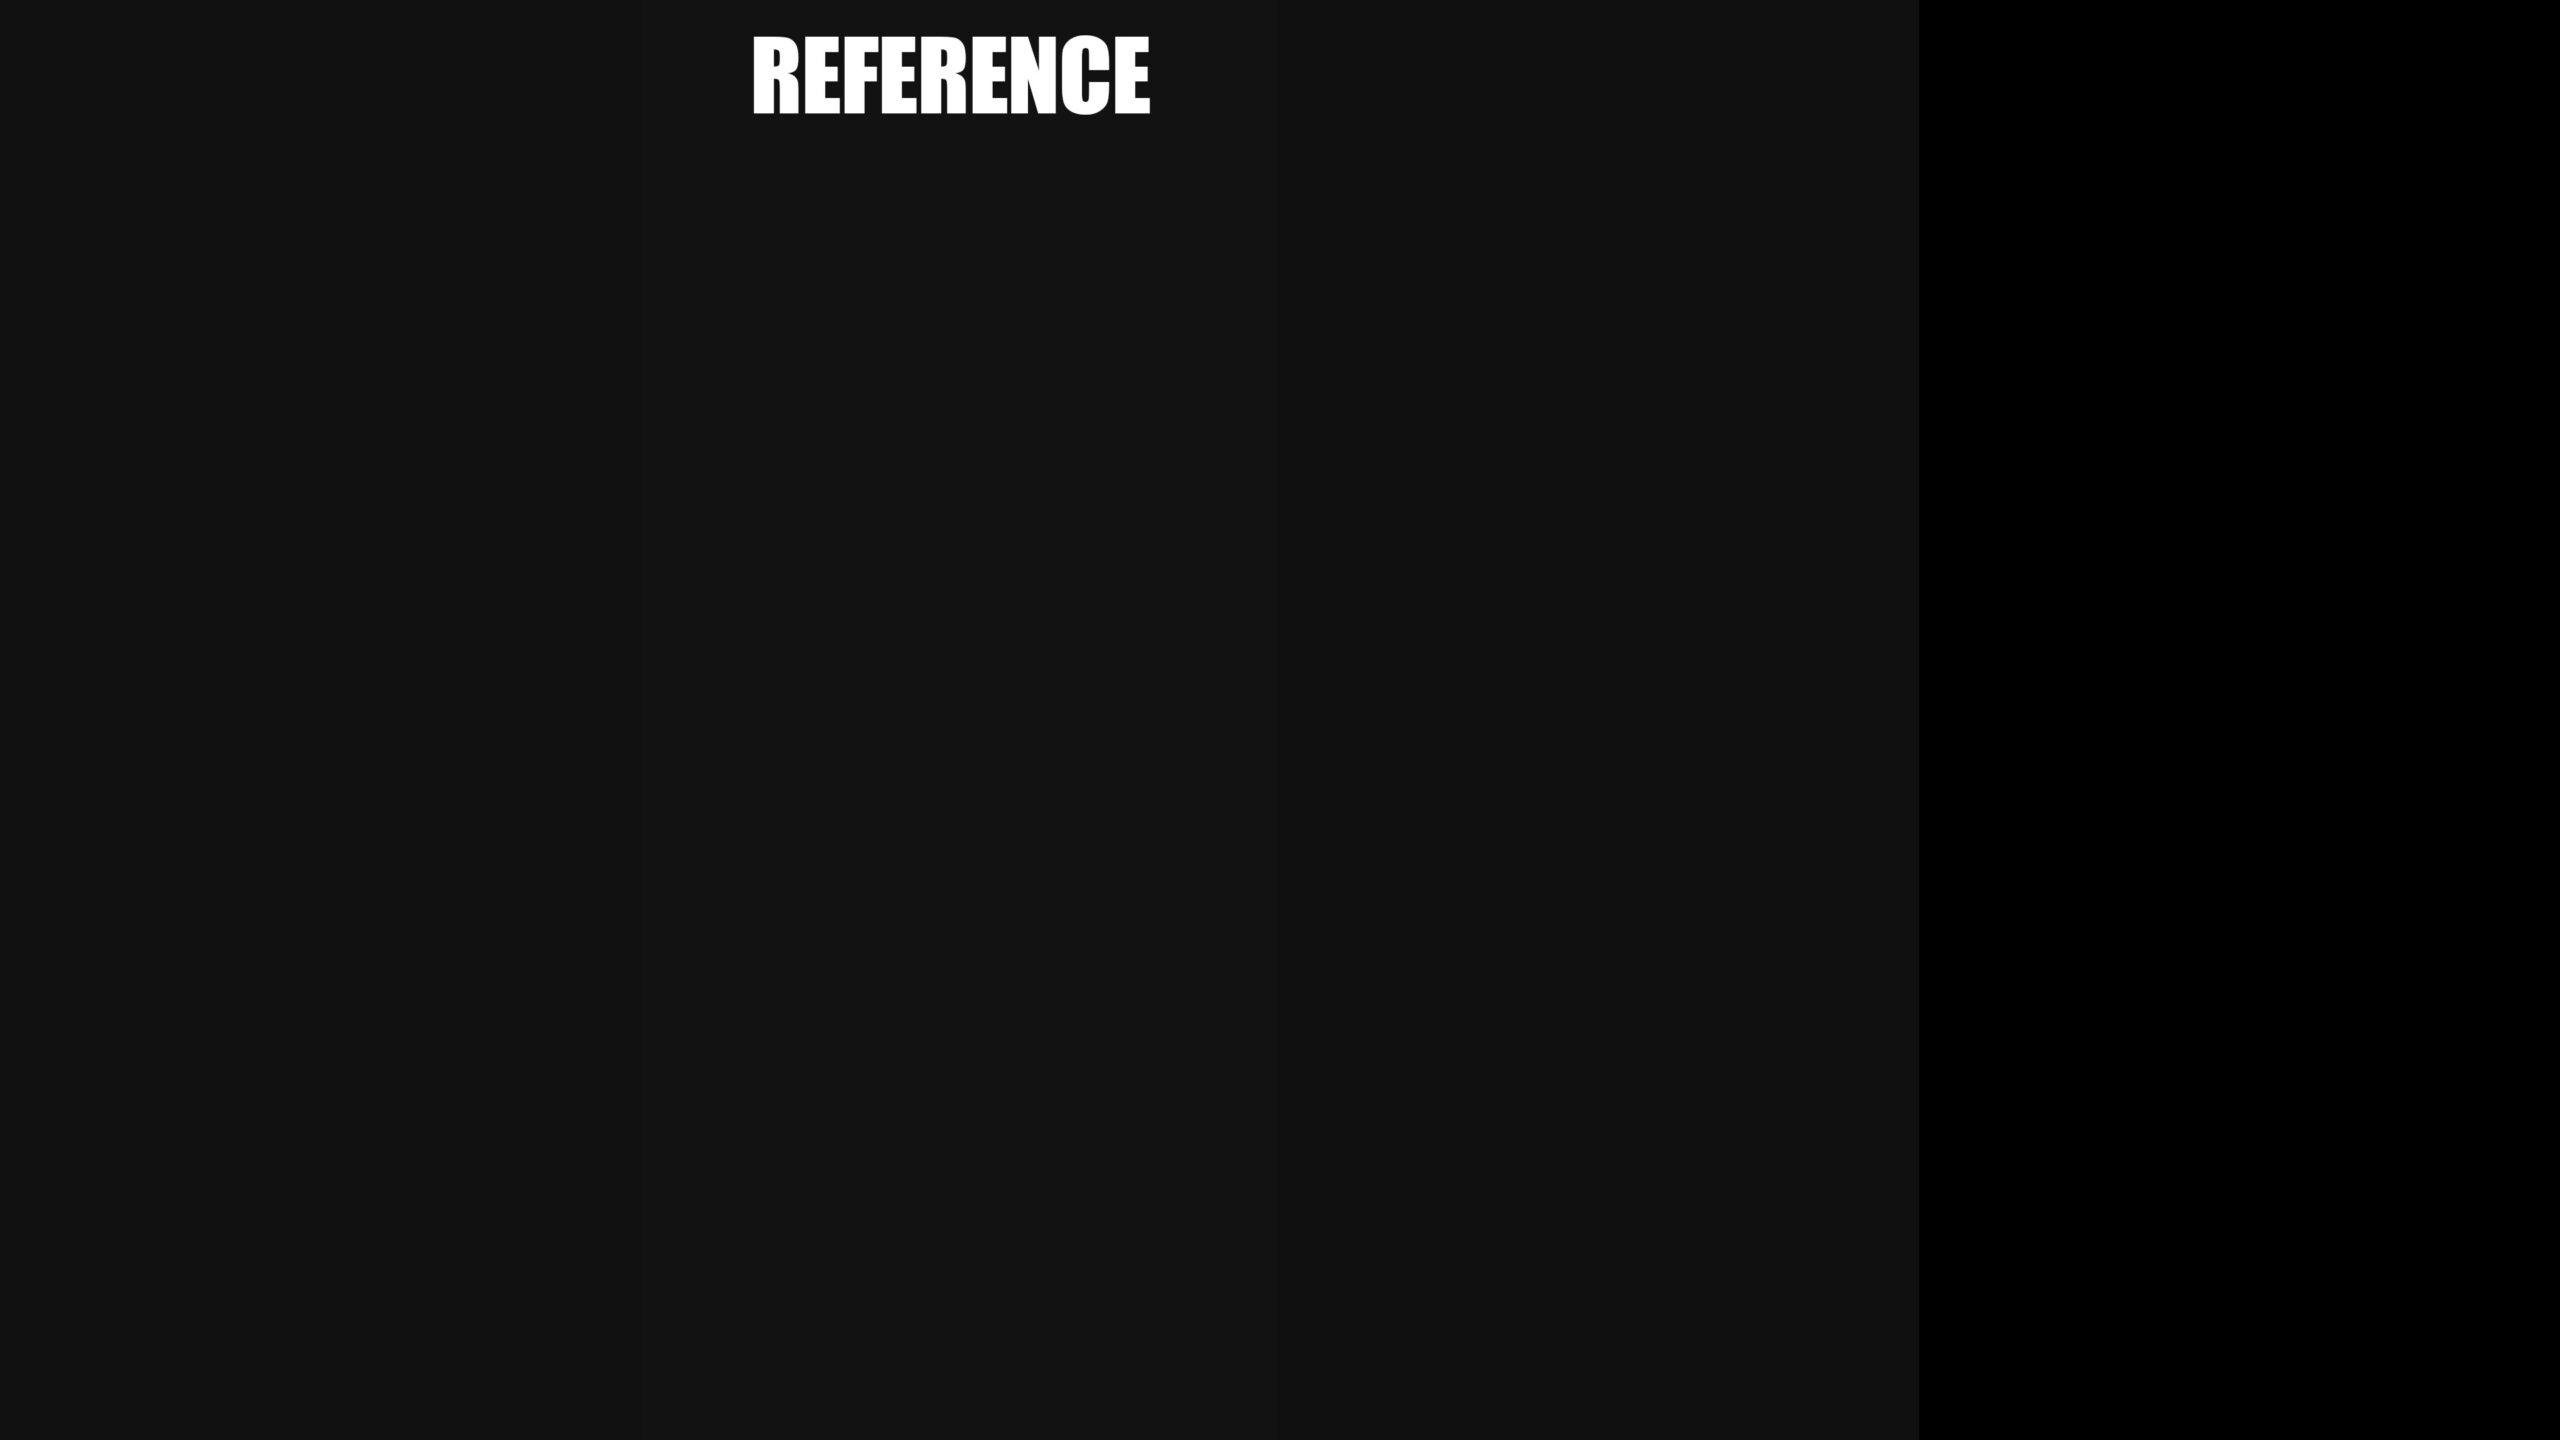
Next, we’re going to calibrate the contrast using this pattern where the reference white is RGB 234, 234, 234, which is one step back from the brightest white you should be able to easily distinguish. Lower your contrast value until you can see the box on the right and gradually raise it until the box on the right goes away but make the stripe on the left stay easily distinguishable from the background. When the contrast is set up perfectly the box in the middle of the stripe should be very difficult or impossible to see.
The remaining picture options are color, which controls the saturation of the image, tint which will shift the image from a more green hue to a more magenta hue, sharpness which adds a thin white line in between dark areas and midtones to make edges stand out more, and color temperature which shifts the image between blue white balance and a warmer more yellow white balance. I’d recommend keeping sharpness at or close to zero, but color, tint, and temperature will mostly just be to your preference, since setting those up properly requires thousands of dollars of calibration equipment and software.
Once you’ve got those settings dialed in fire up your favorite movie and enjoy your new properly setup projector. I’ve said before, but cheap LCD projectors like the Happrun H1 have no business being as good as they are for under $75, and an untrained eye would have trouble choosing between them and other much more expensive 1080p projectors.
Speaking of, coming up in February I’ll be exploring the $200-600 price range, so leave a comment if you have a specific projector request to be included in that video, and next week I’ll be at CES where I’m sure we’ll see tons of new hopefully increasingly affordable projectors.
Links to all the items in this video are below and as always, I would appreciate it if you use those links since as and Amazon affiliate, I do earn a small commission on the sale at no cost to you. If you enjoyed this video don’t forget to hit that thumbs up button and consider subscribing to my YouTube channel and as always, thanks for watching The Hook Up.