Beginners Guide To Shelly Relays – Choose the Right Relay for the Job
June 2, 2021Today on the hookup we’re going to take a look at the most common smart home device in my house, shelly relays. I’m going to help you decide which of the 4 locally controlled shelly relays is right for you, show you how to wire them, and give you some tips and tricks for setting them up.
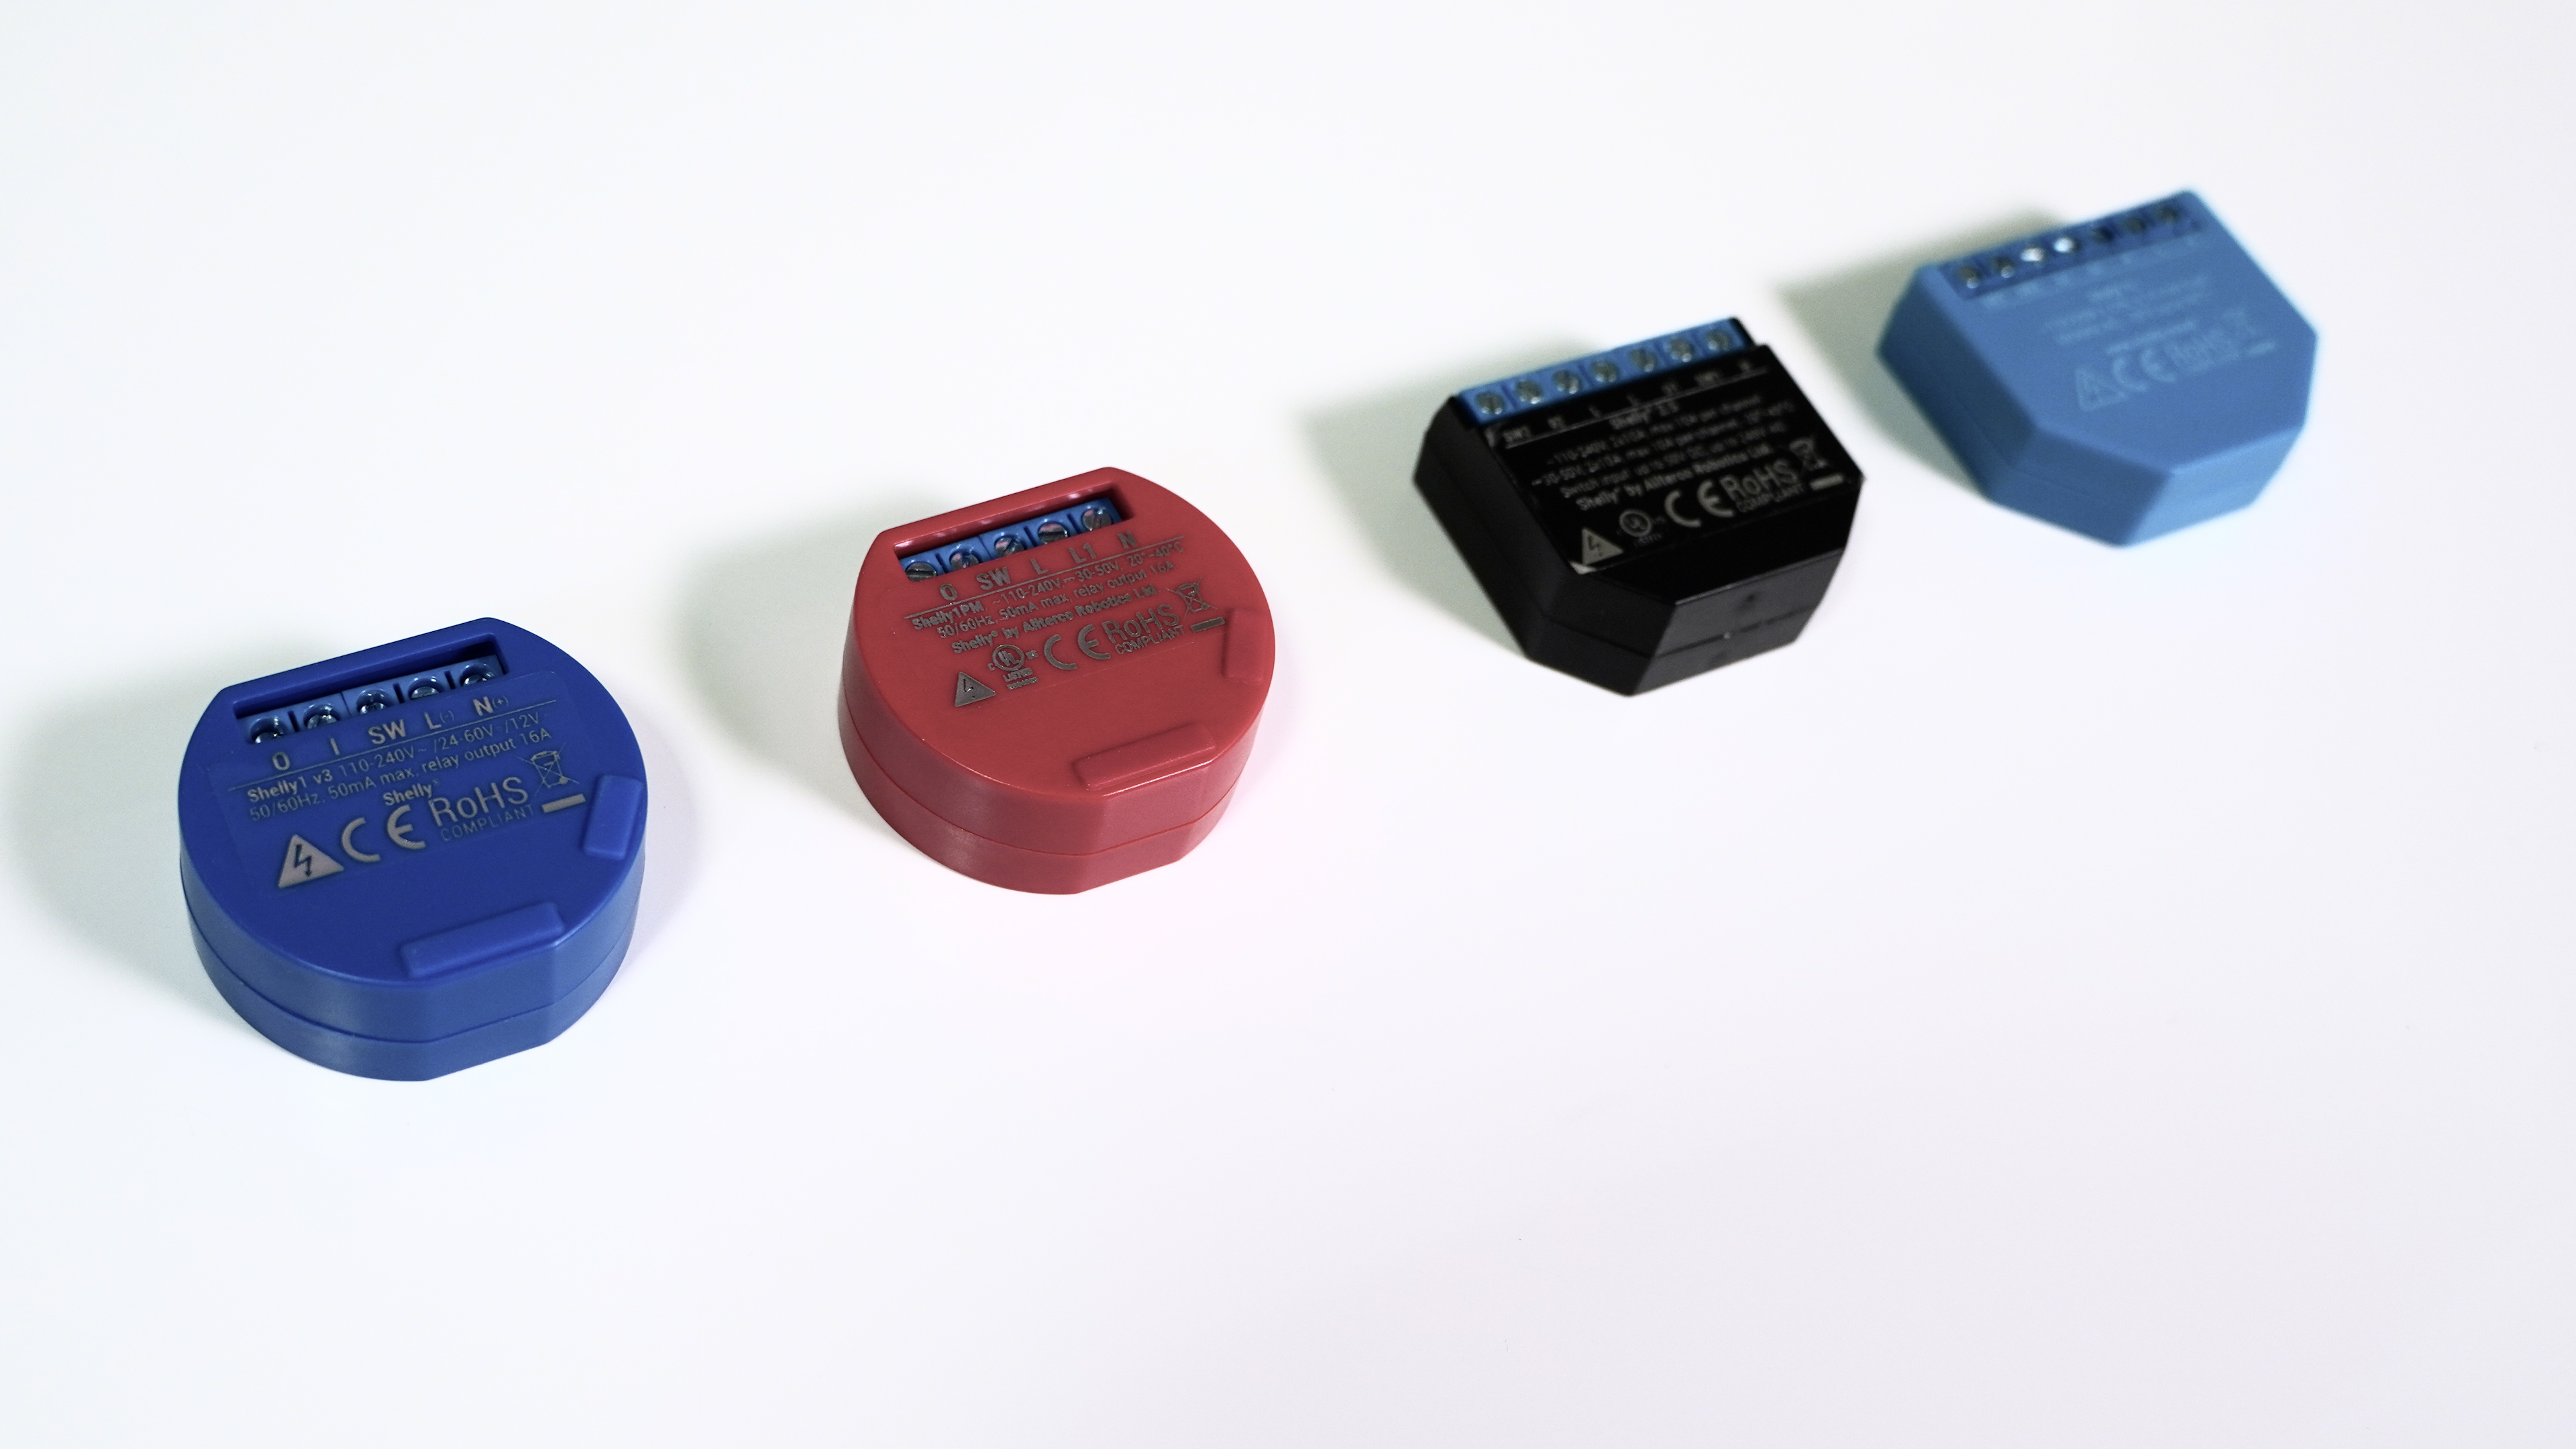
In my opinion the biggest problem with the shelly devices is that they all look really similar, even though they definitely have different applications. A new automator could be easily overwhelmed by all the different devices, and end up with the wrong one, or just decide to skip shelly all together, which would be a shame, because shelly has done so much right. This video isn’t sponsored by shelly, but it is sponsored by HolidayCoro.com
When I first reviewed the shelly 1 in August 2018 one of the main selling points was how easy it was to install custom firmware like Tasmota, but in 2019 I stopped bothering with tasmota on my shelly devices because the factory firmware can function completely locally, and includes all the protocols I want like MQTT, CoAP and REST. Now in 2021 the official shelly home assistant integration literally discovers your shelly devices for you and adds all the available sensors and controls automatically. And, don’t forget, we’re talking about LOCAL control here so feel free to disable the shelly cloud and even block your shelly devices from the internet, because they don’t need it.
The current shelly lineup contains about 30 different devices, but they can be grouped into 5 major categories to accomplish almost anything that you want to do in your smart home.
Today, we’re specifically going to look at the relays.
Relays are devices that turn power to circuit completely on or off. Shelly’s are designed to be installed behind a standard wall switch and will give you wifi control over that load. What makes these shelly devices different from other smart switches is the fact that you will still use your existing light switches to control them, meaning if you have unique or antique switches you won’t need to replace them with a tacky looking smart switch, so you can upgrade the functionality of your home without destroying the character.
So which of the 4 shelly relays is right for you?
The first thing you need to know is whether your switch location contains a neutral wire. Some old houses, and specific countries put the neutral wire at the load, such as a ceiling light and only run the hot wires to the switch. If you look behind your switch and there are only two wires, you don’t have a neutral, and the Shelly1L is your only option for a relay.
The Shelly1L has the lowest maximum load of any of the shelly relays at just 4.1A continuous, which in a 110V circuit is 450watts, and in a 220V circuit is 900watts. The Shelly1L does have thermal protection on it, so it can safely shut off the relay if the load is too high, but you still shouldn’t try to put more than a 4A continuous load on it.
The Shelly1L works using magic or what sometimes called electromagnetic induction, which requires a minimum load of 20watts in order to have enough electricity running through the circuit to power the WiFi and relay. If you don’t have a 20watt load you can add this device called the shelly bypass in parallel to add load to your circuit.
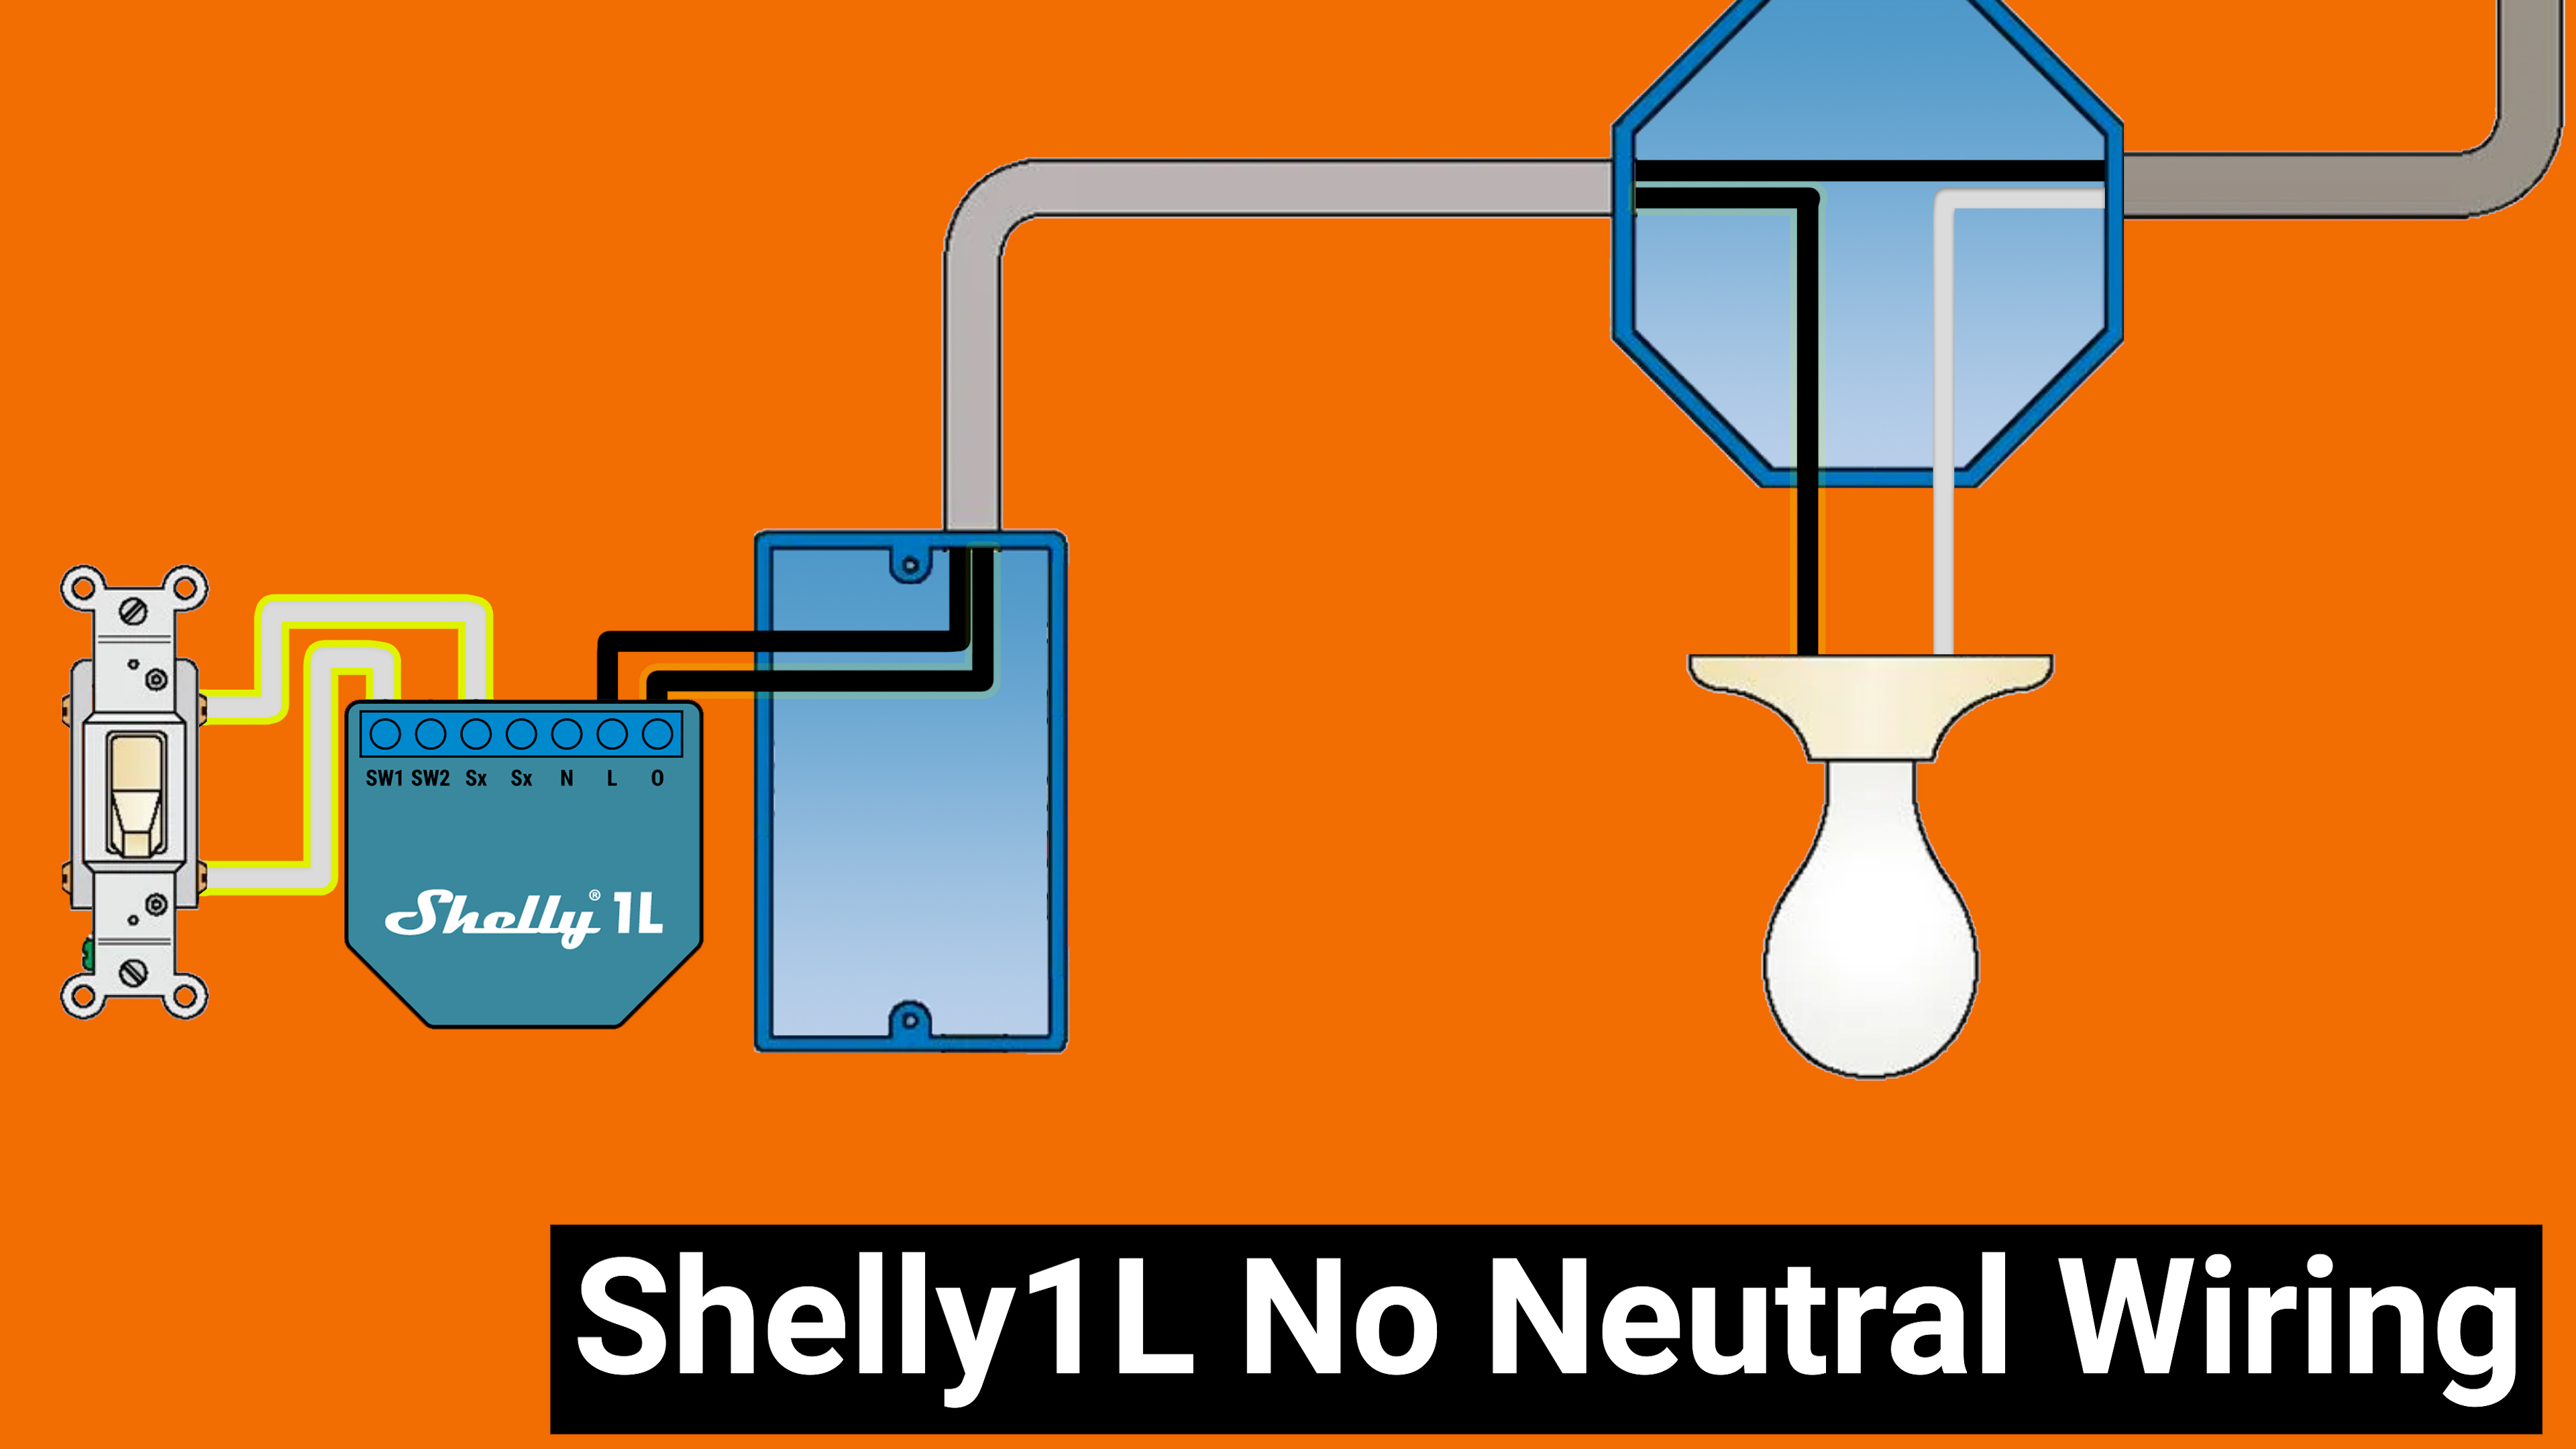
The most common way to wire your shelly1L looks like this with your hot wire source attached to the L terminal, and your hot wire load attached to O. Your switch then gets wired to S1 and Sx. If you have two switches you could also wire S2 to Sx, but it isn’t necessary. Like I said, If you have a 20watt load you don’t need to use the bypass, but if you need it, it will get installed at your load, in parallel, like this.
You can also install the Shelly1L with a neutral, but you shouldn’t because there are much better options for that.
If you do have a neutral wire at your switch, your next questions should be how many circuits do you want to control, and how many amps will run through those circuits?
If you have two switches, and each circuit is under 10A you probably want to use Shelly’s flagship product, the Shelly 2.5, which is a UL listed device that can be used to control two separate circuits up to 10A. There are two switch inputs, two relay outputs, power monitoring, and overheat protection. In the shelly 2.5 whatever voltage you supply on the line terminals will be output to the O1 and O2 terminals.
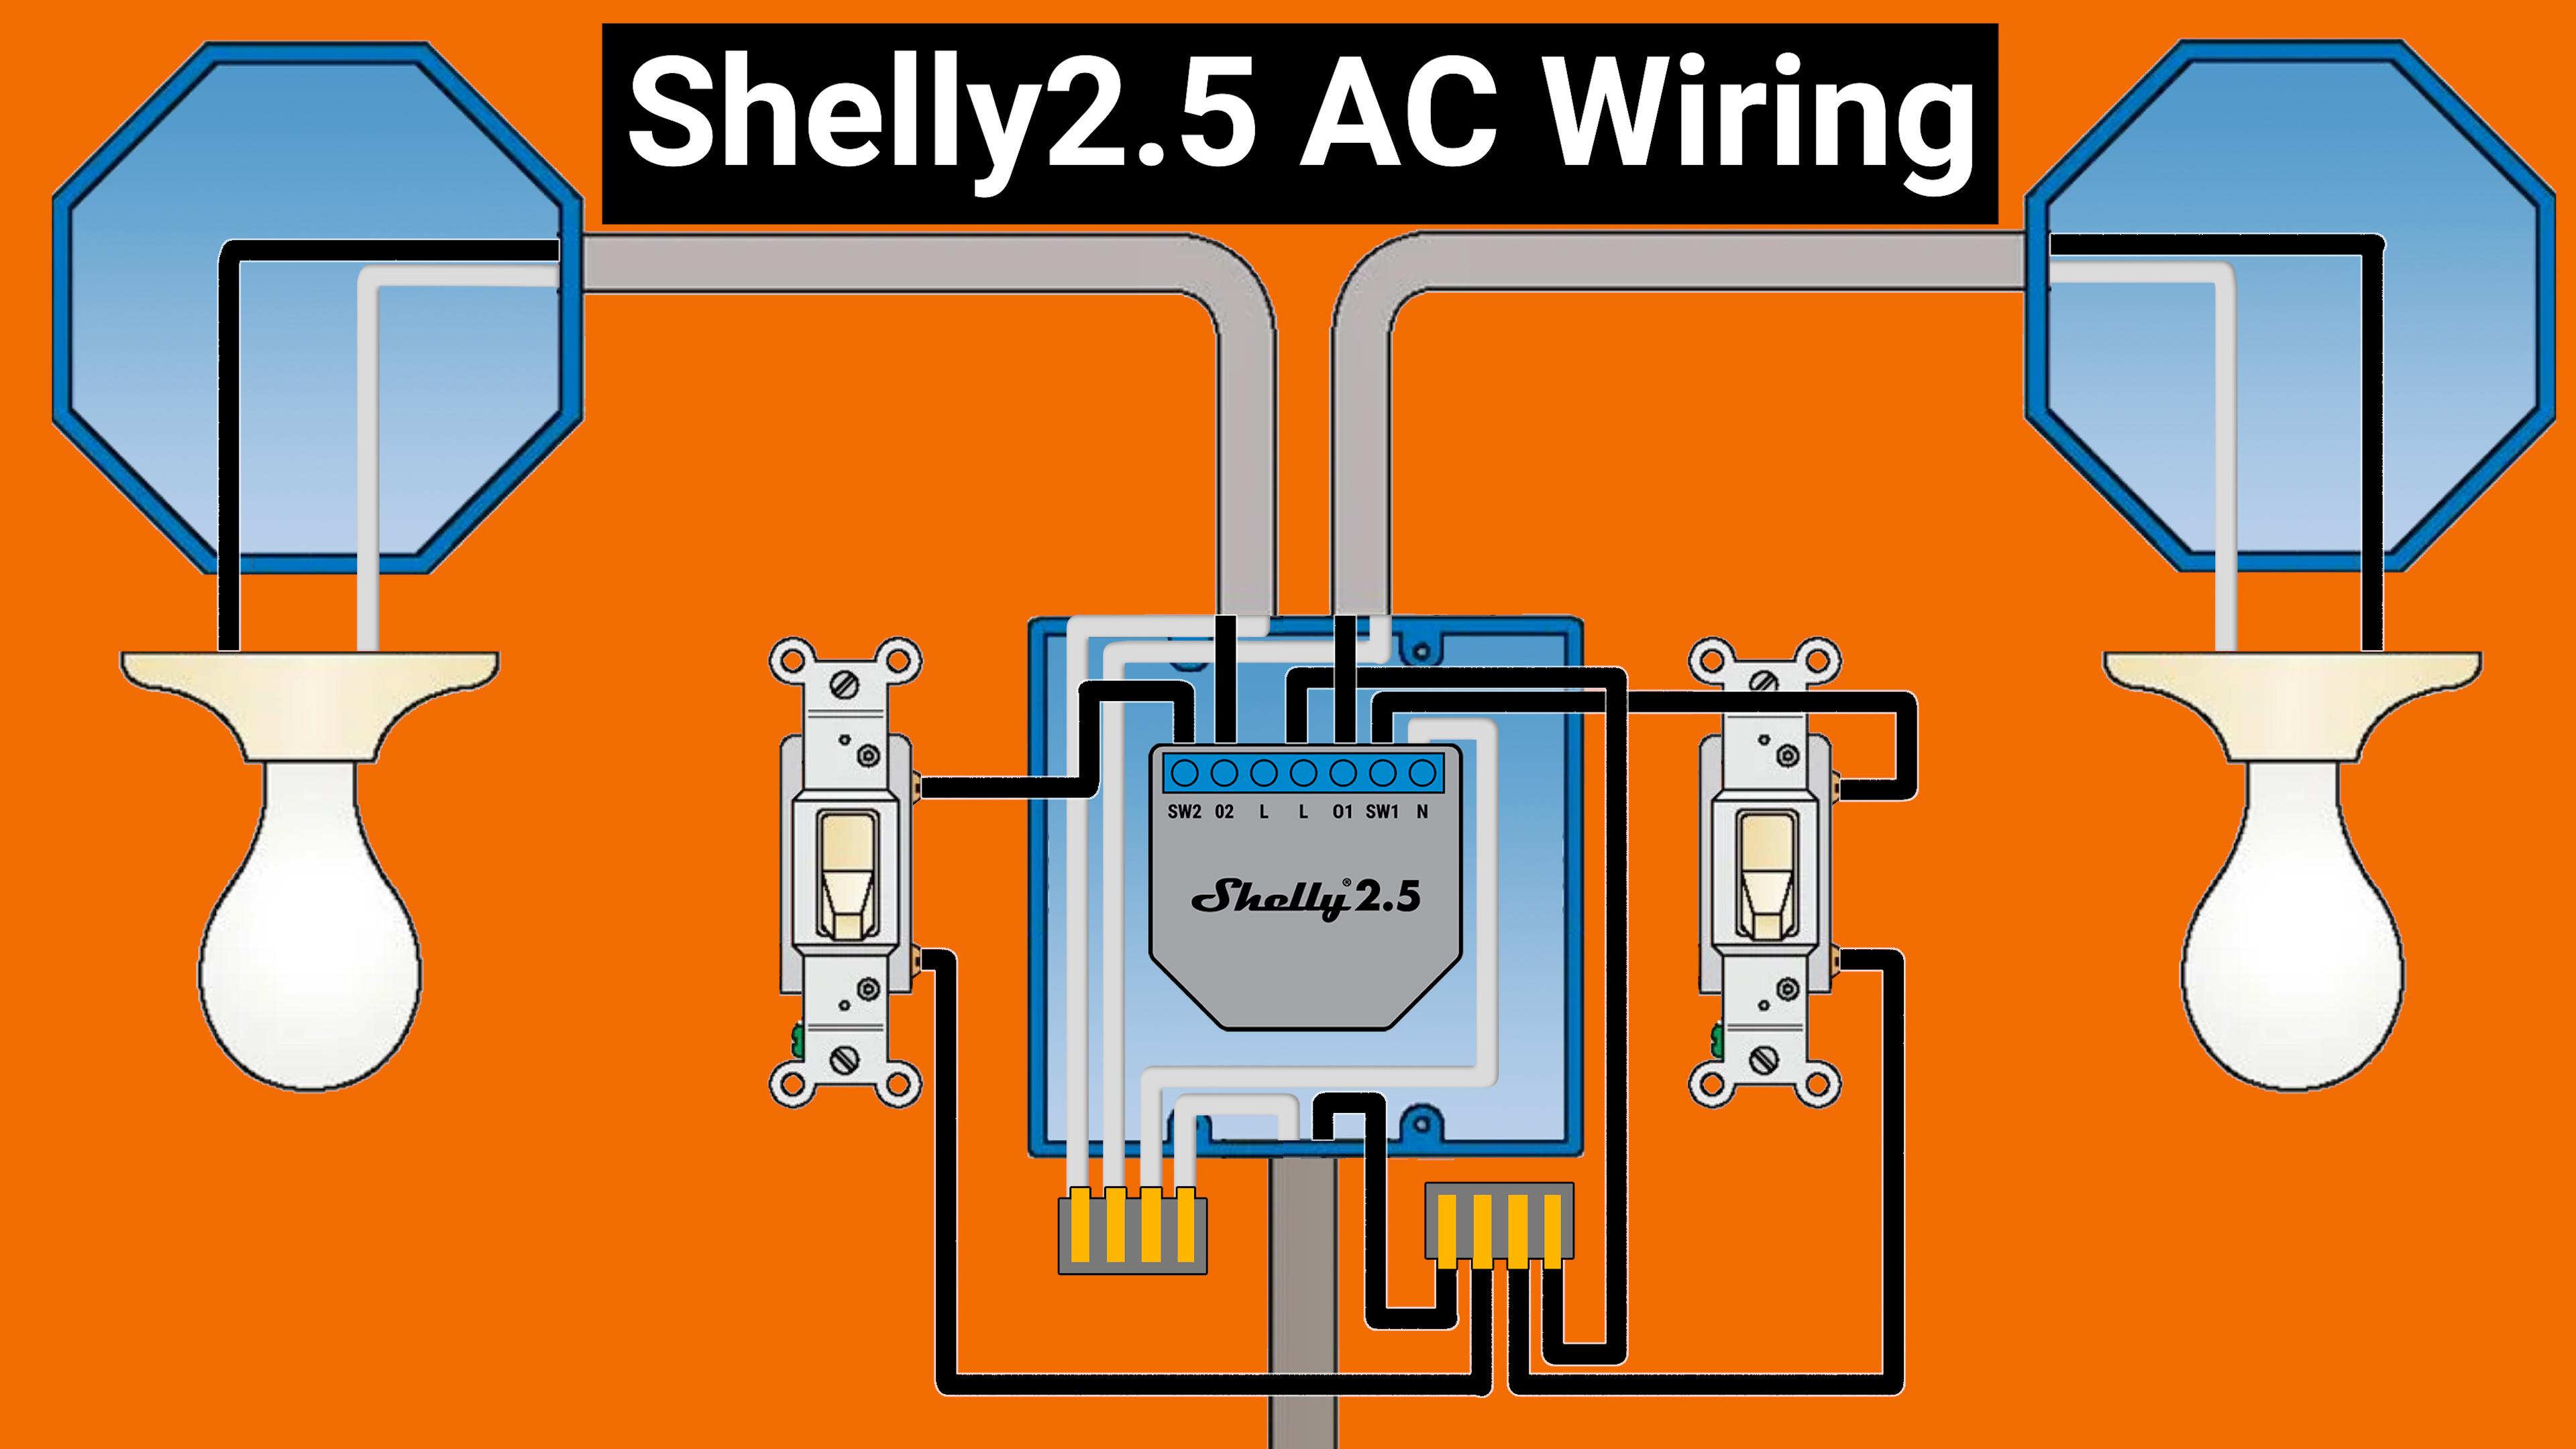
The most common wiring configuration of the Shelly 2.5 looks like this with your hot wire source attached to the L terminal, and your hot wire loads attached to O1 and O2. Your switches will be connected to your hot wire source, and the SW1 and SW2 switches on the Shelly 2.5. Last, the N terminal connects to your neutral wire. The second L terminal is technically there if you are going to max out the load on both circuits, but typically isn’t needed since the two L terminals are connected internally.
10A is quite a lot of load per circuit, and like the Shelly1L, the 2.5 has safety mechanisms built in to turn off the relay if the power consumption or temperature is too high, but if you are planning on controlling a particularly large load like resistive heater you should use the Shelly 1PM, which can handle up to 16A.
The shelly1PM has a single 16A relay, thermal monitoring, and power monitoring. The shelly1PM is shelly’s most heavy duty relay and on a 220V circuit the Shelly1PM can handle 3500 watts, or 1750 watts on a 110V circuit, but be aware that a space heater or air conditioner that is advertised as 3500 watts will have a slightly higher current draw initially, and a motor will have orders of magnitude higher current draw than it’s rated wattage when it first starts up. Moral of the story, you always want to overestimate your load and be mindful of what kind of load it is, this goes for all switches and relays, not just shellys.

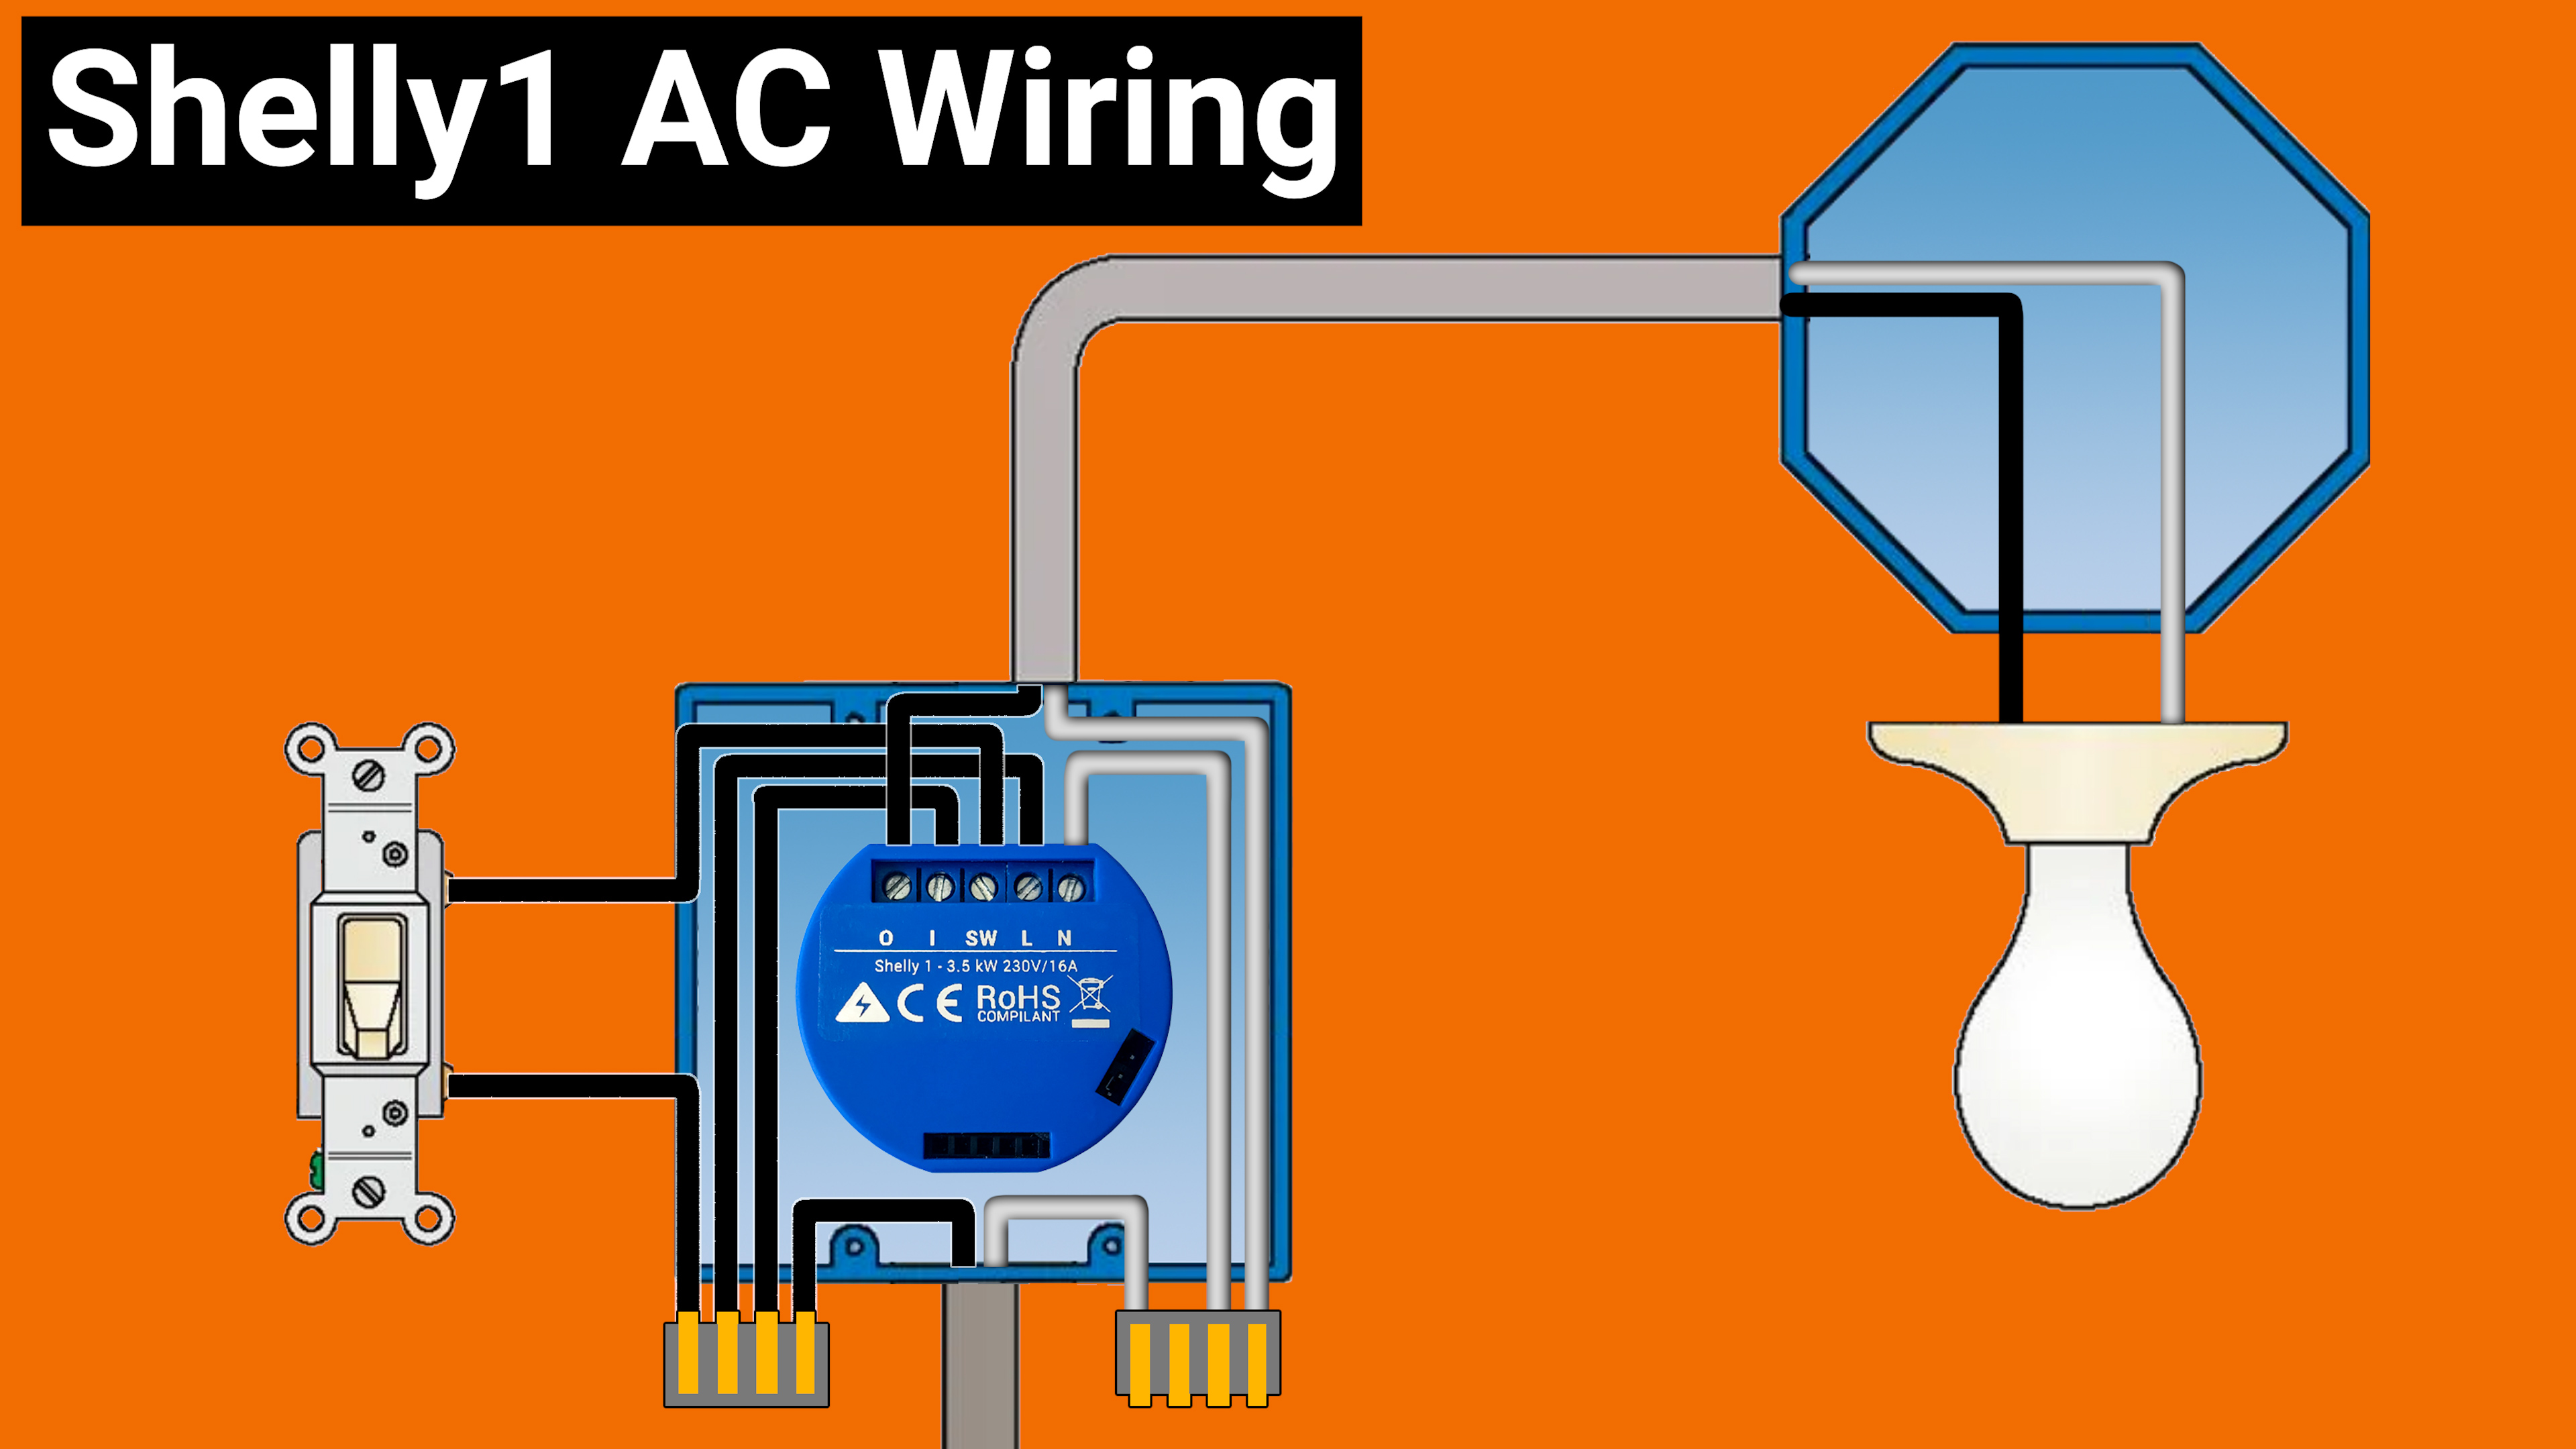
The most common wiring configuration of a Shelly1PM looks like this with your Hot wire source attached to L and your hot wire load attached to O. Your neutral wire hooks into N, and one side of your switch should be attached to the hot wire source while the other goes into the SW terminal. There are two L terminals on the shelly1PM but like the shelly2.5 you only need to connect both of them if you intend to max out that 16A rating.
And that leaves us with my favorite shelly device, the Shelly1. The Shelly1 doesn’t have thermal monitoring like the 1L, 1PM, and 2.5, and it doesn’t have power monitoring either, but there are a few things about the shelly1 that make it my go-to for small projects.
First, all the shelly relays we’ve looked at so far output whatever source voltage they are being powered with directly to the relay output, meaning if you power it with 110V, then 110V will come out of the O terminal when it is switched on, but on the Shelly1 the relay is isolated and has what are called “Dry Contacts”. This means that when you switch the relay on, it will connect the I terminal to the O terminal, but no current passes through that circuit unless it’s supplied on the I terminal.
Second, every relay we’ve looked at can be powered using 110V-230V AC, and the Shelly1, 2.5, and 1PM can be powered with 24-60V DC, but the Shelly1 can also be powered directly using 12VDC. The extra jumper on the Shelly1 bypasses the voltage regulation circuit to supply the electronics with 12V directly, this is super useful since a lot of projects utilize 12V for things like LEDs, Locks, and Sensors, and this allows you to use a single power source. It also means that you can feel free to use the SW terminal and other GPIO pins on the shelly1 for whatever you want when powered with a 12V source because unlike when powering with mains voltage, these will be referenced to ground and are safe to use. You shouldn’t attempt to use the SW or GPIO pins on other shelly devices for low voltage applications because they are referenced to mains voltage, not ground.
Because the shelly1 lacks power monitoring and thermal protection, I almost exclusively use it for DC powered projects like my IoT garage door opener, Sliding glass door lock, and Christmas tree automation, but if you do want to use it that way, here’s the typical AC wiring schematic.
Your hot wire source will connect to L, I, and one leg of your switch. The hot wire load will connect to O. The other leg of your switch will connect to SW and your neutral will connect to N. Having a dry contact relay does increase the number of wires you need, so it makes sense why shelly omitted it on their other relays, but it is super useful in low voltage projects.
Like I said I almost always use the shelly1 in DC mode, which looks like this with the positive DC source connected to the N terminal where it says +, and the negative or ground attached to L where it says -. You can connect whatever you want to the dry contacts of the relay, and the SW input can also be used by connecting one side of your switch to ground and the other side to the SW terminal.
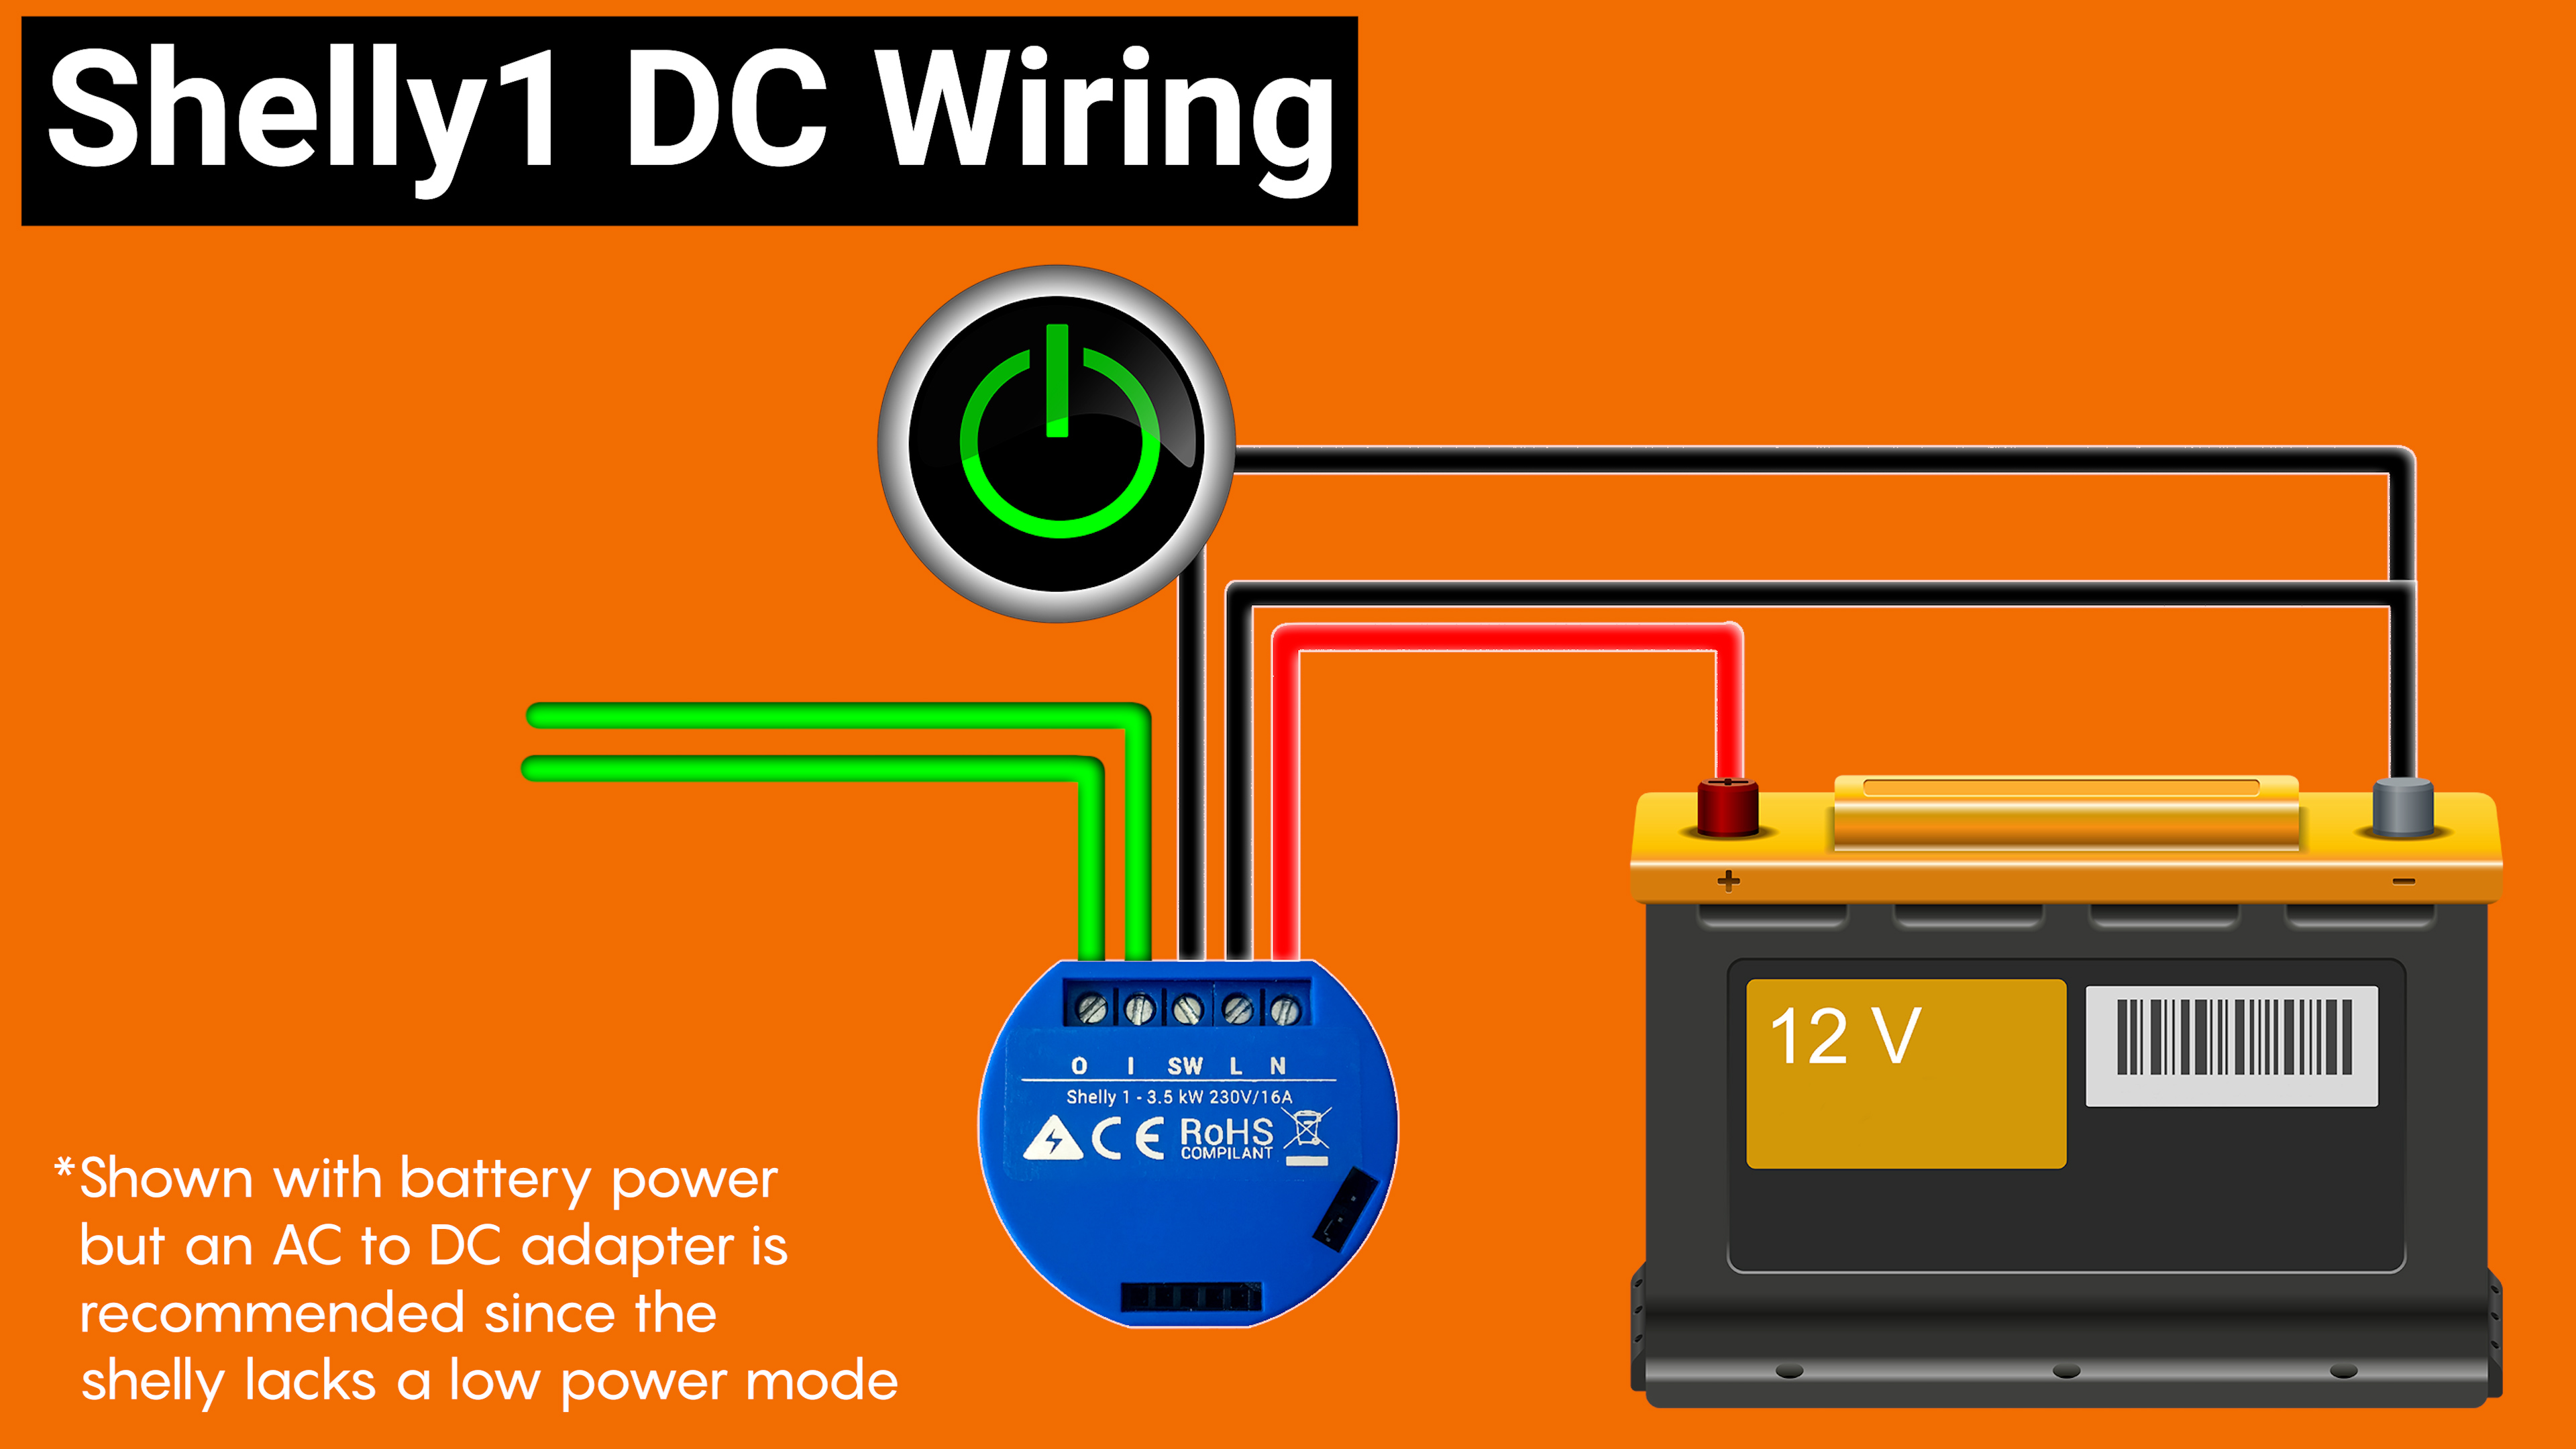
If you are using 24-60V DC you should leave the jumper in the factory position, but if you want to use 12V you need to switch the jumper from regulated to unregulated. Unfortunately, this means your shelly isn’t protected from user error anymore, and if you supply it with over 12V or mix up your positive and negative wires your shelly will let out the magic smoke, and will never work again… so pay extra attention before plugging it in.
So to summarize:
No neutral, under 4 amp load? Shelly 1L
Standard switch application, under 10A load? Shelly 2.5
High current application? Shelly 1PM
Dry contact or 12V DC applications? Shelly1
There’s also one more specialty application of the shelly 2.5 where you can hook it directly to your roller shutters and it will use the O1 and O2 terminals to run your shutter motors in either forward or reverse. It’s got some fancy programming using the power monitor to know when it is fully open or fully closed and can even do partial openings. The typical wiring for this setup looks like this for AC powered roller shutters with the hot source connecting to the L terminal, Neutral connecting to N, the O1 terminal connected to the Forward or “up” direction of your roller shade motor and the O2 terminal connected to the reverse or “down” direction. The roller shade motor will also need to have a neutral connection of its own.
If you have a manual control switch the UP button will be wired to hot on one leg and SW1 on the other, and the DOWN button should be wired to hot on one leg and SW2 on the other. If you intend to use the Shelly 2.5 as a roller shutter control it’s important to set it up that way in the web interface, so next lets talk about getting your shelly devices connected to your network.
It is technically possible to add your shelly device using the shelly app, but in my experience it can be more headache than it’s worth if you have mixed 2.4gigahertz and 5gigahertz WiFi. My recommended method is to power up your shelly, then go to the settings on your phone and look for the wifi SSID with Shelly in the name. Connect to that hotspot and then open your browser to 192.168.33.1 which will bring you to the web console for your shelly.
From this webpage you can switch your shelly on and off and change all of its settings. So first things first lets get the shelly connected to wifi. Go to internet and security, then wifi mode – client. Put in your SSID and password and hit save. Your shelly will then reboot and join your network. You can access it a few different ways. First, if you go into the shelly app, you should see a prompt that a new device has been discovered, and you can continue the setup via the app. My preferred method is to log into my router to find the IP address of my new shelly, or you could also use an app like “Fing” to find that IP address. Last, if your network supports mDNS you can use your shelly’s mDNS name to access it. The only place I know to find that name is by going to advanced developer settings, enable mqtt, then click “use custom mqtt prefix” and the mDNS name will auto populate. If you copy that before entering your wifi information you can access your shelly by pasting that name into your browser with a forward slash at the end.
The next thing to do is get your shelly firmware updated. Having the latest firmware will solve 99% of the issues you might have with your shelly, but depending on how old your firmware is updating isn’t always as simple as pressing the check for new firmware button. In the settings tab click “firmware update” and then “check for new firmware”. Shelly firmware names start with the date that they were released. If your device reports that it has the latest firmware, but the date at the front is older than a few months, it’s probably wrong.
The fix for this is to temporarily connect your shelly device to the cloud by going to “internet and security” and then “enable cloud”. This will connect your shelly device to shelly’s servers and check for the latest firmware there. You can then repeat the process of checking for firmware in the settings tab and it should work as expected.
Connecting to the shelly cloud allows you to control your shelly devices via amazon echo, and google home using the shelly skill, and also give you remote access to your shelly devices without needing to set up port forwarding or a VPN, but if, like me, you prefer to use only local control you can disconnect your shelly from the shelly cloud after getting the latest firmware.
And this is the point where there stops being a “best setup”, and where your setup will depend heavily on what you are using your shelly for.
But lets talk about control. If you are using the shelly cloud, you can control your shelly devices from anywhere in the world via the shelly app. If you are not using the cloud, you can still control your devices in the shelly app, but you need to be on the same network as your shelly devices.
Most people will end up adding their shellys to a home automation hub like home assistant, hubitat or smart things. Unfortunately the smart things integration uses the shelly cloud, but hubitat and home assistant use local control. For local control the shelly has three options: REST, MQTT, and CoAP which shelly calls CoIoT. You are probably most familiar with the REST and MQTT protocols. REST essentially uses HTTP commands to control the shelly and gather information from it. The problem with REST is that it uses polling, in other words a hub like home assistant needs to constantly ask the shelly if anything has changed since the last time they talked. MQTT and CoIoT are push protocols, meaning the shelly will immediately let your hub know when something has changed.
MQTT is a broker based system where there is one main server that all devices communicate with, where CoIoT is a broadcast based protocol so anytime something changes on the shelly, it sends out a multicast message over the network to any and all interested devices. MQTT is a more efficient protocol, using less network resources, but because it uses a single server for communication, that server needs to be setup properly in order for your device to work. But since CoIoT uses multicast, it doesn’t really care who’s listening, it just sends the message out on your local network for anyone to listen for. As you can imagine, from a security standpoint this means you wouldn’t want to use CoIoT on a public network, but a private network it’s great because it requires no setup and allows new devices to be discoverable.
If you choose to use MQTT you’ll set it up in the web interface by clicking on internet and security, advanced developer settings, and enable MQTT. You can see that CoIoT is enabled by default, which is why when you connect your shelly to your network, home assistant will automatically discover it and give you a notification to set it up. If for some reason that doesn’t happen you can add it to home assistant manually by using the shelly integration.
A quick note about this: If CoIoT isn’t working properly then home assistant will fall back to the REST protocol. If you control your light with manually you should see it immediately update in home assistant, if there’s a lag it means that CoIoT isn’t working, which is mostly likely because of one of your specific network settings. For me, I needed to disable IGMP snooping on my unifi network for CoIoT to work properly.
There are tons of other small settings you can tweak in the menu, but the last thing I’m going to cover are the switch types. I mentioned earlier that a major selling point of a shelly is the ability to add smart functionality to a completely normal looking switch. The inevitable trade off of this is that sometimes the switch state won’t match the state of the lights. If you have a lot of 2 way or 3 way switches in your house you are probably already used to this, but for some people a switch in the up position means that the light should be on, and anything else is unacceptable. The good news is that whatever your opinion on the situation, shelly has a switch option for you.
Using the button type menu you can choose momentary, for use if your switch is actually a button; Toggle, which will always synch the state of the switch and the light when operating it manually, in other words you can still turn it on and off from the app, but if you turn the light on, and the switch is off, then you will need to first toggle the switch up into the on position and then down to the off position to turn it off.
There’s also edge switch, which will be most like a 2 way or 3 way configuration where the state of the light will change any time the switch is toggled, this means that sometimes you’ll end up turning the light on, by flipping the switch down, but the state of the light will change with every switch movement.
The last switch type is called activation switch that turns on for a specific amount of time and then turns itself back off, usually this isn’t used for lights, but I can see it being effective for something like a bathroom fan.
In summary you can probably see why shelly devices have gained so much popularity; they’ve built a product line that can satisfy basically every use case you can imagine. Whether your sticking point is UL certification, no neutral, high current, low price, local control, low voltage, or you just want to use your existing light switches shelly is the best out there and I’ll continue to use them in my house and for my projects for the foreseeable future. I hope this video helped you figure out which shelly is right for you, but if you have additional questions feel free to leave a comment.
Thank you so much to my awesome patrons over at patreon for your continued support of channel, if you’re interested in supporting my channel please check out the links in the description. If you enjoyed this video please hit that thumb up button and consider subscribing and as always, thanks for watching the hookup.