Your WiFi Sucks, Fix It With These 5 FREE Tips
July 14, 2021Today on the hookup we’re going to talk about why your WiFi sucks, and what you can do to fix it. I’m going to explain the most common issues with wifi networks and show you how to increase your wifi performance in 5 quick, easy, and free steps.
In some regards wifi is extremely complicated, but most of the common wifi problems are caused by two things that are relatively simple to understand called attenuation and interference. WiFi consists of different frequencies of radio waves, and although radio waves are different than sound waves, a simple analogy can be made between the two to teach you why your WiFi sucks.
Imagine you are in a large room and you want to talk to a person all the way on the other side of the room. If the room is empty, the only limitations will be the volume of your voices and the sensitivity of your ears. Lets say one person can’t talk very loud and also has bad hearing. If the other person has great hearing and a loud voice the conversation can still happen, but if not there will be a lot of “What did you say?” and “Can you repeat that” going on, which will decrease the rate of your conversation.

WiFi devices have the same two important characteristics: They have a transmit power, or how loud they can talk, and they have antenna gain, or how well they can listen. In most cases the majority of data is going to flow from the access point to the device, so that’s what we’ll look at first.
This video was sponsored by Gosund, manufacturers of quality smart home basics like wifi plug sockets, lightbulbs and LED strips. Because these gosund products are wifi based you don’t need any special hub or receiver to operate them, just your normal 2.4 gigahertz wifi network. Gosund products use the extremely popular Tuya platform meaning setting them up is quick and easy in the tuya app and they can be used with products from hundreds of other companies that are also based on tuya. If a gosund product is your first smart home device you can set up scheduling and operate them remotely via the tuya app or easily add them into amazon echo or google home. If you’re a seasoned automator you’ll be happy to know that gosund products integrate easily with home assistant and Samsung smartthings. Check out gosund’s lineup using the links in the description.
The measurement for how well a wifi device can hear its access point is called “Received Signal Strength Indicator” or RSSI. RSSI basically measures the difference between the strength of the signal that was sent out by the access point, and the signal that was received by the wifi device. A measurement of 0 dB means 100% of the transmit power made it to the client, which is basically impossible, and -100 dB means none of the signal made it to the client. In general, you should place your access points so that any device that needs to talk to them has -70 dB or better RSSI, and if it is a high bandwidth device like a phone, tablet, or streaming device you should shoot for -60 dB or better.
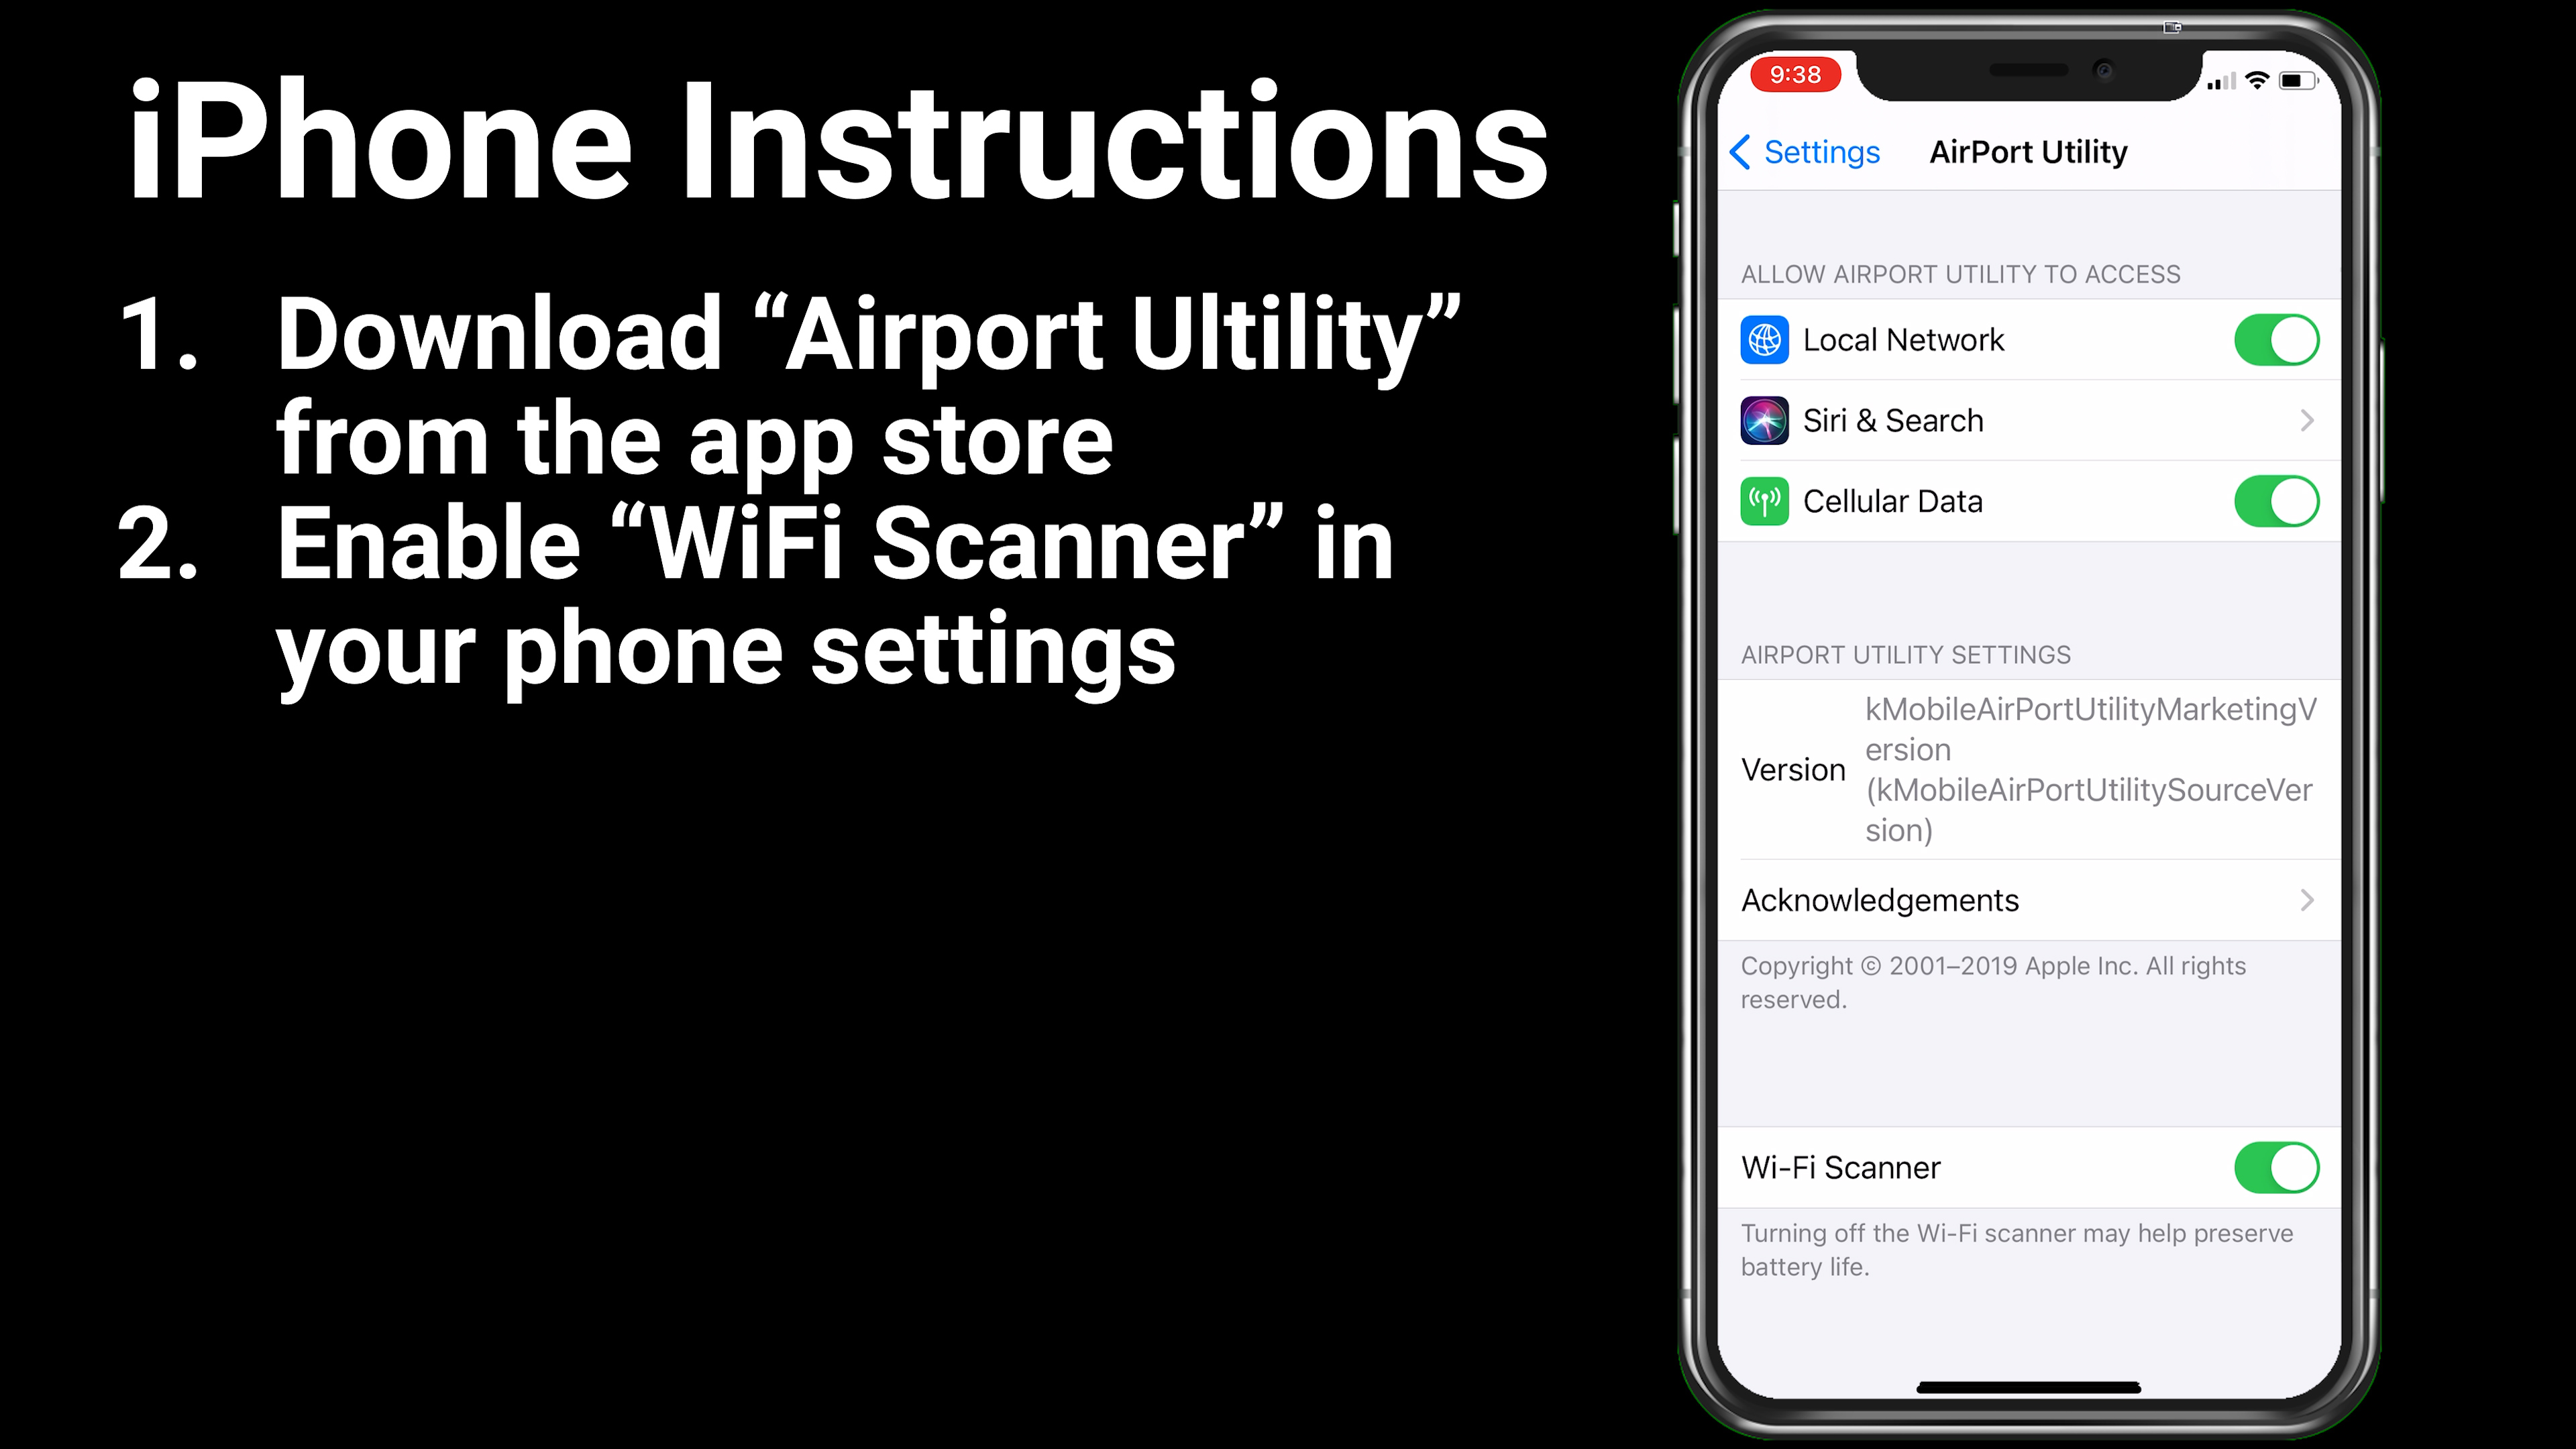
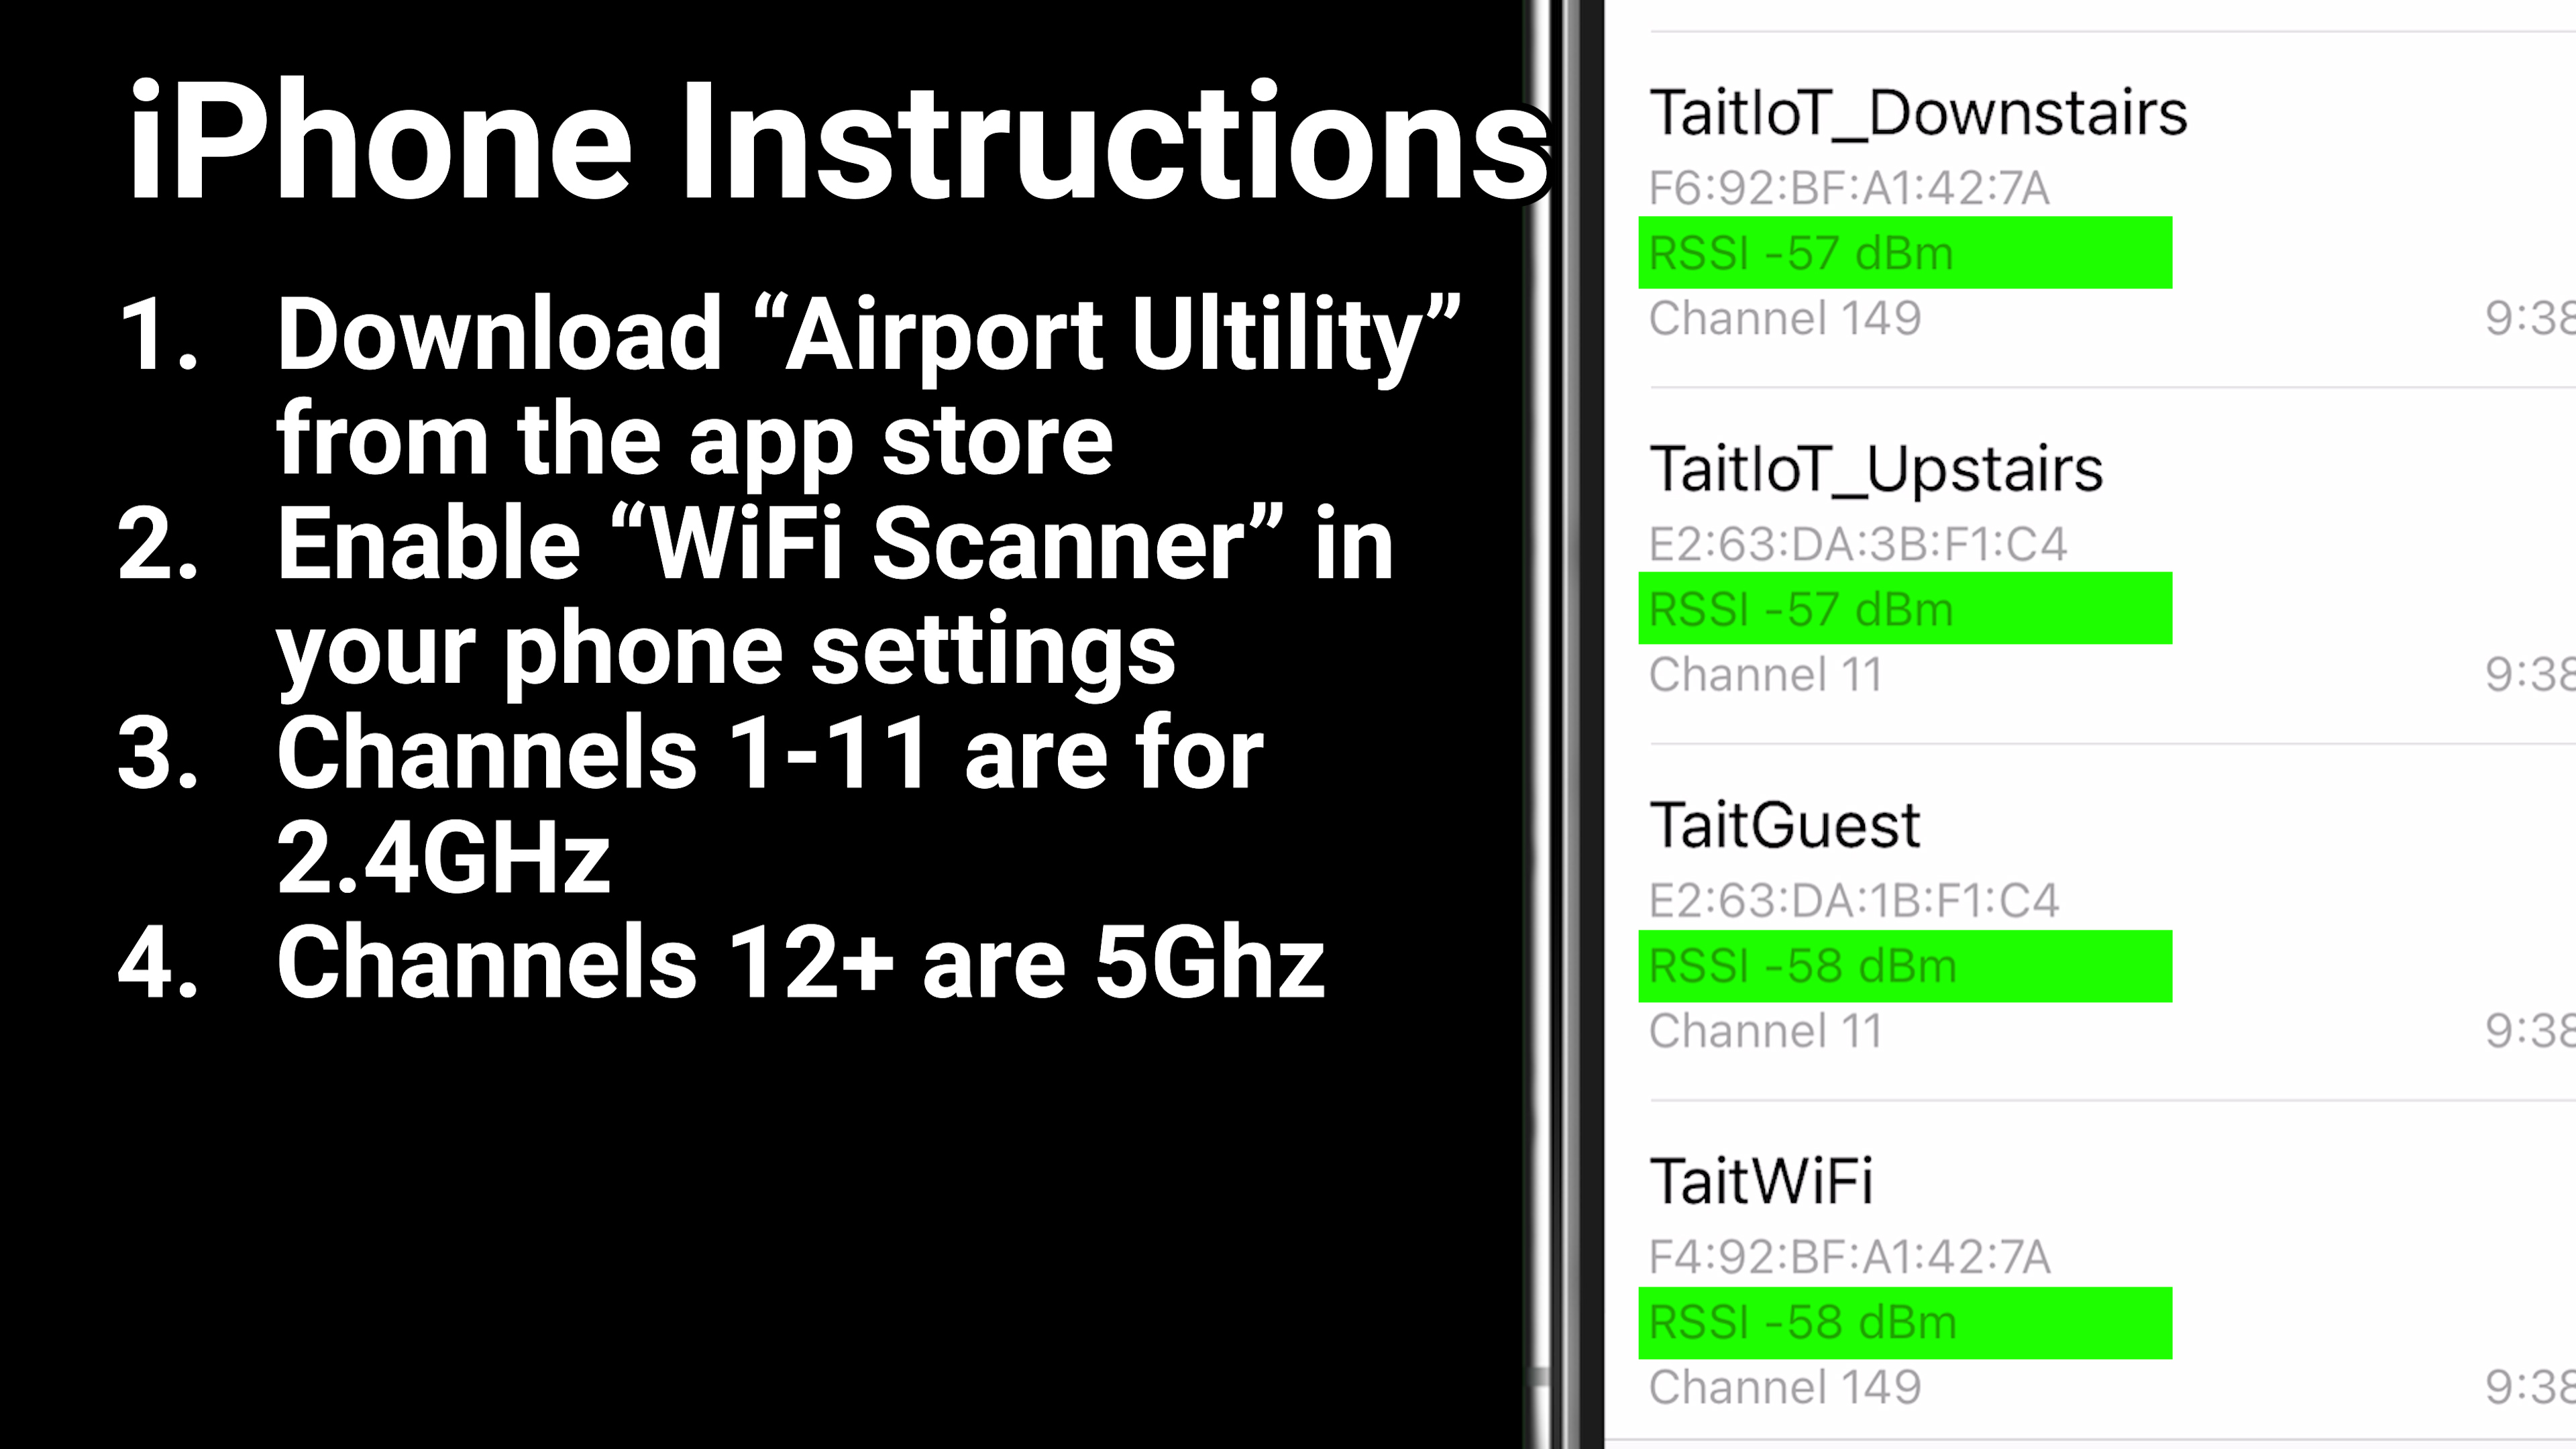
So the first step to determining why your wifi sucks is to figure out the RSSI at each important location throughout your house. To do this for free you can use a cell phone or tablet with a WiFi analyzer app. There are a bunch of good options for android, but If you have an iphone there is only one option, since apple doesn’t give app developers access to the tools required to make a proper wifi analyzer. So if you have an iphone jump into the app store and pick up the app called airport utility made by apple. This app is meant to be used with apple’s wifi solution, but if you download it and then go to settings you can enable the WiFi scanner within the app. Once wifi scanner is enabled, you can walk around to different areas of your house and see what kind of signal you are getting from your access points. I recommend checking out important areas like the couch, patio, and definitely the bathroom. You’ll see some channel numbers between 1 and 11, those are your 2.4 gigahertz channels, and the rest are for 5 gigahertz. You should pay close attention to the RSSI values listed next to your specific network name.
As you move around your house you will probably find some strange pockets of low signal, so lets talk about why those might exist and what you can do to fix them. In our ballroom example this pockets would be caused by putting up some walls or curtains in between the two people. Those walls absorb the sound waves and make it more difficult for one person to hear the other and some materials will absorb more sound than others.
This concept of absorbing the wave is called attenuation which actually describes a reduction in the amplitude of a wave, which is basically the same as signal strength. As a wave passes through an object it will transfer some of its energy into that object based on the physical characteristics of the material and the frequency of the wave. Dense materials generally cause more attenuation, but some materials are also specifically designed to not let electromagnetic radition through.
Placement of your access points and devices is much more important than you think. I have a WiFi microcontroller outside that controls my pool. Inside, about 15 feet away is a UniFi UAP6 Lite, which should have more than enough transmit power to reach this device and plenty of antenna to hear the response, but my connection consistently sucks. Clearly putting the microcontroller inside this weatherproof metal box isn’t great for signal, but even with an external antenna I still have RSSI measurements over -70db from just 15 feet away.
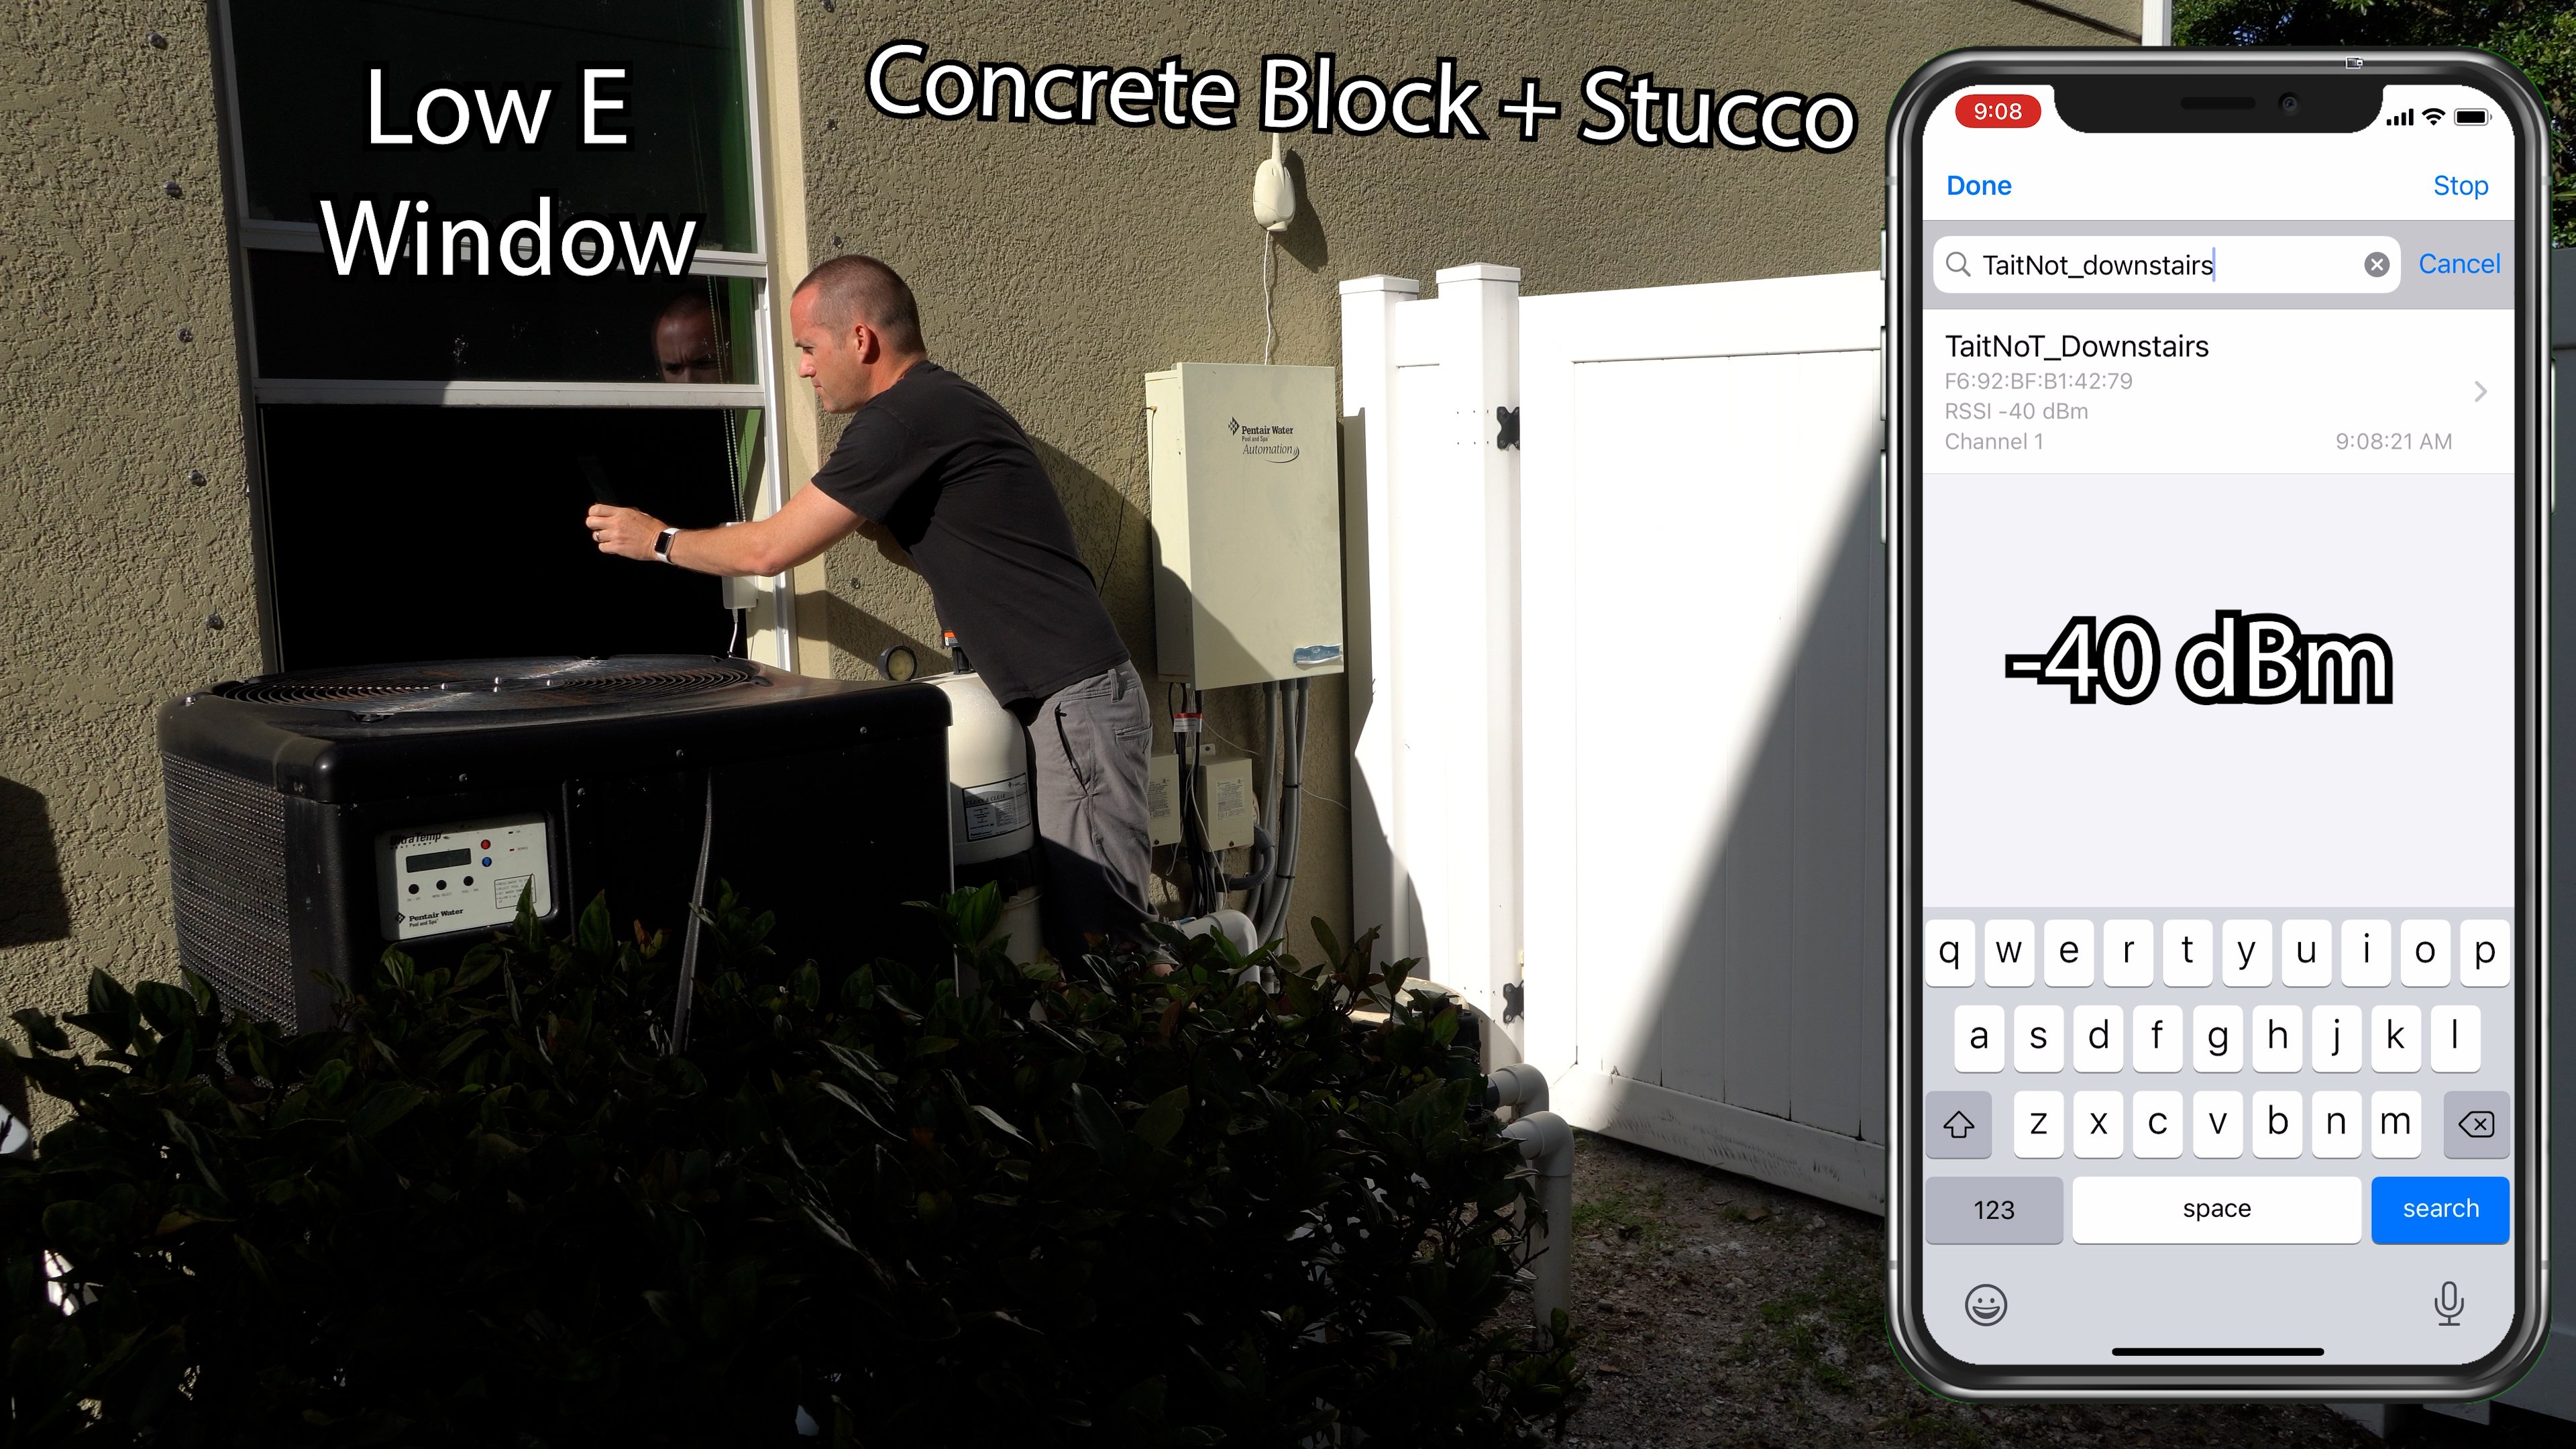
The first problem is concrete, which is what the first floor of my house is made of. Neither WiFi band does a great job penetrating concrete, especially thick concrete block covered in stucco, but what about the window? Most of the time windows do a great job of letting WiFi signals pass… except in florida where we try to block as much of the sun energy as we can, so most windows have a special coating called Low E which specifically reflects electromagnetic radiation, including WiFi signals. You can see that just opening the window moves my RSSI from -74dB to a nearly perfect -40dB.
So, step two is to change the placement of your devices as much as possible to increase their chances of getting a good signal. In your house the wifi signal can be easily disrupted by things like mechanical closets, metal furniture, or extra thick walls, especially in older houses where the walls are made from metal lathe covered in plaster. I know it seems like a great idea to mount your router and access point under your desk and out of the way, but you are instantly lowering the signal strength of every device in your house by doing so. Moral of the story, device placement matters, if you have a device that you want to have an extremely fast and stable connection, try to put it in direct line of sight to the wifi access point.
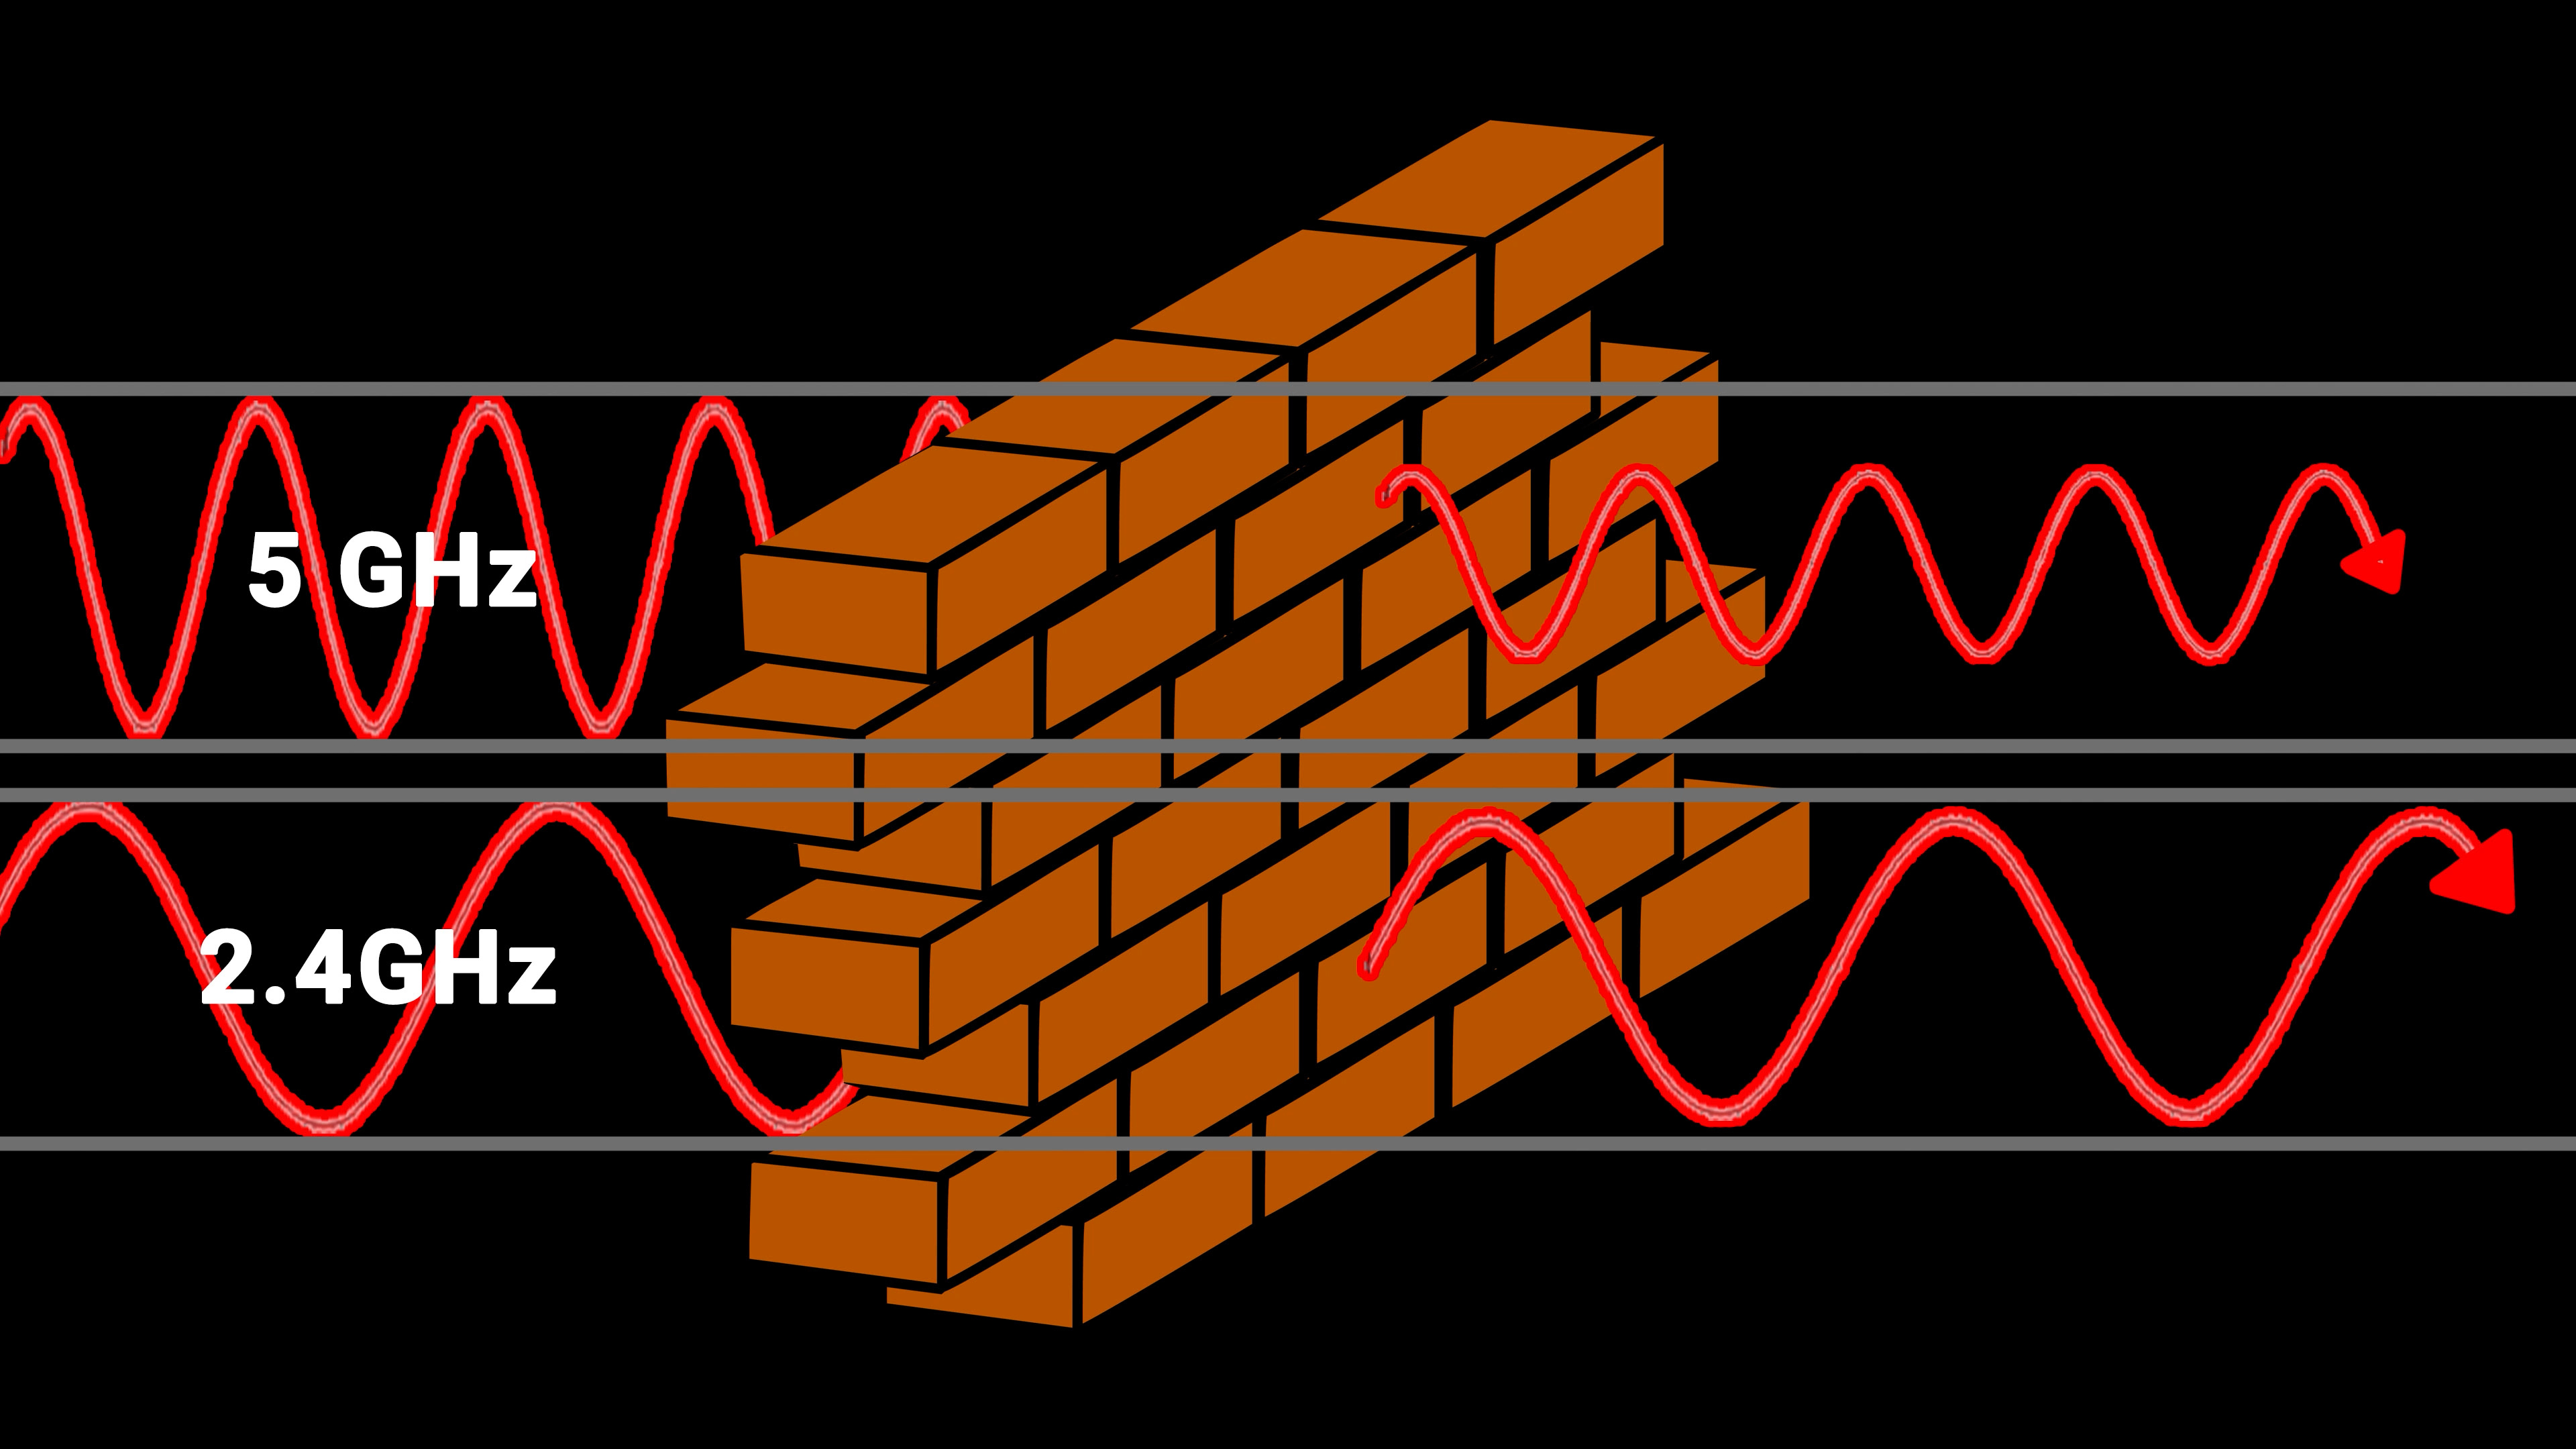
And that leads me to step 3, which is choosing the right wifi frequency for your device. 2.4 gigahertz is the more common frequency that all wifi devices can utilize, but 5 gigahertz will give you higher speeds and in general should have less congestion and interference. Because of this the general rule that your internet provider tells you is to put any compatible device onto the 5 gigahertz network. However, this isn’t always the best advice. The two different WiFi bands are affected differently by different building materials. In general 2.4 gigahertz wifi will attenuate less an therefore have greater range than 5 gigahertz wifi. The reason for this is simple, the shorter 5 gigahertz wave travels a longer distance inside of the material than the longer 2.4gigahertz wave. The more distance it travels the more opportunity it has to transfer energy from the wave to the attenuating material and therefore the signal strength will decrease more with each object that it needs to pass through. If you are experiencing poor wifi signal to a specific device and your wifi access point supports splitting the 2.4 gigahertz and 5 gigahertz bands into two different network names, try connecting the device you are having trouble with to the 2.4 gigahertz network instead of 5 gigahertz, this will lower the maximum possible speed, but a full signal strength 2.4 gigahertz connection will be significantly faster than a weak 5 gigahertz signal. Remember you can also use your wifi analyzer to look at the difference in RSSI between your 2.4 gigahertz network, which will have channel numbers between 1 and 11, and your 5 gigahertz network, which will have channel numbers higher than 11, and then make your decisions accordingly.
Sometimes placement is fine, and signal strength is fine, but your wifi still sucks. In this case the culprit is more than likely interference. Moving back to our ballroom, now imagine that there are a bunch of other people to the room all having their own separate conversations. Your ears pick up all that extra noise, and it becomes difficult to differentiate the voice you want to hear from all of the other voices in the room.

Luckily, unlike human ears, wifi has the ability to tune to a specific frequency range and only transmit and listen to that that one small frequency band. So step 4 is to change the channel on your wifi network to avoid interference from neighboring networks.
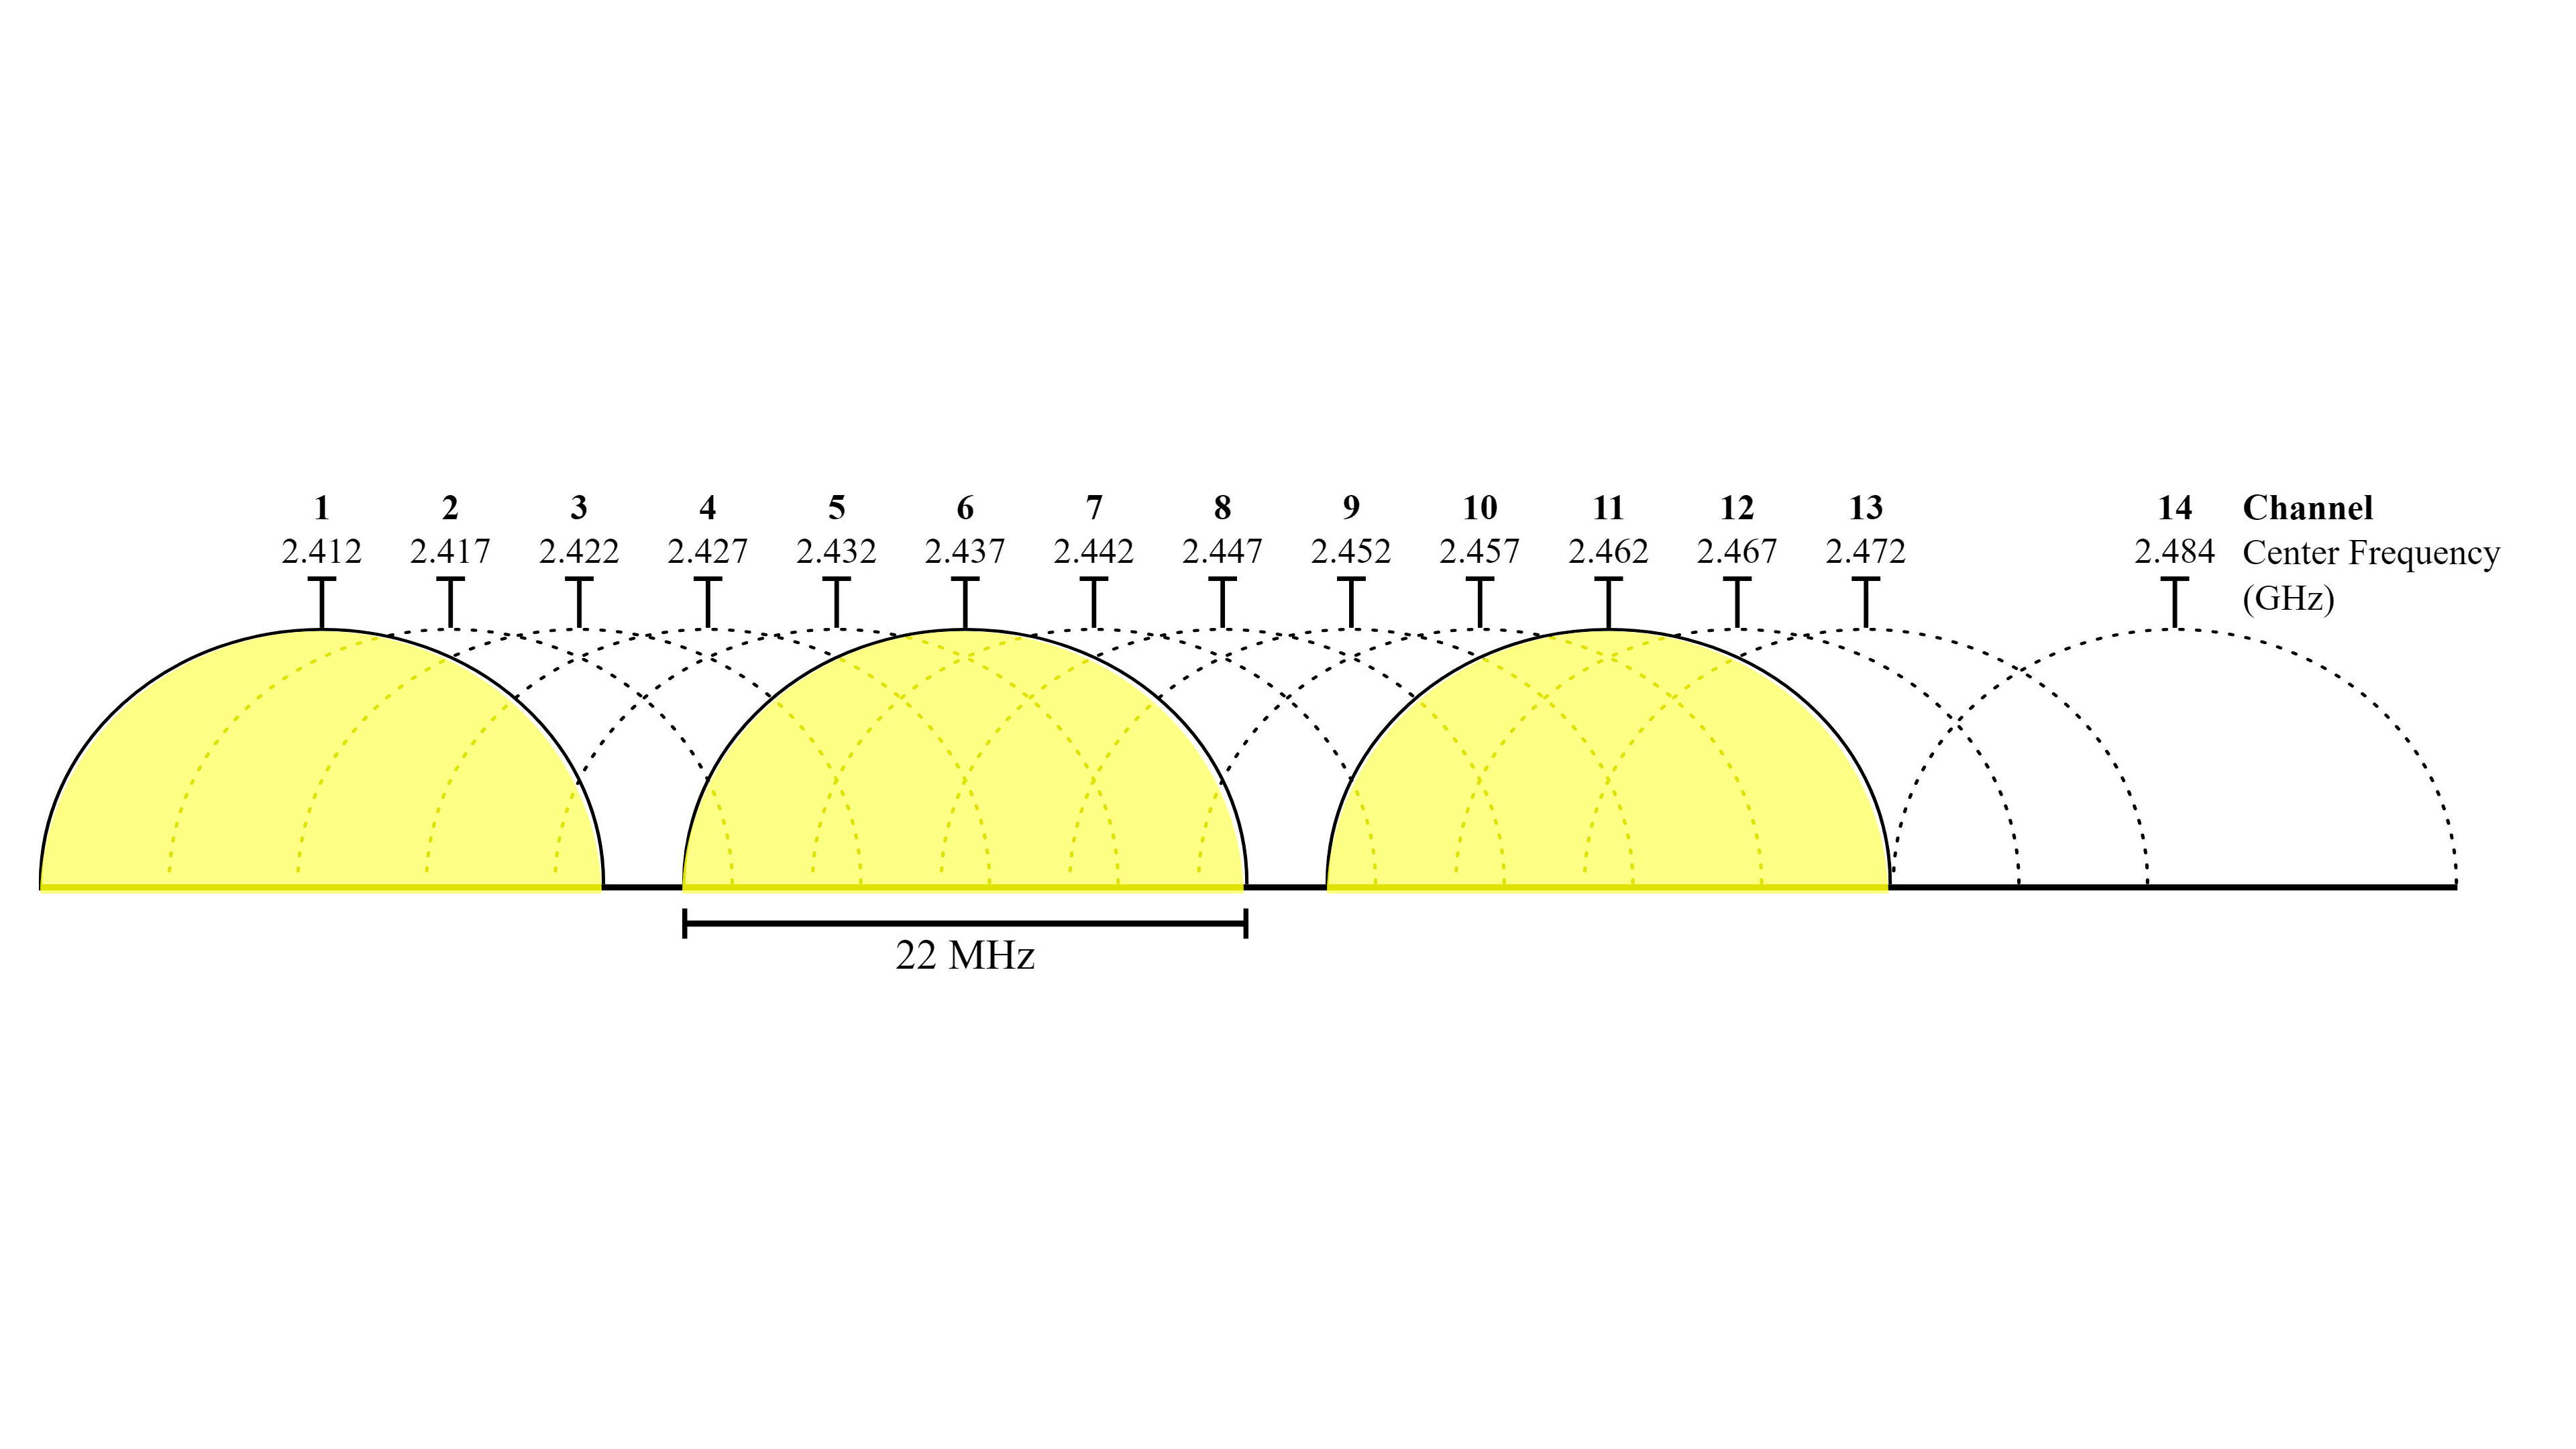
2.4 gigahertz is the name we give to the 802.11n wifi standard, but it actually has 11 channels that range from 2.41ghz to 2.47ghz. The problem is that those 11 channels overlap each other, so there’s still lots of interference between channels 1 and 2, 2 and 3 and so on. The 2.4 gigahertz band actually only has 3 non-overlapping channels which are 1, 6, and 11. When you are using your wifi analyzer you should check to make sure there aren’t any other access points with strong signals on the same channel as you because they WILL interfere with each other significantly. Also, If you see that your neighbor’s wifi is using channel 3 or 9 it might be worth respectfully mentioning to them that they are ruining two non overlapping channels with their WiFi channel selection… they likely have no idea what they are doing.
For 5 gigahertz WiFi there are 24 non overlapping channels, so it should theoretically be easier to find a channel without interference, but a majority of the channels have restrictions for when and where they can be used, and a large chunk of them are known as DFS channels meaning you can’t manually select those channels because they could interfere with other services on that frequency like military radar. Still, because the 5 gigahertz band has a higher rate of attenuation and therefore lower range, WiFi network congestion and interference is usually less of a problem on the 5 gigahertz band and you probably won’t need to worry about scanning and manually selecting a channel for 5 gigahertz unless you live in a very densely populated area like an apartment complex. If you do, then these are the non-overlapping channels you should be looking for.
Last, your neighbors might not be the problem. Step 5 is to make sure that there aren’t any devices in your house broadcasting their own SSIDs. It’s common for smart home devices to broadcast their own access points for setup, and streaming devices like the roku have a wifi network for direct connect mode. If you aren’t using these features it’s best to disable them to prevent interference and unnecessary wifi congestion. Worse yet, if you’ve installed new WiFi in your house other than the one the cable company provided you with, make sure you disable the WiFi on your cable modem and router, not only to prevent interference but also for security since those wifi networks are often insecure with procedurally generated passwords that can be determined from the device’s MAC address.
And that leads me to my next point, If you’ve gone through those 5 free steps and your WiFi is still bad it might be time to get some new equipment. The WiFi from your internet service provider isn’t designed to cover an entire 2000 square foot home, no matter what they told you, so upgrading it will almost certainly increase your wifi performance. There are two schools of thought when upgrading your wifi, you can either get a single unit with a massive array of antennas, which I wouldn’t recommend, or you can go with a mesh system. Mesh systems work by having one main unit that connects to your cable modem and then satellite units that plug in throughout your house.
These systems typically work by communicating with each other on a separate frequency called the backhaul, and then each broadcasting their own wireless networks with the same SSID. You’ll be able to seamlessly roam between the different networks and because the satellite units are located throughout your house you are more likely to have direct line of site to one at any given time, meaning your wireless signal will be stronger.
Another less talked about benefit of mesh systems is that because the maximum distance from a satellite unit to a wifi client will be less than just having a single access point, the transmit power of the networks can be significantly lower, leading to less interference with your neighbors wifi. It’s fun to be able to connect to your wifi network from a block away, but it’s definitely not best practice for security, or even performance.
As for equipment recommendations, I used a google WiFi 3 pack for my 2200 square foot house for years before switching to a ubiquiti unifi system. Aside from the lack of advanced options and firewall rules the google wifi system worked great for me, I’ve also heard good things about linksys velop from a friend who does residential installs, but I don’t have any first hand experience.
If you’re feeling especially tech savvy and your pockets are deep you might decide to go all in on a Ubiquiti UniFi prosumer setup, if so check out my most recent 3 part series about Ubiquiti UniFi using the dream machine pro and the unifi UAP6 Lite access points.
Thank you so much to my awesome patrons over at patreon for your continued support of my channel, and if you’re interested in supporting my channel please check out the links in the description. If you enjoyed this video please hit that thumbs up button and consider subscribing, and as always, thanks for watching the hookup.