FREE License Plate Reading, Face Recoginition, and Object Detection for Blue Iris – Full Walkthrough
April 20, 2023It’s been almost two years since I made my first video about adding free, local, AI computer vision to Blue Iris, and the improvements that have been made in both functionality and ease of use since then are massive. So today, I’m going to do a full setup walkthrough covering installation of Blue Iris and CodeProject AI, cover best practices and general settings, show you how to add cameras from different manufacturers, set up motion detection with AI computer vision, train the AI to recognize familiar faces, and last I’ll show you how to set up a camera to do completely free local license plate recognition using that same CodeProject AI software. This is a long video so if you’re only interested in a specific part, feel free to use the chapter markers to skip around.
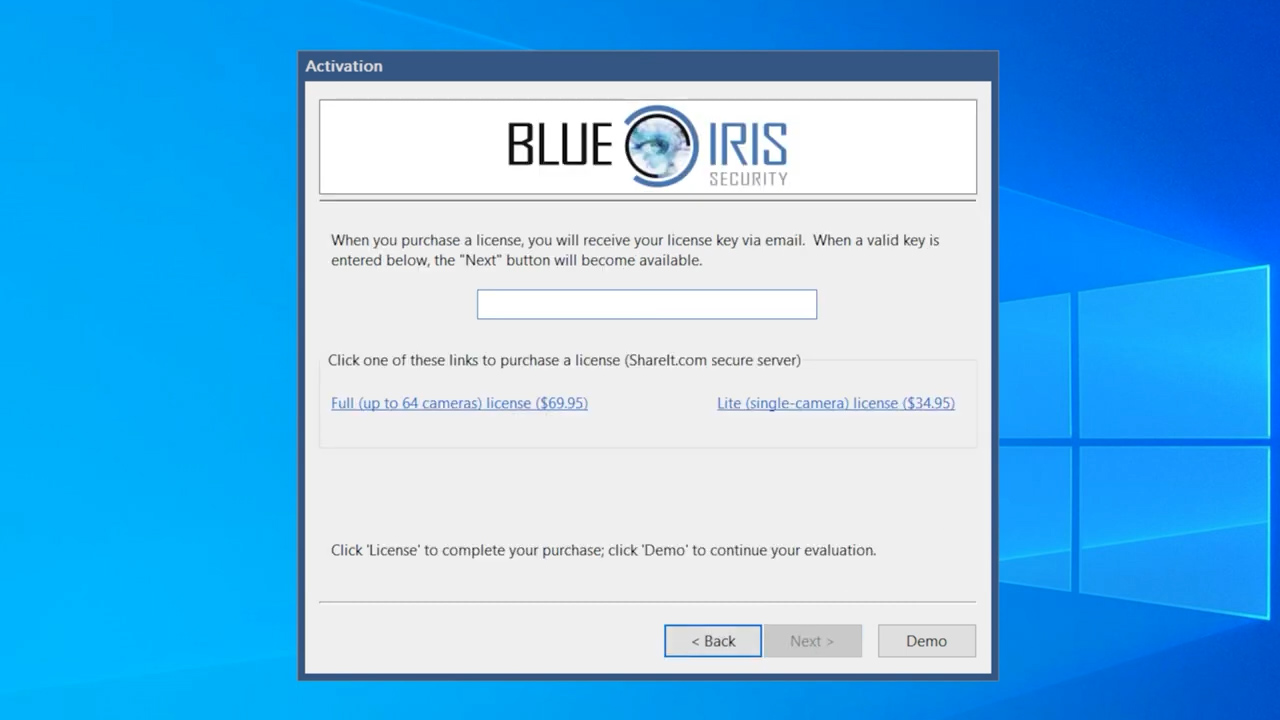
First, just to be completely clear: Blue Iris itself is not free. Blue Iris is a Windows only software NVR with a one-time license fee of $70. Your $70 license is good forever, and also comes with one year of free software development updates. If you want to receive the latest and greatest updates after a year, there’s an option for a $35 annual subscription but it’s not required.
The AI portion, CodeProject AI, is a self-hosted, local, free and open source artificial Intelligence server that can run as a Windows service, or in a docker container, and you’re welcome to use it with whatever NVR software you want, but in this video I’m going show how to use it with Blue Iris. There’s a 15-day free trial for Blue Iris software so set it up and see if you like it, and my guess is you’ll decide it’s at least $70 better than any free option.
You don’t need a crazy expensive gaming computer setup to handle Blue Iris, and my personal server is an old Dell 6th generation Intel i7 6700 with 16 GB of ram and an aftermarket GTX 1650 graphics card and it handles 14 cameras with computer vision, as well as acting as both my Plex server and my Home Assistant server. I’ve got links for recommended hardware below, but in general you’ll want a 6th generation or higher Intel processor, at least 16 GB of RAM, an NVIDIA graphics card, a fast solid-state hard drive as your programs drive, and a surveillance grade spinning hard drive to store your footage.
You can download the Blue Iris version 5 installer directly from their website for free, and once installed you’ll be prompted to either enter your license key or continue with the 15-day free trial.
When Blue Iris starts, click the gear icon to go to Settings. Give your server a name and then click on “Check for Updates.” You should be on the latest version, if not go ahead and update. At the bottom of the page there’s a link to download CodeProject AI, click that and follow the prompts to install. The CodeProject AI server has all the computer vision models on it, so it takes quite a while to download, and you’ll see a command prompt window pop up and execute a bunch of commands. It will close itself when it’s done.

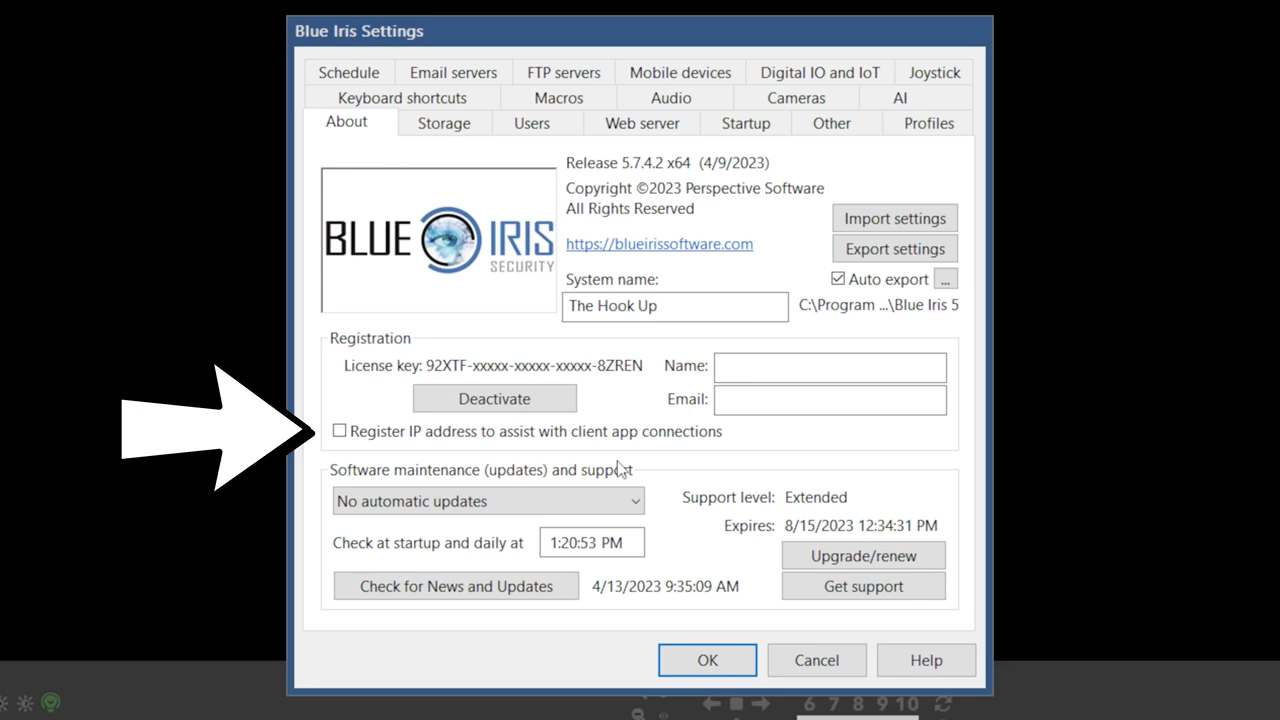
On the About page the only decision you need to make is whether you want to use the Blue Iris cloud server to keep track of your external IP address for use with the Blue Iris mobile app. I personally only use Blue Iris with a VPN and local IP address, so I uncheck this box.
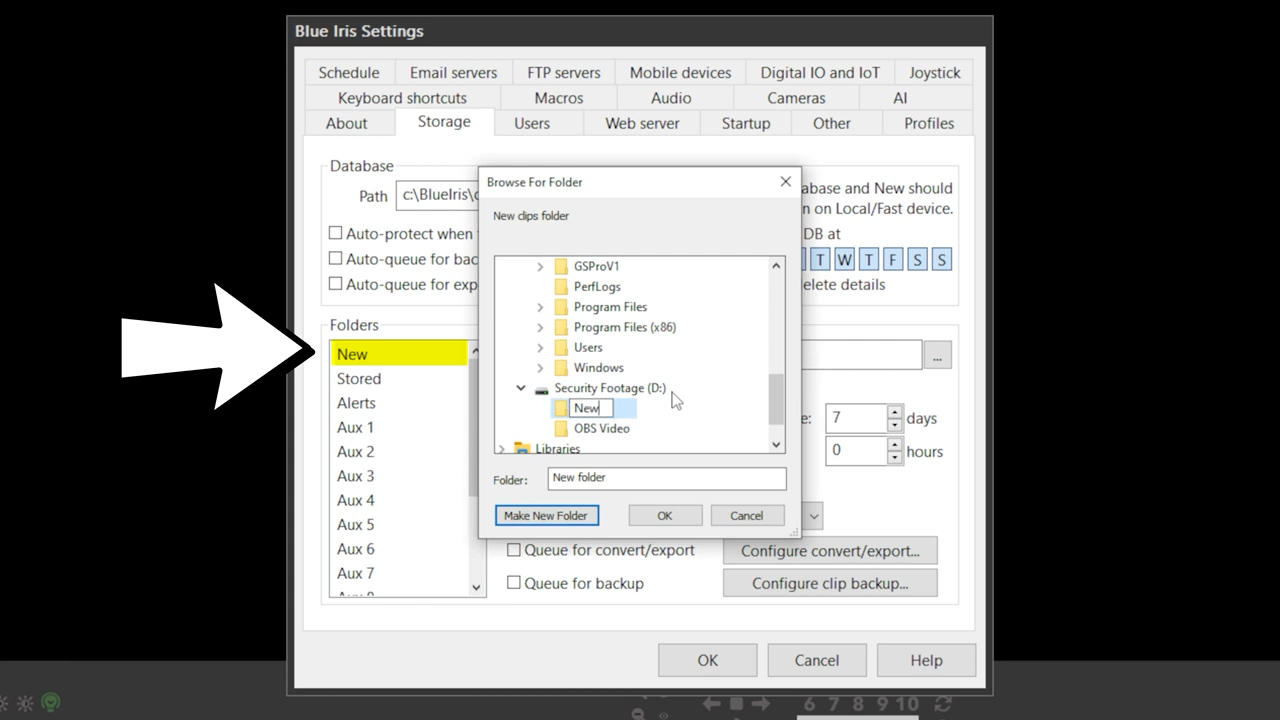
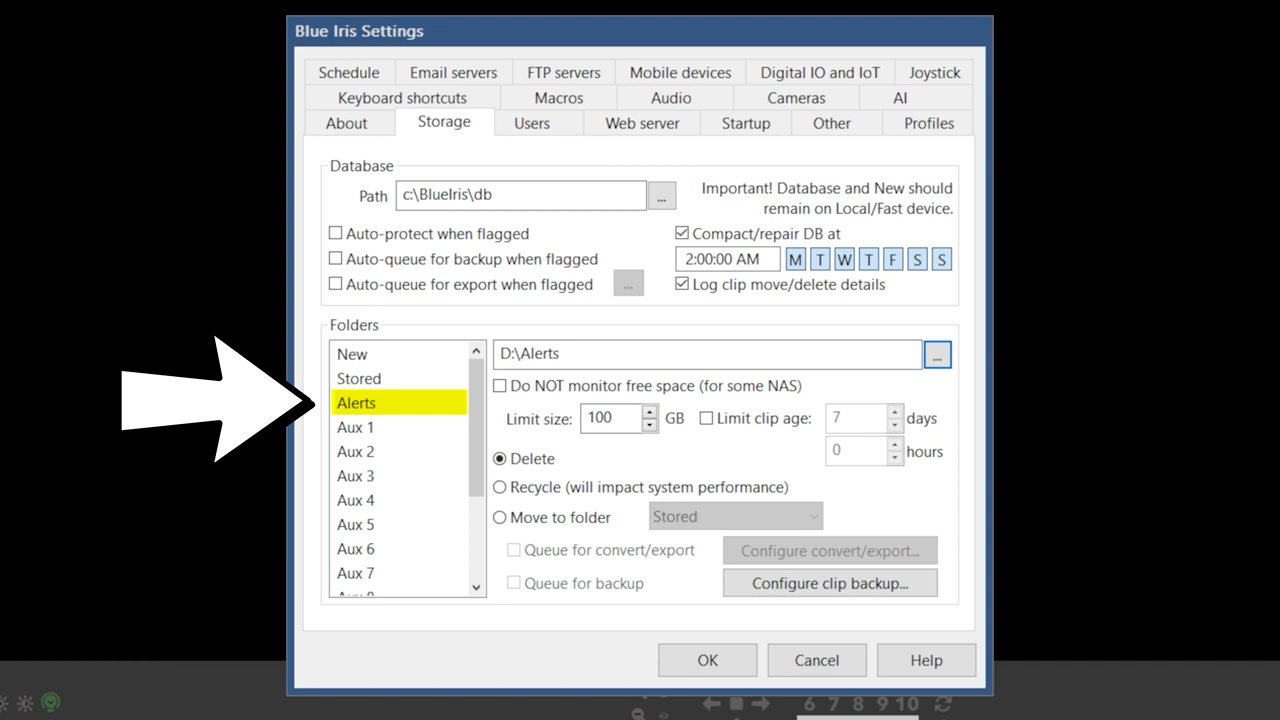
The next tab is Storage, and the top section is for the Blue Iris database. The database is what catalogs all your clips and alerts and should be stored on the fastest hard drive on your computer. My C drive is a solid-state drive so I’m going to leave it in the default location.
In the bottom section we’ll define storage for images and video files stored by Blue Iris. Almost all video files will end up in the new folder, so it should be pretty large. I’ll create a new folder on my secondary hard drive called new storage and set the size to 1000 GB, and I don’t want to delete files based on age, I just want to keep as much as possible in that 1 terabyte of space. When the storage fills up it should just delete the oldest files.
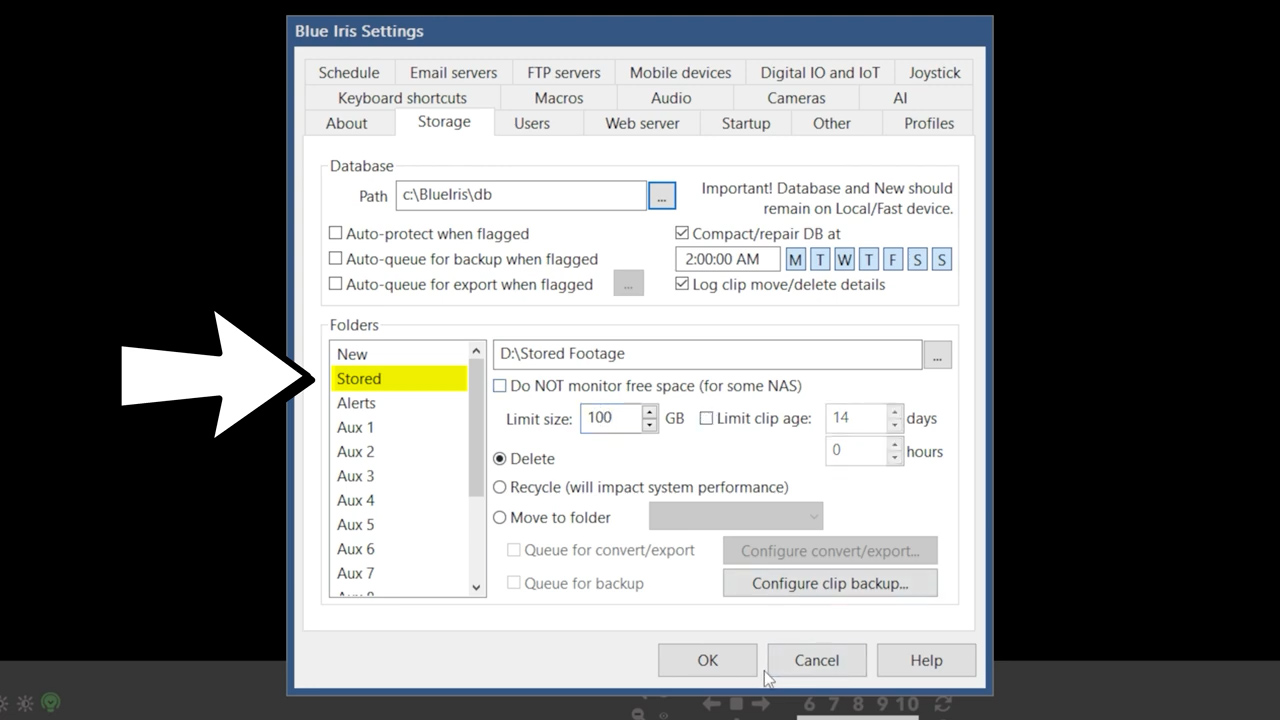
Stored is a folder used to protect clips from being automatically deleted. This folder isn’t going to get a lot of use, but I’ll make a separate folder on my hard drive and limit the size to 100 GB.
The Alerts folder is mostly going to contain high resolution images that are marked up with AI results and the details of each computer vision analysis in a .dat file. I’ll do the same thing for this drive, limiting size to 100 GB before deletion, and create a separate folder on my secondary hard drive.
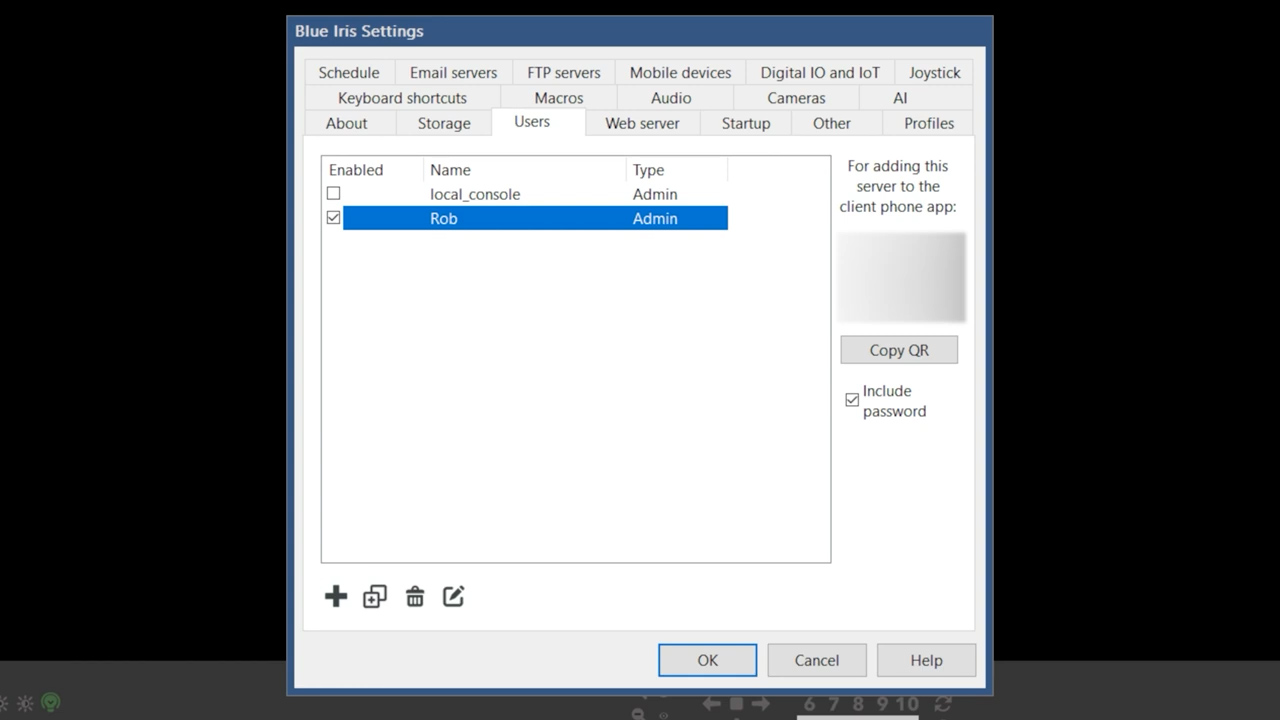
The next tab is Users, and you can see there is an automatically generated local_console Admin profile. We want to create a new profile with a secure password. The Blue Iris user management system is extremely configurable and can limit user logins based on time, limit which users can see which cameras, and a lot more.
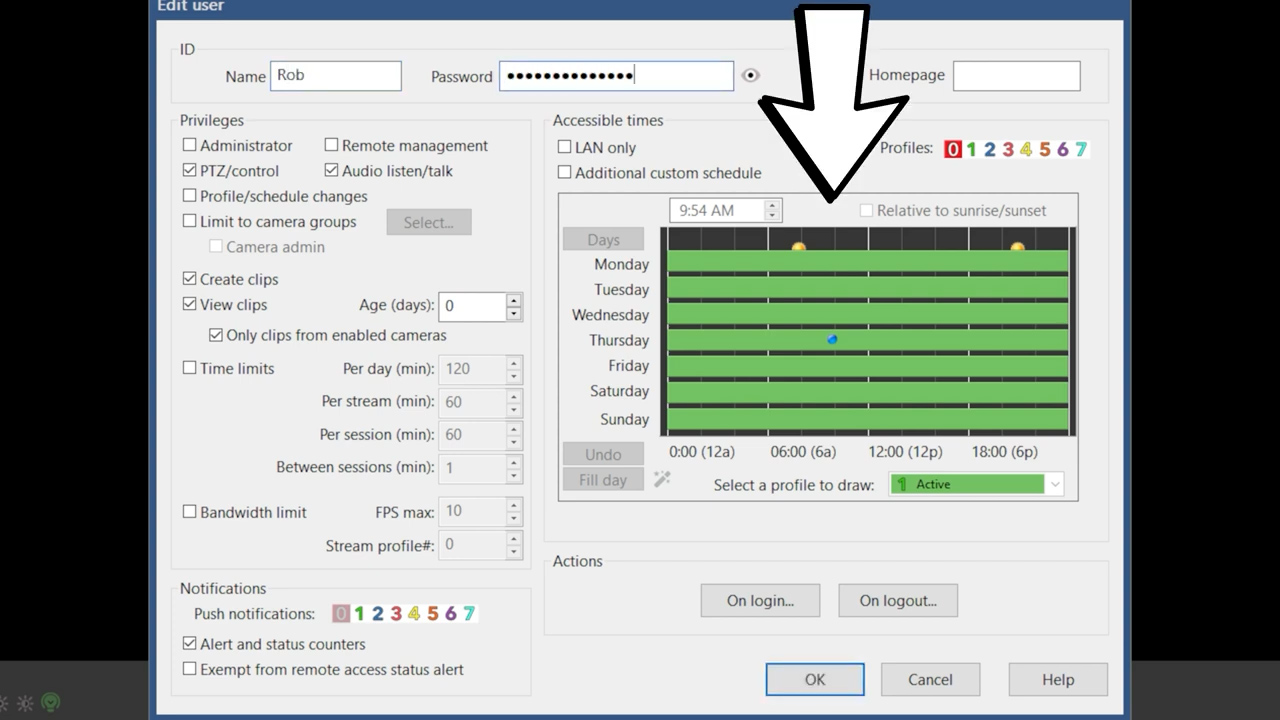
For me, I just want my profile to be an administrator, and since I use a VPN to access my Blue Iris server remotely, I want to limit this account to LAN only. After creating my new profile, I also disable the default local_console account.
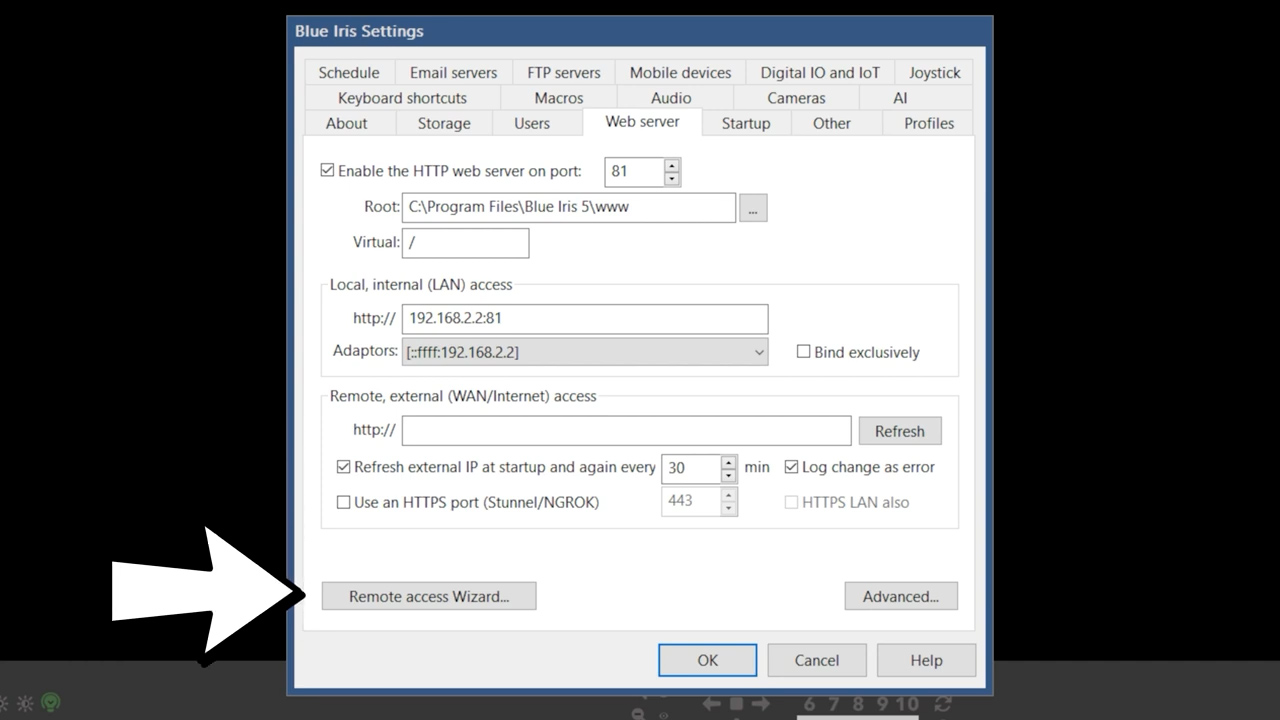
The Web server tab is next which is one of Blue Iris’s best features. The UI3 interface is my favorite way to interact with Blue Iris because it’s simple and responsive and runs on almost any computer. Start by enabling the webserver which defaults to port 81, and the local LAN IP address should also auto-populate.

Remote access could be a whole video on its own, so I’m not going to go into the specifics. I use Blue Iris with my UniFi VLAN, which means I don’t need to set up remote viewing at all since VLAN traffic just acts like local network traffic. If you want to set up remote access, I’d recommend using the excellent Remote access Wizard.
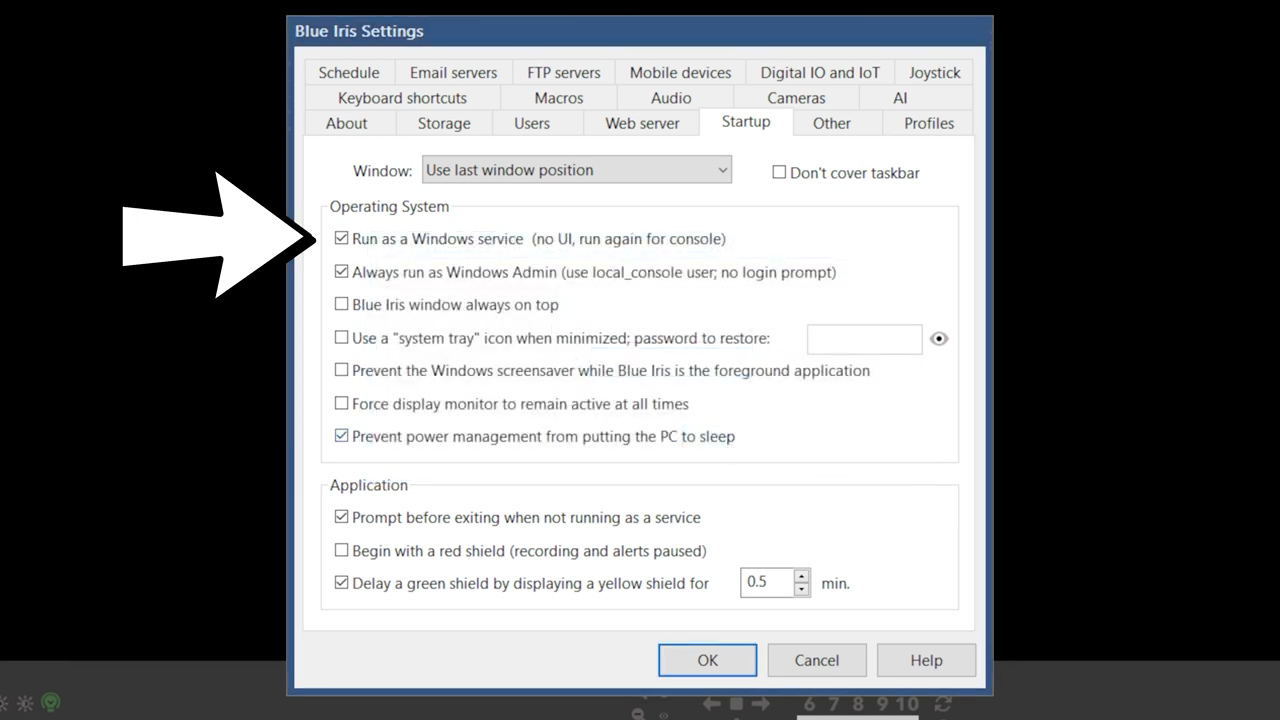
In the Startup section the only really important setting is to make sure that Blue Iris runs as a service. Not only will this reduce resource usage because you don’t need to run the UI, but it also means that when your computer restarts Blue Iris will startup even if you don’t log in to Windows. After enabling this option, it will prompt you for your Windows login, even if the username looks a little strange, the password is still whatever password you use to log into this particular machine. The only other option you should check is to prevent your computer from going to sleep, but honestly, it’s better to just configure this in your windows power options instead. The rest of the options are really up to your personal preference and use case.
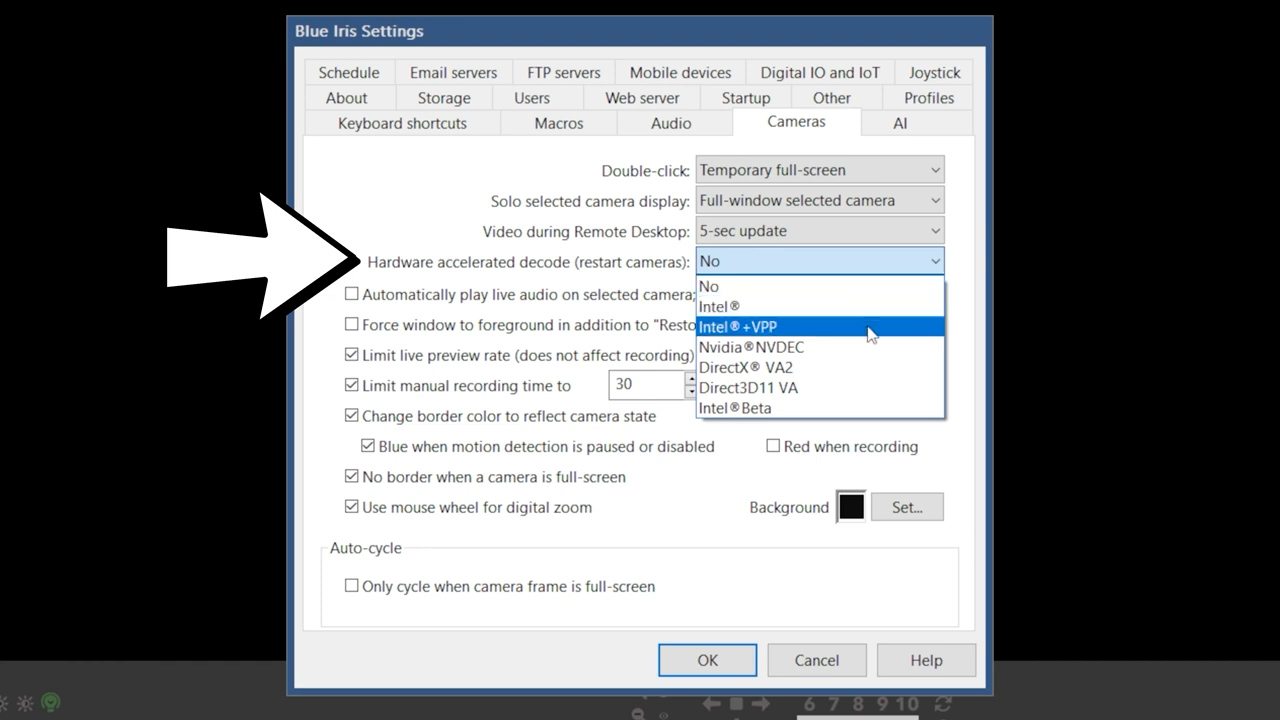
Other, Profiles, Joystick, Keyboard shortcuts, Macros and Audio don’t have any settings that need to be changed so jump over to the Cameras section. In this section you’ll select your default hardware acceleration profile. This is what I was talking about when I said a 6th generation Intel processor is the best option, since it was the first generation to have Intel’s Quick Sync hardware video decoding. In almost all cases you’ll want to select Intel + VPP which means that when you select the default encoding profile during camera setup, you’ll use Intel’s Quick Sync video decoding instead of raw processing power.
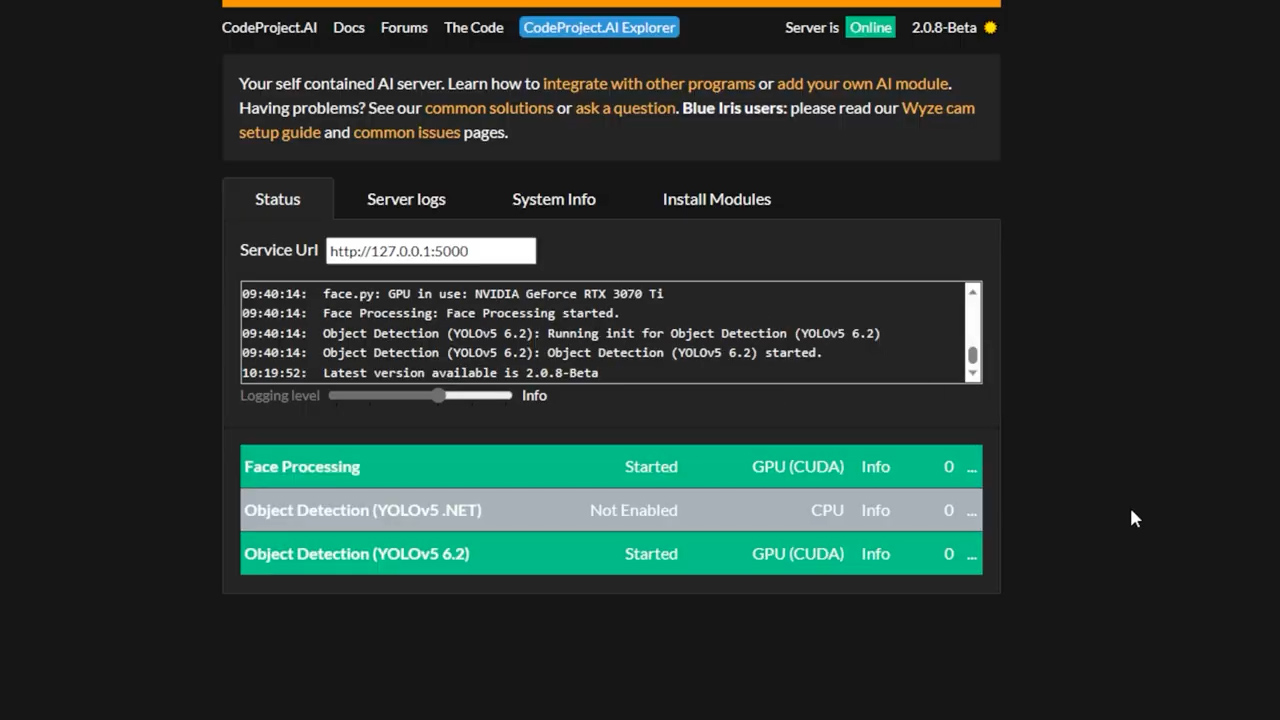
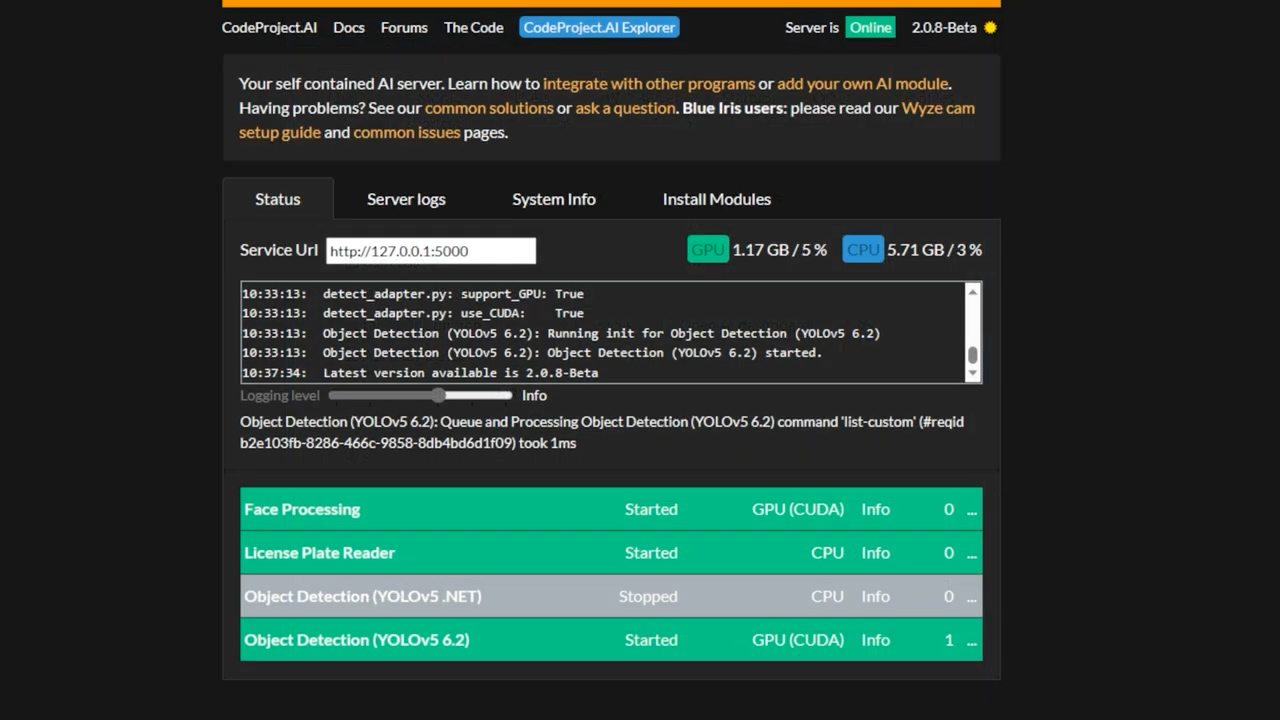
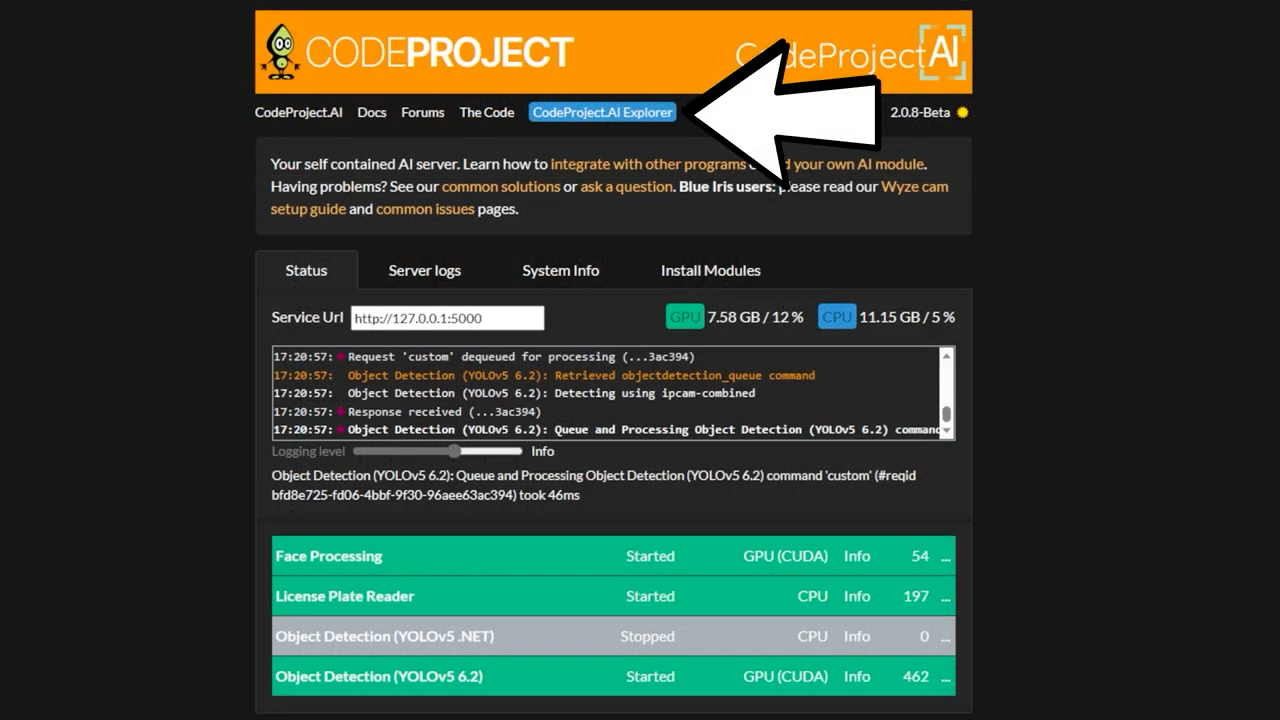
The next tab is the AI tab where we’ll specify that we want to use CodeProject AI which is the new preferred method and while the previous method, DeepStack, still works, it is now deprecated. Once you check the box to use the AI server it should detect that CodeProject AI is already running. You can confirm that by clicking the open AI dashboard link.
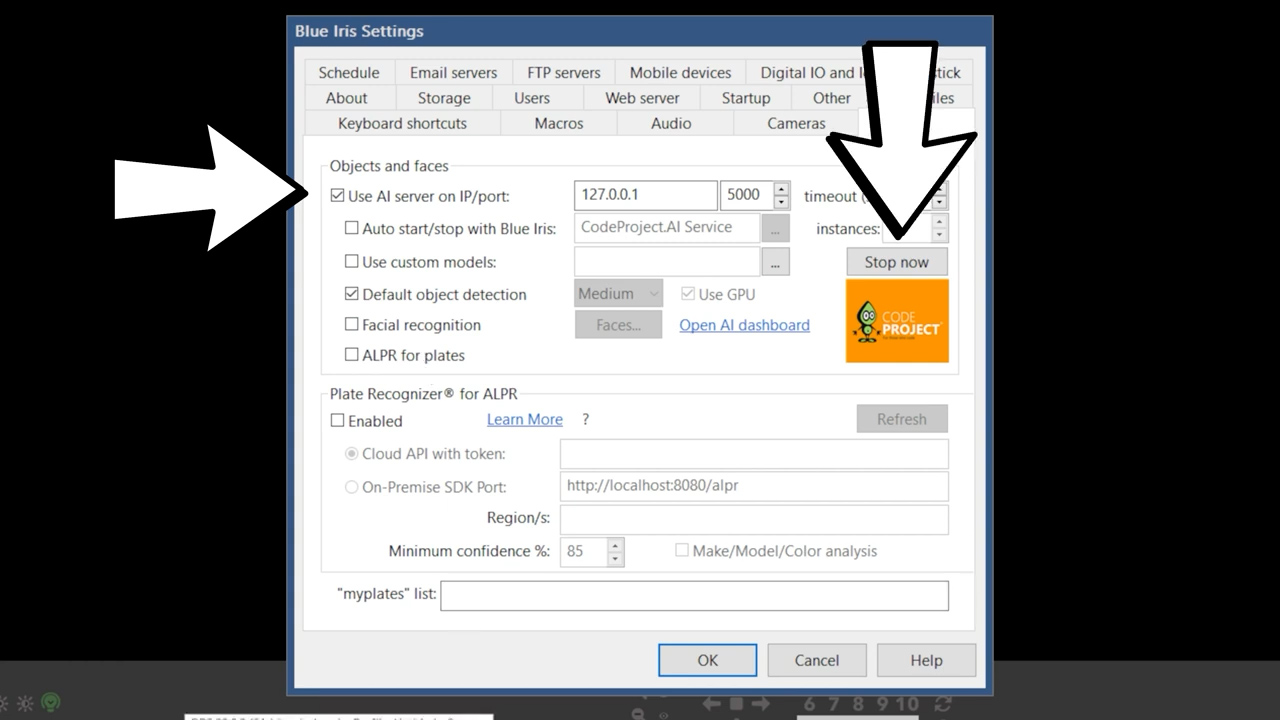
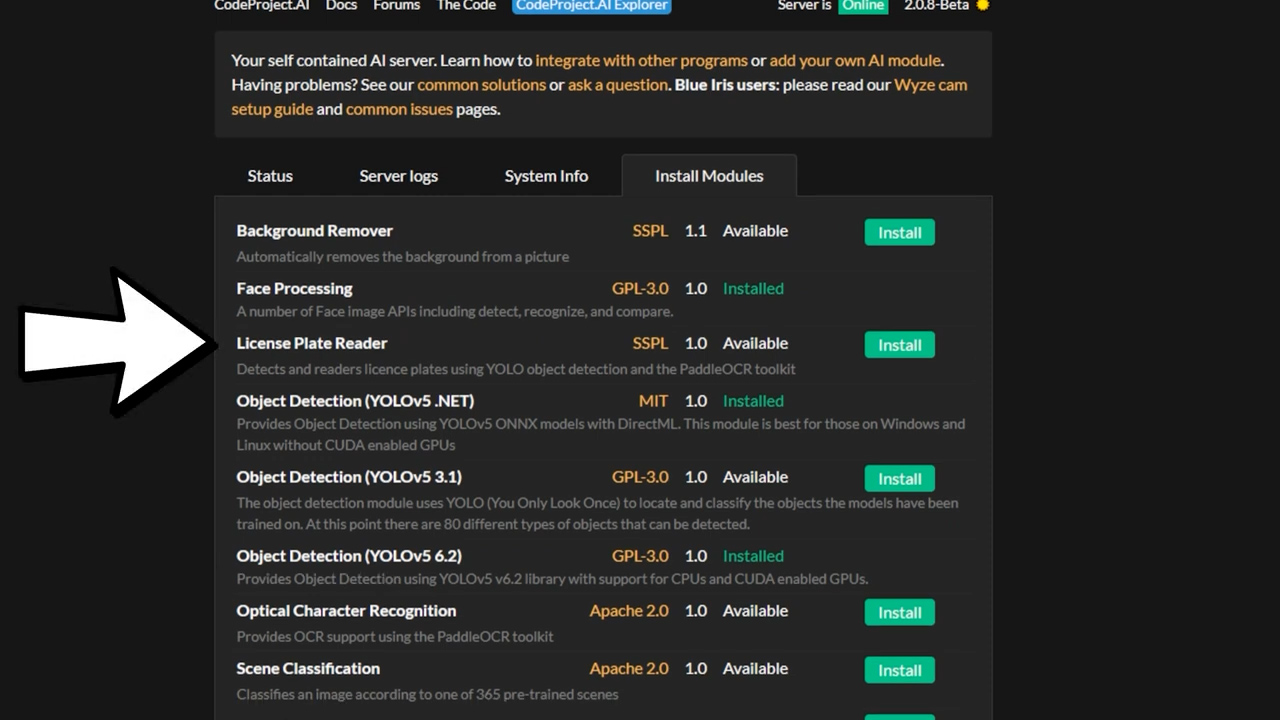
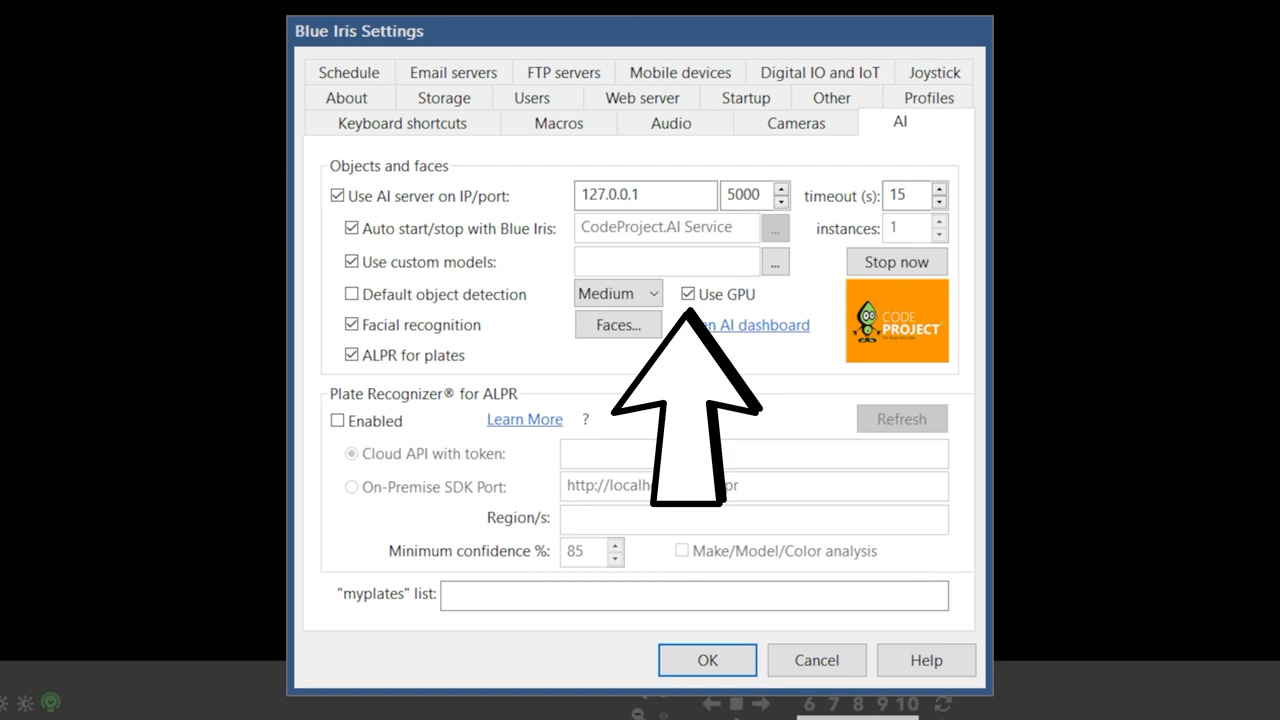
Back in Blue Iris we’ll select to automatically start and stop the CodeProject AI service with Blue Iris, and we’ll also be using custom models instead of the default object recognition. Later in this video I’ll be covering facial recognition and license plate recognition, so enable those here if you want to use them, and if you want license plate recognition click back over to the AI dashboard and in the Install Modules tab hit Install for the License Plate Reader module. If you have an NVIDIA GPU this is also where you can specify if you want CodeProject AI to use your CPU or GPU. As I mentioned, you can also run CodeProject AI in a docker container, so you could set it up on a remote server, but that’s beyond the scope of this video.
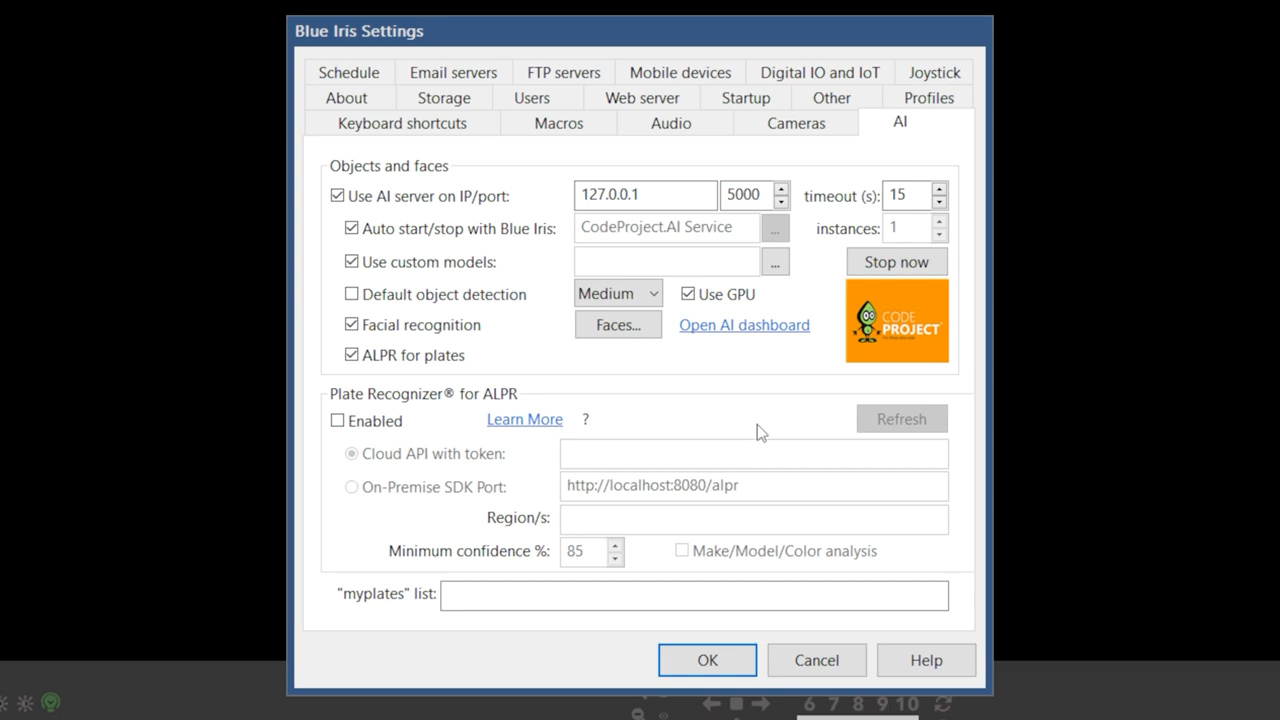
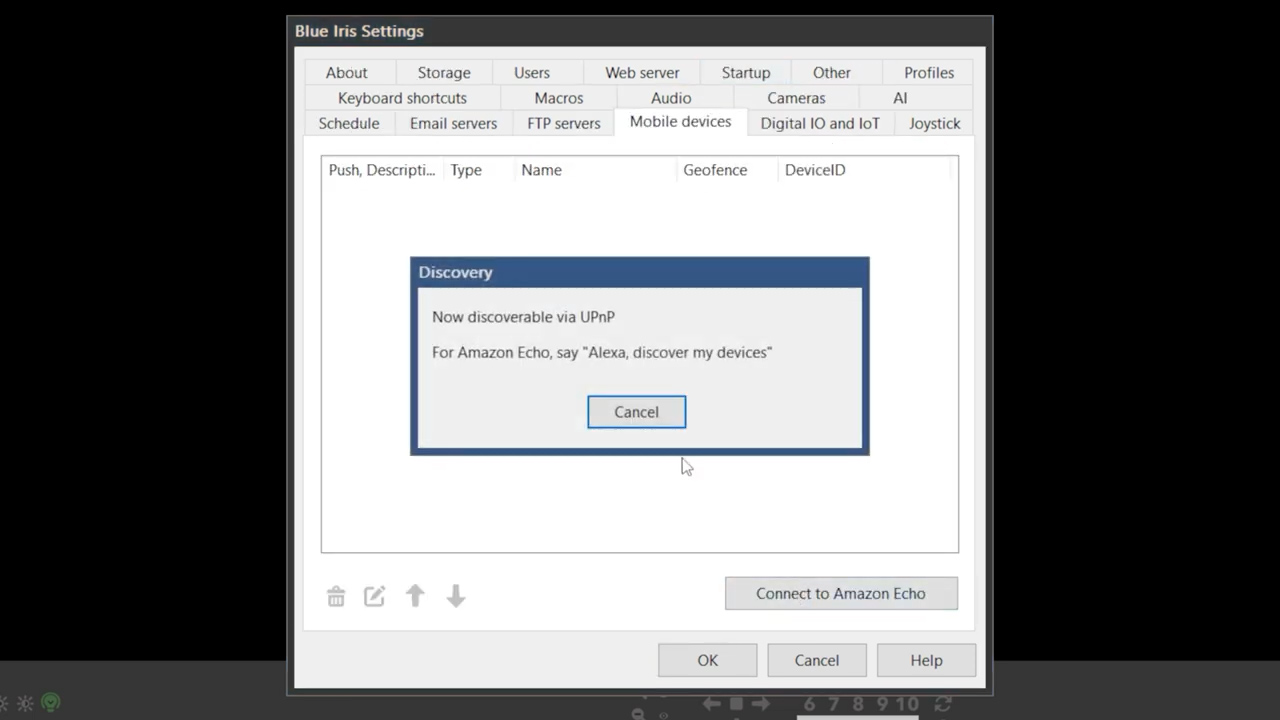
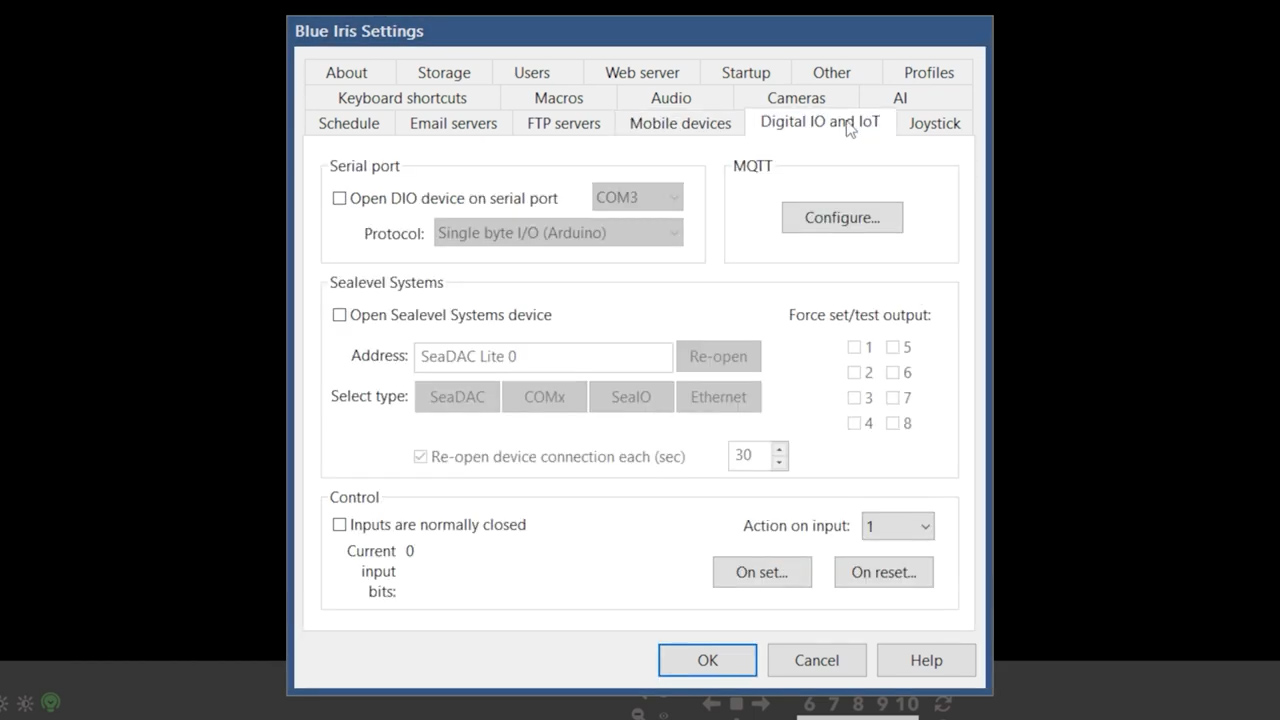
The only other tabs that I mess with are the Mobile devices tab which is where you set up your cameras to use with Amazon Echo devices, and the IoT tab where you can set up your MQTT server to work with your home automation platform, but I’m going to skip MQTT setup for now and talk about it later in the license plate recognition section. When you hit okay it will tell you that Blue Iris and your computer need a restart, but don’t do that until your CodeProject AI server is done installing the license plate recognition module.
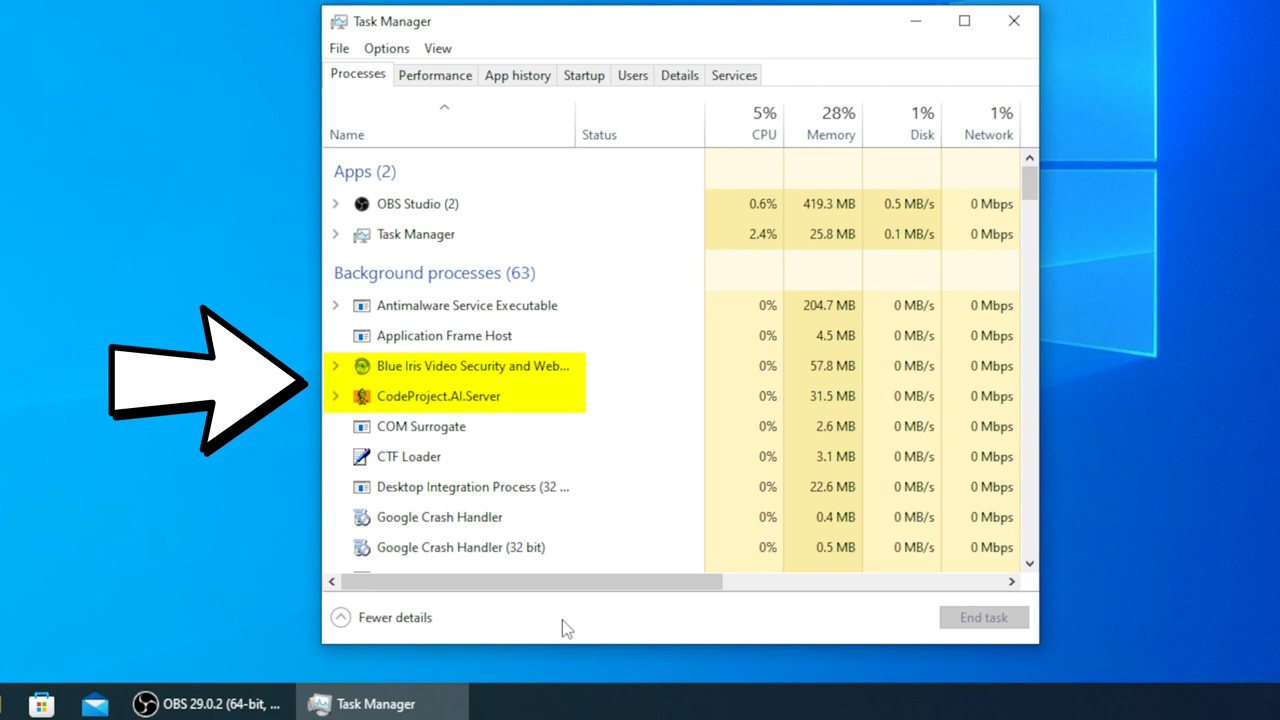
When you get back into Windows you should be able to see both Blue Iris and CodeProject AI running as a background service in Task Manager.
Back in Blue Iris under the AI settings you should now see the custom models list populated, and if you go to the AI dashboard you should see your three modules running and whether they are utilizing your GPU or CPU.

Now that your general Blue Iris setup is done, it’s time to add some cameras, and I’m going to cover adding the three most common consumer grade IP security camera brands: Reolink, Hikvision, and Dahua, but if you have a different brand, it should be similar.
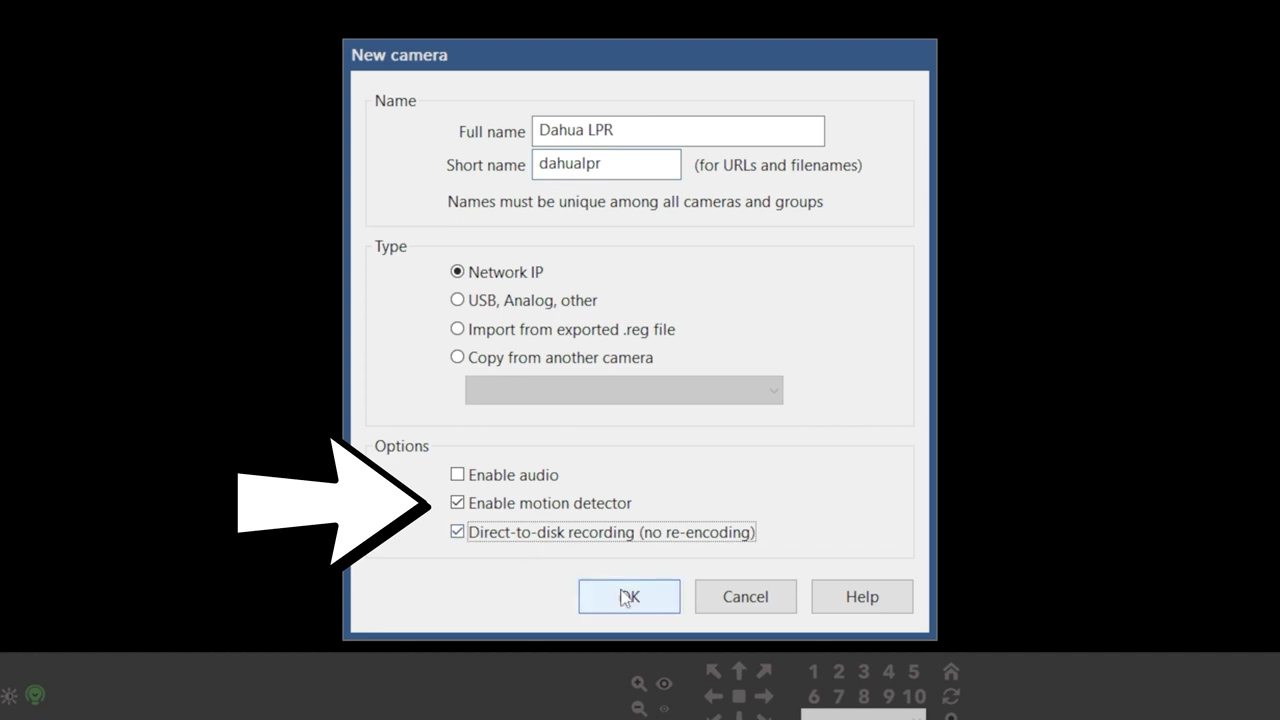
Right click anywhere on the main screen to add your first camera and give it a name and a short name with no spaces or caps. You’ll want to enable the motion detector, direct to disk recording, and if your camera has audio, you can enable it here, or do it later in the setup.
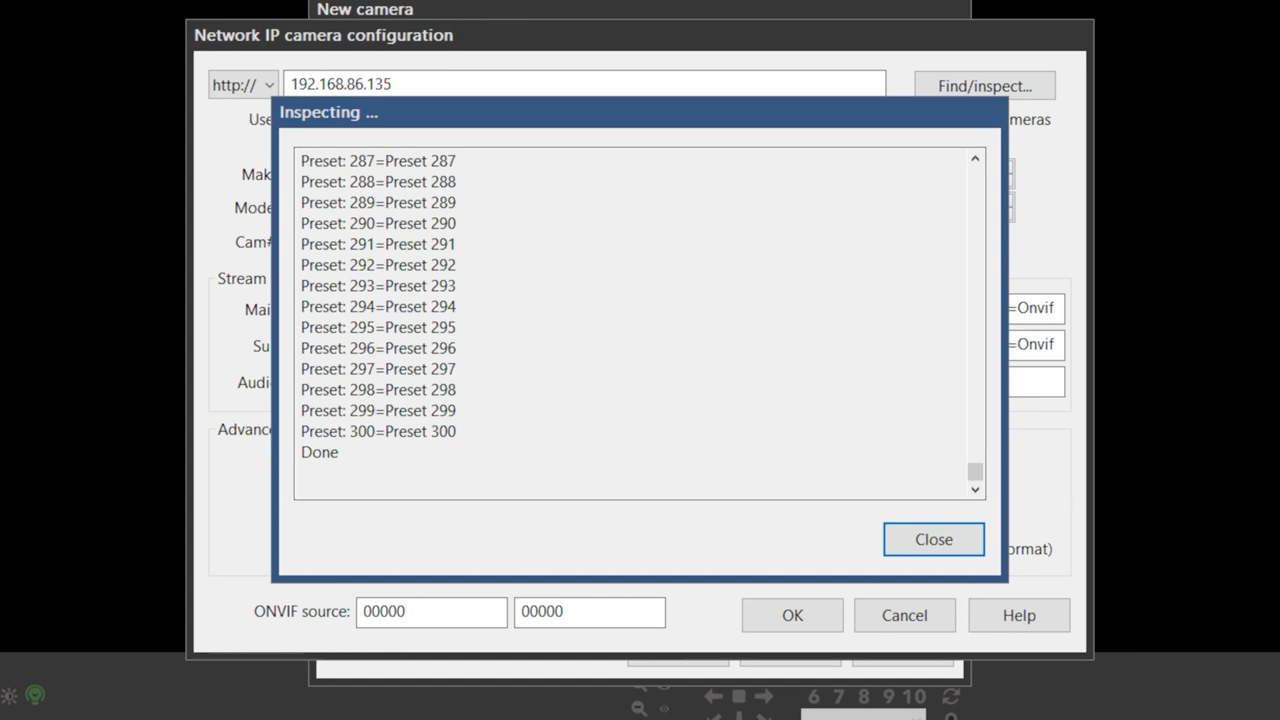
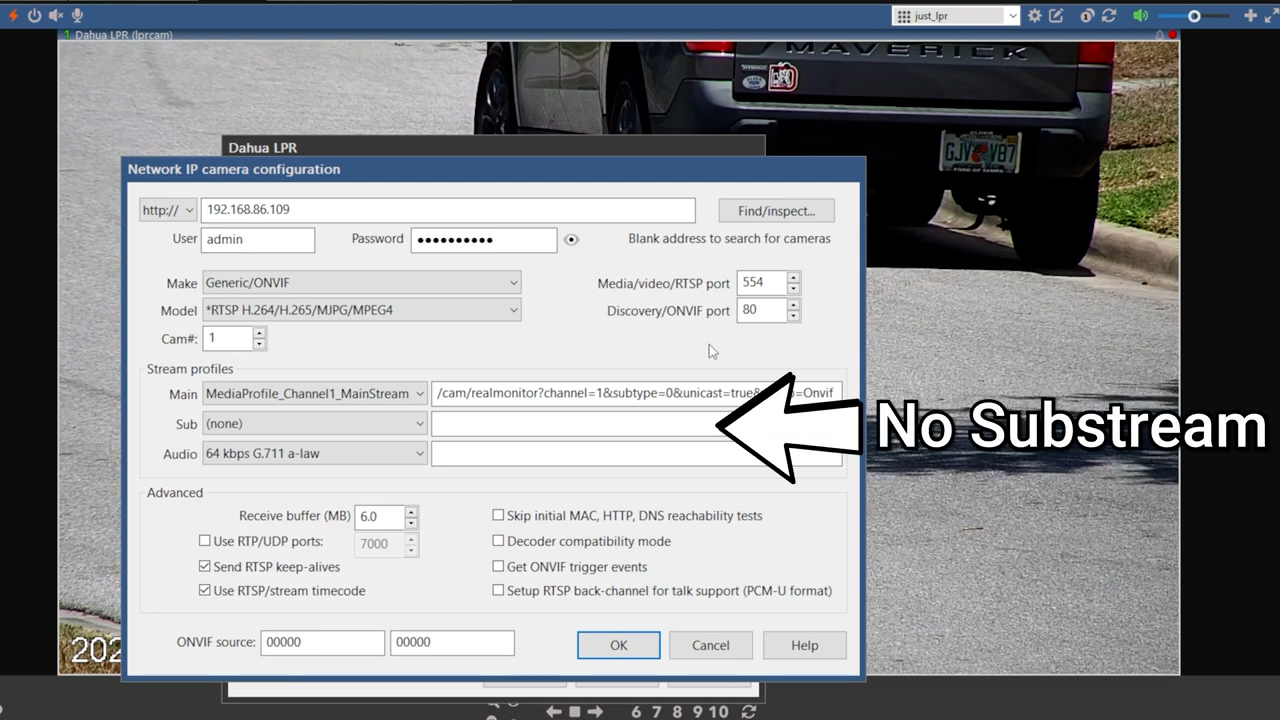
Starting with the easiest brand, Dahua. If your cameras are made by Dahua or any of their OEM brands including Empire Tech, Amcrest, Lorex, or any other brand that has a web interface that looks like this, then all you need to do is enter the IP address, login and password and press Find/inspect. You should immediately see messages indicating that it has services available via ONVIF, and the mainstream should auto-populate.
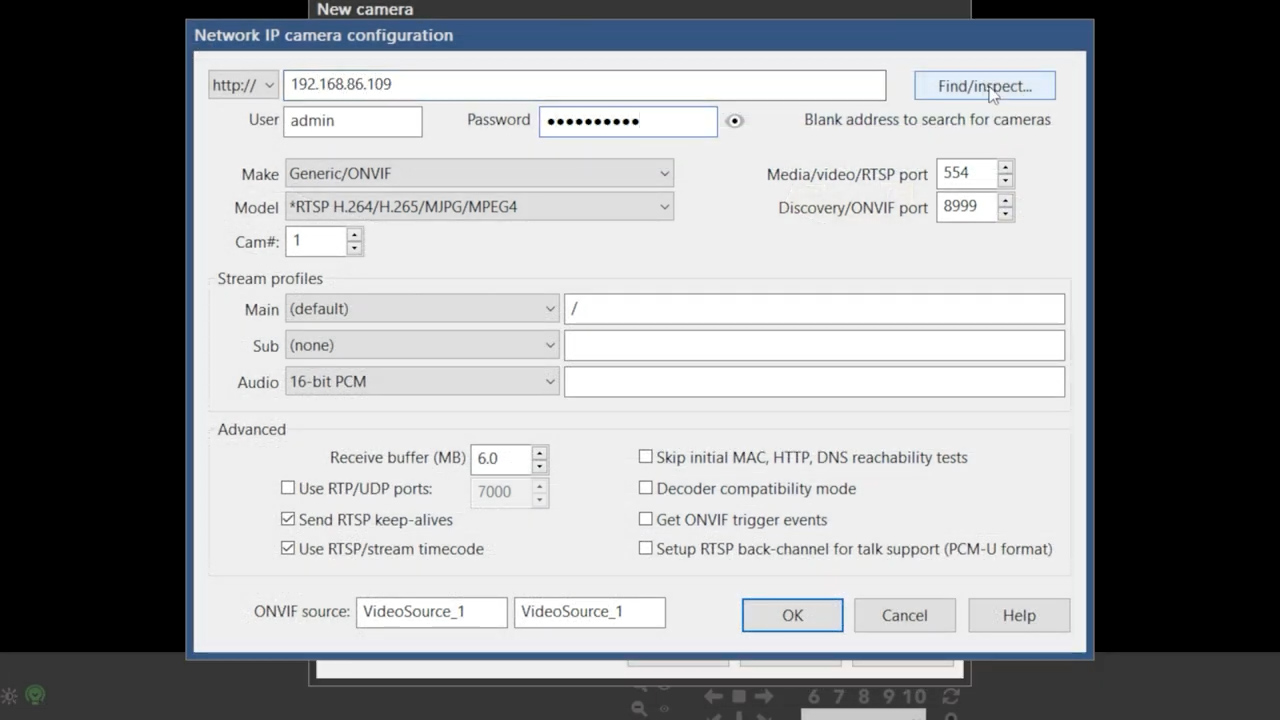
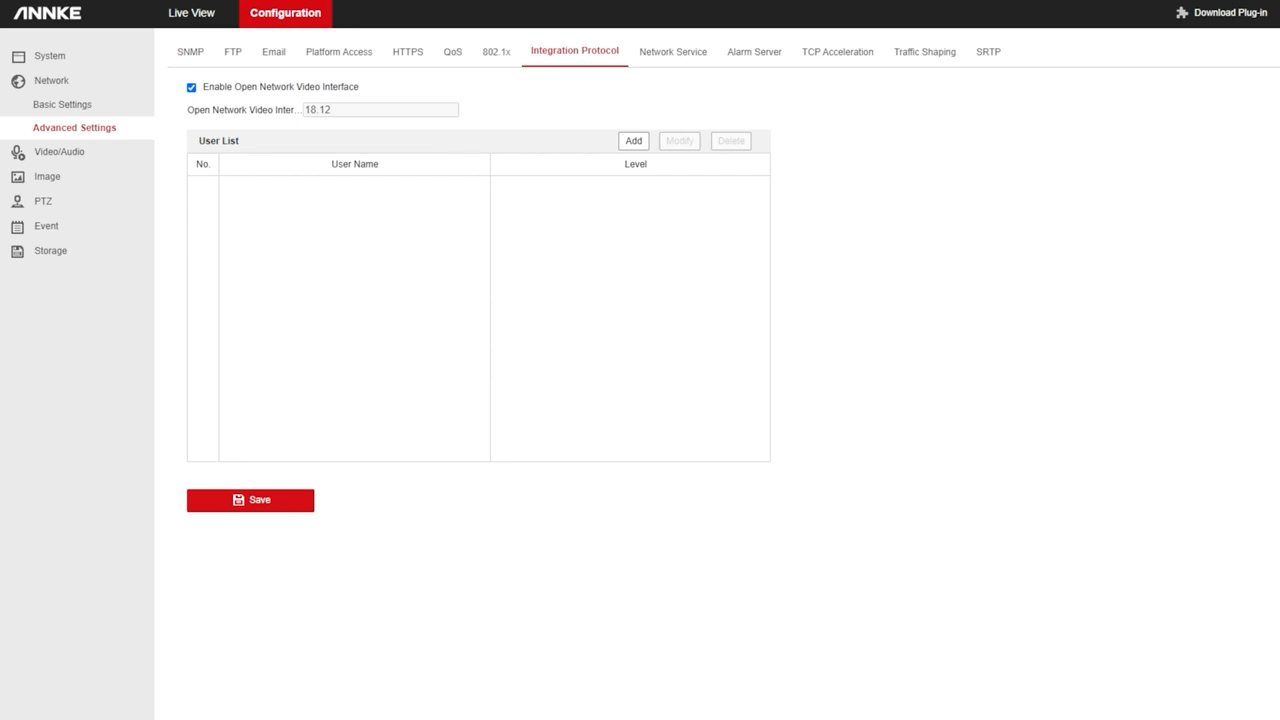
If you have a camera made by Hikvision or any of their OEM brands like Annke, Nelly’s or any other brand with a web interface that looks like this, you’ll need to first enable ONVIF by selecting network, advanced settings, integration protocol, then click the box to Enable Open Network Video Interface and add a user. Hit save, then head back to Blue Iris.
Enter your camera’s IP address, login, and password and hit Find/inspect and you should see ONVIF messages appear, and the mainstream profile should auto-populate.
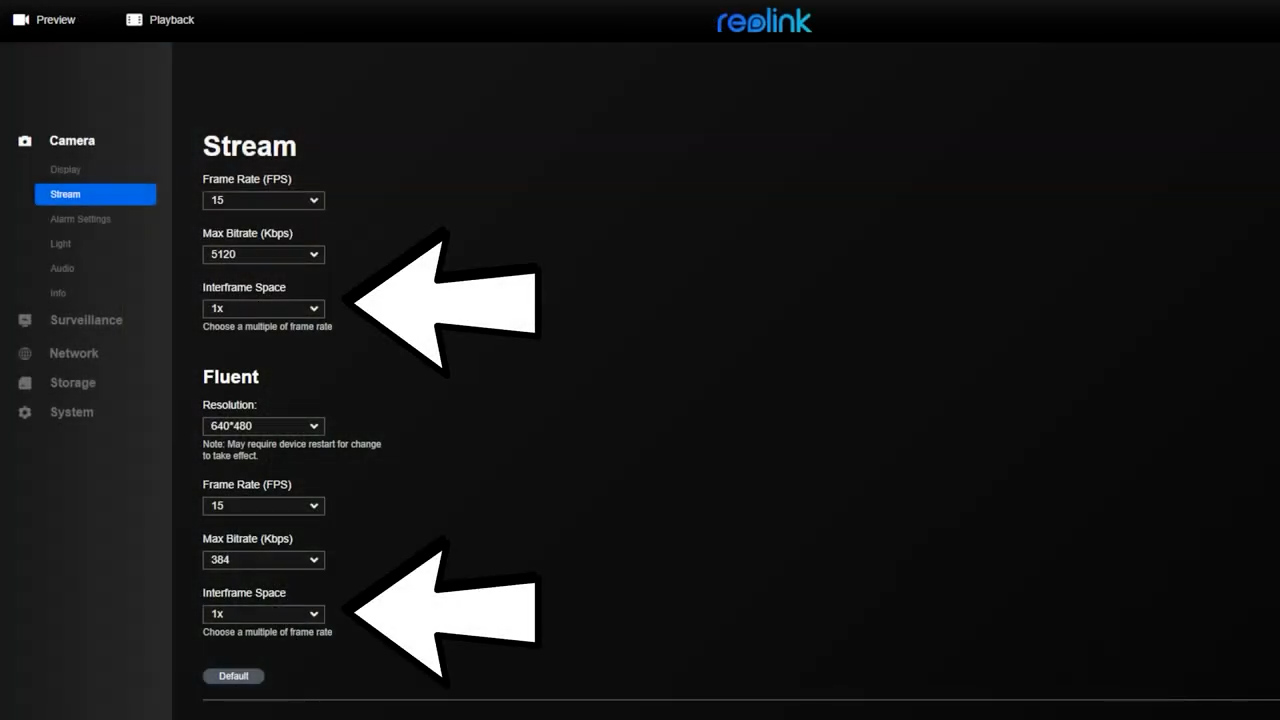
If you have a camera made by Reolink you’ll want to set up your camera streams with a 1x interframe space, and more importantly, you’ll want to enable Fixed Frame Rate mode. If your Reolink camera doesn’t have these options it is likely not going to be fully compatible with Blue Iris, and you should check for a firmware update on the Reolink website.

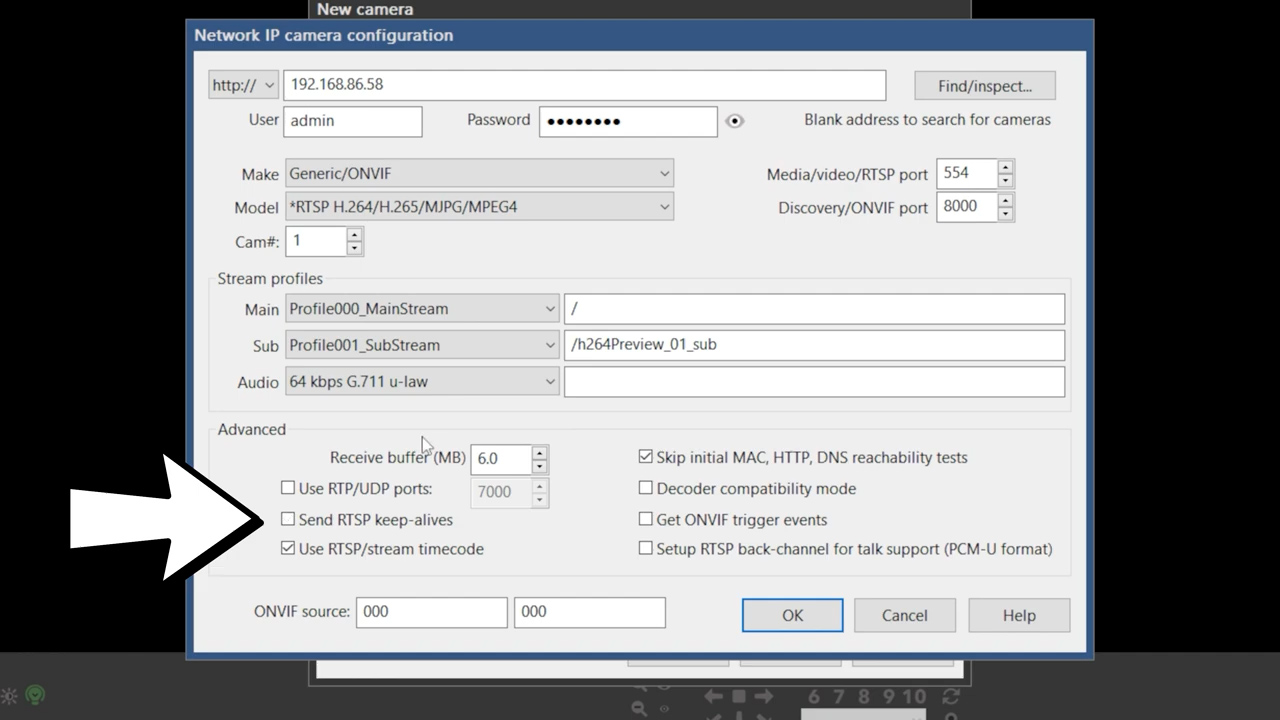
Under Network, click Server settings and enable RTSP and ONVIF and take note of the ONVIF port, which should be 8000. In Blue Iris you’ll put in the IP address, username and password of your Reolink camera and change the ONVIF port to 8000, then hit Find/inspect and the rest of the fields should auto populate. The last thing you need to do with Reolink cameras is uncheck the box that says “Send RTSP keep-alives,” which can cause certain Reolink cameras to reconnect every 30 to 40 seconds.

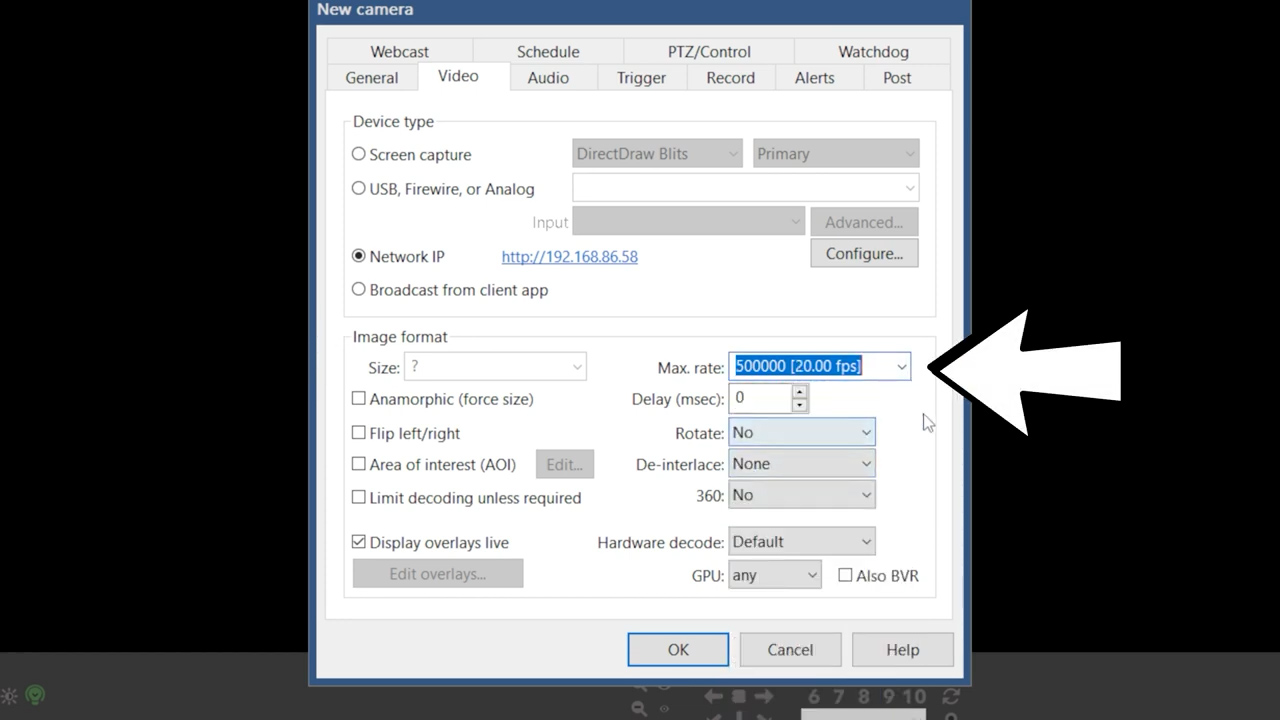
Hit OK and then in the image format section you’ll want to select a max frame rate that is greater than the frame rate of the camera, and I also disable live overlays, which helps to reduce system resource usage.
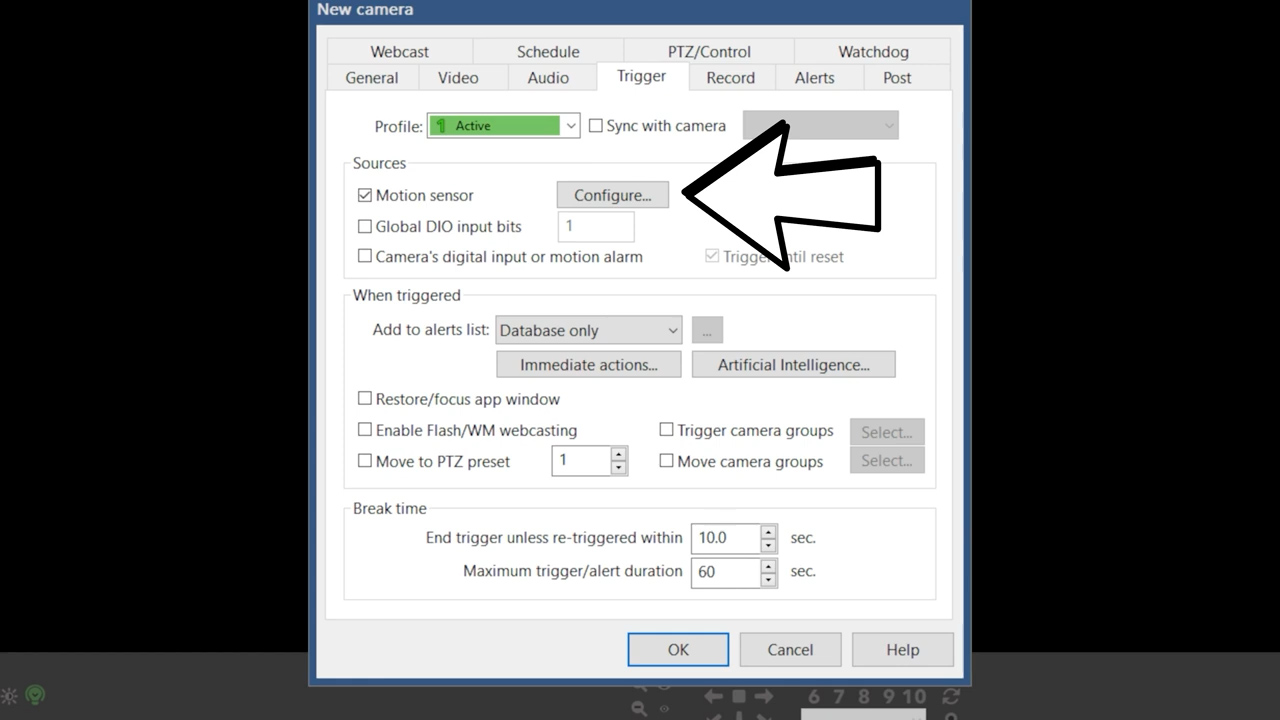
If your camera has a microphone, you can enable audio in the Audio tab, otherwise click over to the Trigger tab.
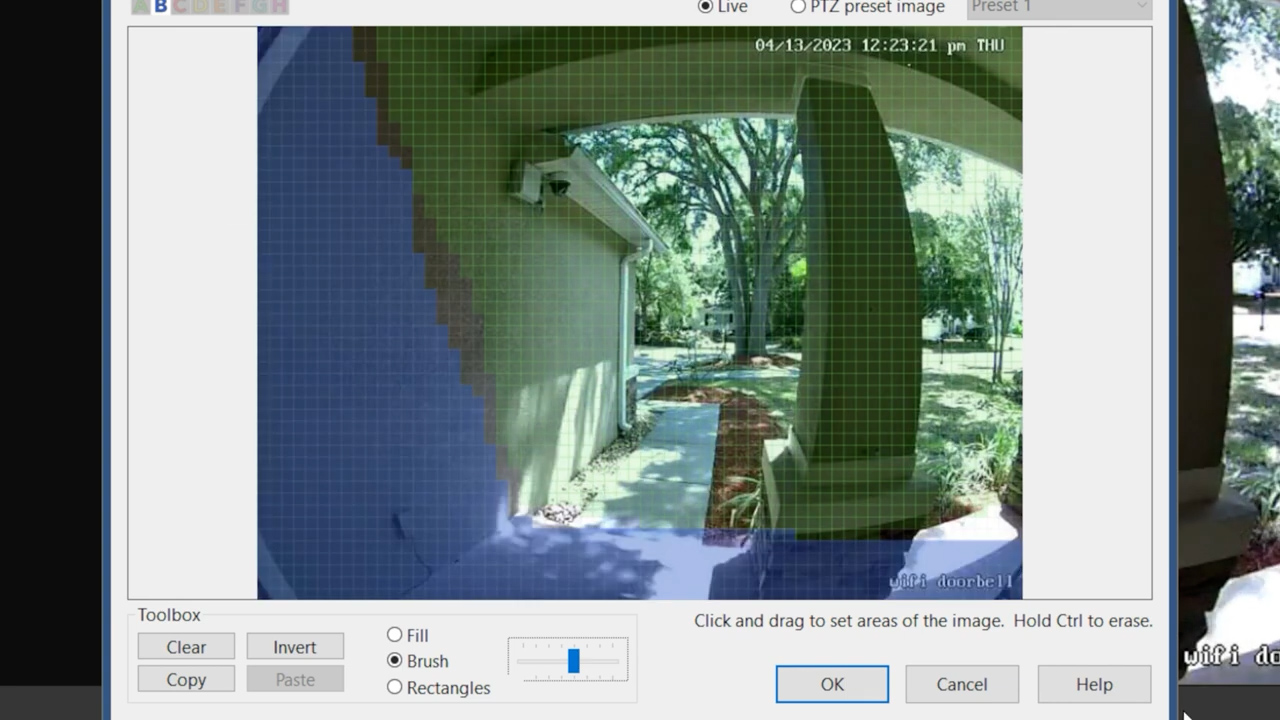
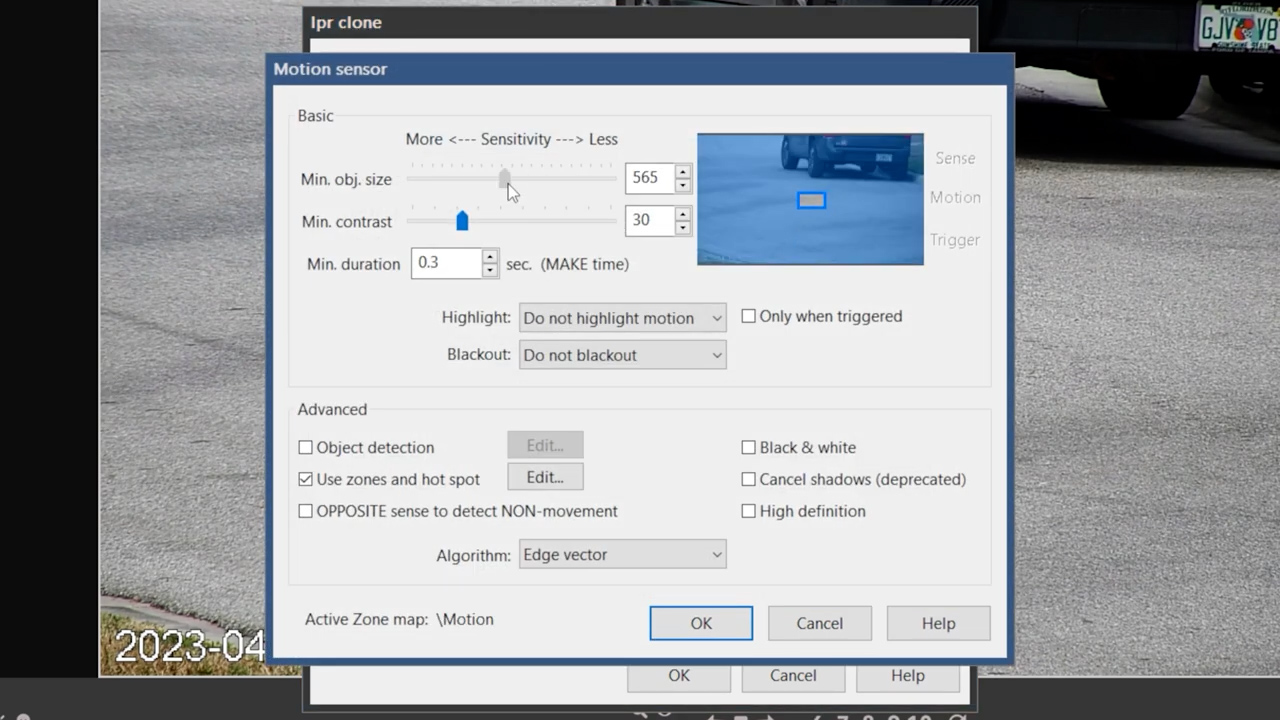
The first section is called Sources, and this determines how a trigger is initiated. The most common way is by using Blue Iris’s built in motion sensor. The most basic adjustment you can make is to the minimum object size and minimum contrast change to trigger. At this point you may want to exit the Motion sensor configuration and hit OK, which will load your camera’s live view.
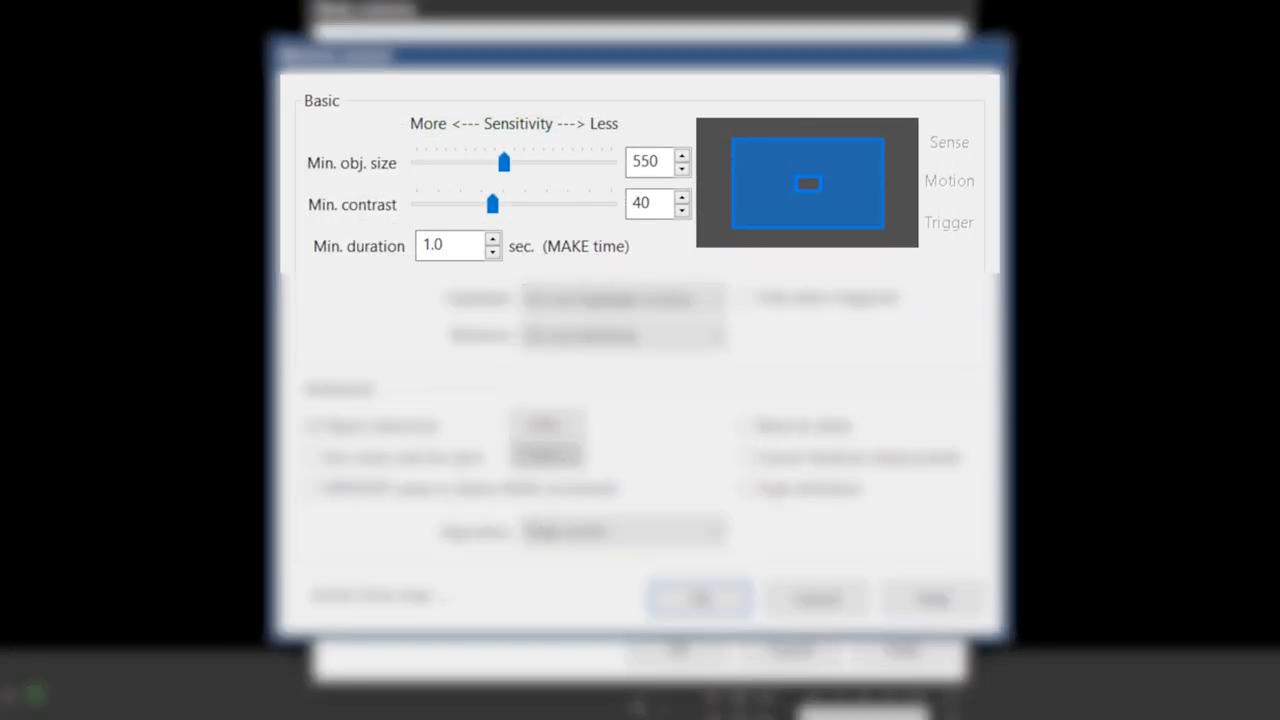
After your camera loads, right click and select Camera settings, then go back to the Trigger tab. Now if you click on Motion sensor it will have a live view and give feedback on real time motion sensing triggers. Adjust your minimum object size and minimum contrast to control the sensitivity of your motion detection, but remember that this is just the trigger, and every trigger will be validated with AI, so you should be a little more liberal with these settings. I also set my MAKE time low, which is the duration of movement, again, because we will further validate any motion using AI.
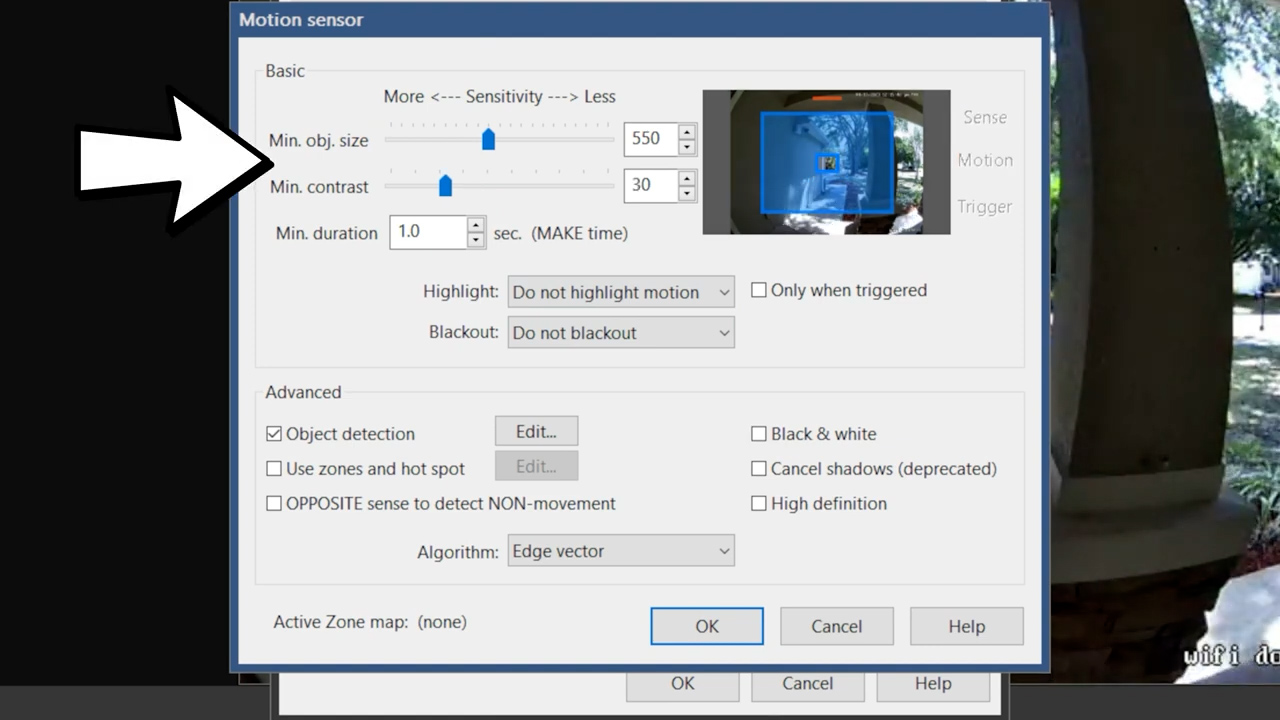
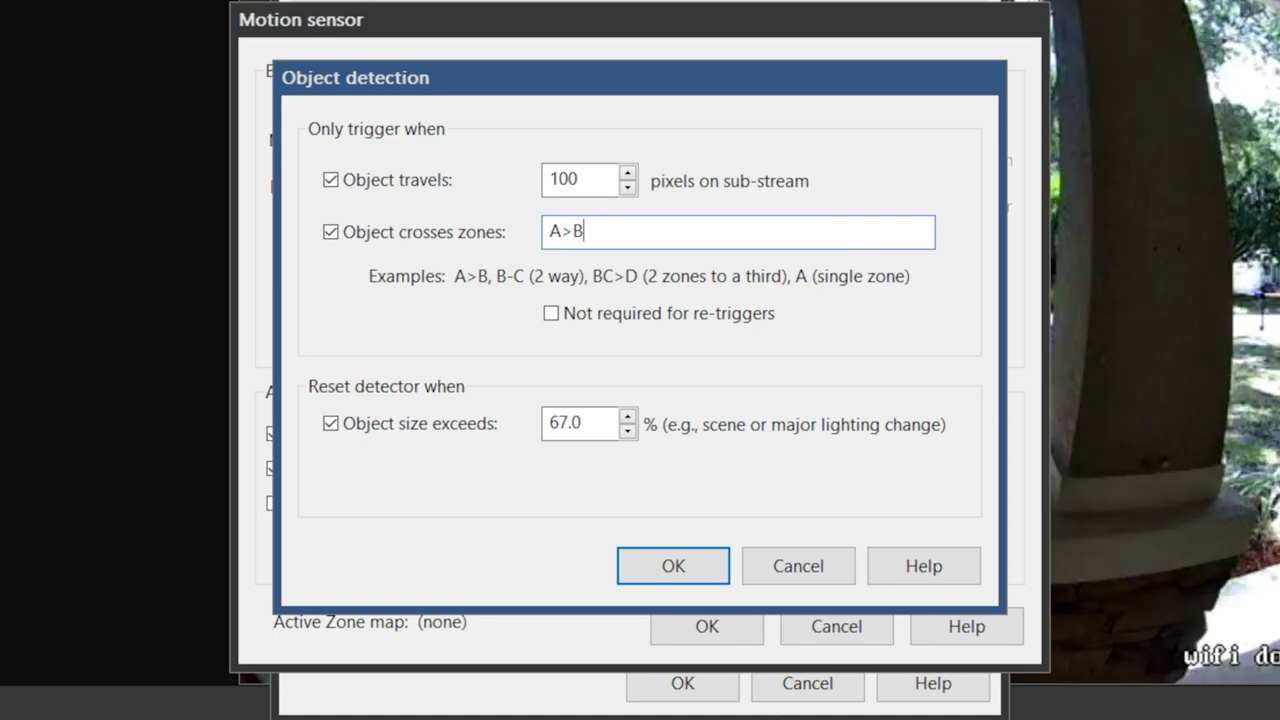
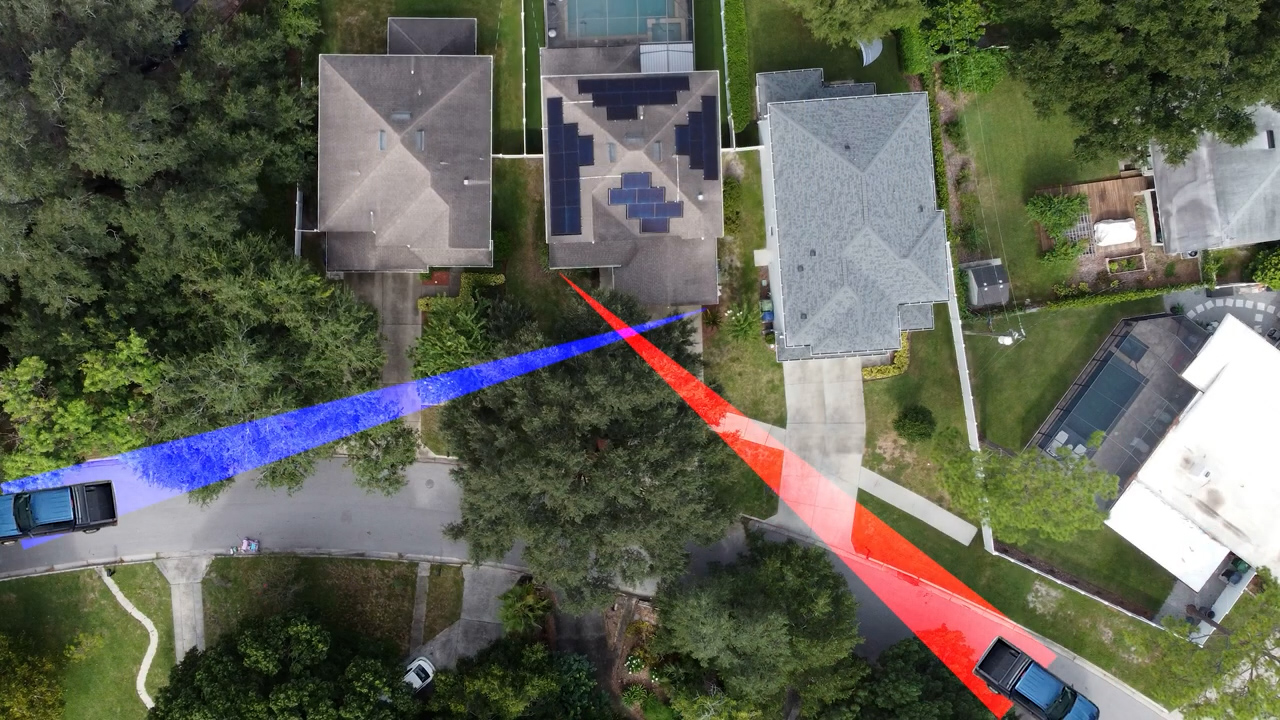
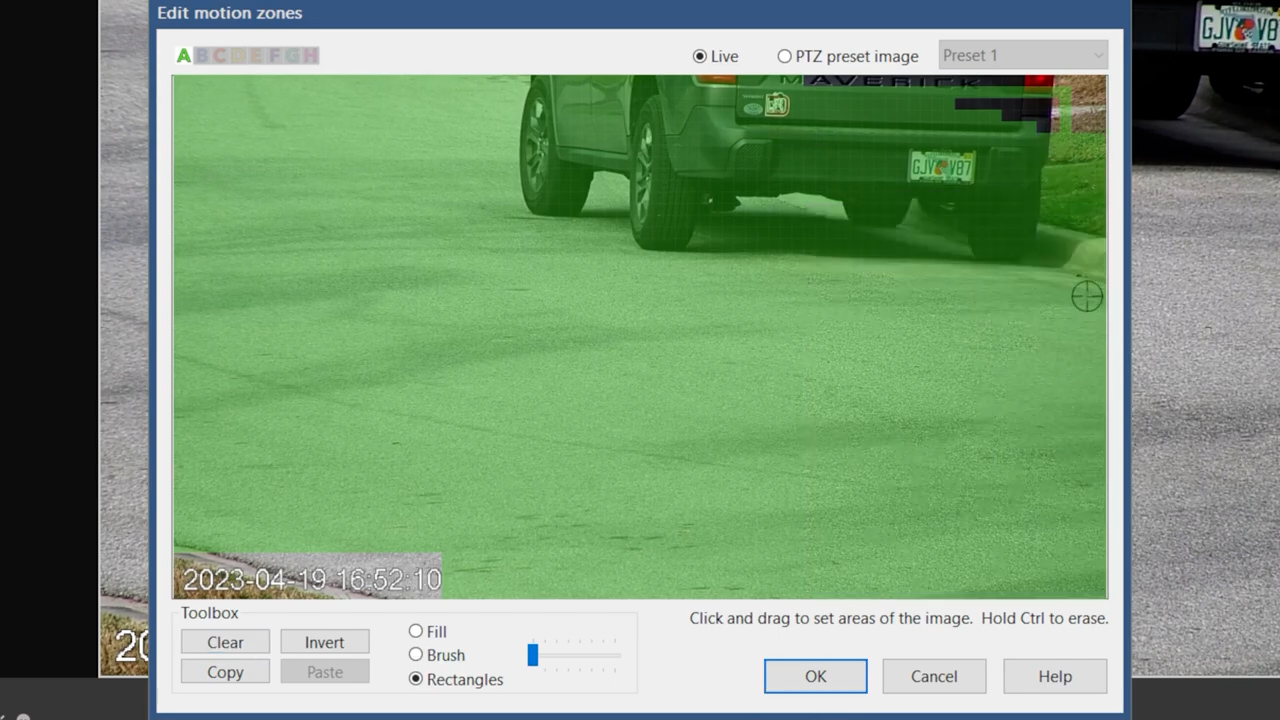
Object detection is not particularly important, but it can be used in conjunction with motion zones to accomplish specific detection behavior like line crossing. For instance, if I only wanted to track motion for people walking up to my door, I could define Zone A as everything except my porch, and Zone B as only my porch, then in object detection I can say only trigger if an object moves from Zone A into Zone B.
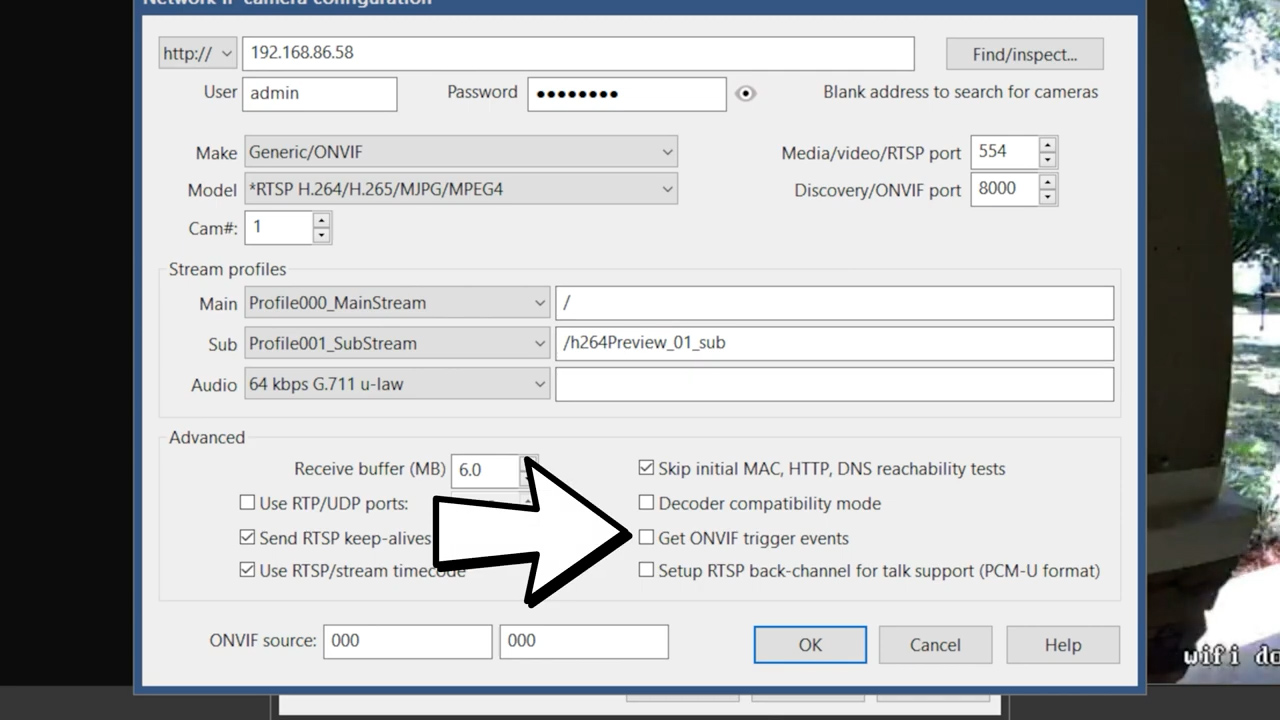
If you don’t want to use the Blue Iris motion detector at all, another option for some manufacturers is to use the camera’s on-device motion detection, in which case you’d select the box to use the Camera’s digital input or motion alarm, and in the video tab you’ll make sure that the “Get ONVIF trigger events” box is checked.

In this case, the Reolink doorbell doesn’t send ONVIF motion events to Blue Iris, so we’ll just use the motion sensor.
Next is what to do when the camera is triggered, and we want to validate the motion using artificial intelligence.
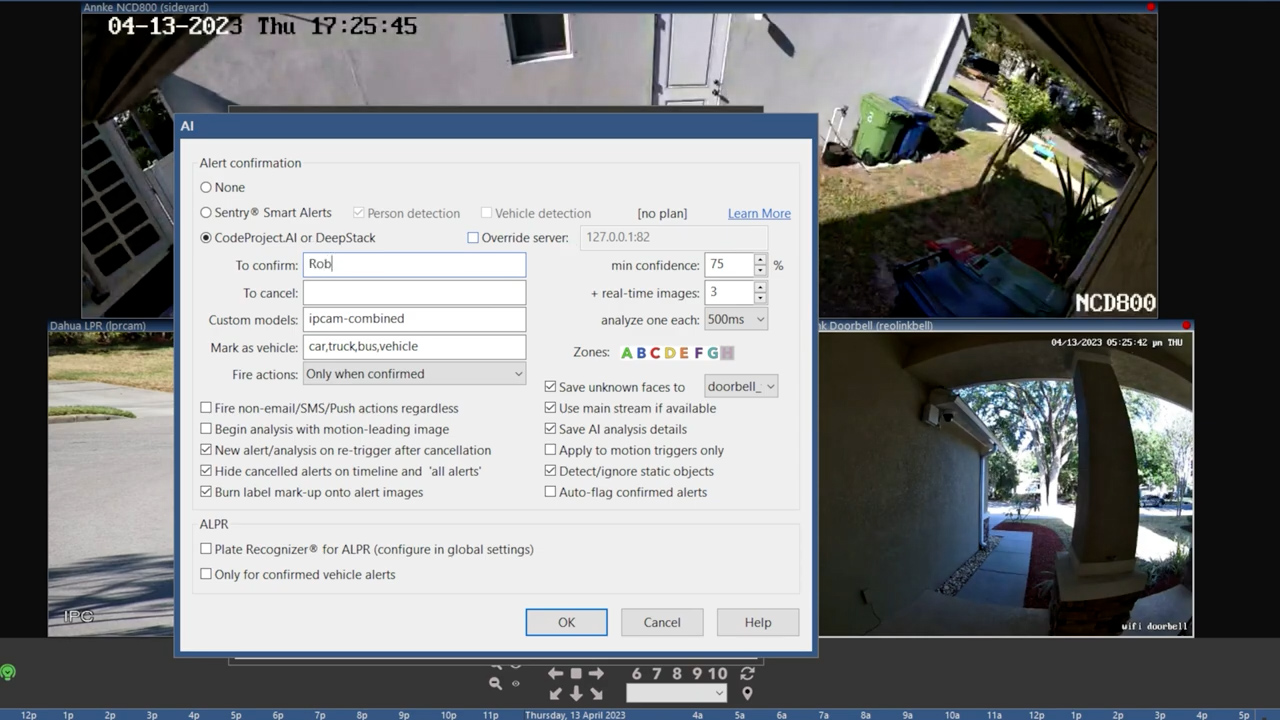
Select CodeProject AI and the first box is what objects you want the AI to look for. By default, it looks for people, cars, trucks, buses, bikes, and boats, but you can edit this window to recognize a huge amount of trained objects. The Custom models field is important since we opted to use Custom models in the initial AI setup. If you leave it blank it will check the image against every custom model and use whichever model generated the highest confidence level, but that will take longer and eat up recognition cycles, so I recommend just using one or two, in this case we’ll use the IPCam-combined model.
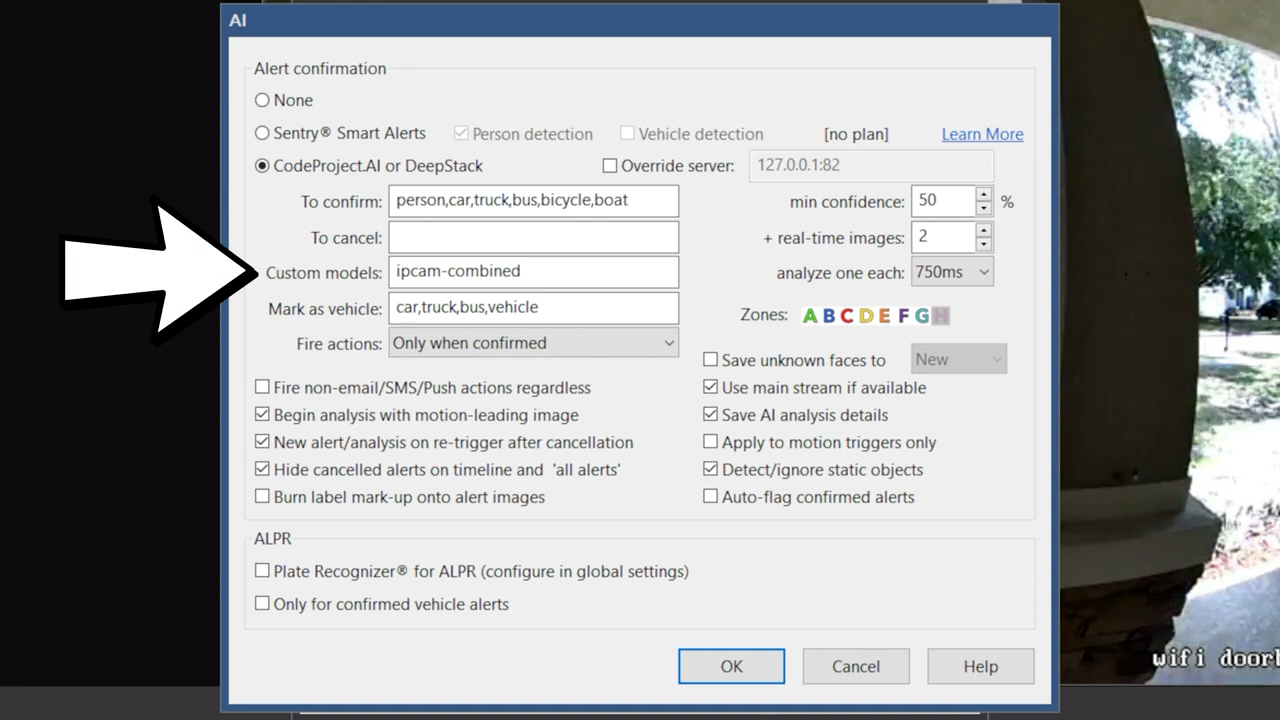
The next box is for classifying your results, in the web interface you can sort by person detections and vehicle detections, and this just determines what gets defined as a vehicle.
On the right you’ve got a confidence level, which is how sure the AI model is that the image matches an object in your “To confirm” list. I usually keep this above 75%. Next is how many additional images should be analyzed by the AI in the event that the first image did not detect anything. Your settings here will depend largely on how powerful your graphics card is and how many cameras are doing analysis. Obviously, more is better but don’t go overboard. I’m going to do 3 images at 500 ms increments for a total of 1.5 seconds of analysis.
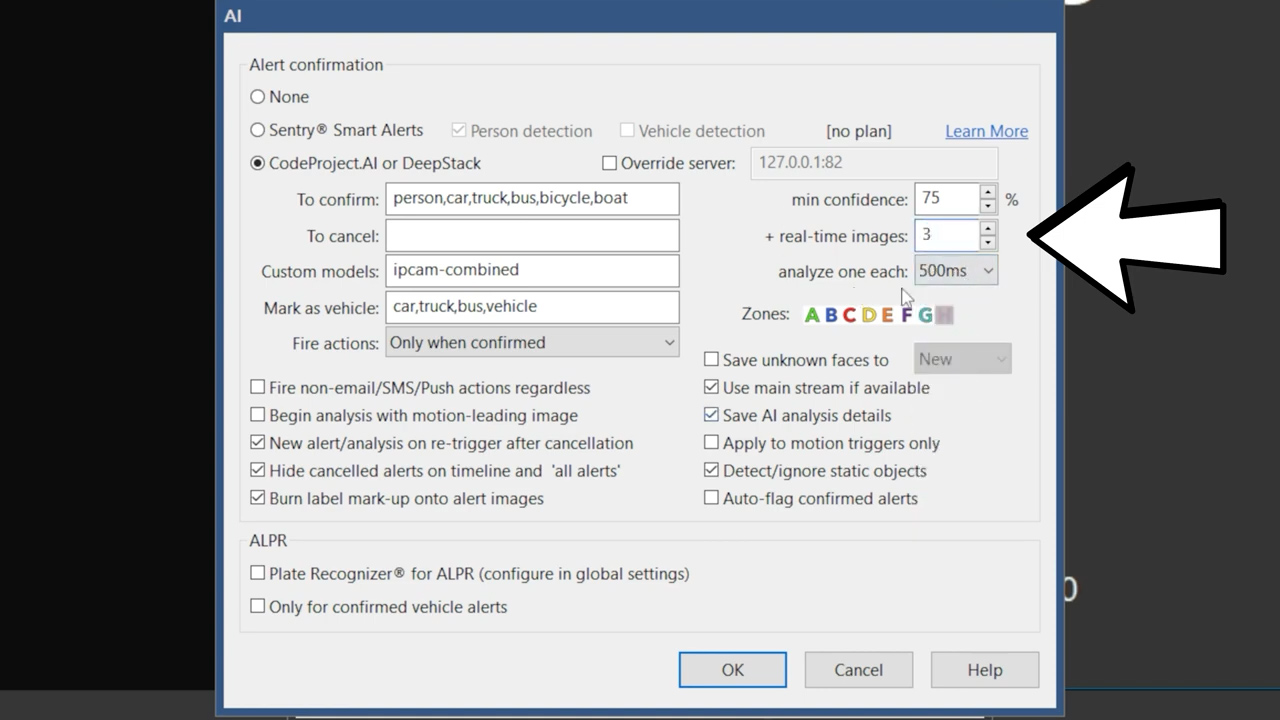
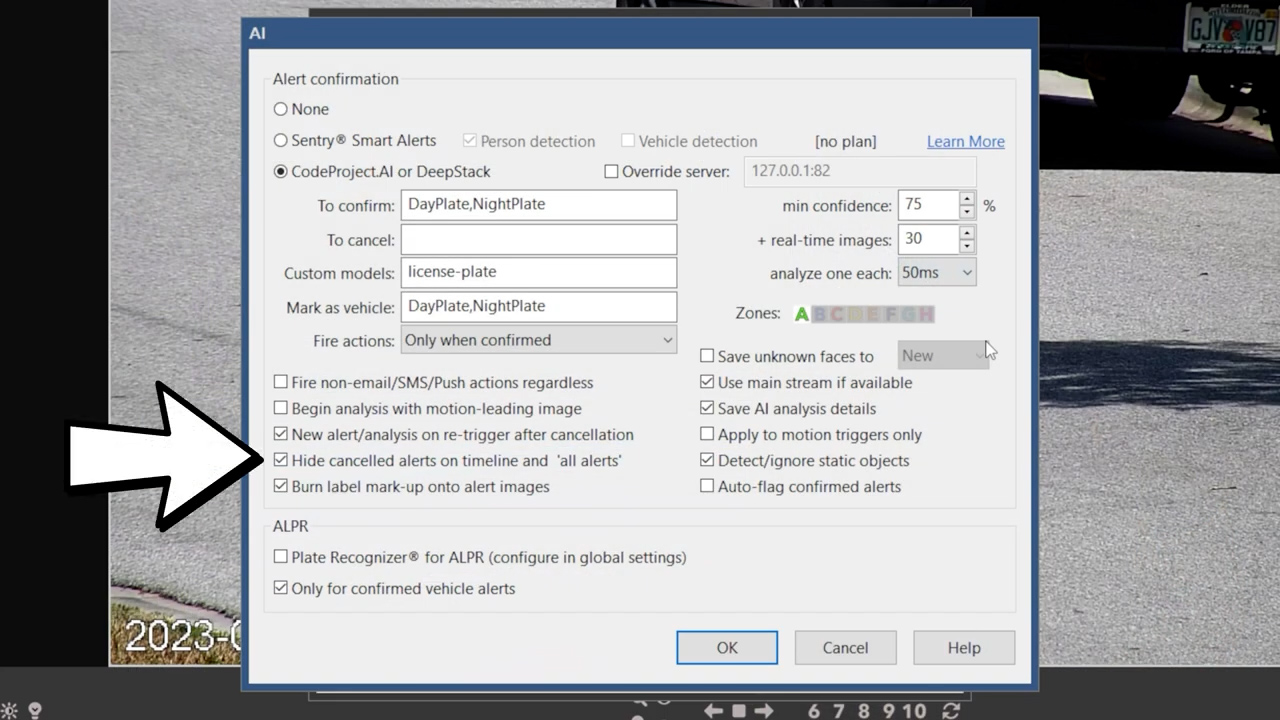
We want to fire actions only when triggered, analyze after every re-trigger, hide cancelled alerts, burn labels onto alert images, use the main stream for analysis as long as your GPU can handle it, save the details of the computer vision, and detect and ignore static images.
I’m going to set a break time of 10 seconds, meaning a new trigger needs to happen in 10 seconds to continue the clip, and I’ll set the maximum trigger duration to 120 seconds.

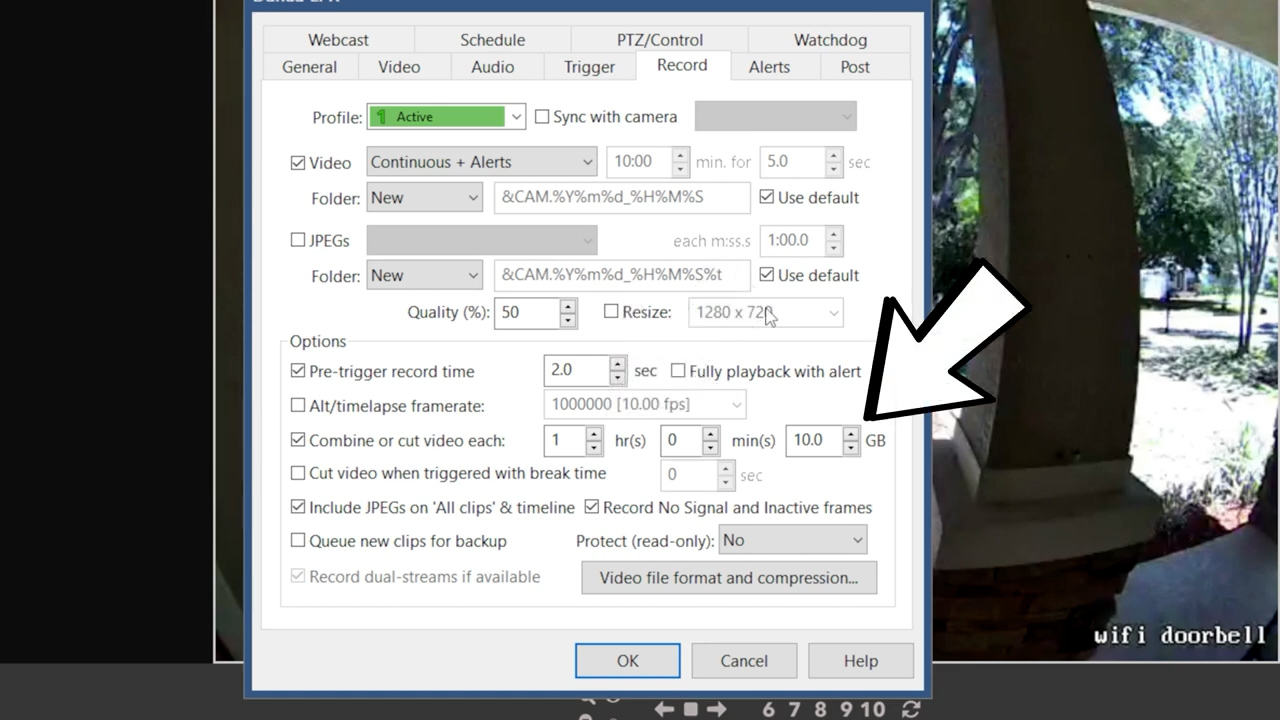
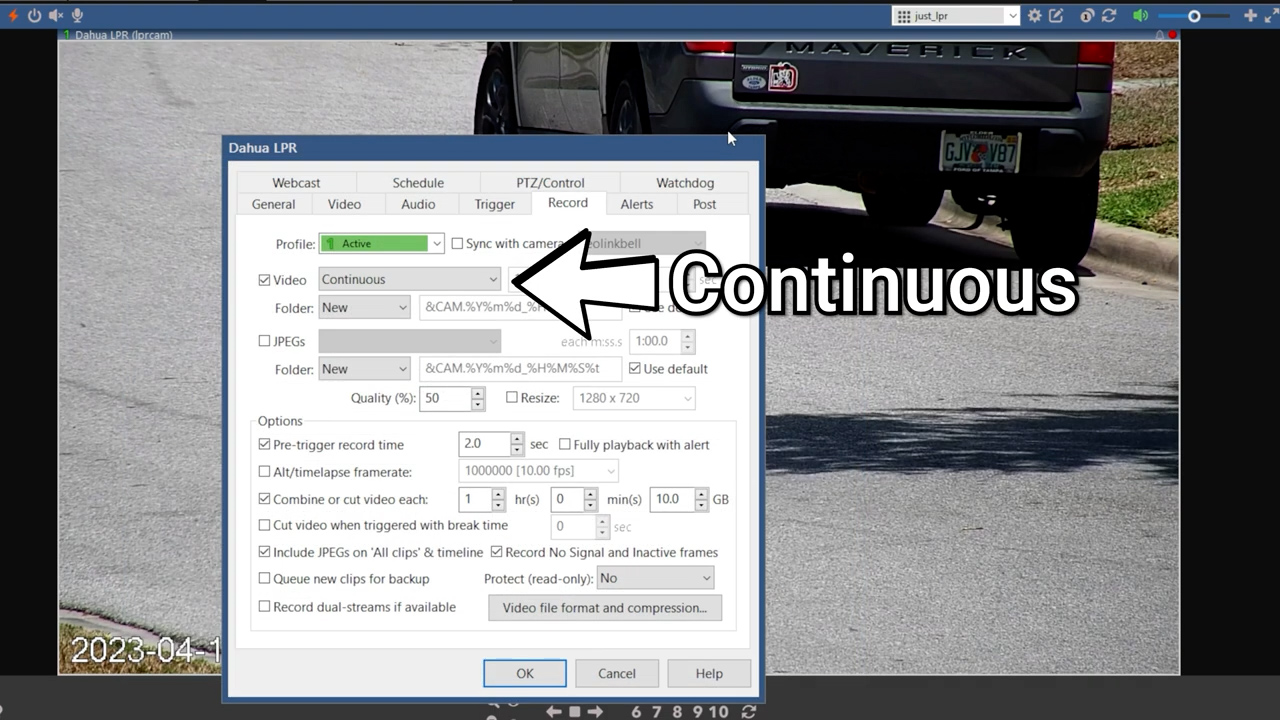
In the Record tab you can choose to only record when triggered which will record in high resolution any time the Blue Iris motion detector detects an object, only when alerted which will record any time there is a trigger that is validated by computer vision, continuously which will record a high resolution stream 24/7, continuous plus triggered which will record the low resolution substream continuously and switch to high resolution anytime the Blue Iris motion detector detects an object, or last the one that I’d recommend is continuous + alerts which will record the low resolution substream 24/7 and switch to high resolution whenever a motion event is validated by the AI computer vision.

I use a 2 second buffer since my computer vision analyzes images for 1.5 seconds and can take up to half a second to do an analysis, this means that if it takes the maximum amount of time to confirm the event, I will still have a full resolution record of the entire event.

I use the combine videos option since it makes exporting clips a bit easier, and I limit them to 1 hour or 10 GB.
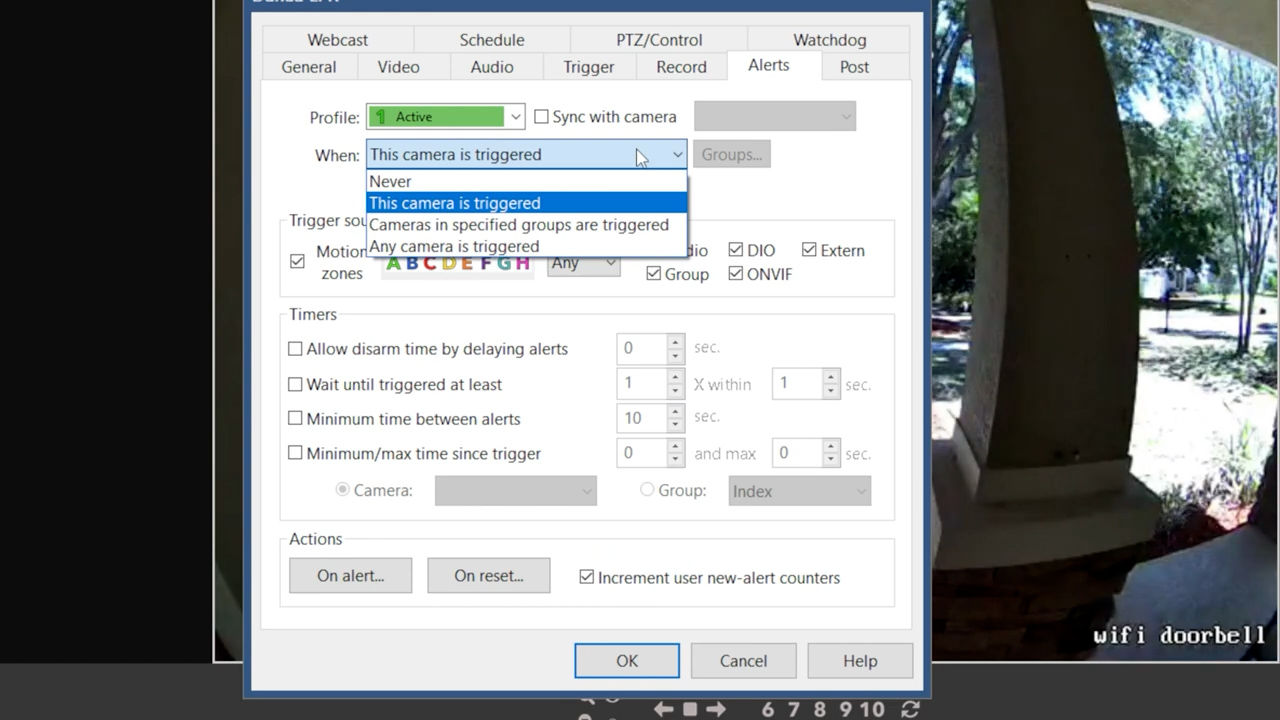
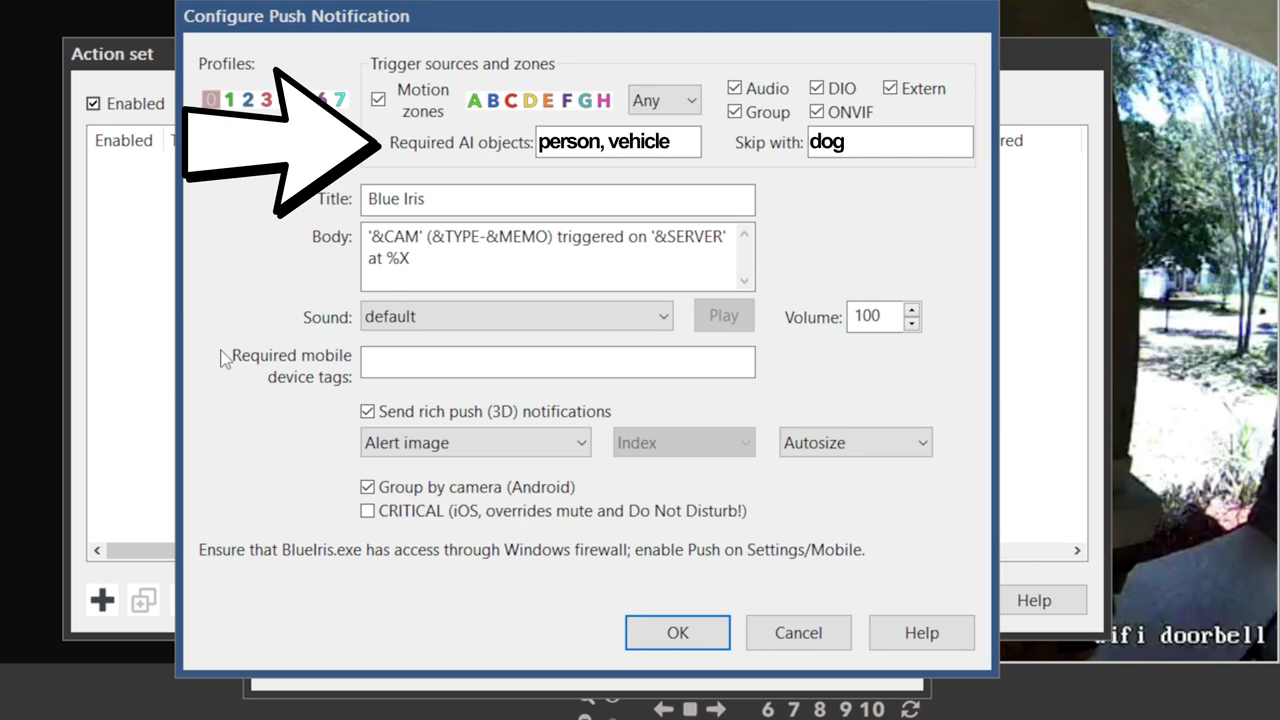
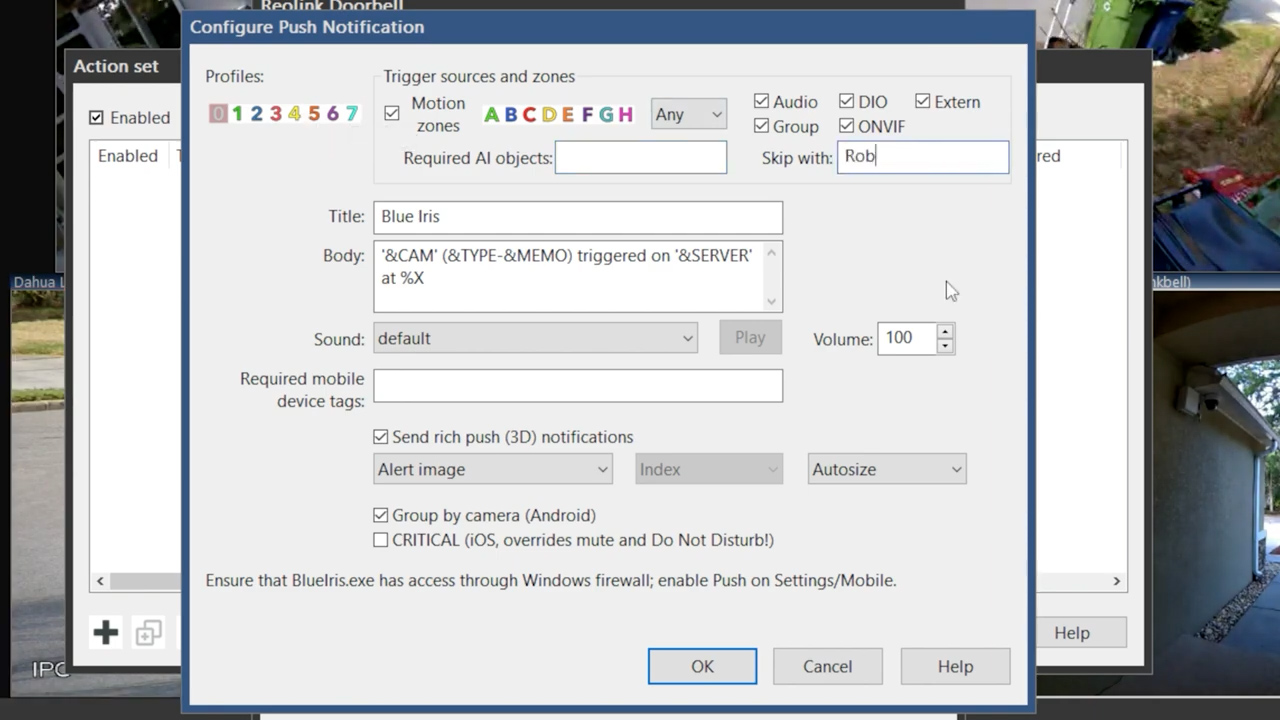
Last is the Alerts tab where you can select what motion events cause what actions. You can use push notifications to the mobile app, MQTT to your home automation server, text messages, email, and a ton of other stuff. You can also specify specific AI detection objects in your alerts, so you could record for people and cars, but only send an alert for people, or record dogs, people, and cars, but skip the alert if there is a dog. This tab is super powerful but is going to largely depend on your use case.
Thankfully there’s not much else to do in the other tabs, so you can hit OK to load up your camera, and it’s time to make sure everything went according to plan. Open up the Status window for your camera and you should see the resolution of the main and sub stream, the type of hardware acceleration, and the FPS and keyframe interval of your camera.
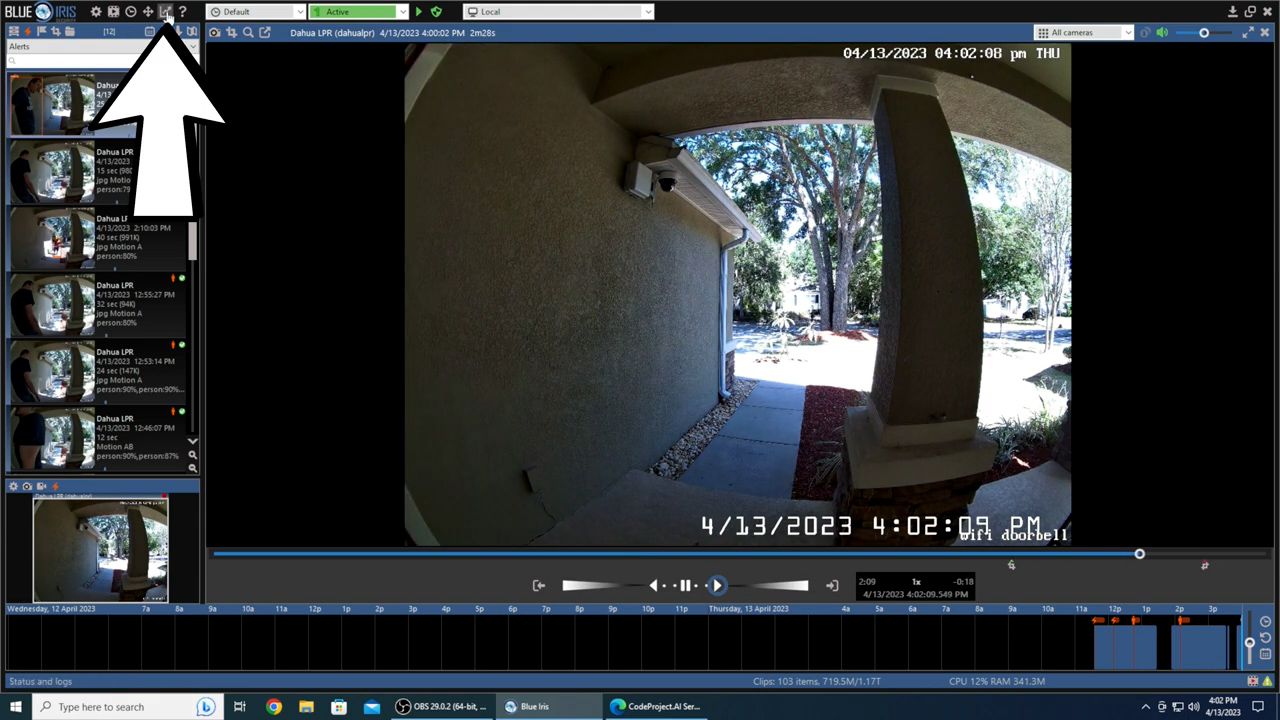

Now it’s time to test motion and AI. Walk or drive in front of your camera and make sure it responds the way it should by detecting the initial motion, and then confirming any requested objects using CodeProject AI. The best way to check on how your AI is working is to click on the AI tab of the Blue Iris Status window and then click on the specific clip in the alerts list. This shows you that the IPCAM combined model took 61 ms to identify me as a person with a 77% confidence rating, which is above my threshold, so you can see that the next consecutive AI analysis 500 ms later gets automatically cancelled because the object has already been validated. You can also see that it skipped the frame a half second before the trigger because I didn’t select leading edge motion in the initial AI setup.

You can also see that it didn’t detect a license plate, and the face was unknown. If you didn’t turn on license plate recognition and facial detection then you wouldn’t have these two entries, but since everything looks good, I’m going to get this name edited to reflect which camera I actually added, and then I’m going to add my two additional cameras using the clone camera option. This keeps all the settings exactly the same, so all we need to do is go to the video tab, put in our new IP address, hit find/inspect, and then update the main and substream URLs.

Now we have three cameras with the exact same AI settings that would be good for general use, so now let’s setup the extra stuff starting with face detection, and I specifically want to add that to my front door. The first step is going to be to go into AI, and make sure facial recognition is checked, but don’t ever press this Faces button.

Next go to Storage, click on Aux 1, and give it a new name. I’m going to call mine Doorbell Faces. I’ll make a new folder for it and allocate it 1 GB of space and have it delete after 14 days.

Then go back to your camera and back to the Trigger tab. Click on AI then check the box to Save unknown faces to the doorbell_faces folder and hit OK. Then you just need to walk in front of your camera a bunch and get all different angles. For rapid collection of faces I like to take everything out of the To confirm window except something it will never find because that means the AI will be working really hard.

All the unknown faces should be added to the Doorbell Faces folder, then go to the CodeProject AI web interface and click CodeProject AI explorer. Click Face and put your name in under face registration, then select the files from the doorbell_faces folder and register the face. Now if you go back to Blue Iris and click on one of your clips you can right click and select Testing & Tuning, Analyze with AI to see if it will properly detect you now.
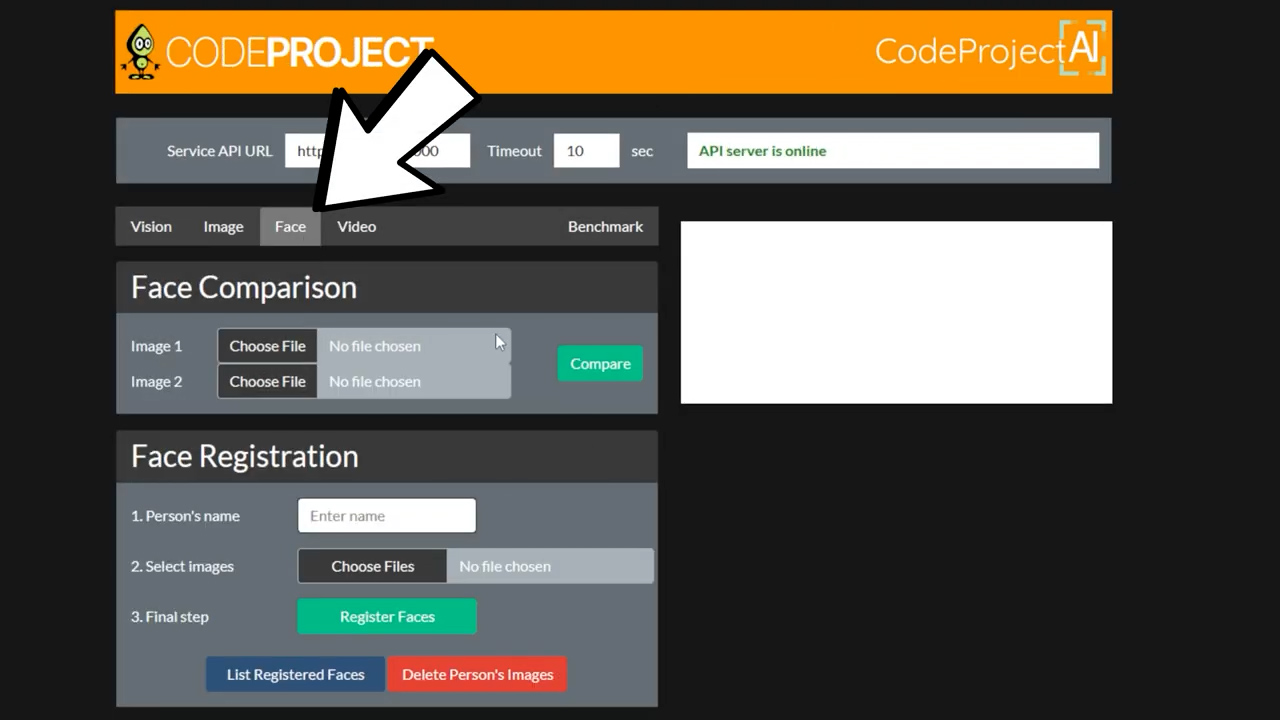

If that works, you can go into your camera’s AI settings and add your name to the to confirm list. Now when you walk up to the door you can get a confirmation that Rob was at the door. Using the new alerts search function you can also search for a registered name and it will only bring up those clips, and using the Alerts tab you can do things like send a push notification only when a specific person is detected, or skip the alert if a specific person is in the frame.
As new people come to your door, they should be added to the unknown faces folder, then you can add their face to the AI program using the web interface, but don’t click the Faces dialog in Blue Iris because it can make things a little buggy.
I should mention that face detection works great for zoomed in eye level cameras like a video doorbell, but don’t expect panoramic cameras to be able to accurately identify a face from more than a few feet away.
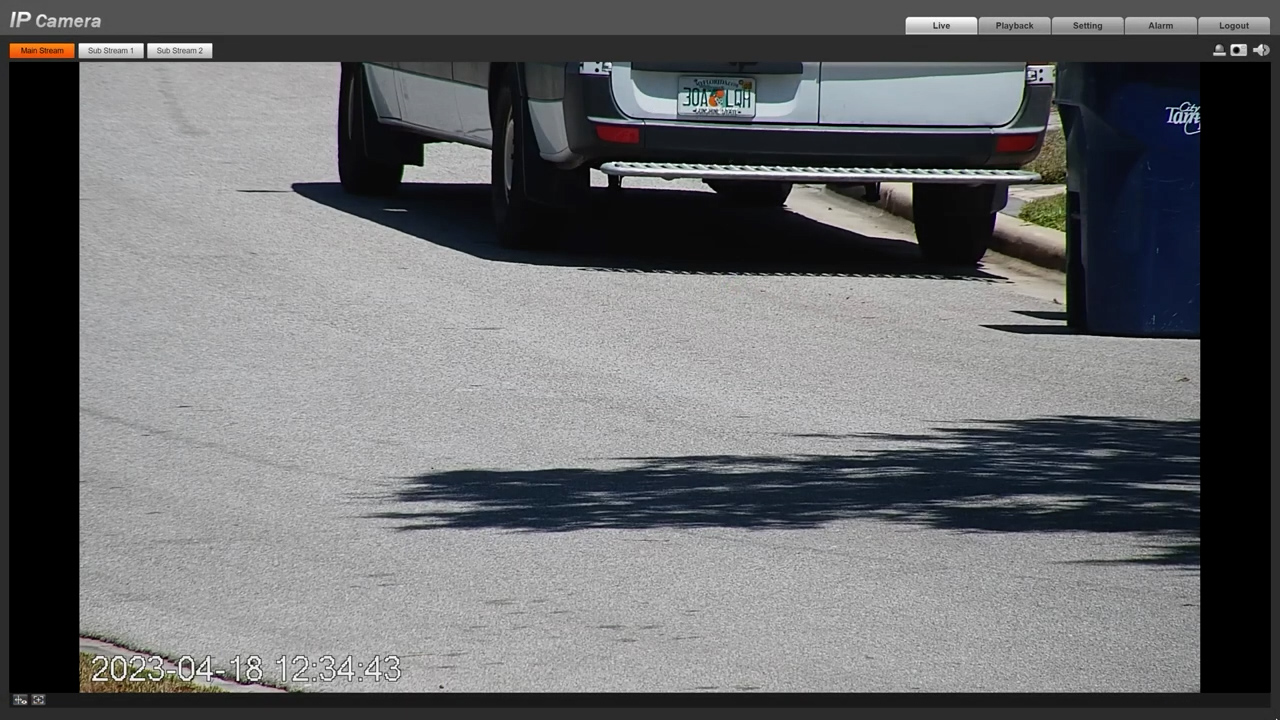
And the same goes for license plate recognition, but to an even greater extent. One of the most common comments I get on my security camera review videos is “I want a camera that can see my whole yard but also clearly show license plates”, and that’s just not a thing. It doesn’t matter how much money you spend, or how many megapixels a camera has, the parameters needed to clearly capture a plate during the day are completely different than what you would use for a typical wide-angle camera, and at night the differences are even more extreme, not to mention that the positioning of license plate cameras should also be different than a standard overview camera.
Capturing license plates is difficult, and positioning is one of the most important factors to get right. The best results will come from capturing a plate head on instead of at an angle, so if your road is perpendicular to your house, you’ll want to aim as far down your street as possible to get the most undistorted view of the plate, and if there’s a stop sign or a curve that makes cars slow down a bit, that can also help significantly.

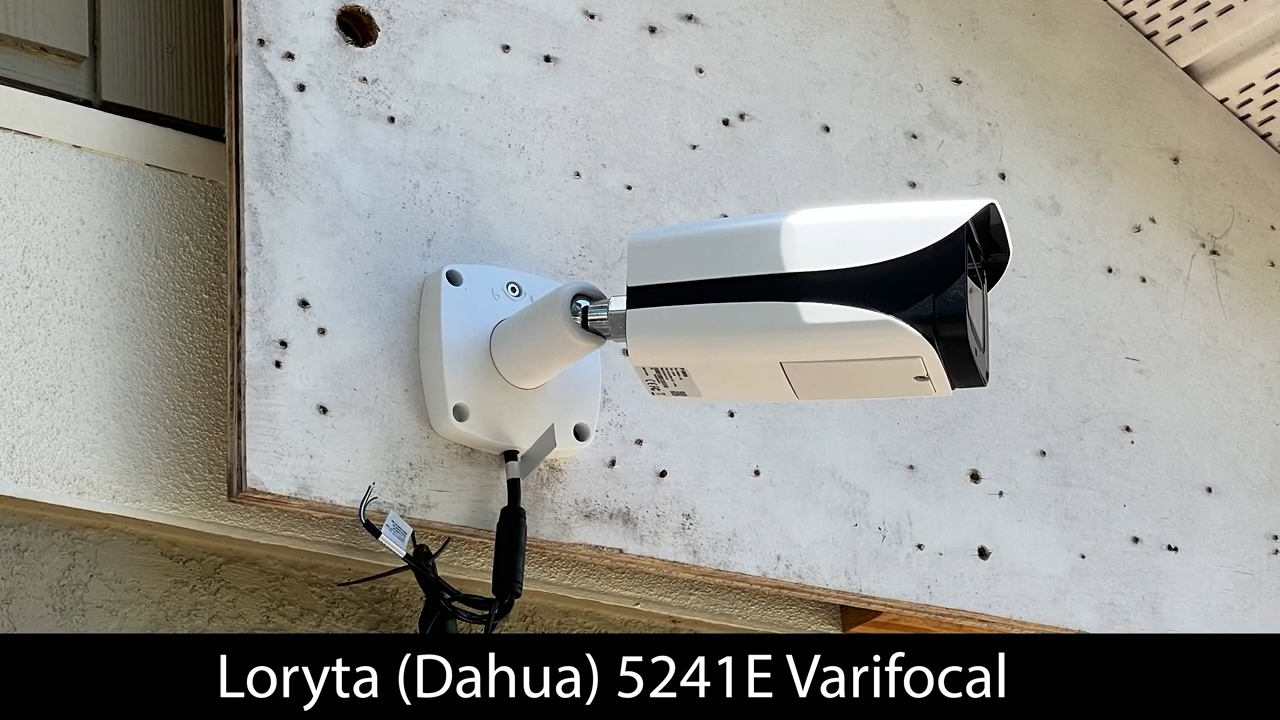
In Florida we only require rear plates, so to collect every plate that passes I need a different camera for each direction, and I place them at opposite ends of my house to get the best angle. I’ve successfully used a few different cameras for plate recognition including the Annke CZ500 Speed dome, Amcrest 1063EW PTZ camera, and the Loryta 5241E from EmpireTech and for pure plate recognition the Loryta’s 64 mm focal length and 2 MP sensor are unmatched, especially at night.
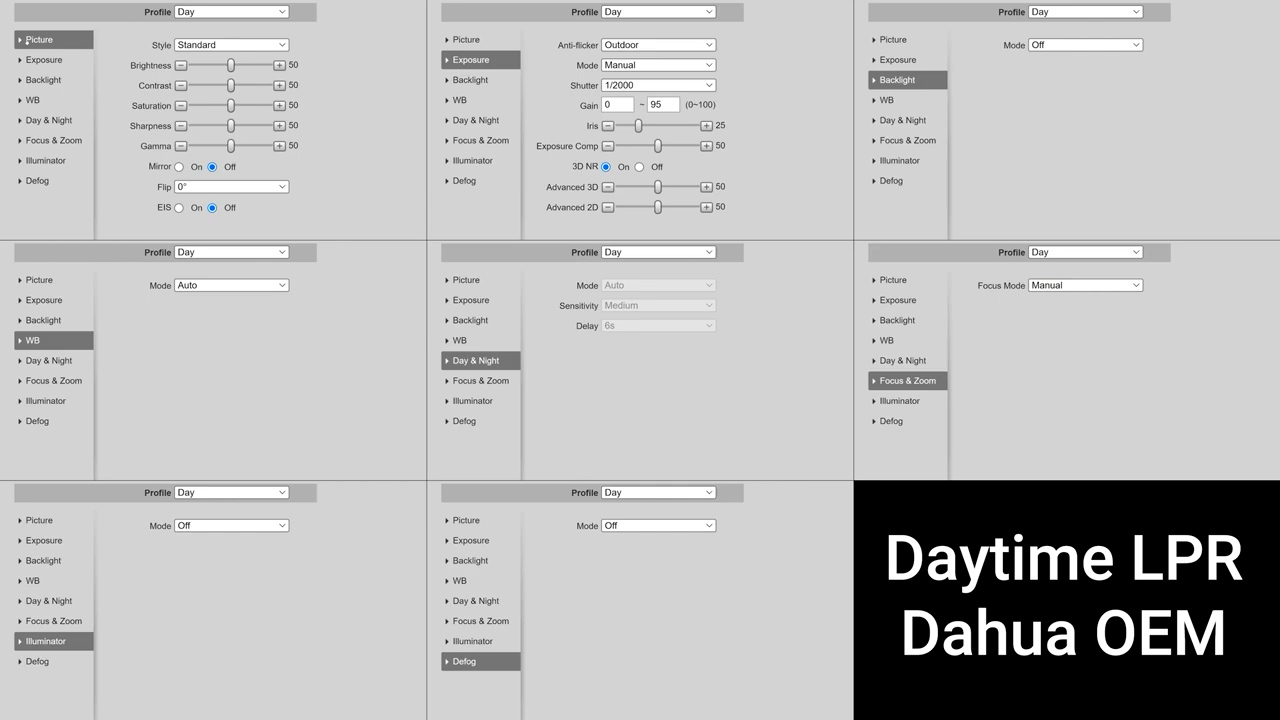
Your cameras should be zoomed in enough so that the car takes up as much of the frame as possible as it drives by, and your camera settings need to be dialed in for fast moving objects, which means a shutter speed of at least 1/1000, but the faster the better, and most importantly you need to set a manual fixed focus because by the time your camera changes focus from the pavement to a passing car the plate will already be out of frame. You may need to tweak the settings for your specific setup, but these are the daytime camera settings that work best for me.

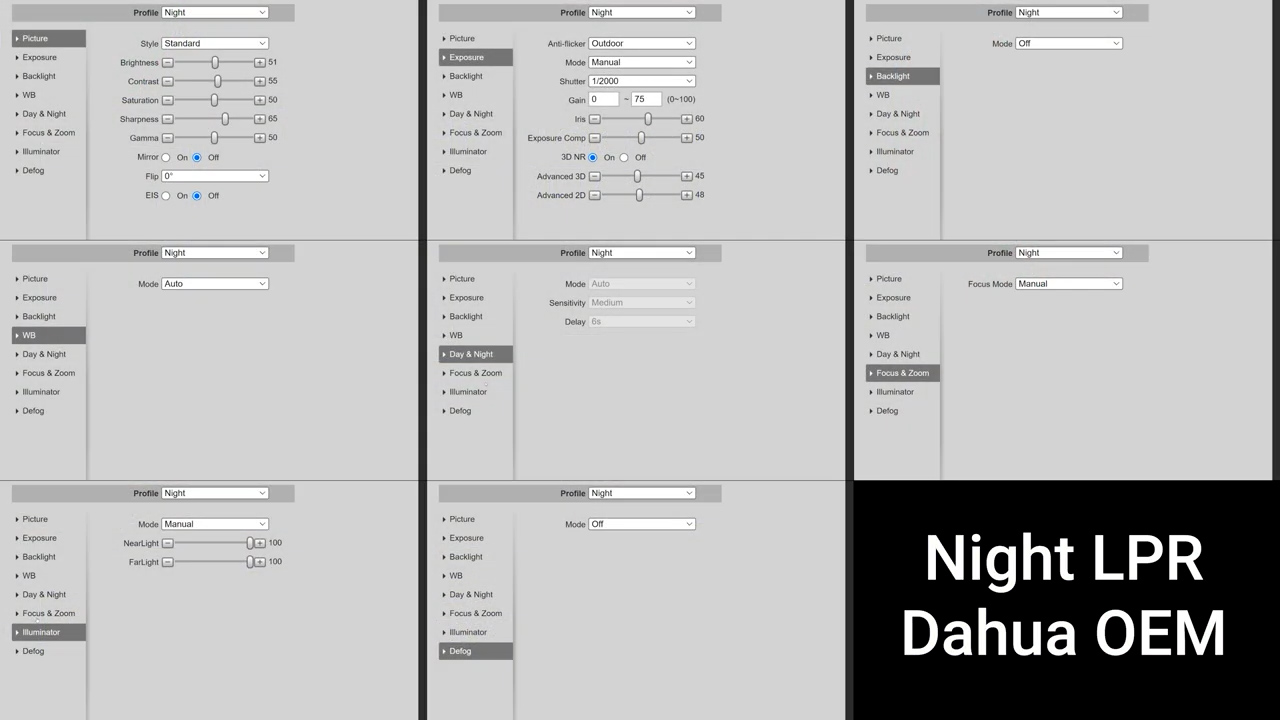
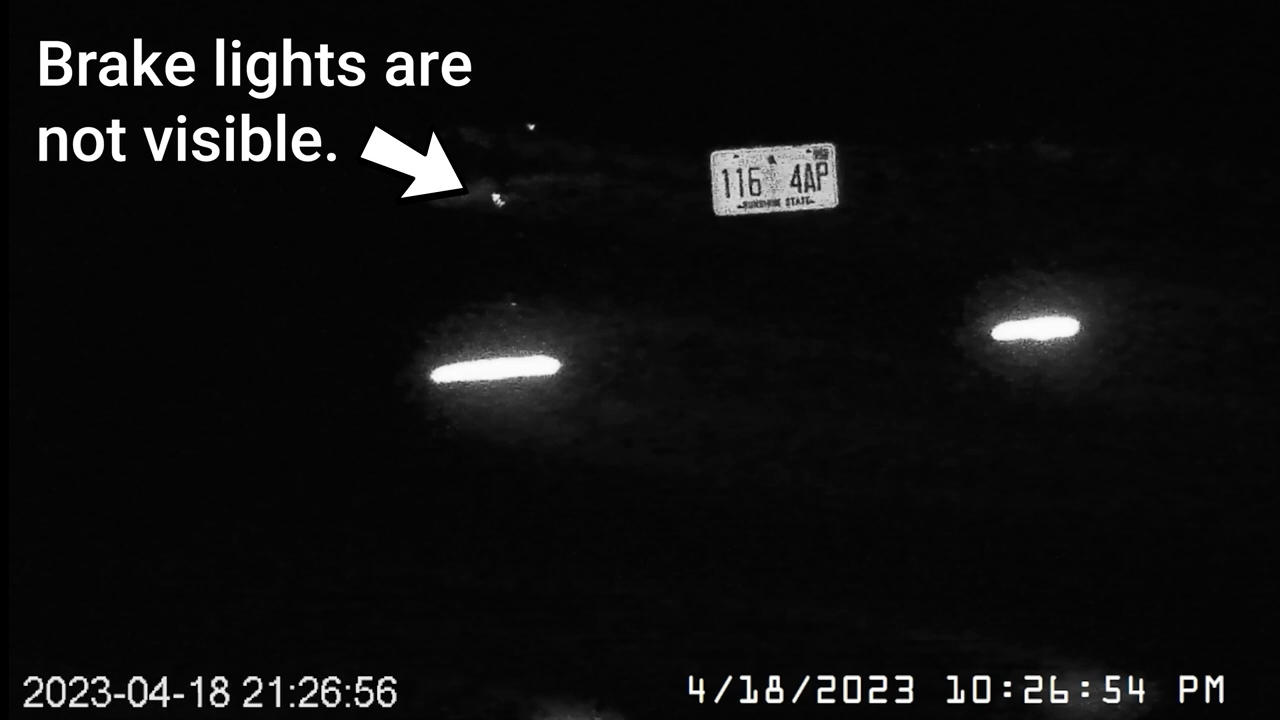
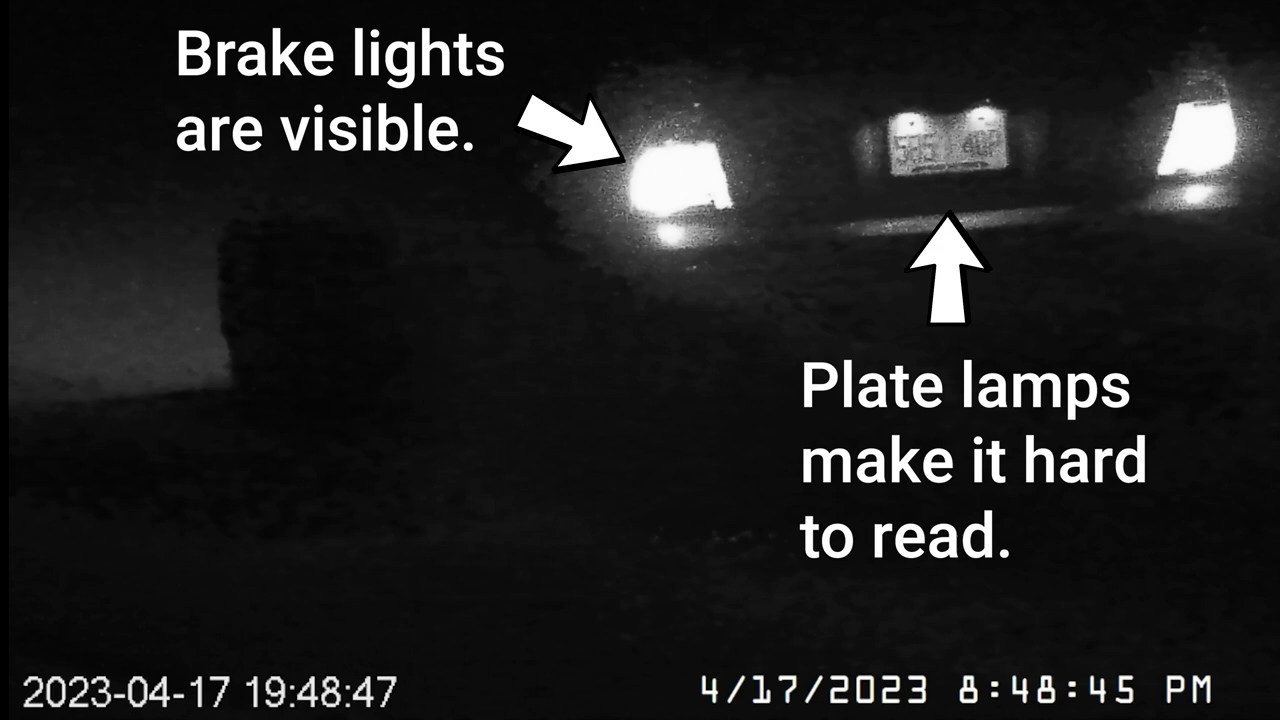
Night settings for an LPR camera are even more unique, because you’re essentially going to see an all-black image anytime a plate isn’t in frame. License plates have a reflective coating which can cause them to be completely blown out by infrared night vision so the strategy for recording plates at night is to turn down the exposure so much that the plate is the only thing visible, which results in a clear image of the plate number. Ideally, you’ll want the car’s plate lamps to be contributing such an insignificant amount of light to the overall image that they aren’t even visible and the entire picture is illuminated by the infrared LEDs of your camera. One thing I didn’t see mentioned online was that my camera needs a different focus value when the IR filter is activated, so I’ll go over how I solved that with Blue Iris a little later.

After you have your camera set up to the point where you can clearly read the plates yourself, only then should you try to set up CodeProject AI to do plate recognition. The computer is never going to be better than you at deciphering text, so if you can’t read it yourself, don’t expect any Hollywood image enhancement miracles. Also on this subject, it’s a good idea to have this camera recording at full resolution 24/7 so in the event that there is a plate misread by the AI you can go back and look at the footage yourself to see if you can do a better job with your own eyes.
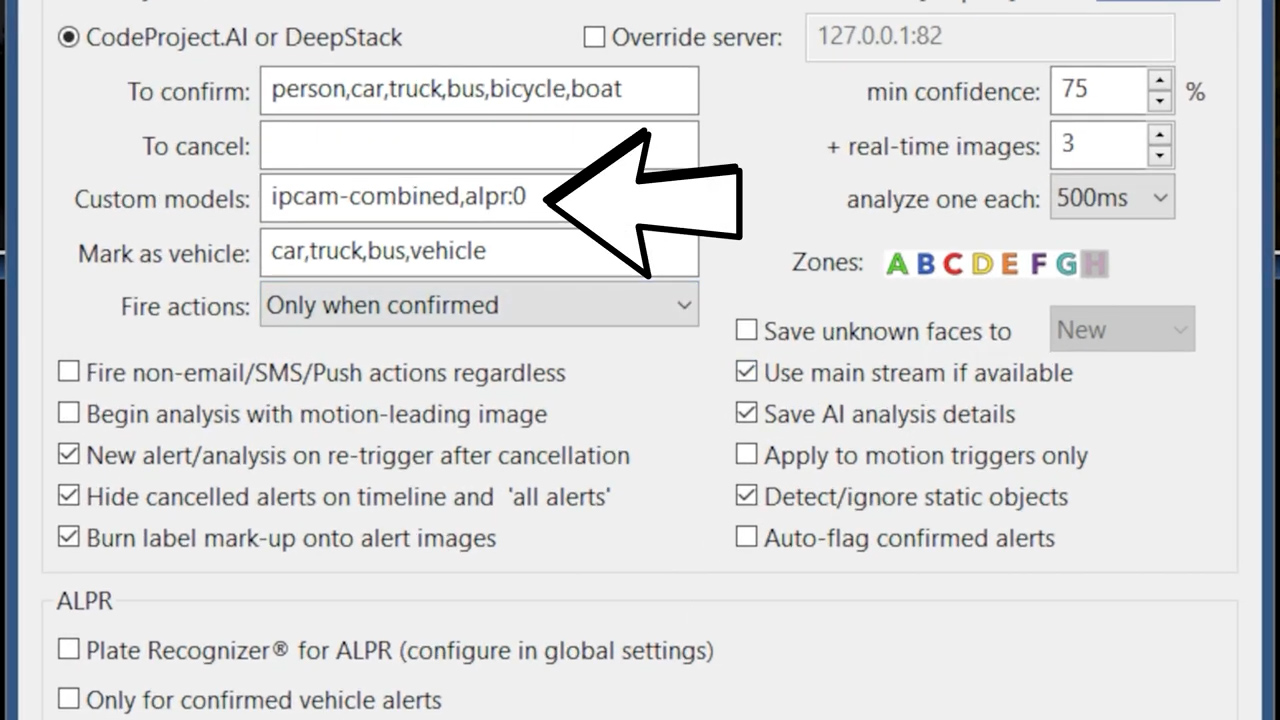
In an ideal world to get AI Plate recognition set up in Blue Iris you’d just go into the settings of the camera you want to use for plate recognition and go to Trigger, then Artificial Intelligence. In the to Confirm window you’d change your objects to dayplate and nightplate with a comma but no spaces in between, then copy paste those same objects in the mark as vehicle field.
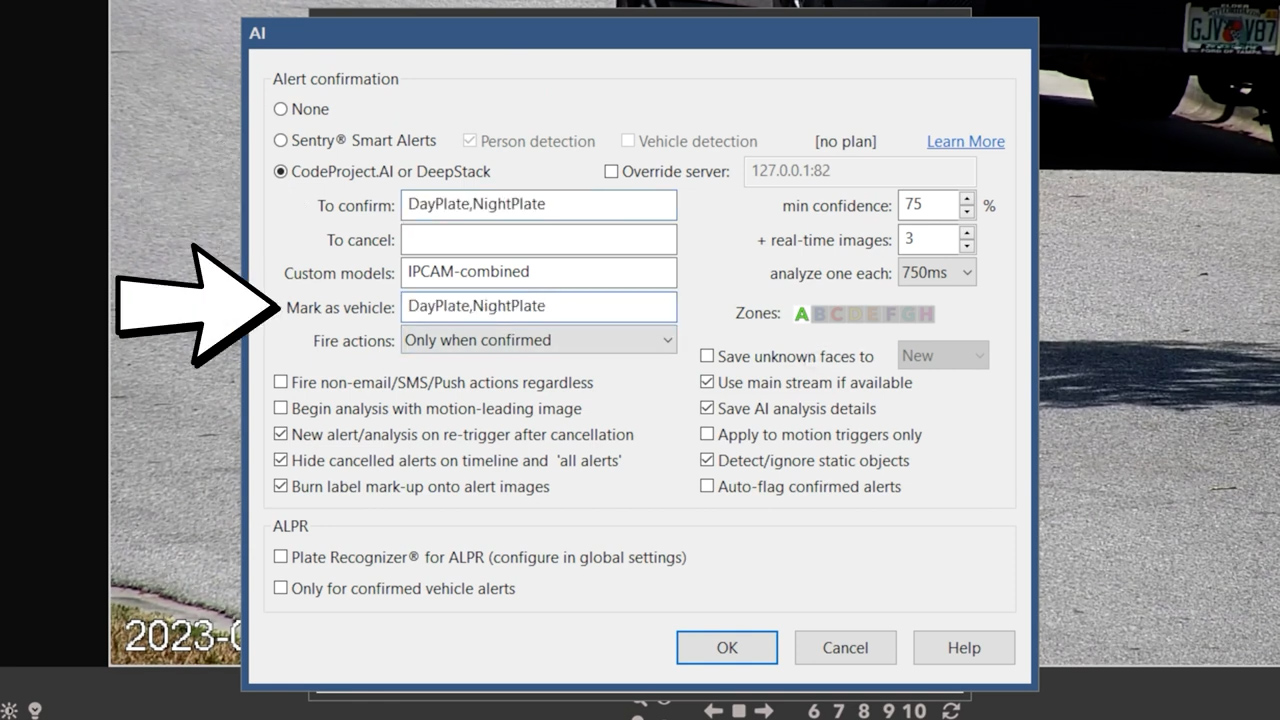
For Custom model, you’d use license-plate and click the button at the bottom that says “only for confirmed vehicle alerts”. In my case I have my camera set to 20 frames per second, and I want the AI to examine every frame until it is confident that it has read the plate properly. That means if I want my 1.5 seconds of total analysis but this time for every frame I’ll set it to 30 total images, one every 50 ms.


These were my initial settings, and they sort of worked, but I got a lot of plate misreads and even some events where it detected a plate with high certainty but didn’t try to read the plate. For this reason, I highly recommend unchecking the box that says “Hide cancelled alerts.” That way if a car drives by and doesn’t register a plate you can go back into the Blue Iris status window, click on the AI tab and open that alert to see the details.
You can see it only performs plate recognition once the event has been tagged as a vehicle by identifying either a day plate or a night plate with high confidence level, and that’s where I ran into issues. During the day my daytime plate confidence levels were above 90%, but at night they were in the 60-80% range, so I wasn’t getting any nighttime plate analysis if I set the level too high, but I was getting misreads during the day if I set it too low.

The solution was to make two different profiles in Blue Iris. Starting with the daytime profile we can remove nightplate from the to confirm window and set the confidence level to 92%.

Then back in the Trigger window select profile two. I’m going to lower the minimum object size for a trigger and increase the detection zone size. Then in Artificial Intelligence I’ll use only nightplate, and lower the confidence level to 70%.
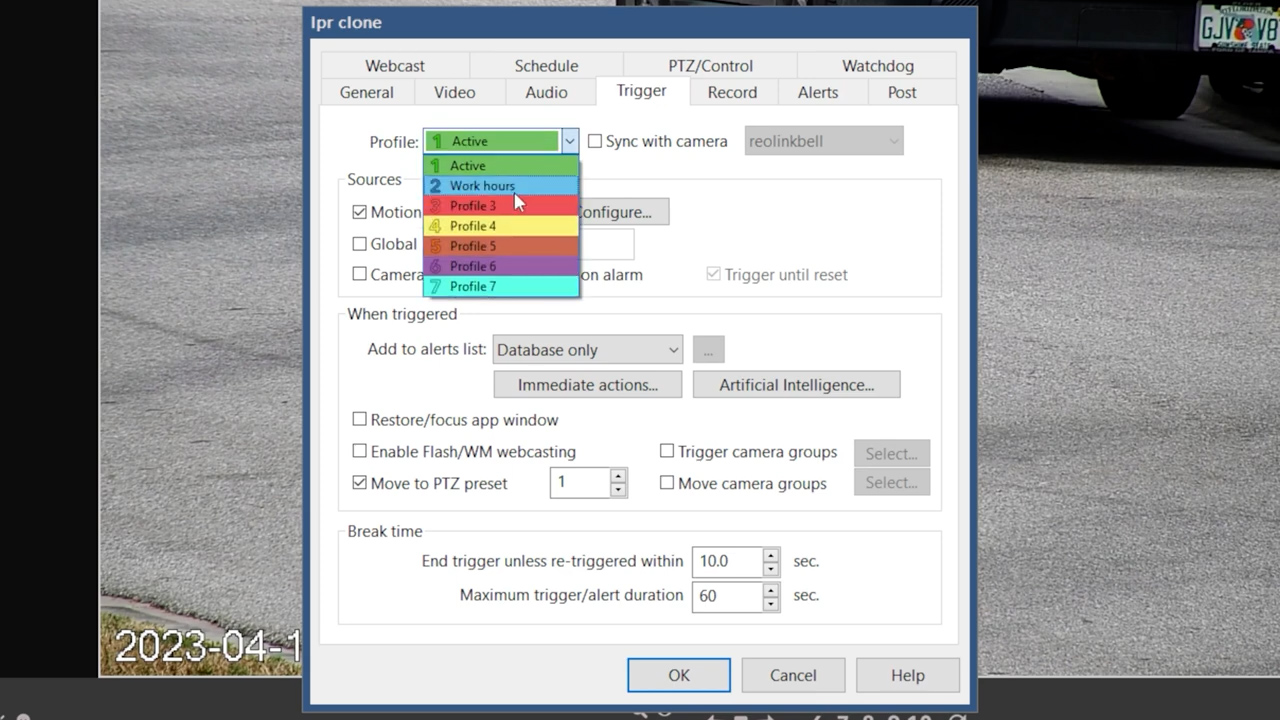

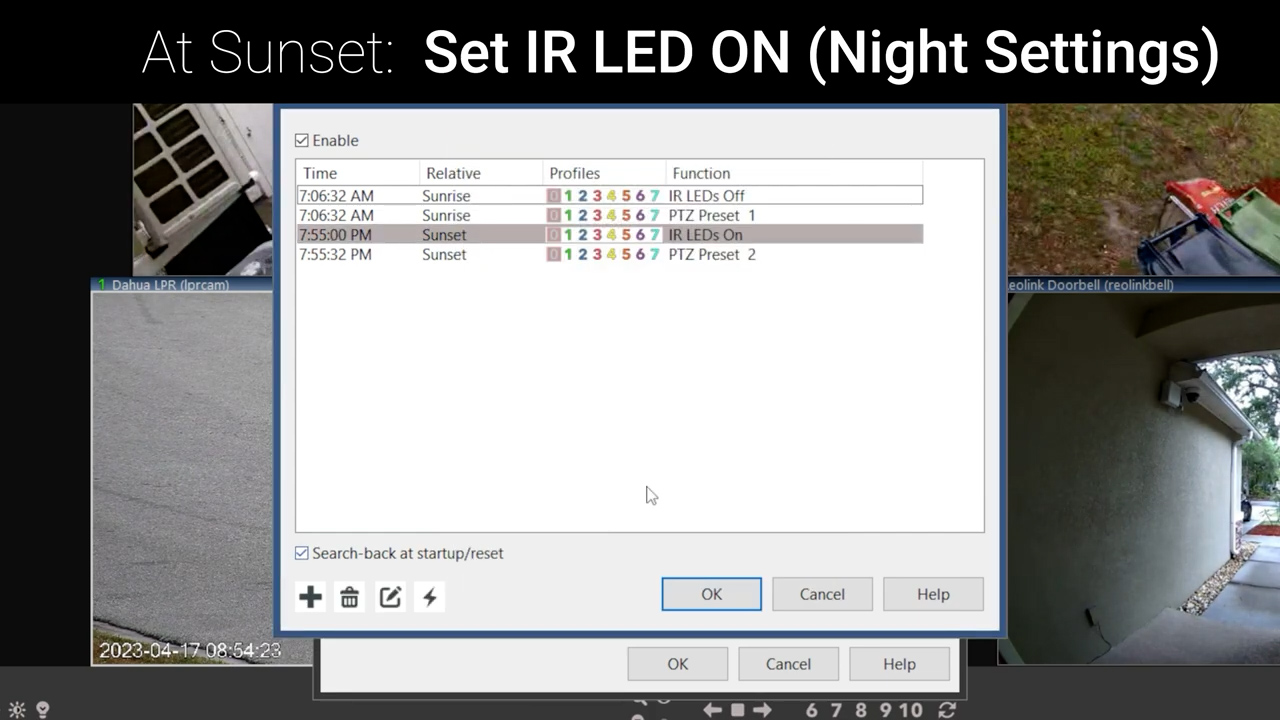
Now I need to configure Blue Iris to switch profiles at sunrise and sunset. Start by making sure Blue Iris knows your location by going to the Main settings, then Schedule, and click on the map pin icon. A window will pop up where you can select your location and get your general latitude and longitude, and you can copy paste those into Blue Iris.
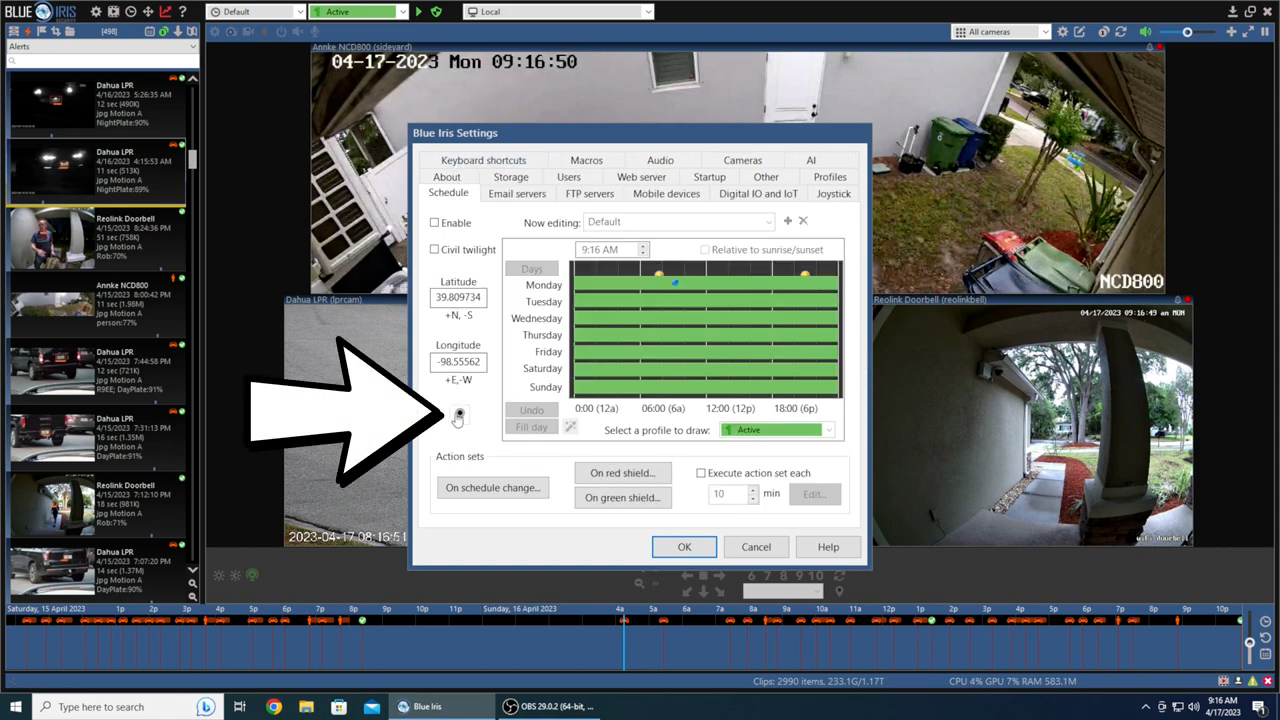
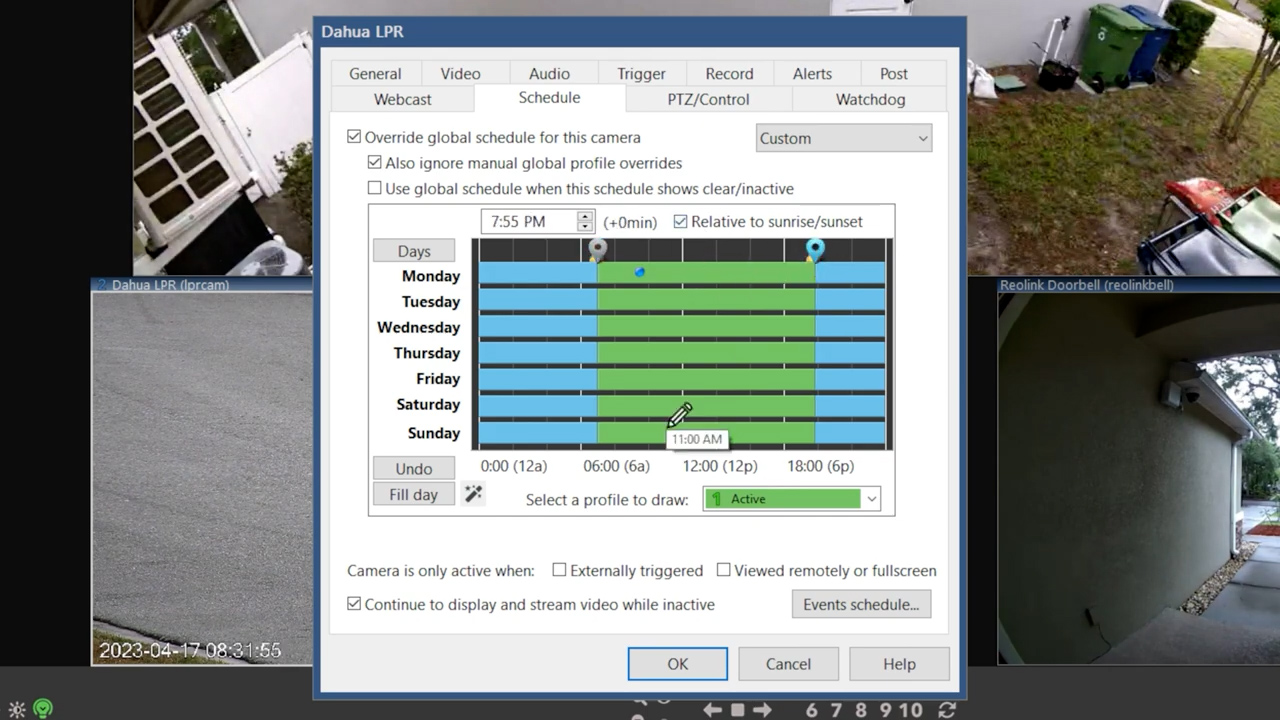
Then back in your camera settings go to Schedule, then select Override global schedule for this camera, and Ignore manual global profile overrides. Select all days, then draw your profile changes around sunrise and sunset. Then click the sunrise pin and check the relative to sunrise box and do the same for sunset.
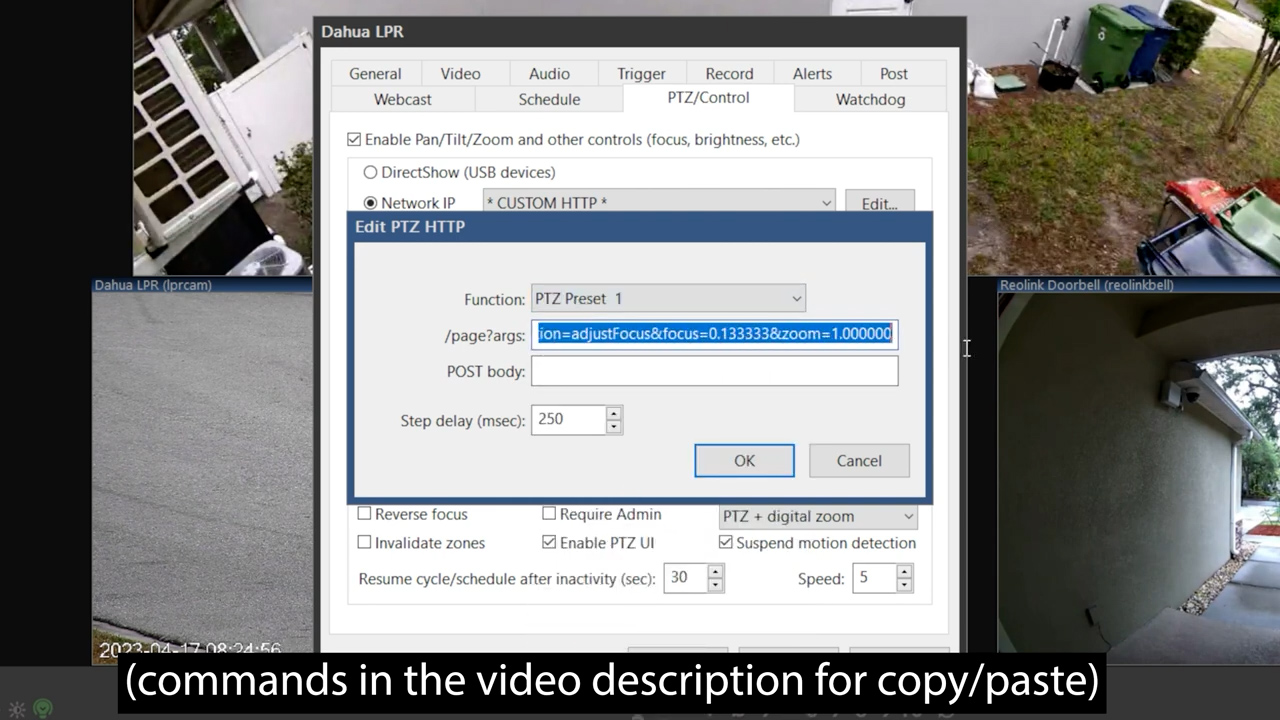
The last piece of the puzzle is to fix the daytime and nighttime focus issue, which might just be an issue with my camera, but I’m going to cover it anyways just in case. Dahua cameras have the ability to adjust almost all their settings with web commands, so we’re first going to get the camera focused using the web interface, then grab the zoom and focus settings using this web command.
Then, we can manually set the zoom and focus using another command, so in Blue Iris I’ll go to PTZ Control, then select custom HTTP and hit edit. Under preset 1 I’ll just paste in that command for the daytime focus and zoom, then I’ll repeat that process to find the right zoom for night and put that as preset 2. While I’m here I’ll also add the custom command to switch to night profile, and the one to switch to day profile, and I’ll of course put these commands below so you can copy/paste them.
Dahua Commands:
Get current focus status: {camera ip}/cgi-bin/devVideoInput.cgi?action=getFocusStatus
Set Zoom/Focus via URL: {camera ip}/cgi-bin/devVideoInput.cgi?action=adjustFocus&focus={focus level}&zoom={zoom level}
Set Day Mode via URL: {camera ip}: /cgi-bin/configManager.cgi?action=setConfig&VideoInMode[0].Config[0]=0
Set Night Mode via URL: {camera ip}: /cgi-bin/configManager.cgi?action=setConfig&VideoInMode[0].Config[0]=1
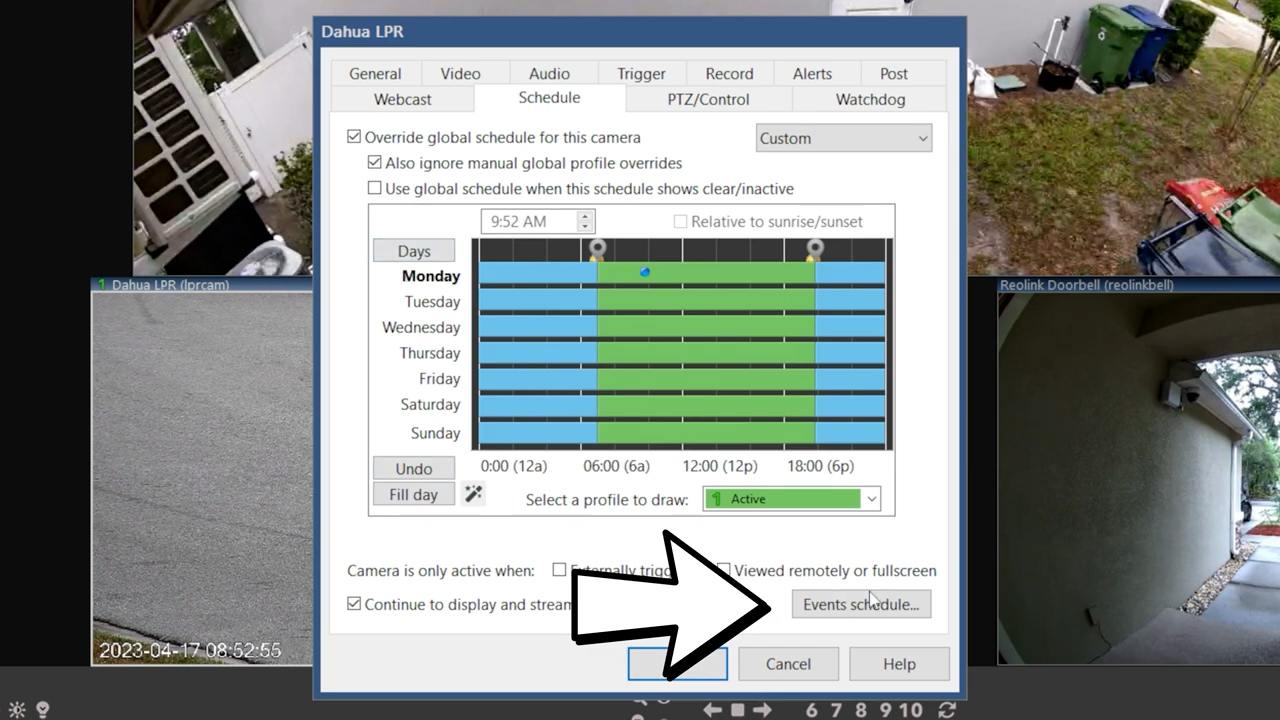
Last, I’ll go back to the Schedule tab and go to Events schedule. Add a new item, put in sunrise time, and click relative to sunrise/sunset, then select preset 1. Add another item, put in the sunset time, click relative to sunrise/sunset, then select preset 2. Add another item, put in sunrise time, click the box, and select IR LEDS OFF, then add one last item, put in sunset time, click the box and select IR LEDS ON.
Like I said before, plate recognition is actually pretty difficult, and I can’t guarantee that these settings will get you all the way to the finish line, but they should be pretty close.
One last thing that is currently necessary when using plate recognition but will probably be fixed in a future update is that you need to add the custom model alpr:0 to any camera that you don’t want performing plate recognition. Leaving it on isn’t going to hurt anything, but it will eat up GPU cycles and could slow down your overall object recognition.
The next obvious question is what are you going to do with these plates? One option is to search your alerts window for a plate number, which will bring up every time that car has driven by. Another option is to pass that information into a home automation platform like Home Assistant using MQTT.
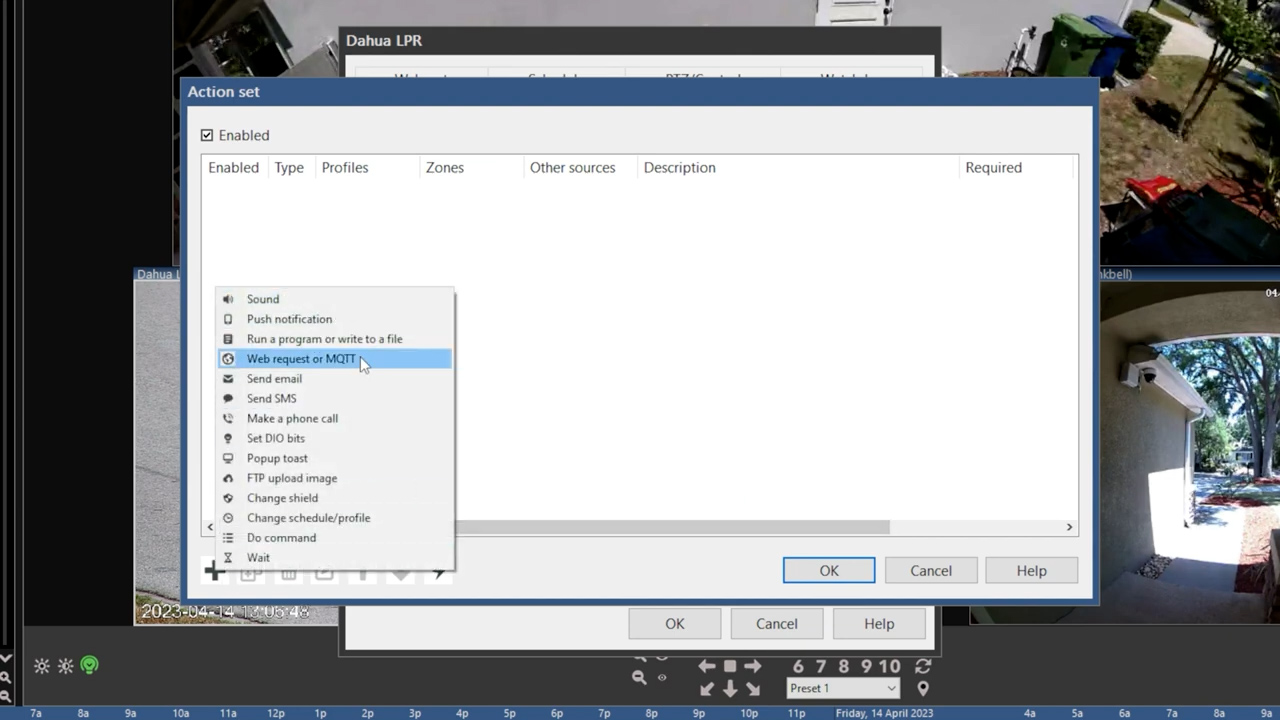
To do that you’ll need to set up your MQTT server in the Digital and IoT section of the Blue Iris settings. If you don’t know what an MQTT server is, I’d highly recommend checking out some videos about Home Assistant or Node Red, but assuming you do have a server set up, you just input your credentials, hit test, then okay.

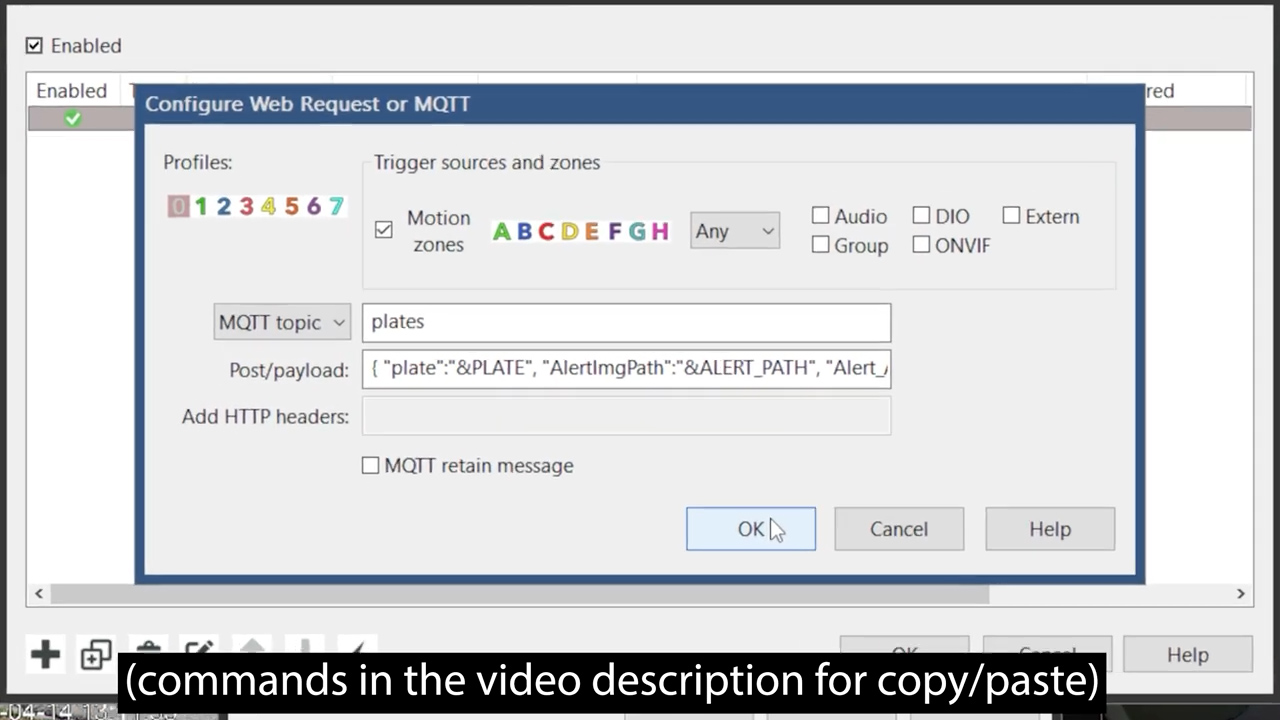
Then back in your camera, in the Trigger tab, click the Immediate actions button under the When triggered section, hit add, then select web request or MQTT. Change the drop down to MQTT topic, which can be anything you want. I called mine topic plates. Then for the payload you’ll use a little bit of JSON to pull out the important aspects of the alert including the plate, date and time, or if you just want to send the plate you can just type &PLATE.
{"plate":"&PLATE", "AlertImgPath":"&ALERT_PATH", "Alert_AI":"&MEMO", "Date":"%Y-%m-%d %H:%M:%S","Camera":"&CAM"}
Wrapping things up, for both the facial recognition, and plate recognition I need to add a disclaimer that you’ll need to do your own research about your local laws to determine if you’re even allowed to use those functions. Plate recognition for example is usually not illegal, but in many places it is illegal to film a public road, and laws banning facial recognition are usually targeting use by law enforcement, but often also include a blanket statement for any type of surveillance. In my city both are perfectly legal as of the release of this video.
Another thing that needs to be said is that these video instructions work perfectly right now in April of 2023, but options and instructions might change down the road. I’ll do my best to keep major breaking changes updated in a pinned comment under this video, but all important changes will be documented on my website.
Speaking of links below, I’ve got affiliate links for Blue Iris and all the cameras that I’ve shown in this video so if you appreciate the time and effort that it takes me to make videos like this one, I hope you’ll consider using those links since I do earn a small commission on those sales at no cost to you.
I’d also like to thank all my awesome Patrons over at Patreon for your continued support of my channel, and if you’re interested in supporting my channel, please check out the links below. If you enjoyed this video consider subscribing to my YouTube channel, and as always, thanks for watching The Hook Up.