Add an Amazon Dash Button to Home Assistant (Hass.io) for FREE
September 19, 2018Today on the hookup we’re going to set up an amazon dash button with home assistant to remind you to take vitamins or prescription meds first thing in the morning, and the best part is, it only takes about 15 minutes to set up and it doesn’t cost a penny!
At the ripe old age of 36 my love for orange juice and spicy food caught up with me and I was battling a case of chronic heart burn. I took a quick trip to my doctor and she prescribed me a 30 day course of medication to get it under control. The medication works best when taken on an empty stomach first thing in the morning. Sounds easy enough… too bad I’m terrible at remembering things early in the morning.
The idea here is simple, when I come down stairs in the morning to kiss my daughter and wife goodbye before they head to school, I’ll come over, take my pill, and press the amazon dash button. If I press the button it will deactivate the medicine reminder input_boolean. If I don’t remember to take my pill, the reminder will stay on and after 15 minutes it will send me a notification on my phone to remember to take my pill before I leave for work.
Simple concept, simple implementation.
Step 1: order an amazon dash button. I mentioned that this thing didn’t cost me a thing, and ultimately it didn’t. Amazon has a deal where you buy a dash button for $4.99 and then they give you a four dollar and ninety nine cent credit when you make a purchase with it. I needed some AAA batteries anyways, so I ordered the dash button for AAA batteries.
FREE (after purchase) Amazon Dash Button: https://amzn.to/2QDBFQh
A day later the dash button showed up on my doorstep.
To set it up, you open up your amazon app, hit the hamburger icon, then your account. Scroll down to dash buttons and devices and then set up a new device. Follow the on screen prompts to get your dash button hooked up to your home wifi, and then choose the product you want to get your $4.99 discount on. Click finish and press the button to order the item.
Next you’ll disconnect your dash button from your amazon app, and then hold down the dash button for 6 seconds, until the light flashes. Next you’ll go into your wifi on your phone or computer and connect to the Amazon ConfigureMe wifi, once connected navigate to 192.168.0.1 to see your device’s information. The important piece of information here is your MAC address. Copy this down exactly, you’ll need it to set up your dash button in home assistant. After you grab that MAC address, go ahead and repeat the setup process in your amazon app, but this time don’t select an item to buy, just exit the setup process once you get to that step.
To make sure you did everything correctly, press the dash button and you should get a notification in your amazon app that says you need to finish the setup process, that means it won’t be ordering something every time you press the button. Before exiting the app, go to your dash button notification settings and turn every option off, that will prevent you from getting that setup notification every time you press the button.
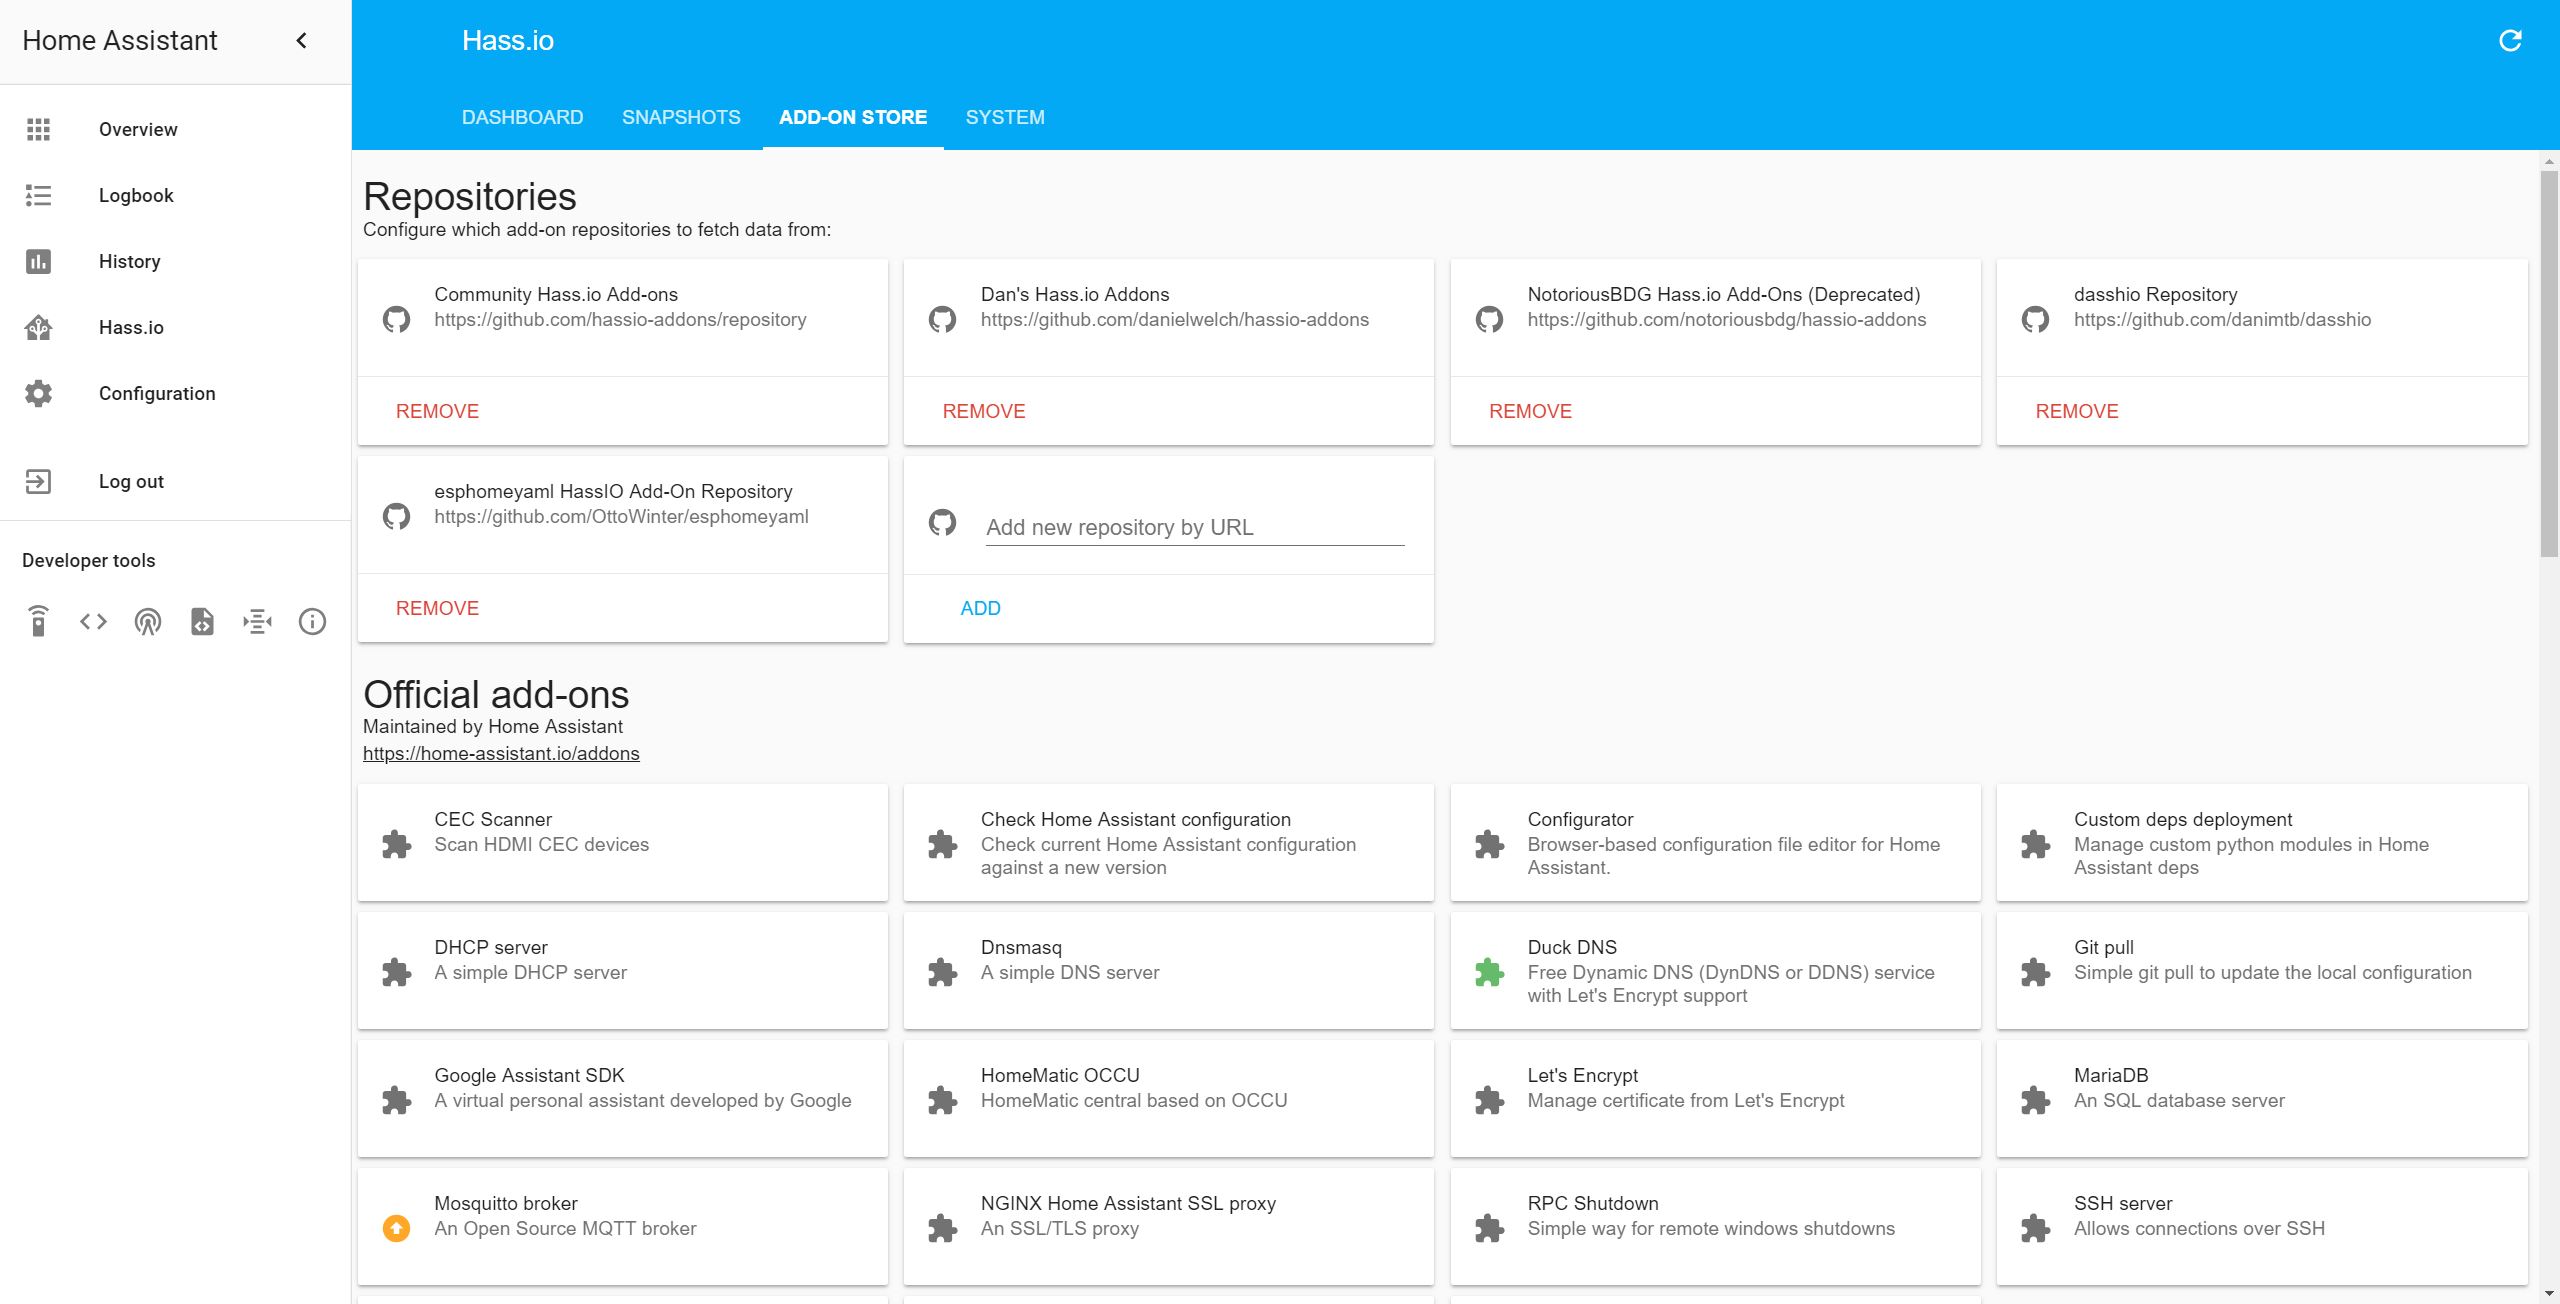
Next we’ll add our dash button to home assistant. As you might know, I’m running the hass.io version of home assistant, so I’m going to use the dash button addon called dasshio made by Dani MTB. Copy the link for Dani MTB’s github repository from the description below and add it as a custom repository in your hassio addon store. Scroll down to dasshio in that new repository and hit install.
While I’m waiting for it to install, I’m going to add an input Boolean to home assistant called “Rob Medicine Reminder” and save, I’ll need to restart home assistant to finish adding it, but I’ll wait until after dasshio is finished installing.
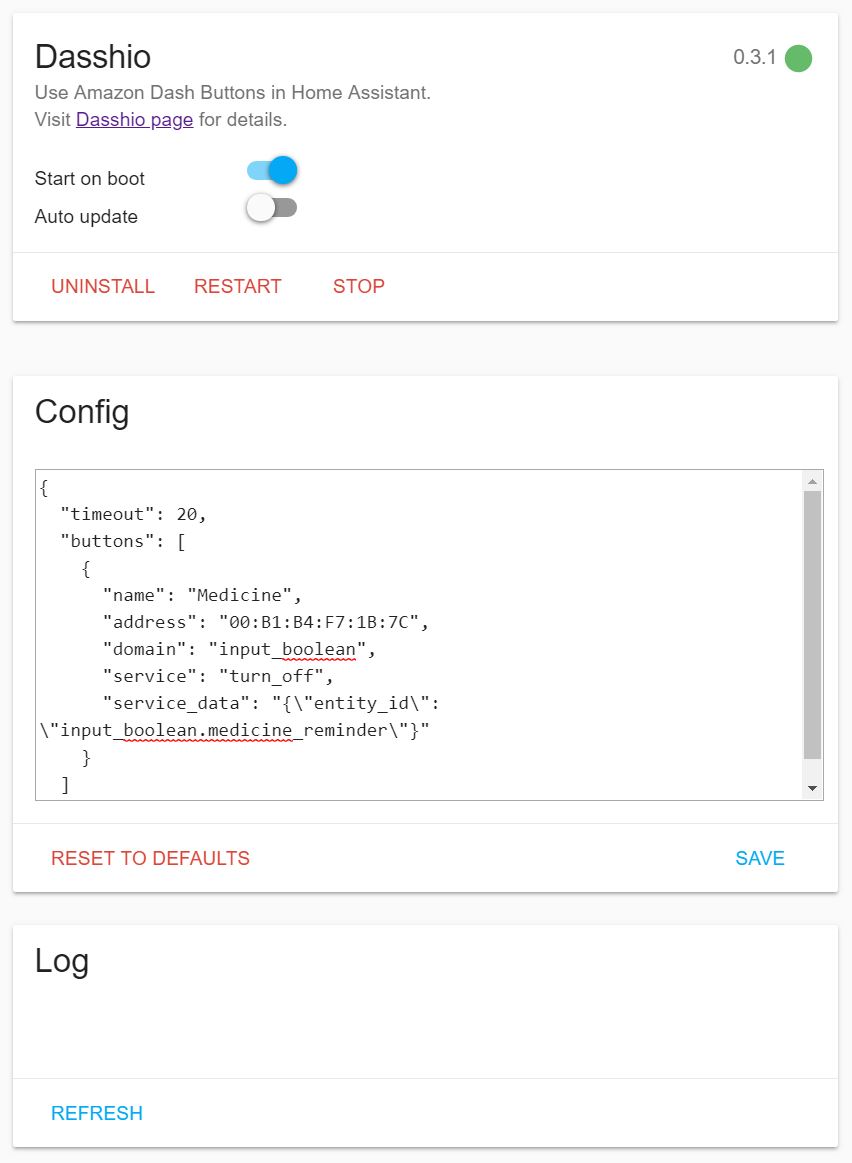
Now that dasshio is installed we’ll need to update the configuration file in the addon for our new button. Under “name” you’ll put something descriptive for your dash button, I’ll call mine “Medicine”. Under address you’ll paste in the MAC address for your button that you copied down earlier. Mac addresses are in hexadecimal, so you’ll need to add colons every two characters. For domain you’ll decide what you want to control. This could be any domain that is available under the services tab in home assistant.
For me, to make my automation writing easier, I’m going to use an input Boolean. The service that I want my dash button to perform is “turn_off”, and under service data you’re going to specify the specific entity id of the input Boolean that you want to turn off. There’s a little weirdness that happens here since you need to actually type out quotation marks within a json file. To do this instead of typing a quotation mark, you’ll actually type backslash quotation mark, instead of just a quotation mark. If you’re unsure of how to get your json properly formatted you can just copy my config from the description and change your input Boolean name. The last option is this timeout value at the top.
The timeout value limits how often each dash button can activate your service in home assistant. A value of 20 will allow the dash button to turn my input Boolean off once every 20 seconds. For my purpose, this is just fine, but if are going to use this for a light switch, you probably want to lower this number. If you make it too low you may find that a single button press activates the service multiple times.
Now that I have everything configured I’m gonna hit save, and then reboot home assistant to add that input_boolean I added earlier to my available entities.
While I wait for my home assistant to start back up I’m going to plug another one my videos. I pretty much never worry about messing with my home assistant setup because I’ve got it set to back up to my dropbox every Monday, so I can easily roll back any changes that I make that screw things up.

A major complaint that I hear from hass.io users is how long it takes to reboot home assistant, in that same video I show you how to set up the recorder component so your database file doesn’t get massive. By keeping this database small you’ll significantly decrease the time it takes for your hassio instance to restart. My database file stays around 12.5 megabytes and it consequently takes only around 90 seconds from when I press the restart button to when I can access my dashboard again on a raspberry pi model B.
Now that home assistant is restarted, lets go ahead and test out our new button before we get to making automations:
I’ll toggle my input Boolean on via the dashboard, and then press my dash button to turn it off. It takes between 1-2 seconds for the Boolean to respond, which is more than fine for my purposes, but might be a little annoying if you were using this to turn on a light.
I’m going to set up a simple node red automation to handle the alerts
At at 6:45am on weekdays, and 8:45am on weekends it will start this 30 minute delay trigger node. If at any time I hit the dash button or turn off the Boolean in home assistant it will cancel the trigger node and prevent a notification from being sent, but if I don’t press the button, at 7:15 am on weekdays and 9:15 on weekends it will send me a notification on my phone to remind me to take my meds.
I’ve exported this node-red flow and put it in the description below.
This automation is really simple… too simple… and it’s not the actual automation that I use.
In next week’s video I’m going to walk you through the automation that I actually use, which sends me an actionable notification on my iphone that allows me to snooze the timer for 5 minutes in case I’m not downstairs yet, toggle the Boolean off if I already took my meds, but I didn’t remember to hit the button, or my personal favorite, allows me to send another reminder notification once I return home, in case I already left for work without taking my pill. Next week’s video will also include some other cool tips and tricks about using node-red in your automations that will open up a world of possibilities for you.
This video was specifically about setting up a dash button with the hassio version of home assistant. It is possible on all other types of home assistant, but the process will be slightly different. BurnsHA has a video for setting up dash buttons on a traditional linux home assistant install, so you can check that out if you’re still resisting hassio.
Thanks to my patrons for your continued support of my channel. if you’re interested in supporting my channel without costing you a thing, I’ve put affiliate links for amazon dash buttons down in the description, using those links not only benefits my channel, but like I said, it’s also totally free. If you run into problems with this project leave a comment and I’ll do my best to help you out as soon as I can. If you enjoyed this video, please consider subscribing, and as always, thanks for watching the hook up.
FREE (after purchase) Amazon Dash Button: https://amzn.to/2QDBFQh
Example Dasshio Config: https://github.com/thehookup/Misc/blob/master/example_config.txt
NodeRed Flow: https://github.com/thehookup/Misc/blob/master/node_red.txt
Visit my website: http://www.thesmarthomehookup.com
Follow me on Twitter: @TheHookUp1
Support my channel:
Patreon: https://www.patreon.com/thehookup
Music by www.BenSound.com