Permanent Holiday LED Installation
October 27, 2023Permanently installed LED kits look awesome and can seriously cut down on your yearly decorating time, and right now there are more choices than ever. The question is, do they all look the same? And will a $150 kit perform just as well as a $500 one? Let’s find out.
In the first test we’ll see which brand is the brightest and most power efficient. Then we’ll compare their apps and compatibility. After that we’ll evaluate their ease of installation and other mounting considerations. And last, we’ll look at some side-by-side footage of each kit to make sure you get the exact look you want.
Cost, Brightness, and Power Draw
For a price of $150 the least expensive permanent LED kit we’ll be looking at is the Novostella 80 LED, 100 ft, RGB IC lights. The Novostella kit comes with two 50-foot strings with 40 1.5-inch LED pucks containing 7 RGB LEDs each, spaced 13 inches apart. Each 50-foot string connects to the single power supply and controller. Novostella says the strings cannot be cut or extended, and in my testing, there was no issue cutting the strings short, but extending the strings past 50 feet or 40 LEDs does not work, and only the first 40 LEDs will light up.
The Novostella’s non-waterproof power supply is 24 V and 1.75 A for a total of 42 watts of potential power delivery, and I found that on full brightness white the 80 Novostella LED pucks drew 38.5 watts, which is over 90% of the power supply’s maximum rating which could lead to premature failure.
Using my Hopoocolor colorimeter I measured the brightness and color characteristics for pure red, green, and blue, and also combined RGB white, and each Novostella puck was relatively dim with 76.8 lux for red, 107.2 lux for green, and just 23.7 lux for the blue channel with a combined 200.7 lux per LED for full brightness RGB white.
The diffuser on the Novostella lights is removeable and results in significantly increased brightness, but I can’t recommend using them this way since the waterproof coating is more jelly like than epoxy-like and is easily damaged.
Next for $239 is the Appeck C5103-A Permanent Outdoor Lights. The Appeck lights come in six 5-meter strings which can be daisy-chained for a maximum length of 30 m or about 100 ft. Each 5-meter string of Appeck lights has 12 LED nodes with a single RGB LED combined with a 30-degree lens and each 1 1/8” square node is spaced 14.5 inches apart.
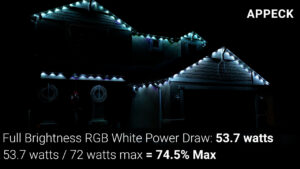
The Appeck’s waterproof power supply is 24 V and 3 A for a total of 72 watts of potential power delivery. I found that on full brightness white the 72 Appeck lights drew 53.7 watts, which is under 75% of the power supply’s maximum rating, which should lead to a long lifespan.
The Appeck’s red brightness was over three times brighter than the Novostella at 249 lux, green was a massive 715 lux, and blue was 170.8 lux, for a combined RGB white brightness of 1045 lux, over five times brighter than the Novostella.
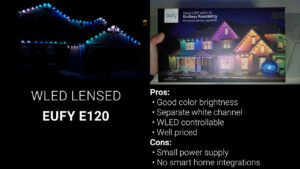
After that, for a price of $299 are the Eufy E120 Permanent Outdoor RGBW Lights. Like the Appeck the Eufy kit includes six 5-meter strings that can be daisy-chained to a maximum length of 30 m or about 100 ft. Each 5-meter string of Eufy lights has 10 nodes each with one RGB LED and one Warm White LED behind a 30-degree lens, and each 1.5” rectangular node is spaced 18 inches apart.
The Eufy power supply and controller are not waterproof, so you’ll need to mount them inside or in a waterproof outdoor box. The power supply is rated at 36 V and 1.5 A for a total of 54 watts of potential power delivery. On full brightness white using the RGB chip I measured 55.4 watts of power draw, which is a very concerning 102% of the power supplies rated power, but it’s unlikely that you’d ever use full RGB white since the Eufy LEDs also include a warm white chip, which at 100% brightness only drew 23.8 watts or around 44% of the power supplies rating.
The brightness on the Eufy lights was the best yet with 560.8 lux on red, 822 lux on green, 203.5 lux on blue, and a massive 1220 lux using the dedicated warm white LED.
Next, also for $299 are the Govee 100 ft RGBIC Permanent Outdoor Lights. The Govee kit also comes with six 5-meter strings which can be daisy chained together to a maximum of 150 ft when buying the larger kits or combining kits together. Each 5-meter string of Govee lights has 12 nodes each with a single RGB LED behind a 30-degree lens, and each 1 1/8” square node is spaced 15 inches apart.
The Govee power supply is wet rated and provides 36 V and 2 A for 72 watts of potential power delivery. On full brightness white the Govee LEDs drew 58 watts total, which is 80% of the power supply’s maximum rating, which is just about perfectly sized to ensure a long life span.
This 80% maximum power draw is no mistake and the Govee engineers have done some creative programming to get it there. When I was measuring brightness the Govee nodes where the brightest by far putting out 774.2 lux for red, 1574 lux for green, and 294.4 lux for blue, but interestingly, only 1122 lux on full brightness RGB white, much lower than we would expect given the individual color brightness. I got curious so I hooked up a non-Govee controller and measured the brightness of the Govee LEDs and was able to confirm that they are capable of over twice as much white brightness at 2478 lux, but doing so increases the power draw to over 120 watts, so Govee limits white brightness via software. This is not only a good idea for increasing the lifespan of the power supply, but it also should prevent overheating of the LEDs, improving their lifespan dramatically as well. Great job Govee.
After that is another Govee product, but this one is their $399 Permanent Outdoor Lights Pro. The Pro version also has six 5-meter strings that can be daisy chained together up to 30 m or 100 ft, but the Pro version only has 10 nodes per string with 18.5” spacing compared to 12 nodes on the non-pro version. However, each 1 ¼ inch square node in the Pro set includes a single RGB LED in the center surrounded by 3 cool white LEDs, and 3 warm white LEDs behind a 30-degree lens.
The Pro version’s waterproof power supply is also rated higher at 36 V and 3 A for a maximum potential power delivery of 108 watts. On full brightness RGB white the Govee Pro draws just 39.5 watts, and turning all 6 white LEDs to full brightness draws just 47 watts, which is less than 50% of the power supply’s rating, so I imagine that the larger power supply is included for future upgrades like the ability to string together significantly longer than 100 ft of lights.
As for brightness, each Govee Pro node is slightly dimmer than the standard Govee kit with 677.4 lux for the red channel, 1120 lux on the green channel, and 234.7 lux on the blue channel. The Govee Pro’s RGB white brightness was just 632.8 lux, but the combined brightness of the six dedicated white LEDs was a massive 1949 lux, making it the brightest yet when it comes to pure white.
The last and most expensive option is what I imagine most people picture when they hear permanently installed LED lighting. The YourPixelStore.com YPS Puck track comes in 15 m bundles with either five or ten LED pucks per meter. Since the rest of the kits I’m testing are 30 meters, I got two 15 m bundles and I went for the 10 LED per meter variety to be able to show both densities using software. Two 15 m bundles of ten puck density comes out to $530, and two bundles of five puck density would be $370, but those prices are just for the tracks and lights, and they aren’t all-in-one kits like the other options.
There are two big differences between the YPS Puck track and the other kits in this video, the most obvious being that the circular pucks come pre-mounted in sturdy 2-part aluminum mounting channels, which not only helps with ease of installation, but also hides all the wires.
The other big difference is that the YPS Puck track doesn’t come with a power supply or controller, so you’ll need to choose those for yourself, but the pucks are 12 V and at full brightness white I measured 111 watts for all 30 meters of ten puck density, so you’ll need at least a 12 V, 10 A power supply, but a 15 A or 20 A supply would be better if you plan on using white extensively.
For brightness, each puck measured 221.5 lux for the red channel, 427.5 lux on green, and 101.5 lux on the blue channel for a combined RGB white brightness of 726.5 lux, which puts it well above the diffused Novostella lights, but below the 30-degree lensed lights from Appeck, Eufy, and Govee.
However, keep in mind that these brightness ratings are per LED, and if we multiply the single node ratings by the total number of nodes it puts the YPS Track in first, the standard Govee in second, and Govee Pro in third for total light output.
LED Controllers and Apps
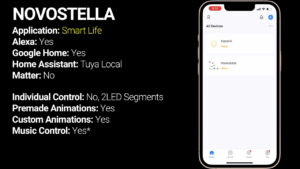
Now that we know what the LEDs can do, let’s talk about their controllers and apps. Starting with the least expensive Novostella brand. The Novostella kit uses the Smart Life app for control and has the ability to create custom patterns by assigning different colors to 20 segments of lights. Because of the way the Novostella kit is wired the two 40 LED strings always do the same thing, and because the app only has 20 segments that means that each segment in the app controls two lights on each 50 ft string.
The Smart Life app also has a bunch of pre-programmed animations with cryptic names like Glacier Express, Fireworks at Sea, and Hut in the Snow, but it is nice that you get a small preview of what the animation is before clicking it, so it’s simple to browse through and find the colors that you want.
There’s also a limited custom animation mode and a music reactive mode that can either use the microphone in the control unit or you can use your phone’s microphone if you have the app open. I found that both music reactive options were pretty bad and were flashy and seizure inducing, and I personally can’t imagine ever using them.
The Appeck light kit also uses the Smart Life app, but the interface looks completely different from the Novostella. The custom pattern generator has 36 segments, which means it also controls the lights in groups of 2, but unlike the Novostella lights, the entire string is addressable instead of repeating the same pattern on both strands.
The Appeck app also has an entire library of pre-programmed animations with hilariously translated names like Hallowmas and Fatherwis Day, but there is no preview of the pattern in the app, so you’ll need to select each animation to see what it looks like.
The custom mode on the Appeck has all the same options as the Novostella, but a bit of a different look, and like the Novostella, I thought that the music reactive mode was pretty unusable and flashy using both the microphone in the control unit and the phone microphone.
The Govee App on the other hand is a bit of a masterpiece. When you first enter the app it looks pretty simple with a menu that lets you create custom patterns using segments of four lights, which makes things easy and may be exactly the look you want, but the great part about the Govee App is how deep it goes, and if you really get into it you can make extremely customized patterns and animations where you can individually control the color and brightness of each light in the string, and if you have more than one Govee product, you can combine them in what they call DreamView mode where all the individual products sync together to create a single pattern.
The Govee music reactivity modes are also significantly better than the Smart Life options, but still use the microphone on the actual controller. However, using DreamView you can sync multiple products to a Govee remote light show box that lets you put the microphone exactly where it needs to be to get the best music reactivity response.
Compared to Govee, the Eufy app is good, but not great and definitely not as polished. There’s an easy-to-use custom mode allowing full individual control of each LED and basic animation controls, but I wasn’t able to get the warm white LEDs to turn on using the custom option. The Eufy app also has a large library of pre-programmed animations that are useful and thoughtfully named, so it’s easy to find what you are looking for, but the big selling point is their Magic Show option which uses a sort of chat GPT interface to make a pattern based off of a prompt. You can press the “Magic Dice” button to have it create a random pattern or give it a description and see what it comes up with. In my testing I had about a 25% success rate in getting it to make the pattern that was close to what I wanted, and it did better with abstract prompts than it did with actual instructions. I think if Eufy released some kind of tutorial on how to talk to the AI to get it to use specific colors and patterns it would be more useful, but overall, I still think it’s a cool idea.
The Eufy app also has the option to link your Eufy lights to your Eufy cameras to turn on a specific pattern if a person is detected, but unlike the AI pattern generator I personally didn’t find this particularly useful or interesting.
The last app to talk about is for the YPS track, and it’s a little different since the YPS track doesn’t come with any controller or app, but I’m using a QuinLED DigQuad controller running an extremely powerful open-source LED program called WLED.
While not as user friendly as the Govee app, WLED is absolutely the most customizable of all the controllers in this video and can create segments, spacing, offsets, custom patterns, and has a huge list of animations that can each be customized with your own color palettes, and further modified using the tempo and intensity slider bars.
The other big advantage to using WLED as your controller is if you ever decide to do a full music synchronized light show you don’t need to change any wiring because programs like xLights can stream light show data directly to WLED over your network for millisecond precision timing.
WLED Compatibility
And because I feel like permanently installing LEDs on your house is a bit of a gateway drug into full on light show addiction I also tested each of these permanent LED kits for WLED compatibility and I found that the YPS Puck Track, Govee non-pro, Novostella and Appeck lights were all completely controllable in WLED using the standard WS281X setting and the Eufy was controllable as an RGBW light strip in the most recent version of WLED, but instead of standard RGBW it has to be set up as color order BRGW with the B and W channels swapped.
And unfortunately, because of their separate warm white and cool white channels I couldn’t find a setting that made the Govee Pro lights work as expected in WLED.
Ease of Installation
Next let’s talk installation, and because I was installing six different sets on both my first and second floor, and because I wanted to be more like Colin Furze, I rented a 45 ft articulating manlift. If your house is single story a ladder would probably be sufficient but remember, even though a 24-hour manlift rental will cost you between $300-500, it’s a lot less expensive than falling off a ladder, and it makes the entire installation process much faster and less complicated.
That said, some of the kits would be much easier to install on a ladder than others.
The Appeck, Govee, Govee Pro, and Eufy lights all come with 3M double sided tape on the back, but each kit says that the adhesive is only meant for temporary installation and that screws and clips should be used for permanent installs. I would personally recommend putting a clip on each side of every node, but there are definitely not enough clips included in the package for that, with the Appeck including 80, the Eufy including 35, and the Govee kits including 30 clips each, so you’ll need about 100 additional clips for the Govee and Eufy kits, and 64 extra for the Appeck.
The good news is that the double-sided adhesive does make it easy to put the lights up initially, and then you can come back with the clips and screws after all the lights are positioned. It’s worth mentioning that although the adhesive looked identical on the Govee, Eufy, and Appeck kits, the design of the Appeck lights made it difficult to get enough contact between the tape and soffit, and for my installation I had to use hot glue to get the Appeck lights to stick for anything more than a few minutes. Still, I think any of these four kits could easily be installed on a first-floor roof using a ladder because the double-sided tape gives you enough time to place the lights and install the clips without having the rest of the string dangling around you.
The Novostella kit on the other hand comes with plastic brackets that are meant to be screwed into your soffit and then each LED node snaps into that mounting bracket. Once it’s in, the bracket is extremely stable, but getting it aligned just right to clip in can be difficult, especially if your soffits are flimsy like mine. I’m not afraid of heights, but I don’t think I’d personally be comfortable installing the Novostella lights on a second story roof from the top of a ladder, so a manlift rental is highly recommended if you choose this kit.
The YPS channel installation is interesting because it only needs two screws per segment, but it can be difficult to hold the track and your drill above your head at the same time from the top of a ladder. So, if you are planning on attempting this install from a ladder, I’d recommend putting some double-sided tape on the track to stick it in place while you get your screws installed, but with the manlift it was pretty simple to keep everything in place without the tape.
Install Tips
And that leads me to the next section, which are all the little things I learned about installing these kits by doing it wrong the first time.
When it comes to making things look uniform and tidy the YPS Channel was definitely the easiest to install and keep straight and consistent, and cutting the channels to go around corners and peaks is easily done using a pair of tin snips to cut the sides, and then bending the channel until it breaks. It’s obviously not as simple as going around a curve with just a wire, but it didn’t take me significantly more time to install the YPS track than any of the other kits.
As with all LED channels, for the YPS track I’d recommend staggering the two pieces of each channel to force them to line up properly, and doing so makes the seams in between segments almost invisible.
For the Novostella, the most important thing is making sure that your nodes are evenly spaced, which can be done by just pulling the wire taut before placing your next mount, but if you pull it too tight it makes it impossible to snap the node into the bracket, so I had to unscrew and relocate at least a dozen brackets over the course of the install.
Positioning on the Appeck, Govee, and Eufy lights is a little more complicated and a lot more important. Because of the 30 degree lenses and the scalloped pattern that they project, the distance between each node, distance away from the wall, and angle of the node all need to be extremely consistent if you want a uniform look, and the more the lights overlap the more obvious it will be when one of them is out of place. I recommend taking a ruler or tape measure up with you to make sure you’re keeping your distances the same, otherwise you might be unhappy with your install the first time you turn them on, which isn’t great if you did a 24-hour manlift rental.
For jumping gaps in your roofline, you’ve got 3 options.
For small gaps I found it was easiest to keep the strings intact and just wrap the extra LEDs in electrical tape.
And for large gaps at the end of a string you can use the included extension cables if you’re lucky enough to have a gap at the end of the string, but realistically you’re probably going to need to cut and extend at least one of your strings and I found that the YPS, Novostella, and Govee Pro lights could all be cut and extended up to 25 feet without any issues, but the Eufy, Govee non-pro, and Appeck kits started to have data problems after 10 feet of extension.
Side-by-Side Footage
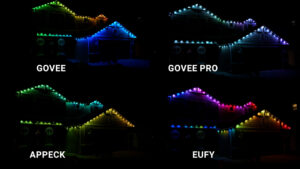
So now that they’re all installed, let’s take a look at their performance side by side.
First let’s look at the scalloped options, then compare the Novostella, 10 LED Density YPS Puck Track, and 5 LED Density YPS Puck Track.
Conclusions
As a veteran light show creator and self-proclaimed LED expert, I was not expecting to be wowed by these easy to install permanent lighting kits, but I was definitely wrong, so which one is the best?
If you’re looking for the scalloped wall wash look, and you feel confident that you’re not going to want to get into the full-on music light show hobby then I think the Govee lights are the easy pick. They are the brightest, have the best app with the most options, and have wet rated power supplies that are appropriately sized for a long lifespan. The standard Govee kit has 72 pixels total which means that each of the wall wash colors will overlap with the next, while the Pro kit steps down to 60 pixels total which creates a more separated look but has the added benefit of completely tunable white light using the warm white and cool white LEDs. The Pro kit also comes in both white and black, so you can pick whatever color matches your soffits the best.
Personally though, I’ll be keeping the Eufy lights installed. I’m a sucker for warm white light, and the ability to control the lights with WLED instead of the Eufy controller is a huge plus for me since I already have a WLED controller, and I think the wall wash will look awesome in my light show. If you’re looking to save a little money the Eufy kit is $100 less than the Govee Pro kit and still includes a separate warm white channel and as I said, the Eufy app still works very well, just not as well as the Govee app.
If you’re really on a tight budget the Appeck lights are around 20% less expensive than the Govee non-pro kit and are essentially a clone, but for something that’s meant to be permanent and something that I’m potentially going to spend an entire day installing I feel like saving $60 is not particularly important, especially if it means a less functional app, and slightly lower quality components.
If you’re looking for a more traditional look, the Novostella diffuser style nodes give a very festive holiday look that is similar to old C9 bulbs. But for me with white soffits, I think the black casing and black wiring of the Novostella would stick out like a sore thumb and even if you had dark soffits the white diffuser would give them away. And although I think the mounting system for these lights is great, if you live in a community with a Homeowner’s Association, I could definitely see them fining you for not taking down the Novostella lights after December since they kind of just look like big Christmas lights.
The YPS Puck track is awesome and it’s the clear choice for anyone wanting year-round lighting with the option to incorporate those lights into a full-on light show. The only thing that would have made the YPS Puck track better for me is having a separate warm white channel, but I still found the RGB warm white to be pretty convincing, especially when paired with other exterior lights. One thing that did surprise me in my testing was that in most cases I preferred using the YPS Puck track at half density, meaning 5 lights per meter instead of 10, but thankfully that’s easily configurable in WLED and going with the higher density gives me the most options and I’m excited to add both the YPS Puck Track and the Eufy lights into this year’s light show.
I also designed and 3D printed some mounts for the Eufy lights which are much more secure and easier to use than their included clips, and I’ve got a link to that 3D print file along with links to all the lights in this video below and as always I appreciate if you use those links since as an Amazon affiliate I do earn a small commission on the sale at no cost to you.
I’d also like to thank all of my patrons for their continued support of my channel, and this month on Patreon I’ll be giving away a set of these lights to one lucky patron, and all you have to do to get in the drawing is be in an eligible tier and post on the giveaway thread by November 1st. If this video was helpful don’t forget to give it a thumbs up and consider subscribing, and as always, thanks for watching The Hook Up.
Best Overall Kit: Govee Non-Pro
- AmazonUS: https://amzn.to/49mIRsm
- AmazonCA: https://amzn.to/3wzud1Q
- AmazonUK: https://amzn.to/45Rza21
Best Tunable White Kit: Govee Pro
- AmazonUS: https://amzn.to/3tN1eGp
- AmazonCA: https://amzn.to/3wD2Yni
- AmazonUK: https://amzn.to/42ZC4Sk
Best RGBW kit to use with WLED: Eufy E120
- AmazonUS: https://amzn.to/3Q6mX3u
- 3D Printed Eufy Mount: https://www.thingiverse.com/thing:6284846
Best “Permanent Install” Light Show Option: YPS Puck Track
Other kits tested
- Appeck C5103-A (AmazonUS): https://amzn.to/3tReb29
- Novostella Permanent LEDs (AmazonUS): https://amzn.to/3s8hqBE
**As an Amazon Affiliate I earn a commission on qualifying purchases at no cost to you**


